Ontario, Canada
Joined: January 03, 2007
KitMaker: 1,505 posts
AeroScale: 595 posts
Posted: Wednesday, July 16, 2008 - 12:55 AM UTC
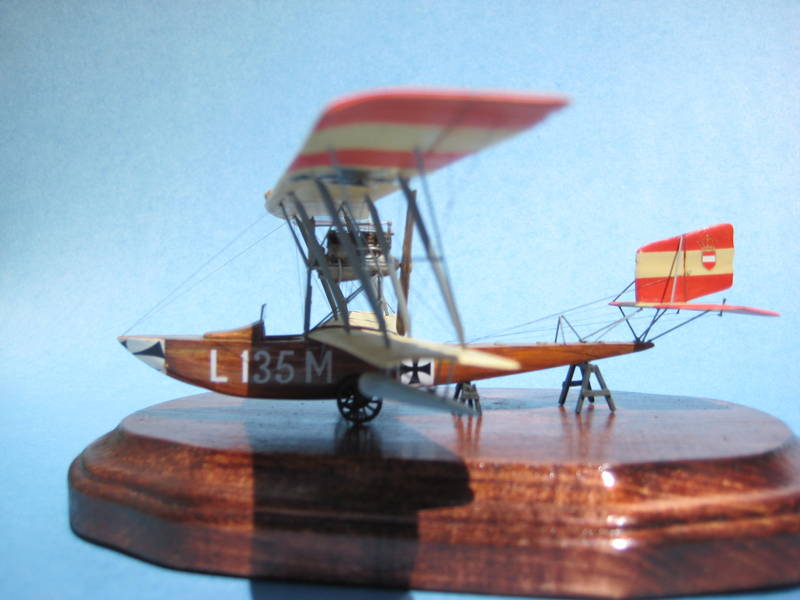
my Lohner

(Editor's note: Hopefully those are the pics. Rowan)
Projects:
K44 Anti Tank gun
Diana
Albatros DIII
Alberta, Canada
Joined: January 19, 2008
KitMaker: 6,743 posts
AeroScale: 6,151 posts
Posted: Wednesday, July 16, 2008 - 01:53 AM UTC
I must say jim , thats a lovely red x . I really like the shade , what was the paint used on this one ? I'm guess Tamiya but I could be wrong on that . Looking forward on seeing your pic's .

Ontario, Canada
Joined: January 03, 2007
KitMaker: 1,505 posts
AeroScale: 595 posts
Posted: Wednesday, July 16, 2008 - 03:23 AM UTC
Thank you ,Mr Editor ...I seem to be a bit slow when it comes to this process.....these are exactly the pics I meant to post...
Thank you Teri.....the red on the wings and tailplane are simple Testors acrylic red....the fuselage was done using a basecoat of Humbrol Linen....then was given an acrylic clearcote to protect it from the oil wash. The oil wash was a bit of a happy mistake actually. I meant to mix some raw sienna in enamel thinner and streak the surface....allow to set for a few minutes then blend it all in ...but it went on WAY heavier than anticipated. After moments of panic I calmed down and was very satisfied with the results. After the paint set for a week I coated it in Future floor polish to give it the varnished effect and seal the decals.
The kit is a 1:72 scale Vac form Wings72 I got for $6.00 at a swapmeet. Sweety of a kit
Projects:
K44 Anti Tank gun
Diana
Albatros DIII
Merlin
 Senior Editor
#017
United Kingdom
Joined: June 11, 2003
KitMaker: 17,582 posts
AeroScale: 12,795 posts
Posted: Wednesday, July 16, 2008 - 03:34 AM UTC
Hi Jim
Stunning work! 1/72 scale - crikey!

If you've got some more pics, this really deserves to be an On-Diplay Feature, at the very least. If you you took in-progress shots, it'd make a wonderful subject for an article on vacuform building...

All the best
Rowan
BEWARE OF THE FEW...
As I grow older, I regret to say that a detestable habit of thinking seems to be getting a hold of me. - H. Rider Haggard
Ontario, Canada
Joined: January 03, 2007
KitMaker: 1,505 posts
AeroScale: 595 posts
Posted: Wednesday, July 16, 2008 - 04:56 AM UTC
Im sorry Rowan,but I did not take in -progress shots.....Iv only had a digital camera since the end of June this year......and sadly my lovely little Lohner has met with tragedy...during her photoshoot I snapped off the tail section and I am currently trying to put that behind me and develop the appropriate"karma" to attempt repairs. However.....I do have a Sopwith Folder in Vac that I have been wanting to build one day....
Projects:
K44 Anti Tank gun
Diana
Albatros DIII
Merlin
Senior Editor #017
United Kingdom
Joined: June 11, 2003
KitMaker: 17,582 posts
AeroScale: 12,795 posts
Posted: Wednesday, July 16, 2008 - 05:36 AM UTC
Hi Jim
Dreadful to hear the Lohner's taken a bash! It doesn't exactly look like the sort of model that's likely to bounce...
Definitlety take in-progress shots when you tackle the Sopwith - it's always great to see vacuforms built as well as this and it'll be a real inspiration to others.
All the best
Rowan
BEWARE OF THE FEW...
As I grow older, I regret to say that a detestable habit of thinking seems to be getting a hold of me. - H. Rider Haggard
Östergötland, Sweden
Joined: April 04, 2006
KitMaker: 1,058 posts
AeroScale: 1,004 posts
Posted: Wednesday, July 16, 2008 - 06:57 AM UTC
Just love that woodpaint. Nice
Larsa Q
Colorado, United States
Joined: January 25, 2004
KitMaker: 11,669 posts
AeroScale: 11,011 posts
Posted: Wednesday, July 16, 2008 - 08:15 AM UTC
Most impressive Jim! Excellent.
". . .The most important thing is to know why you build and then get the most that you can out of building." via D.D.
Grumpyoldman
_ADVISOR Florida, United States
Joined: October 17, 2003
KitMaker: 15,338 posts
AeroScale: 836 posts
Posted: Wednesday, July 16, 2008 - 09:18 AM UTC
Excellent work, and at least we got to see a few photos before it's untimely demise.
Character is what you do when no one is looking.
Few things are harder to put up with than a good example.- Mark Twain
Make yourself an honest man, and then you may be sure that there is one less scoundrel in the world.--Thomas Carlyle
Ontario, Canada
Joined: January 03, 2007
KitMaker: 1,505 posts
AeroScale: 595 posts
Posted: Wednesday, July 16, 2008 - 09:58 AM UTC
She will be reborn!...Im just persnickety enough to fix the little bugger too...Iv already fixed her once when my LHS had bunglehands in the display case...Ill do it again..My 1:48 FE2B lost ALL its rigging mysteriously when I moved ( the rigging eroded at the connection points) so I re-rigged her out of spite(or love)...Its probably my favorite model in my display case...
Projects:
K44 Anti Tank gun
Diana
Albatros DIII
Victoria, Australia
Joined: November 26, 2006
KitMaker: 608 posts
AeroScale: 602 posts
Posted: Wednesday, July 16, 2008 - 11:23 AM UTC
Very Pretty Jim. An exquisite piece. You must have some very well trained spiders.
Please fix it and post more photos. It would be a dreadful shame if you did not.
An ex of mine "accidently" brushed my Blue Max Sopwith Camel off the shelf twice many years ago. I rebuilt it each time, completely redoing the rigging... It holds a special place in my heart I think because it was the first build I did coming back to the hobby.
Cheers,
Hugh
Alberta, Canada
Joined: January 19, 2008
KitMaker: 6,743 posts
AeroScale: 6,151 posts
Posted: Thursday, July 17, 2008 - 02:27 AM UTC
Looks fantastic Jim , so much better then the red x I first saw . Your rigging is wounderful , I'm sure you will get it back into flying order . Thanks for sharing .
West Virginia, United States
Joined: December 18, 2006
KitMaker: 1,121 posts
AeroScale: 1,063 posts
Posted: Thursday, July 17, 2008 - 05:03 AM UTC
Awesome work, Jim. I know a lot of patience and skill goes into a build like that. I hope you're able to post some more pictures.
Mark
Ontario, Canada
Joined: January 03, 2007
KitMaker: 1,505 posts
AeroScale: 595 posts
Posted: Thursday, July 17, 2008 - 10:35 AM UTC
Thanks Mark...were working on that
Projects:
K44 Anti Tank gun
Diana
Albatros DIII
Indiana, United States
Joined: May 14, 2007
KitMaker: 3,117 posts
AeroScale: 2,270 posts
Posted: Thursday, July 17, 2008 - 10:37 AM UTC
It looks (did look) absolutely fantastic
"Treat 'em Rough", Current Builds--Wingnut Rumpler
I am frequently seen with blood shot eyes from staying up past my nap time to get the right colour scheme on my latest WWI model?
Ontario, Canada
Joined: January 03, 2007
KitMaker: 1,505 posts
AeroScale: 595 posts
Posted: Friday, July 18, 2008 - 12:36 PM UTC
Projects:
K44 Anti Tank gun
Diana
Albatros DIII
New York, United States
Joined: December 15, 2006
KitMaker: 365 posts
AeroScale: 344 posts
Posted: Friday, July 18, 2008 - 01:42 PM UTC
Jim,
Outstanding work. If you decide to build another vac-form, please take some in progress pics, I can't think of a better way to learn what's involved as I have a couple on the shelf and want to learn what to expect.
Excellent job, Dwayne
Slovenia
Joined: August 23, 2007
KitMaker: 86 posts
AeroScale: 75 posts
Posted: Saturday, July 19, 2008 - 05:26 AM UTC
WOW!
I love the look of this one

. Well done Jim.
Ontario, Canada
Joined: January 03, 2007
KitMaker: 1,505 posts
AeroScale: 595 posts
Posted: Saturday, July 19, 2008 - 01:59 PM UTC
Thank you Zoran. Thank you Dave and yes,I am starting to take pics of my Sierra scale 1:48 Hansa Brandenburg C.1 I will do pics from start to finish.
In 1:72 you have for the wing a single sheet of contoured plastic,yet in 1:48 you have a top and bottom piece to join. I admit I have never tackled a 1:48 biplane Vac form and am looking at the rib tape and thinking that with filling and sanding I may/will lose detail. I am thinking that I could use strips of clear decal film or something similar to simulate the ribtape, then coated and painted appropriately.
What do you guys think?
Projects:
K44 Anti Tank gun
Diana
Albatros DIII
Alberta, Canada
Joined: January 19, 2008
KitMaker: 6,743 posts
AeroScale: 6,151 posts
Posted: Saturday, July 19, 2008 - 02:46 PM UTC
Hey Jim , I have start cutting out the parts of my first vac kit . Tom's Model Works Albatros D.III 1/48 and the same question came to mind as well . I think your methed will work , was thinking of the same thing . There is so many sink marks and bumps the wing is almost useless , Have lots of spares from Eduard kits so I might go that way as well , but that would take the fun out of it !
Ontario, Canada
Joined: January 03, 2007
KitMaker: 1,505 posts
AeroScale: 595 posts
Posted: Sunday, July 20, 2008 - 11:41 AM UTC
Terri....I should tell you the rather embarrassing story of how I learned how to do the Woodman method of skinning wings. I bought the Eduard Albatros C.III and was rather speedily moving throught the build and one day I was having a beer (mistake) and got to looking at the warped upper wing. I got the UTTERLY DUMB idea that I could put it in the oven and flatten out the warp. lol it turned into a styrene RAISIN on me and I shrieked in horror at my own foolishness. So I sanded the tar out of it and used the Woodman method to skin it....painted them and I must say they look GREAT......a funny ,embarrasing,happy accident

Projects:
K44 Anti Tank gun
Diana
Albatros DIII