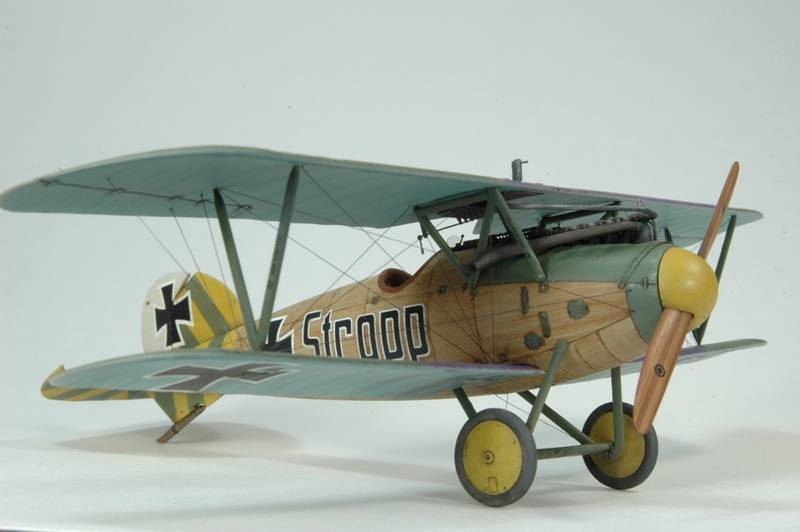
_GOTOBOTTOM
Early Aviation
Discuss World War I and the early years of aviation thru 1934.
Eduard's 1/48 Albatros DVa "Stropp"
Edmundson
_VISITCOMMUNITY
Alberta, Canada
Joined: May 07, 2006
KitMaker: 7 posts
AeroScale: 6 posts
Posted: Tuesday, April 07, 2009 - 06:08 PM UTC
Hi Folks,
This is the first a/c I’ve built in a while, and it was constructed to represent the Albatros DV at the Smithsonian Museum as it actually looked when it was captured. Research suggests that the wings had a two-colour camo finish as opposed to the lozenge fabric on the actual restoration, and Stephen Lawson pointed out that the wheels and spinner were yellow back in 1918.

I still have to add the small supports at the bottom of the outer struts before the model is totally complete.

My thanks go to the helpful posts on this forum and the enthusiasm shown for everyone’s efforts in our hobby.

Regards,
Gary Edmundson


JackFlash
_VISITCOMMUNITY
Colorado, United States
Joined: January 25, 2004
KitMaker: 11,669 posts
AeroScale: 11,011 posts
Posted: Tuesday, April 07, 2009 - 07:50 PM UTC
Most impressive.
BradCancian
_VISITCOMMUNITY
Queensland, Australia
Joined: August 30, 2006
KitMaker: 285 posts
AeroScale: 281 posts
Posted: Tuesday, April 07, 2009 - 10:15 PM UTC
VERY nice Gary. There is not a thing I don't like about this build. The wood grain is excellent and subtle, the weathering is light yet still there, the rigging is great, and your choice of grey/green for the metal fittings looks great too. Do you have any more pictures?

Really great stuff!

BC
Kalt
_VISITCOMMUNITY
Mendoza, Argentina
Joined: June 14, 2006
KitMaker: 222 posts
AeroScale: 219 posts
Posted: Wednesday, April 08, 2009 - 01:26 AM UTC
Beautiful model, Gary ! Please post more pictures

Cheers,

Claudio
thegirl
_VISITCOMMUNITY
Alberta, Canada
Joined: January 19, 2008
KitMaker: 6,743 posts
AeroScale: 6,151 posts
Posted: Wednesday, April 08, 2009 - 01:48 AM UTC
Most impressive build . The weathering is fantastic , not to much just the right amount !

I must say though , I'm with the rest of the guys . Please post some more pic's !!!
TheZOX
_VISITCOMMUNITY
Slovenia
Joined: August 23, 2007
KitMaker: 86 posts
AeroScale: 75 posts
Posted: Wednesday, April 08, 2009 - 02:39 AM UTC
Amaizing looking albatros
Well done Gary.
Kornbeef
_VISITCOMMUNITY
England - South East, United Kingdom
Joined: November 06, 2005
KitMaker: 1,667 posts
AeroScale: 1,551 posts
Posted: Wednesday, April 08, 2009 - 03:47 AM UTC
Echoes all the above comments.......very nice, hard to believe the base is the old Eduard kit.
Dwaynewilly
_VISITCOMMUNITY
New York, United States
Joined: December 15, 2006
KitMaker: 365 posts
AeroScale: 344 posts
Posted: Wednesday, April 08, 2009 - 01:42 PM UTC
Gary,

Excellent work! Please post more pics if you can. Outstanding effort!

Dwayne
Edmundson
_VISITCOMMUNITY
Alberta, Canada
Joined: May 07, 2006
KitMaker: 7 posts
AeroScale: 6 posts
Posted: Wednesday, April 08, 2009 - 03:19 PM UTC
Hi again,
Thanks for the kind comments on the model. Very much appreciated. I added some additional pictures to the original post, as requested. Now that I understand how to do it!
Regards,
Gary Edmundson
Kalt
_VISITCOMMUNITY
Mendoza, Argentina
Joined: June 14, 2006
KitMaker: 222 posts
AeroScale: 219 posts
Posted: Wednesday, April 08, 2009 - 08:10 PM UTC
Very nice !
Could you explain us how you replicated the wood color?

Edmundson
_VISITCOMMUNITY
Alberta, Canada
Joined: May 07, 2006
KitMaker: 7 posts
AeroScale: 6 posts
Posted: Thursday, April 09, 2009 - 12:41 AM UTC

Quoted Text

Very nice !
Could you explain us how you replicated the wood color?


Hi Claudio,
Glad you like it. The woodgrain was done by first painting the fusalage with Tamiya's Buff acrylic, and then giving it a gloss coat. Sections of the penelling were masked off, and a weak oil paint wash was applied to the individual sections using the colours raw umber and a hint of burnt sienna (but not too much!). Using an old size 0 brush, the oil paint was dragged across the surface in a streaked manner creating the woodgrain look. The panels were protected after drying with a gloss coat after each session, so that they could be masked over for the subsequent sections to be done. I fist practiced on a piece of scrap styrene to get the paints and colours right, and to test how wet the wash had to be for the right look of the streaks.
Regards,
Gary Edmundson
JackFlash
_VISITCOMMUNITY
Colorado, United States
Joined: January 25, 2004
KitMaker: 11,669 posts
AeroScale: 11,011 posts
Posted: Thursday, April 09, 2009 - 02:39 AM UTC

Quoted Text


Quoted Text

Very nice !
Could you explain us how you replicated the wood color?


Hi Claudio,
Glad you like it. The woodgrain was done by first painting the fusalage with Tamiya's Buff acrylic, and then giving it a gloss coat. Sections of the penelling were masked off, and a weak oil paint wash was applied to the individual sections using the colours raw umber and a hint of burnt sienna (but not too much!). Using an old size 0 brush, the oil paint was dragged across the surface in a streaked manner creating the woodgrain look. The panels were protected after drying with a gloss coat after each session, so that they could be masked over for the subsequent sections to be done. I first practiced on a piece of scrap styrene to get the paints and colours right, and to test how wet the wash had to be for the right look of the streaks.
Regards,
Gary Edmundson

This post was removed.
JackFlash
_VISITCOMMUNITY
Colorado, United States
Joined: January 25, 2004
KitMaker: 11,669 posts
AeroScale: 11,011 posts
Posted: Monday, April 12, 2010 - 08:21 PM UTC
Bringing this up for a fellow modeler.
gajouette
_VISITCOMMUNITY
Texas, United States
Joined: February 01, 2007
KitMaker: 365 posts
AeroScale: 356 posts
Posted: Tuesday, April 13, 2010 - 02:34 PM UTC
Gary,
Beautiful Albie my friend. Excellent wood grain ,heck it's all great.Please do post some in progress photos .
Regards,
Gregory Jouette
 _GOTOTOP