_GOTOBOTTOM
Early Aviation
Discuss World War I and the early years of aviation thru 1934.
Roden's 1:32 Airco DH 2
dieschwalbe
_VISITCOMMUNITY
England - North West, United Kingdom
Joined: February 15, 2008
KitMaker: 43 posts
AeroScale: 35 posts
Posted: Sunday, August 09, 2009 - 10:57 AM UTC
This is gonna be unusual; a build with absolutely ZERO aftermarket stuff.

I had high hopes for this bird, especially having 2 other Roden kits, and the reputation Roden have acquired. I have to say my first impressions aren't good. I have found the kit to be covered in flash; parts misaligned when moulded, and the detail very soft in lots of cases. Locating pins and holes are so misformed or shallow as to be of no use.

This going to be a real FUN build

First up, the obligatory box and bits shots:


Here's a pic of a sprue of parts, and Rodens little joke to it's buyers...those wonderfully pronounced ejector pin marks which leave both a mix of extra plastic and recesses, in the most awkward of places. Just look at the size of those rigging wires too. Filligree this is NOT! I think this is is worst moulded kit I have seen since I returned to the hobby....


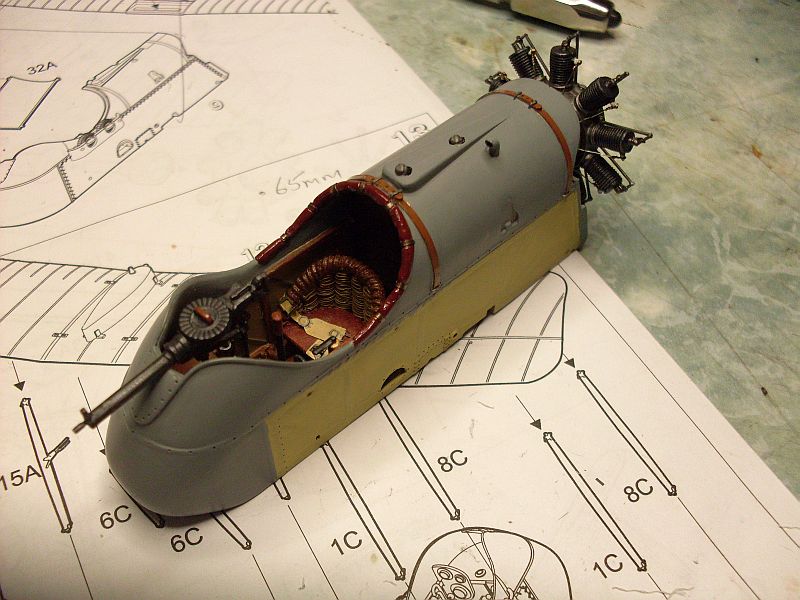
I did some serious cleaning up of the nacelle parts, and I have also had to run the nacelle halves (the joins) over a piece of wet 'n day paper to even up the joining faces, as these too were dire.


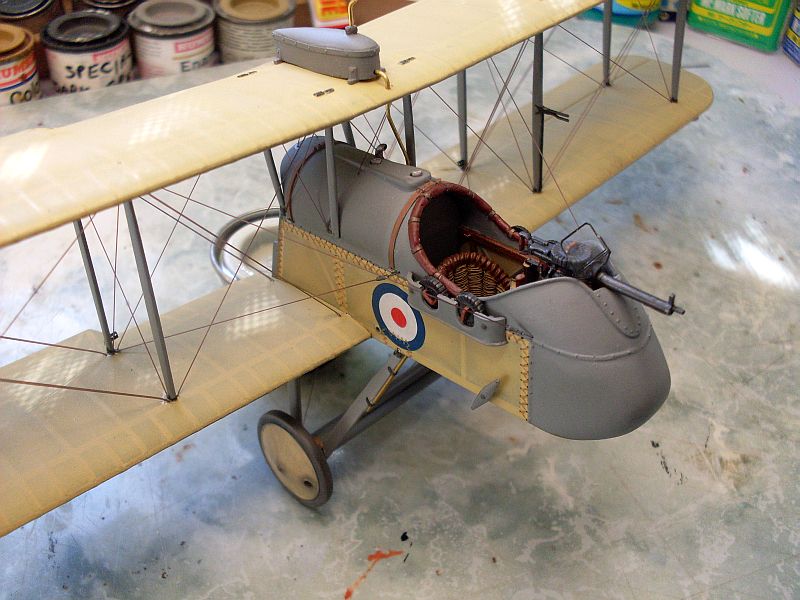
Notice I have also opened up the holes on the rear nacelle, over the fuel tanks where the cabane struts later attach. I can't understand why Roden moulded these with no opening.

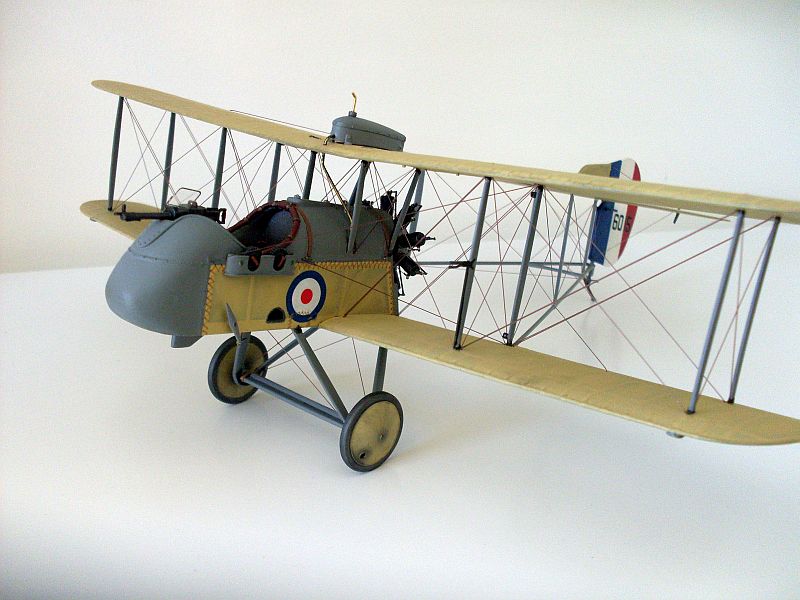
I now have to work a way of wrinking the external canvas too. The pics I have of the DH-2 show the canvas to be everything from taught to wrinkled to hell and back. I think a few wrinkles will add character. Extra detaling will be added to the interior, such as cabling, and the new cross brace wires. The padded area behind the pilots head is aldo badly moulded, and I'll replace this with 2 part epoxy putty.

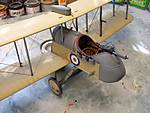
The horribly moulded bucket seat will be replaced with a handmade wicker one. Never tried it before, so that will be fun.

......lets see if we can make a silk purse from a sows ear

Jim
Kornbeef
_VISITCOMMUNITY
England - South East, United Kingdom
Joined: November 06, 2005
KitMaker: 1,667 posts
AeroScale: 1,551 posts
Posted: Sunday, August 09, 2009 - 09:23 PM UTC
Jim, it looks like you are right about having your work cut out. ref the wrinkles, as I sid to Lars Cs Repainted on his build which I'm sure you have checked already. I would cut out the panels out between the frame giving a better scale effect making replacing the bracing wires easier and eliminating a few of those damn awful pin marks. Replace the skin with beercan / toothpaste tube / wine bottle foil / leadsheet or whatever I'm pretty sure there is an overlapped hem around the edge you can incorporate to hide the join

Hand made wicker seat....have fun

Keith
thegirl
_VISITCOMMUNITY
Alberta, Canada
Joined: January 19, 2008
KitMaker: 6,743 posts
AeroScale: 6,151 posts
Posted: Monday, August 10, 2009 - 02:06 AM UTC
Hi Jim !

Yup you have your work cut out for you . Home made wicker seat now that is a challenge .

Looking forward to your progress .
dieschwalbe
_VISITCOMMUNITY
England - North West, United Kingdom
Joined: February 15, 2008
KitMaker: 43 posts
AeroScale: 35 posts
Posted: Monday, August 10, 2009 - 06:22 AM UTC
Hi Keith,

Cheers for the tip....I honestly never thought of removing the plastic totally and replacing it with something more effective; only to lie it over the plastic itself.

As I type, I have now predrilled the panels and I'll remove them tonight, so thanks for that. I have some real thin tin metal foil which should just do the trick. I can lay the wiring and braces easily now as you said.

Can you now get etch stitching? What's the best way of producing this to look realistic?

@Terri, the wicker seat will be a swine, so it will be real fun to try it out. Soldering iron at the ready

Jim
Kornbeef
_VISITCOMMUNITY
England - South East, United Kingdom
Joined: November 06, 2005
KitMaker: 1,667 posts
AeroScale: 1,551 posts
Posted: Monday, August 10, 2009 - 12:06 PM UTC
Jim

I think Eduard have just released stiching in etch but have a vague memory *as most mine are* of Archer releasing stiching in theeir surface detail range some time back.
thegirl
_VISITCOMMUNITY
Alberta, Canada
Joined: January 19, 2008
KitMaker: 6,743 posts
AeroScale: 6,151 posts
Posted: Monday, August 10, 2009 - 01:00 PM UTC
Jim , Eduards has the stitching as well as part of poland .

For the side panels you can also use tissue paper soak in white glue which will give you more of a fabric look to with the wrinkles .
wombat58
_VISITCOMMUNITY
New South Wales, Australia
Joined: March 26, 2009
KitMaker: 366 posts
AeroScale: 309 posts
Posted: Monday, August 10, 2009 - 01:18 PM UTC
Hi Jim.

Good luck with this one Jim, it is a real mongrel. I have built all of Rodens 1/32 WW1 aircraft and this one certainly does not live up to the usual high standard of Roden products. I am at the rigging stage but up till now it has been a real headache. If anything can be moulded wrong Roden did it, requires a lot of work to make things look any where near decent. I made my wicker seat, detailed the cockpit area, replaced the padding around the cockpit, put rivets around the fuselage, wrinkled the fabric, fully detailed the engine with valve springs etc, made a prop boss, detailed the top wing fuel tank, drilled hundreds of holes for the rigging (I'm really sick of drilling holes, especially 0.20mm, very small and hard on the eyes) plus heaps more other detailing. I pre-shaded the wings and tailplane and replaced the axle with a metal one.
I have to admitt though, it is starting to look pretty good.
Anyhow, good luck with your build and hope you have as much fun as I have ( LOL)


Cheers

Des.


Current projects;

Roden de Havilland DH-2 1/32
WNW Junkers 1/32
WNW Bristol 1/32
Heller Constellation (for a mate) 1/72
JackFlash
_VISITCOMMUNITY
Colorado, United States
Joined: January 25, 2004
KitMaker: 11,669 posts
AeroScale: 11,011 posts
Posted: Monday, August 10, 2009 - 07:07 PM UTC

Quoted Text

Hi Jim.
Good luck with this one Jim . . . I made my wicker seat, detailed the cockpit area, replaced the padding around the cockpit, put rivets around the fuselage, wrinkled the fabric, fully detailed the engine with valve springs etc, made a prop boss, detailed the top wing fuel tank, drilled hundreds of holes for the rigging (I'm really sick of drilling holes, especially 0.20mm, very small and hard on the eyes) plus heaps more other detailing. I pre-shaded the wings and tailplane and replaced the axle with a metal one. I have to admitt though, it is starting to look pretty good. Anyhow, good luck with your build and hope you have as much fun as I have ( LOL) Cheers Des."


Wow Des! Images please!
Repainted
_VISITCOMMUNITY
Östergötland, Sweden
Joined: April 04, 2006
KitMaker: 1,058 posts
AeroScale: 1,004 posts
Posted: Tuesday, August 11, 2009 - 03:38 AM UTC

Quoted Text


Quoted Text

Hi Jim.
Good luck with this one Jim . . . I made my wicker seat, detailed the cockpit area, replaced the padding around the cockpit, put rivets around the fuselage, wrinkled the fabric, fully detailed the engine with valve springs etc, made a prop boss, detailed the top wing fuel tank, drilled hundreds of holes for the rigging (I'm really sick of drilling holes, especially 0.20mm, very small and hard on the eyes) plus heaps more other detailing. I pre-shaded the wings and tailplane and replaced the axle with a metal one. I have to admitt though, it is starting to look pretty good. Anyhow, good luck with your build and hope you have as much fun as I have ( LOL) Cheers Des."


Wow Des! Images please!


Yes, pics please.And for Jim it´s nice to have someone building the same kit. I have been short of hobbytime, but good times coming so I will go on with my build. Just had a" King of the road" finished.

Good luck Jim, the flash and sinkmarks are for free when Roden makes new ones

Larsa Q
dieschwalbe
_VISITCOMMUNITY
England - North West, United Kingdom
Joined: February 15, 2008
KitMaker: 43 posts
AeroScale: 35 posts
Posted: Tuesday, August 11, 2009 - 06:54 AM UTC
I'm going one further and obliterating that dire casting on the outside by removing all detail. I'll add this back with plasticard etc. Terri....might just go for the PVA/tissue solution to the fabric. It should be a little reminiscent of when I built flying models

Thanks for the info and help on all this...it's good to know I'm now alone with one of these 'wonderful' kits too.
dieschwalbe
_VISITCOMMUNITY
England - North West, United Kingdom
Joined: February 15, 2008
KitMaker: 43 posts
AeroScale: 35 posts
Posted: Tuesday, August 11, 2009 - 09:05 AM UTC
According to the Windsock datafile, the nacelle has 3, possibly 4 errors. The rudder control cable exit should be over the leading edge of the wing. The position moulded is for the early 1916 machines, and Roden has definately tried to aim for the late 1916 design due to many factors (position of machine gun, shape of ammo pockets and plate covering main part of gun channel and the laced fabric inspection panels). The other 2 problems I see are the shape of the hole at the cabane strut fixing point, which is very easily corrected with a little extra plastic removed, plus also there appears to to an access door on the late machines, towards the rear upper nacelle. This isn't moulded and if it applies, it should be scribed in.

With the first problem, bearing in mind I have removed all the plastic in between the timber structures, I'll have to remove the rudder cable exit and re-situate it just over the wing, forward of the fuselage former located in that position.

The last problem is the rear fuselage fairing which protrudes from the nacelle frame. This looks like it needs to be totally removed for the late version Roden have aimed for.

Oh the fun
wombat58
_VISITCOMMUNITY
New South Wales, Australia
Joined: March 26, 2009
KitMaker: 366 posts
AeroScale: 309 posts
Posted: Wednesday, August 12, 2009 - 03:38 PM UTC
Hi Jim.

With relation to the rudder cable exit point in the fuselage. I have a copy of the rigging plan and truing up procedure from Air Technical Services dated 13/04/1918 and it shows the exit as being just forward of the leading edge of the wing, Roden have got it pretty close, maybe a tad too far forward.
I have not gone to as much exacting detail as you are going to do, my old eyes and hands won't allow it. I completed the wing rigging last night and will now fix the tail section plus more rigging. Overall I have drilled 238 holes, that includes holes for the rivets, boy, am i sick of drilling holes, on the plus side I only broke one drill bit.

Hope you enjoy your build, it is challenging but very rewarding.

Cheers.

Des.
Removed by original poster on 08/15/09 - 11:21:25 (GMT).
wombat58
_VISITCOMMUNITY
New South Wales, Australia
Joined: March 26, 2009
KitMaker: 366 posts
AeroScale: 309 posts
Posted: Saturday, August 15, 2009 - 12:55 AM UTC
Hi Jim.
This is my first attempt at posting photos on a thread, hope it works. The photo (I hope) is my Roden DH-2, obviously not completed. I will be adding the tail section tonight.
wombat58
_VISITCOMMUNITY
New South Wales, Australia
Joined: March 26, 2009
KitMaker: 366 posts
AeroScale: 309 posts
Posted: Saturday, August 15, 2009 - 12:58 AM UTC
looks like I did something wrong???????????

any ideas how I can enlarge the image. I sent the photos from my comp to the photo gallery at 800 x 600 102kb jpg but it comes up in the gallery as being 150 x 113. What is the best size to post the photos in the photo gallery?

Cheers

Des.
JackFlash
_VISITCOMMUNITY
Colorado, United States
Joined: January 25, 2004
KitMaker: 11,669 posts
AeroScale: 11,011 posts
Posted: Saturday, August 15, 2009 - 09:31 AM UTC
Here you go.
wombat58
_VISITCOMMUNITY
New South Wales, Australia
Joined: March 26, 2009
KitMaker: 366 posts
AeroScale: 309 posts
Posted: Saturday, August 15, 2009 - 09:48 AM UTC
Thanks Stephen....

I'm still learning but getting there slowly.

Cheers

Des.

wombat58
_VISITCOMMUNITY
New South Wales, Australia
Joined: March 26, 2009
KitMaker: 366 posts
AeroScale: 309 posts
Posted: Saturday, August 15, 2009 - 10:08 AM UTC
Here is another pic of my DH-2. Tail section and most rigging now complete.

dieschwalbe
_VISITCOMMUNITY
England - North West, United Kingdom
Joined: February 15, 2008
KitMaker: 43 posts
AeroScale: 35 posts
Posted: Saturday, August 15, 2009 - 10:12 AM UTC
How did you do the stitching on the nacelle fabric? That looks wonderful!
wombat58
_VISITCOMMUNITY
New South Wales, Australia
Joined: March 26, 2009
KitMaker: 366 posts
AeroScale: 309 posts
Posted: Saturday, August 15, 2009 - 10:13 AM UTC
I have not gone to as much exacting detail as Jim is planning to do, my old eyes and hands won't allow it. Another shot of the near completed DH-2. It has been a very interesting build.

wombat58
_VISITCOMMUNITY
New South Wales, Australia
Joined: March 26, 2009
KitMaker: 366 posts
AeroScale: 309 posts
Posted: Saturday, August 15, 2009 - 10:17 AM UTC
Hi Jim.
I just followed the moulded stitching and added between each stitch with paint on a very fine brush, very simple but effective. I then drilled holes at each end of every stitch to simulate entry and exit through the fabric (thats a lot of holes).
I'm actually building two of these models, on the second one I drilled a heap of holes and "stitched" the fabric using fine electrical wire, I used 0.20mm drill bits, takes time and a good supply of bits. The model pictured here is the painted stitching.

Cheers

Des.
thegirl
_VISITCOMMUNITY
Alberta, Canada
Joined: January 19, 2008
KitMaker: 6,743 posts
AeroScale: 6,151 posts
Posted: Saturday, August 15, 2009 - 11:33 AM UTC
Very impressive build Des !
dieschwalbe
_VISITCOMMUNITY
England - North West, United Kingdom
Joined: February 15, 2008
KitMaker: 43 posts
AeroScale: 35 posts
Posted: Saturday, August 15, 2009 - 11:39 AM UTC
Hi Des,

Do you have some high res pictures of those photos you could send me to captainpugwash[at]modelshipworld[dot]com?

wombat58
_VISITCOMMUNITY
New South Wales, Australia
Joined: March 26, 2009
KitMaker: 366 posts
AeroScale: 309 posts
Posted: Saturday, August 15, 2009 - 12:11 PM UTC
Thanks Terri and Jim for your comments.

Sorry Jim, the quality of my camera will only produce what you see

I will post some more pictures shortly.

Cheers

Des.
wombat58
_VISITCOMMUNITY
New South Wales, Australia
Joined: March 26, 2009
KitMaker: 366 posts
AeroScale: 309 posts
Posted: Saturday, August 15, 2009 - 12:56 PM UTC
This is an earlier picture of my build. On the engine I added valve springs, rocker arms and push rods, spark plugs and leads. I have drilled all the holes for the rivets to go around the nacelle plus the holes for the stitching. My first attempt at making a wicker seat plus added seat belt. Cockpit padding made with putty plus PE scraps. The belts over the rear of the nacelle made from plastic card. I did a very subtle wrinkling of the fabric, not showing very well in this photo plus shading. It all needs a coat of matt clear.

 _GOTOTOP