Hi there, latest update after some very slow progress. I need to wrap this up in a few weeks if I'm to meet the deadline for a local comp I want to enter, so I had better get a move on. Anyway, here goes...
Upper fuselage and canopy, ready for priming. Note the ICM and Airfix 109F canopy parts that I am using as a mask for painting - fit is actually quite good, but they are too thick and/or too inaccurate to use on their own kits, hence their sacrifice here. It's difficult to see clearly in this pic, but the fit of the upper wing halves to the fuselage was outstanding. I tacked them on first (as per Lynn Ritger's suggestion in his 109 Datafile from SAM Publications) before adding the one-piece lower wing.

Lower fuselage ready for painting. Wheel wells are pre-painted, Futured and washed and will need to be masked. Lower and upper engine cowls are only tacked on with white glue for now - will be removed once painting is complete to install oil cooler equipment and cowl machine guns respectively.

Sink marks filled in upper port wing. These sink marks are one of the few, but well-known, deficiencies of the Tamiya 1/48 Emil series. There are similar marks to fill on the starboard upper wing and both lower wings.
Horizontal stabs added and filled. This is another area where Tamiya falls down a little - the support struts for the stabs are slightly too short, so that if the stabs are installed to accommodate the fit of the struts, they will display anhedral - yuck! After a bit of head scratching, I've installed the stabs without the struts and with about 1-2 degrees of dihedral (I've learned that if stabs are installed dead-level, they also look like they have anhedral). I'll then install the struts after painting is complete, and hope I can winkle them into place satisfactorily. I've done a few test runs and think it will work out OK, but it's still a bit of a worry, not least because the struts are (a) fragile (I've already broken one once) and (b) of a shape that is difficult to replicate.
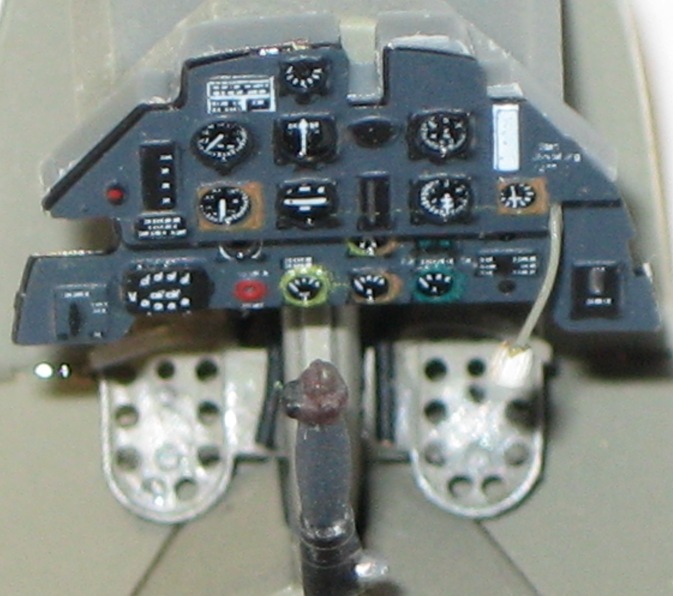
Note also the broken radio line attachment point - will have to replace with wire and superglue...

Flaps assembled, painted and waiting for weathering and installation.

I'm using Ultracast's 109E main wheels - these are beautifully cast and will look even better once I've given them a drybrush and some weathering.
The tailwheel is a spare from Hasegawa's 109G-10 - again as per Lynn Ritger's suggestion - to replace Tamiya's undersized item. I've checked the Hasegawa wheel against 109E wheels in my references, and it looks the business.

I'm using Quickboost exhausts - I had bought some Ultracast items to use, but - uncharacteristically - these were quite poorly moulded, with soft detail and a few air bubbles, which in an item like this are very hard to get rid off. The Quickboost exhausts look much better.

I've decided to replace the kit's machine gun and cannon barrels with these little turned brass gems from Master Model's Air Master series - here they are before painting and installation.

Because the kit I'm using came without a prop and spinner (a friend bought it for me at a ridiculous markdown when his local toyshop was getting rid of its kits), I'm using Ultracast's lovely spinner and blades. They make three versions of 109E spinner - I'm using the standard version. Here they are on my newly acquired PropMaster jig prior to final cementing - it all looks good but I'm a bit nervous to commit - point of no return and all that. Gotta take the plunge...

And finally, some details of the scheme I'll be doing - it's from this fabulous book published by Kecay entitled "Captured Me 109s". There is truly a lifetime of modelling inspiration in this book. My only complaint about it is production, and particularly binding, quality - as you can see if you look closely, about one third of the pages in my copy have come adrift from the spine, and I've only had the book for six months. Not great for something that costs between $70-100 Aussie dollars.
Here is the scheme I'm doing - an E-3 which a pilot from 1/JG 76 embarrassingly (for him) landed at a French airfield in November 1939. The airframe had a long subsequent history in French, British and US hands, but I'm portraying it shortly after capture, with its German markings roughly painted out and replaced with French colours.
For the French markings, I'm using an Iliad sheet designed for the D.520 - the roundels are the right size, and I've already applied the rudder stripes which have gone on very nicely. I'll source the 1/JG 76 badge from the Tamiya kit's decal sheet, and I can make up the work number on the vertical fin from spares in Eduard's Bf 110E. The only marking I'm still really searching for, funnily enough, is the "1" on the fuselage sides - I can use one from an EagleCal's Fw190 sheet I have, at a pinch, but it's not exactly the right size, so I'm still hunting.
Thanks for looking, and comments welcome! cheers Brad