Early Aviation
Discuss World War I and the early years of aviation thru 1934.
WNW GB 2009 - 10 SE 5a Mark K
bill_c
Staff MemberCampaigns Administrator
MODEL SHIPWRIGHTS
_VISITCOMMUNITY
New Jersey, United States
Joined: January 09, 2008
KitMaker: 10,553 posts
AeroScale: 1,198 posts
Posted: Wednesday, January 06, 2010 - 08:52 AM UTC
I can see why WNW suggests leaving the engine cowling off to show off the detail, LOL!
Mgunns
_VISITCOMMUNITY
Arizona, United States
Joined: December 12, 2008
KitMaker: 1,423 posts
AeroScale: 1,319 posts
Posted: Monday, January 11, 2010 - 09:08 AM UTC
A special thanks to Terri and Bill C. for the encouragement to go back to this. After a week away from it, it doesn't seem as bad as I had previously thought. So..here is progress to date:

An updated photo of the engine. This is as close as I can get with my camera. You can see the PE ignition wires. As I plan on using the cowling none of this will be seen, but; I thought I would give it a go.


The picture doesn't show it, but there is counter shading there. I used Keith's method, I will see how it turns out. I have used this on other aircraft with satisfactory results.


This is where I stopped. You can see the PE, (It does look neat) and the other parts of the interior.


You can see the slanted floor. I think this is the culprit. I used the P.E. Terri and others using this set, ensure you trim the edges as it can really gender strife you don't.


Here is the seat back and another view of the PE. The instructions aren't real clear on this one, however, I think I got it right. Terri; I had the same problem with the folding of the PE. However, once buttoned up, one has to really get in there with lamps to see it.


What's this? Darn SPAD's always horning in!

Mgunns
_VISITCOMMUNITY
Arizona, United States
Joined: December 12, 2008
KitMaker: 1,423 posts
AeroScale: 1,319 posts
Posted: Monday, January 11, 2010 - 09:48 AM UTC
Here is the cockpit combing on. Due to not trimming the PE and the plastic the fuselage is a tad wide. I will stretch some sprue and fill in that seam to tidy it up.

Here is the other side. The grey part that can be seen is the MG mount part D-57. You have to work the cockpit combing into the fuselage with this part in as shown. A little trimming on the backside of the combing will assist the modeler getting it in.


Mgunns
_VISITCOMMUNITY
Arizona, United States
Joined: December 12, 2008
KitMaker: 1,423 posts
AeroScale: 1,319 posts
Posted: Thursday, January 14, 2010 - 01:39 AM UTC
This project is in the tank for a long time. I dumbed out and put the plastic in front of my space heater with disastrous results. Needless to say........
edoardo
_VISITCOMMUNITY
Milano, Italy
Joined: November 30, 2007
KitMaker: 642 posts
AeroScale: 382 posts
Posted: Thursday, January 14, 2010 - 01:42 AM UTC
NO!
What a pity! I am very sorry...
thegirl
_VISITCOMMUNITY
Alberta, Canada
Joined: January 19, 2008
KitMaker: 6,743 posts
AeroScale: 6,151 posts
Posted: Thursday, January 14, 2010 - 01:55 AM UTC
Dumb out ! space heater ....... can you salvage any thing from it ? Wow that really bites Mark !

Your build was coming a long very well . Your rendering on the woodgrian was most excellent .

I do hope you will continue when the new kit arrives
Mgunns
_VISITCOMMUNITY
Arizona, United States
Joined: December 12, 2008
KitMaker: 1,423 posts
AeroScale: 1,319 posts
Posted: Thursday, January 14, 2010 - 01:59 AM UTC
Yeah. I have been putting the painted parts in front of the space heater, with no ill effect at all, until last night.
I will continue on when the new one arrives. I did manage to salvage everything but the fuselage halves as it was the engine mount area that got all snarly. One would think that I would learn from this. Must be the Marine in me.
bill_c
Staff MemberCampaigns Administrator
MODEL SHIPWRIGHTS
_VISITCOMMUNITY
New Jersey, United States
Joined: January 09, 2008
KitMaker: 10,553 posts
AeroScale: 1,198 posts
Posted: Thursday, January 14, 2010 - 04:12 AM UTC
Wow, my condolences. That REALLY sucks. Time to do a crash diorama!
Mgunns
_VISITCOMMUNITY
Arizona, United States
Joined: December 12, 2008
KitMaker: 1,423 posts
AeroScale: 1,319 posts
Posted: Thursday, January 14, 2010 - 06:51 AM UTC
Thanks Bill and Terri:
But it's Dead In the Water now.
thegirl
_VISITCOMMUNITY
Alberta, Canada
Joined: January 19, 2008
KitMaker: 6,743 posts
AeroScale: 6,151 posts
Posted: Saturday, January 16, 2010 - 01:52 AM UTC
Will be looking forward to the restart mark
Mgunns
_VISITCOMMUNITY
Arizona, United States
Joined: December 12, 2008
KitMaker: 1,423 posts
AeroScale: 1,319 posts
Posted: Sunday, January 17, 2010 - 03:35 AM UTC

Quoted Text

Will be looking forward to the restart mark


I have been away from the house for a few days, got the slip from the post office that the SE5 is there in the New Richmond Post office awaiting my signature. As Monday the 18th is MLK day, I am sure they are closed, but Tuesday I will stop there after work and pick it up. I managed to salvage all of the interior, the wings, so I have a start. If the cockpit coming hadn't been so tenacious I could have used the other fuselage half, but the coming broke, easier to just get a new one. I will post pics as to the progress. Gives me some time to decompress and plan a different course of action. (COA)
Stay tuned for more exciting news as it happens right here folks.
Torchy
#047
_VISITCOMMUNITY
England - East Anglia, United Kingdom
Joined: September 13, 2005
KitMaker: 2,016 posts
AeroScale: 475 posts
Posted: Sunday, January 17, 2010 - 06:58 AM UTC
Hi Mark
I'll let you have my uncreased fuselage D1 and D4 parts if you want them,FOC
Andy
Dwaynewilly
_VISITCOMMUNITY
New York, United States
Joined: December 15, 2006
KitMaker: 365 posts
AeroScale: 344 posts
Posted: Sunday, January 17, 2010 - 07:33 AM UTC
Mark,

What a great idea Andy! I have the kit as well and haven't started construction yet so you could have the pick of wrinkled or ironed! I'd be more than happy to send either your way, just let me know. I think shipping form NY is a bit less than from across the pond.

Regards, Dwayne
thegirl
_VISITCOMMUNITY
Alberta, Canada
Joined: January 19, 2008
KitMaker: 6,743 posts
AeroScale: 6,151 posts
Posted: Sunday, January 17, 2010 - 07:45 AM UTC
I like it guy's - what a great idea and aid to help out Mark . Mark , if it will help you out you can have the engine cowling and chin pan from my kit , won't be using them
Mgunns
_VISITCOMMUNITY
Arizona, United States
Joined: December 12, 2008
KitMaker: 1,423 posts
AeroScale: 1,319 posts
Posted: Sunday, January 17, 2010 - 08:11 AM UTC

Quoted Text

Hi Mark
I'll let you have my uncreased fuselage D1 and D4 parts if you want them,FOC
Andy


Thanks Andy, I have that part, what really got messed up was the cockpit combing. That is the part I need. I appreciate your offer.

Mark
Mgunns
_VISITCOMMUNITY
Arizona, United States
Joined: December 12, 2008
KitMaker: 1,423 posts
AeroScale: 1,319 posts
Posted: Sunday, January 17, 2010 - 08:15 AM UTC

Quoted Text

Mark,

What a great idea Andy! I have the kit as well and haven't started construction yet so you could have the pick of wrinkled or ironed! I'd be more than happy to send either your way, just let me know. I think shipping form NY is a bit less than from across the pond.

Regards, Dwayne


:-H Thanks for the offer Dwayne and Terri: I really appreciate the show of support for this build and my bafoonery. I have the ironed fuselage, and would be content to move on with that, it is that cockpit combing that wrecked when I was taking it apart.

Who knows, I may just rummage through the trash and see if I can salvage that aspect of it as well.
Stay tuned folks.
CaptainA
_VISITCOMMUNITY
Indiana, United States
Joined: May 14, 2007
KitMaker: 3,117 posts
AeroScale: 2,270 posts
Posted: Sunday, January 17, 2010 - 09:24 AM UTC
A new addition for Stephen's Modeling Rules

Plastic Melts.

I also discovered this a few months ago. I had a model sitting under my modeling lamp. I did not even have the intention of drying paint or anything like that. It was just sitting there, out of the way, melting. The model was actually about 8-10 inches away from the lamp and offset to the side a bit. It was a total loss.

This is a great site. So many enthusiasts ready to mail parts to a modeler in need. I would also offer my wrinkled fuselage halves to you but it is obvious you don't need them. I really love this site, and the people who live here. Give yourselves a big pat on the back.
Mgunns
_VISITCOMMUNITY
Arizona, United States
Joined: December 12, 2008
KitMaker: 1,423 posts
AeroScale: 1,319 posts
Posted: Sunday, January 17, 2010 - 10:42 AM UTC

Quoted Text

A new addition for Stephen's Modeling Rules

Plastic Melts.


This is a great site. So many enthusiasts ready to mail parts to a modeler in need. I would also offer my wrinkled fuselage halves to you but it is obvious you don't need them. I really love this site, and the people who live here. Give yourselves a big pat on the back.


:-H It truly is Carl. I am deeply touched and encouraged by the response of the folks on this site to help me out. It is a testimony to the character and quality of people on this site.
Again thanks to all of you for your offers of assistance and encouragement.

Mark
JackFlash
_VISITCOMMUNITY
Colorado, United States
Joined: January 25, 2004
KitMaker: 11,669 posts
AeroScale: 11,011 posts
Posted: Sunday, January 17, 2010 - 07:29 PM UTC
All of you people make me proud to be here.
bill_c
Staff MemberCampaigns Administrator
MODEL SHIPWRIGHTS
_VISITCOMMUNITY
New Jersey, United States
Joined: January 09, 2008
KitMaker: 10,553 posts
AeroScale: 1,198 posts
Posted: Monday, January 18, 2010 - 03:42 AM UTC
I'll pile on....

If someone needs my undistressed fuselage halves, I'm happy to donate them as well. This IS a bully community of folks.
Mgunns
_VISITCOMMUNITY
Arizona, United States
Joined: December 12, 2008
KitMaker: 1,423 posts
AeroScale: 1,319 posts
Posted: Tuesday, March 02, 2010 - 03:06 PM UTC
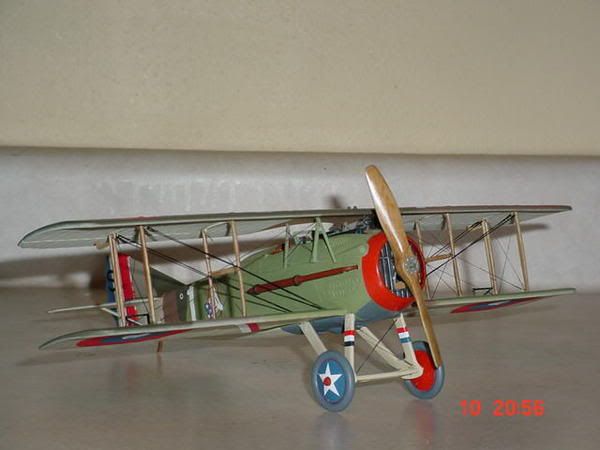
Okay Folks: I am back in the game with the new SE.5a. I don't have any pictures yet, but will tomorrow or Thursday 4 March. I am chock a block with Ephidrine from some behind the counter drugs to counter my long standing viral sinus infection so I spent from 0200 to 0500 on it last nigth. I did salvage all of the cockpit stuff. I did touch them up a bit. I am now using Tamiya acrylics as per the instruction sheet, thinning it with Methyl Ethyl Ketone. Yes I use a respirator. It really goes on nice and dries almost instantly. I have the fuselage halves together, painted the undersurface of the wings and will tape off the ribs for preshading. It is really going together much nicer than the first time. I did send an email to WNW in regards to their instruction sheet. There are some problems with the assembly sequence. I picked up on this during this 'rebuild'. There are real inconsistencies with portions of the assembly sequence mainly the firewall assembly, from page three to page five. I figured it out, but someone new to WWI subjects might get really frustrated with this kit the way the instructions are presently. Not a slam on Wing Nuts. Anyone doing this kit really needs to dry fit the firwall to the starboard fuselage halves to ensure a good fit and alignment, as this kit has no margin for error. I am staying away from PE. As I will be using the engine cowlng I went with my first engine. I have a lot of spares for an SE.5a if anyone needs anything.
Mgunns
_VISITCOMMUNITY
Arizona, United States
Joined: December 12, 2008
KitMaker: 1,423 posts
AeroScale: 1,319 posts
Posted: Tuesday, March 02, 2010 - 03:22 PM UTC
Okay: Here is my progress thus far:


I did salvage the seat and the dash:

I used a little of the Tamiya orange and yellow on the leather seat and seat back to highlight the leather:


I also tried using a wash on the seat belts, and to separate the leather ends of the seat belts I did a wash using Tamiya clear orange and then yellow. It isn't much difference but enough to make it stand out a bit from the seat.

I painted the underide Tamiya Deck tan as per the instructions. I will be taping the rib strips and spars and then preshading.
So far so good. Compared to the LVG CVI this is a much more less forgiving model IMHO.
Another shot of the dash:
Mgunns
_VISITCOMMUNITY
Arizona, United States
Joined: December 12, 2008
KitMaker: 1,423 posts
AeroScale: 1,319 posts
Posted: Saturday, March 06, 2010 - 08:44 AM UTC
Okay folks: I got as far as the preshading at this stage. Here are the wings and the stabilizer.


I also did the struts and the props, neither are finished yet, as I have to paint the trim on the struts and I want to apply a wash of Tamiya yellow on the props and pencil in the laminations.

I don't know what it is but for some reason, this model just doesn't motivate me. I have tried to get pumped over it, but it just isn't happening. It is a good kit, it is going together well for me, it is a neat aircraft. I will get over it. More as I progress.

L8R

Mark
JackFlash
_VISITCOMMUNITY
Colorado, United States
Joined: January 25, 2004
KitMaker: 11,669 posts
AeroScale: 11,011 posts
Posted: Saturday, March 06, 2010 - 04:46 PM UTC
Mark the best way to motivate yourself is to pick up a biography of one of the Se 5a pilots. Recommend Mannock's bio. Or anything by Alex Revell on the subject. Getting a view from the cockpit as it were tends to turn up the enthusiasm. SSShhhh its a secret. Don't tell anyone. . .
Torchy
#047
_VISITCOMMUNITY
England - East Anglia, United Kingdom
Joined: September 13, 2005
KitMaker: 2,016 posts
AeroScale: 475 posts
Posted: Sunday, March 07, 2010 - 06:02 AM UTC
Mark,get your butt in gear and get back on it!!!! she looks good mate ,I'm in the same slump with my WNW LVG,I'm all decaled out with the loz(bashing head on work bench as I type!!!) and I've got to try the rigging yet!!,
Model on

Andy