

Greetings all,
Its time for one of those subjects I have kept on the backburner for a couple of months now. Lets discuss the results or ramifications of altering a stock kit to get a bit of unique build.
Though tongue in cheek the "Rules of Modeling 101" I have posted previously were designed to help modelers understand that when you begin to alter a stock kit that you open up the Gremlin box. For instance if you replace an engine with an aftermarket item you set in motion a series of needed fixes that are meant to accomidate the fit of the new motor. It can be adjusting or replacing the kit motor mount or its locator sockets.
Most aftermarket items (decals, resin or PE)are designed for a specific kit. Sometimes they are designed from details of modern replicas and are translated to use in kits of a specific type listed "for use on the Albatros D.V / Va kits in 1:48 scale".
My most extensive sets of PE application have come from Part of Poland and Eduard. The most problematic concerns are that to make the PE cost efective these companies do not give you a detailed account of what to do with some of the items. You are left to guess that all of the molded plastic details have to be erased before you add the PE. You have to shave or aze down the thickness of this plastic for to accomidate the fir of the PE. The replacement wings need to be pinned to the fuselage for strength etc etc . . .
Lets not forget that the instruction draftsperson can at times get things backwards and the purpose of applying an aftermarket pieces are defeated. Details are hidden or inaccurate.
To a large degree we are trying to build something we are satisfied with. The modelling community shares the singular goal to build in scale miniature subjects we desire. The effort then is to add details not found in the kit. For me the beauty is in the finished details. Though at times (during the build) we are bedeviled by them. This specifically relates back to the generalization of the aftermarket instructions being limited to exploded view mechanical drawings.
One of the things that I found exceptional with the WMM 1:48 Gloster VI multimedia kit was it listed every part by location and identity including the PE. This list gave me a clear indication of a specific item's uses.
At this time I open the thread for discussion.
Early Aviation
Discuss World War I and the early years of aviation thru 1934.
Discuss World War I and the early years of aviation thru 1934.
Hosted by Jim Starkweather
The Domino effect of altering a kit

JackFlash

Joined: January 25, 2004
KitMaker: 11,669 posts
AeroScale: 11,011 posts
Posted: Wednesday, December 30, 2009 - 08:48 AM UTC
thehannaman
Joined: April 04, 2006
KitMaker: 279 posts
AeroScale: 194 posts
Posted: Wednesday, December 30, 2009 - 09:01 AM UTC
Along the same lines of this domino effect is "Consistency of Detail." Say for instance, that you replace an engine with an exquisitely detailed resin set. You jump through all of the modification hurdles and handle all the fit and finish issues. Now, it only stands to reason that the cockpit and control surfaces get worked over to be at the same detail level. Otherwise, would you not merely have a great engine wrapped in a mediocre plastic kit? Then of course, there are all of the issues related to those improvements. Well then, if you're putting a new cockpit and control surfaces on, how do you feel about the kit wheels, or the canopy? Where does one draw the line? How does one balance the level of detail so that it looks consistent and it is still a complete-able project?

BurlBurlingame
Joined: October 01, 2009
KitMaker: 53 posts
AeroScale: 52 posts
Posted: Wednesday, December 30, 2009 - 01:04 PM UTC
I shall simply gripe:
* I miss instruction sheets that identify the part you're building. For example, the brass tubey thingamabob that rears up between the firewall and rudder pedals on the Bristol Fighter. What is it? What does it do? It has a handle on the end. Does one turn it or pump it? Building these models is one way we learn about the real thing.
* Brass-bit manufacturers, please have some thought about how the part is attached to the model. Design the locating pins right on the part, even if we have to drill the corresponding hole.
JackFlash
Joined: January 25, 2004
KitMaker: 11,669 posts
AeroScale: 11,011 posts
Posted: Wednesday, December 30, 2009 - 07:05 PM UTC
It is the grease gun for the Vickers machine gun Constanesco synchronizing gear. 
BurlBurlingame
Joined: October 01, 2009
KitMaker: 53 posts
AeroScale: 52 posts
Posted: Wednesday, December 30, 2009 - 10:30 PM UTC
Quoted Text
It is the grease gun for the Vickers machine gun Constanesco synchronizing gear.
Thanks! Now what's that other little gizmo over there, by the thingie with the whatiz?
Ooh, wait, whilst I have Stephen on BIFF data retainer the Eduard kit goes to great pains to provide a window in the pilot's floor. I don't see this on any other kit and the location seems to provide only a view of the top of the bottom wing. A holdover from the early F2As when the center section wasn't covered?
And more to the point of this thread: How many of you paint areas that can't be seen when the model is built?

Mgunns
Joined: December 12, 2008
KitMaker: 1,423 posts
AeroScale: 1,319 posts

Posted: Thursday, December 31, 2009 - 03:25 AM UTC
Another great thread. I only paint areas that can't be seen when I use the air brush.
Quoted Text
And more to the point of this thread: How many of you paint areas that can't be seen when the model is built?

CaptainA
Joined: May 14, 2007
KitMaker: 3,117 posts
AeroScale: 2,270 posts
Posted: Thursday, December 31, 2009 - 12:15 PM UTC
Quoted Text
And more to the point of this thread: How many of you paint areas that can't be seen when the model is built?
Depends on my aim for that day


thegirl

Joined: January 19, 2008
KitMaker: 6,743 posts
AeroScale: 6,151 posts
Posted: Friday, January 01, 2010 - 03:54 AM UTC
This fit's right in with AMS . It is AMS ! As soon as you start in one area it leads to improvements in another . Then you notice that this piece isn't right now out comes the mad scientist with knife in hand . Next thing you know it after all that building and time put into the project and she is finished only to find out the ref's you used were wrong !
CaptainA
Joined: May 14, 2007
KitMaker: 3,117 posts
AeroScale: 2,270 posts
Posted: Friday, January 01, 2010 - 12:54 PM UTC
Or the instructions are wrong. Oh, that's why it doesn't fit right 
JackFlash
Joined: January 25, 2004
KitMaker: 11,669 posts
AeroScale: 11,011 posts
Posted: Friday, January 01, 2010 - 03:35 PM UTC
You all are tempting me to post the Laws of Modeling 101 again.
CaptainA
Joined: May 14, 2007
KitMaker: 3,117 posts
AeroScale: 2,270 posts
Posted: Sunday, January 03, 2010 - 12:23 PM UTC
The Left Handed Untergefrieter thinks that would benifit the newer guests greatly.
JackFlash
Joined: January 25, 2004
KitMaker: 11,669 posts
AeroScale: 11,011 posts
Posted: Saturday, January 09, 2010 - 04:31 PM UTC
Quoted Text
The Left Handed Untergefrieter thinks that would benifit the newer guests greatly.
well here is the link then!
Laws of Modeling 101
JackFlash
Joined: January 25, 2004
KitMaker: 11,669 posts
AeroScale: 11,011 posts
Posted: Monday, January 18, 2010 - 03:43 PM UTC
To further the cause and enlighten us let me take a kit most of us have built or have in the stash. Try the Eduard 81xx series Albatros D.V / Va 1:48 kit. Since I am discussing the plastic sprues this will apply to all recent and past issues of this kit.
Now the front face of the propeller paddle should taper shightly back. If your using the Eduard 81xx series kits the propeller locator hub is on the wrong face. Shear it off and use a piece of brass or plastic sprue rod and drill a hole through the center of the prop and mount through the cowling opening.
It will be just about this time (looking in the opening for the prop hub in the fuselage) you will reckon that the engine block sits too high. Then we have to talk about the Eduard generic Mercedes engine being too short in height. . .But you won't see that once fuselage is closed up and the propeller mounted. The reason Eduard used the hub
If you work with an aftermarket motor you have to adjust the placement of the engine bearer shelf. Now you will have to add another smaller locator shelf to the engine compartment rear bulk head / fuselage former to sit the engine bearer shelfon. But if you lower the engine bearer shelf you have to remove about 1/16" from each side because the oval crossection of the fuselage tapers.
Kit review Eduard #8112
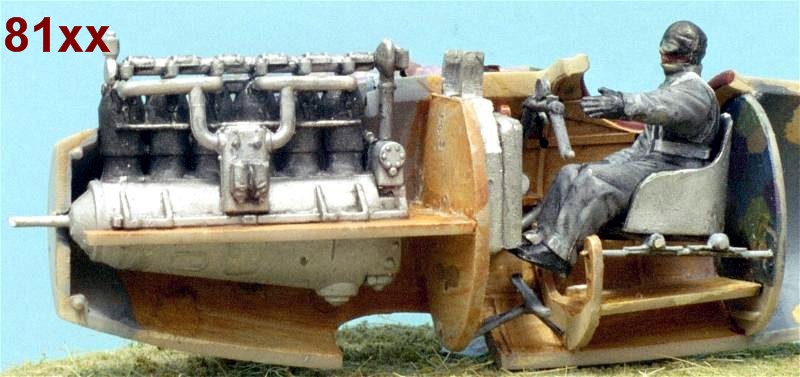
This an 81xx series with a spare Roden Mercedes. To center the rod in the motor for the prop the shelf has to be dropped down
Now the front face of the propeller paddle should taper shightly back. If your using the Eduard 81xx series kits the propeller locator hub is on the wrong face. Shear it off and use a piece of brass or plastic sprue rod and drill a hole through the center of the prop and mount through the cowling opening.
It will be just about this time (looking in the opening for the prop hub in the fuselage) you will reckon that the engine block sits too high. Then we have to talk about the Eduard generic Mercedes engine being too short in height. . .But you won't see that once fuselage is closed up and the propeller mounted. The reason Eduard used the hub
If you work with an aftermarket motor you have to adjust the placement of the engine bearer shelf. Now you will have to add another smaller locator shelf to the engine compartment rear bulk head / fuselage former to sit the engine bearer shelfon. But if you lower the engine bearer shelf you have to remove about 1/16" from each side because the oval crossection of the fuselage tapers.
Kit review Eduard #8112
This an 81xx series with a spare Roden Mercedes. To center the rod in the motor for the prop the shelf has to be dropped down
 |

WEB HOSTING BY


Copyright ©2021 AeroScale and Kitmaker Network, a subsidiary of Silver Star Enterprises
All Rights Reserved. Please read our Conditions of Use and Privacy Policy.
All Rights Reserved. Please read our Conditions of Use and Privacy Policy.