Chengdu FC-1 / JF-17 - 1/48 Trumpeter
Germany
Joined: September 07, 2005
KitMaker: 5,609 posts
AeroScale: 5,231 posts
Posted: Friday, March 12, 2010 - 10:00 AM UTC
Hi all
while building my AFV F-5E I have some waiting time to bridge so I started this model some days ago. Again this si out of the box and it will get Pakistani markings. I am curious if other small airforces will buy this aircraft ...
I wrote an inbox review on my site
JF-17 Thunder
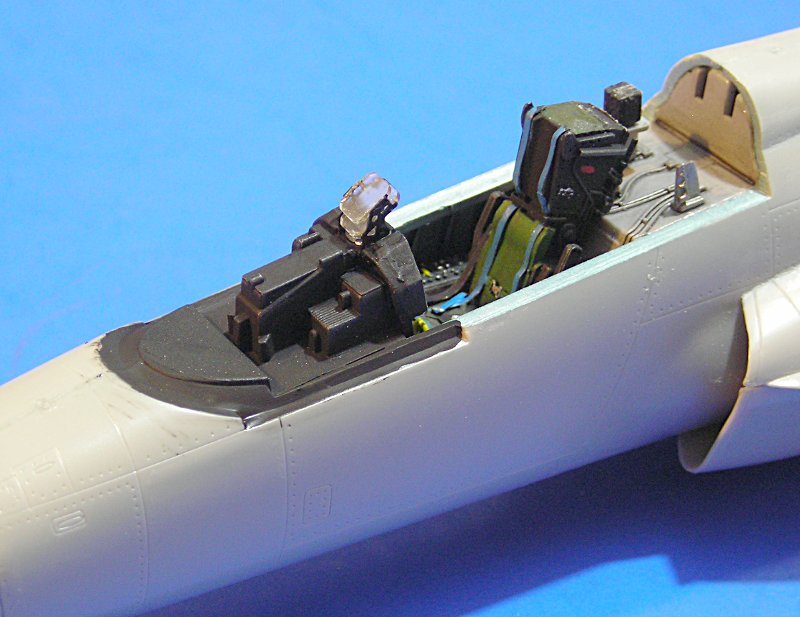
So here it goes. In fact I could build the cockpit very late so I progressed a bit with the whole airframe before turning to the pit, but to keep the instructions in mind I start with the latter here:

Instead of applying the whole decal I just cut out the screens. Dito on the side panels. The throttle was attached late and still needs to be painted.


Trumpeter advises to use an Aotake (H63/X-15) kind of paint for the side walls Instead I used a paint by Jens Popp (JPS) who has a blueish-metallic interior color for F-15s in programme, which I found nice.

Here is everything taped together:

comments welcome! keep in mind this shall be fun

all the best
Steffen
DULCE ET DECORUM EST PRO HOBBY MORI
Merlin
 Senior Editor
#017
United Kingdom
Joined: June 11, 2003
KitMaker: 17,582 posts
AeroScale: 12,795 posts
Posted: Friday, March 12, 2010 - 08:26 PM UTC
Hi Steffen
Nice work so far - it really is a rather attractive aircraft, isn't it! I'll look forward to seeing how it turns out.

All the best
Rowan
BEWARE OF THE FEW...
As I grow older, I regret to say that a detestable habit of thinking seems to be getting a hold of me. - H. Rider Haggard
Germany
Joined: September 07, 2005
KitMaker: 5,609 posts
AeroScale: 5,231 posts
Posted: Friday, March 12, 2010 - 09:11 PM UTC
Thank you Rowan
Well I was about to buy the Bronco kit when I got this as a sample. I find this a really interesting aircraft (from an aesthetical point of view) ... looks like the smallest aircraft built around the largest jet available. Also these side intakes are designed interesting.
The pit is really nice oob ... I have no idea if this is correct or not and I do not care ... it is not a Bf109
... I also have the J-10 in stack (as you might know) and this is a totally different approach. Looking forward to more schemes for different countries: Azerbaijan, Sudan or Zimbabwe ....
all the best
Steffen
DULCE ET DECORUM EST PRO HOBBY MORI
Germany
Joined: September 07, 2005
KitMaker: 5,609 posts
AeroScale: 5,231 posts
Posted: Saturday, March 13, 2010 - 06:29 AM UTC
Hi all
today i mounted it all together. I had some problems getting a smoth transition from the front fuselage to the rear, but I guess this was my fault somewhere on the build. I also attached the HUD two parts PE two clear plastic .. very nice (even if it could be spiced up by using acetate)
I also polished out the mould line on the canopy and gave it a bath in Klear. The part right shows why a multiple part mould was necessary and you also see there is a line on the inside that might be kind of a detonation cord.

all the best
Steffen
DULCE ET DECORUM EST PRO HOBBY MORI
Colorado, United States
Joined: February 03, 2008
KitMaker: 101 posts
AeroScale: 79 posts
Posted: Saturday, March 13, 2010 - 12:04 PM UTC
Hi Steffen,
Wow-you did a great job on the instrument decals! They look great. You have a very nice build going-keep it up.
Tom
Merlin
Senior Editor #017
United Kingdom
Joined: June 11, 2003
KitMaker: 17,582 posts
AeroScale: 12,795 posts
Posted: Saturday, March 13, 2010 - 11:34 PM UTC
Nice one Steffen
A joint like that in the fuselage moulding can often be a recipe for some tidying up. Have they designed it along a panel line to make things easier?
All the best
Rowan
BEWARE OF THE FEW...
As I grow older, I regret to say that a detestable habit of thinking seems to be getting a hold of me. - H. Rider Haggard
Germany
Joined: September 07, 2005
KitMaker: 5,609 posts
AeroScale: 5,231 posts
Posted: Saturday, March 13, 2010 - 11:53 PM UTC
Thanks Tom and Rowan
The joint is at a panel line and it really is a nice fit, but somhow the front part stood slightly (really not much but visible ) proud on the left side and slightly in on the other. I already had made some adjustments beforehand and still it always slipped back in that position ... finally I made some cyan acrylate help to hold the right position
 Edit: (the picture shows the fixed join. I just wanted to illustrate what I was talking about.)
all the best
Steffen
DULCE ET DECORUM EST PRO HOBBY MORI
Merlin
Senior Editor #017
United Kingdom
Joined: June 11, 2003
KitMaker: 17,582 posts
AeroScale: 12,795 posts
Posted: Sunday, March 14, 2010 - 12:58 AM UTC
Hi again Steffen
Ahh, that's not so bad - and the CA should help firm things up. It's a good heads-up for anyone following in your footsteps building this kit.
All the best
Rowan
BEWARE OF THE FEW...
As I grow older, I regret to say that a detestable habit of thinking seems to be getting a hold of me. - H. Rider Haggard
Germany
Joined: September 07, 2005
KitMaker: 5,609 posts
AeroScale: 5,231 posts
Posted: Monday, March 15, 2010 - 07:13 AM UTC
A small update on this one too.
The antenna on the lower front finally broke off (it was forseeable) I replaced it with wire and a piece of stretched Q-Tip. I also filled a small gap on both sides with a piece of stretched sprue.

I also airbrushed the burner can yesterday, but it is not worth to take a pic of that one... yet
all the best
Steffen
DULCE ET DECORUM EST PRO HOBBY MORI
Merlin
Senior Editor #017
United Kingdom
Joined: June 11, 2003
KitMaker: 17,582 posts
AeroScale: 12,795 posts
Posted: Monday, March 15, 2010 - 08:29 AM UTC
Hi Steffen
Neat fix on the antenna.
It really should be a separate piece, shouldn't it - as moulded, it's just asking to get damaged during construction.
All the best
Rowan
BEWARE OF THE FEW...
As I grow older, I regret to say that a detestable habit of thinking seems to be getting a hold of me. - H. Rider Haggard
#439
Washington, United States
Joined: November 05, 2005
KitMaker: 4,950 posts
AeroScale: 3,192 posts
Posted: Tuesday, March 16, 2010 - 05:28 AM UTC
Really nice, thanks for sharing it with us. Now if I remember any of my high school German, I might be able to guess out a word or two.

Hanger Queens in Waiting:
Monogram 1/72 F8F-1
Corsair the Sky Pirate - 1/72 Ace A-7D
Century Series - Airfix 1/72 F-105G
Anti Shipping - Academy 1/72 PBJ-1D
Academy 1/72 F-84E
Germany
Joined: September 07, 2005
KitMaker: 5,609 posts
AeroScale: 5,231 posts
Posted: Tuesday, March 16, 2010 - 06:10 AM UTC
Hello Mark
many thanks for your kind comments (also in the other build log)!
no need to read the kit review, you can often find such things everywhere in english. i provided the link just in case you want to have a look at the kit parts ...
all the best
Steffen
(BTW I am working on this kit too, but not much worth photographing right now)
DULCE ET DECORUM EST PRO HOBBY MORI
Germany
Joined: September 07, 2005
KitMaker: 5,609 posts
AeroScale: 5,231 posts
Posted: Tuesday, March 16, 2010 - 10:26 PM UTC
Hi all
I worked a bit on this model too. I glued on the windshield and attached the hood with Maskol (shall be open on this model). the I masked the "windows" with Tamiya tape. On the underside I attached the gun. It is rather simple on this model but I have no replacement (guess it is a version of the soviet GSch23 as under the MiG-21) so I just drilled out the dangerous ends:

here is a pic of the real thing under a MiG-23 .. for comparison (source Wikipedia commons)

all the best
Steffen
DULCE ET DECORUM EST PRO HOBBY MORI
#439
Washington, United States
Joined: November 05, 2005
KitMaker: 4,950 posts
AeroScale: 3,192 posts
Posted: Wednesday, March 17, 2010 - 03:27 AM UTC
Steffen, sorry, I was being a wise guy about the dual captioned photo.

I did check out your article, I learned several things.
The molding is very nicely done, lots of fine details
It's been nearly 40 years since I was in high school

I might have really deserved that C I got in German

I'm thankfull that your English is better than my German

Google can exchange English for German, but it can't make sense out of what it presented.

Anyway, keep up the good work!

Hanger Queens in Waiting:
Monogram 1/72 F8F-1
Corsair the Sky Pirate - 1/72 Ace A-7D
Century Series - Airfix 1/72 F-105G
Anti Shipping - Academy 1/72 PBJ-1D
Academy 1/72 F-84E
Germany
Joined: September 07, 2005
KitMaker: 5,609 posts
AeroScale: 5,231 posts
Posted: Wednesday, March 17, 2010 - 03:40 AM UTC
Hi Mark
Ahh, your were talking about the photo .... I am going to use it on my build article on the IPMS Deutschland site too, so I needed to caption it in German and English. Maybe I can get it more discriminable next time..
cheers
Steffen
DULCE ET DECORUM EST PRO HOBBY MORI
#439
Washington, United States
Joined: November 05, 2005
KitMaker: 4,950 posts
AeroScale: 3,192 posts
Posted: Wednesday, March 17, 2010 - 03:55 AM UTC
Is the kit a different mark than your reference photo? The photo seems to have the gun on the centerline, well ahead of the CL pylon, the kit has it on the port side intake and the CL pylon seems to be a bit forward of the photo.
Hanger Queens in Waiting:
Monogram 1/72 F8F-1
Corsair the Sky Pirate - 1/72 Ace A-7D
Century Series - Airfix 1/72 F-105G
Anti Shipping - Academy 1/72 PBJ-1D
Academy 1/72 F-84E
Germany
Joined: September 07, 2005
KitMaker: 5,609 posts
AeroScale: 5,231 posts
Posted: Wednesday, March 17, 2010 - 04:04 AM UTC
As I wrote
"here is a pic of the real thing under a MiG-23" ....
Another thing which I was probably not clear enough about: The thing that hangs under the FC-1/JF-17 is probably not a GSch 23 gun pod but a Chinese "copy" or license product...
hope that makes my comment clearer
all the best
Steffen
DULCE ET DECORUM EST PRO HOBBY MORI
Germany
Joined: September 07, 2005
KitMaker: 5,609 posts
AeroScale: 5,231 posts
Posted: Wednesday, March 17, 2010 - 09:22 PM UTC
Yesterday I had some fun with the air brush and could proceed quite a bit.
I used Gunze paint and all are from different production batches. One is old style, one has the new cap and one has the white green banderole. The worked together like a charm but I really fear the clear coat.....
The radom is H306, the base colour H308 and the darker grey on the fuselage H 307. I copied the paint instructions to the "correct" size and cut paper masks from the copies. Else you could not descern between the camo colours as they would just blend together.


all the best
Steffen
DULCE ET DECORUM EST PRO HOBBY MORI
#439
Washington, United States
Joined: November 05, 2005
KitMaker: 4,950 posts
AeroScale: 3,192 posts
Posted: Thursday, March 18, 2010 - 07:17 AM UTC
Looks good.
I agree, the low vis colors make it hard to have a visually appealing model.
Hanger Queens in Waiting:
Monogram 1/72 F8F-1
Corsair the Sky Pirate - 1/72 Ace A-7D
Century Series - Airfix 1/72 F-105G
Anti Shipping - Academy 1/72 PBJ-1D
Academy 1/72 F-84E
Germany
Joined: September 07, 2005
KitMaker: 5,609 posts
AeroScale: 5,231 posts
Posted: Thursday, March 18, 2010 - 07:41 AM UTC
Thank you Mark!
I am not complaining about moden camouflage schemes. My point was that the camo greys on this machine are very similar and if I would have airbrushed them without the masks you could not see these are different colours as it all would have blend together.
all the best
Steffen
DULCE ET DECORUM EST PRO HOBBY MORI
Germany
Joined: September 07, 2005
KitMaker: 5,609 posts
AeroScale: 5,231 posts
Posted: Friday, March 19, 2010 - 11:20 PM UTC
Hi All
yesterday i sprayed the whole model with Revell clear flat enamel as a barrier layer for the Klear. And this morning I applied that product. On great thing about it is that it dries really fast so I started applying decals an hour ago. Just a few larger markings so far. I will have to work through this over several days as there are many stencils on this sheet and most of them are sub-mm

all the best
Steffen
DULCE ET DECORUM EST PRO HOBBY MORI
Merlin
Senior Editor #017
United Kingdom
Joined: June 11, 2003
KitMaker: 17,582 posts
AeroScale: 12,795 posts
Posted: Saturday, March 20, 2010 - 12:58 AM UTC
Hi Steffen
Looking good.
Why did you apply a barrier layer before the Klear - I've never known it to attack paint?
All the best
Rowan
BEWARE OF THE FEW...
As I grow older, I regret to say that a detestable habit of thinking seems to be getting a hold of me. - H. Rider Haggard
Germany
Joined: September 07, 2005
KitMaker: 5,609 posts
AeroScale: 5,231 posts
Posted: Saturday, March 20, 2010 - 02:48 AM UTC
Hi Rowan
Gunze and Future /Klear were never close friends, but the new batches cause a hefty cracking in the Klear layer as I experienced it with my SUE. To avoid this I used an enamel barrier then and it worked also this time... no big deal just a little annoying.
I have to use Klear as I need it to get the Trumpeter decals to work --- even with it it is quite difficult to get rid of the carrier film and the flat surface of teh decals
all the best
Steffen
DULCE ET DECORUM EST PRO HOBBY MORI
Merlin
Senior Editor #017
United Kingdom
Joined: June 11, 2003
KitMaker: 17,582 posts
AeroScale: 12,795 posts
Posted: Saturday, March 20, 2010 - 04:29 AM UTC
Hi Steffen
I see - it's to protect the Klear from what's underneath (not vice versa). I can't remember if I ever used Klear over GS - they haven't been widely available for years in the UK. I see MDC stock them now, so I will have to try them again, because they were always among my favourite acrylics.
All the best
Rowan
BEWARE OF THE FEW...
As I grow older, I regret to say that a detestable habit of thinking seems to be getting a hold of me. - H. Rider Haggard
Germany
Joined: September 07, 2005
KitMaker: 5,609 posts
AeroScale: 5,231 posts
Posted: Monday, March 22, 2010 - 04:01 AM UTC
Hi all
well, this work is tedious ... and I did not even come to the super small stencils...

Still have to find out how the "no step" markings should be oriented...
all the best
Steffen
DULCE ET DECORUM EST PRO HOBBY MORI


