Early Aviation
Discuss World War I and the early years of aviation thru 1934.
WNW GB 2009 - 10 Albatros D.V - Mikael
edoardo
_VISITCOMMUNITY
Milano, Italy
Joined: November 30, 2007
KitMaker: 642 posts
AeroScale: 382 posts
Posted: Thursday, October 21, 2010 - 12:03 AM UTC
Hi Mikael!
Thank you! It does surely help!
I heard of gouache but I am not sure of the Italian translation of it.
I found "guazzi" searching on the net, but not sure of what does it mean
The only water base paint coluour I can think of is "acquarello" but I don't think this is the case.

Ciao
Edo
OEFFAG_153
_VISITCOMMUNITY
Västra Götaland, Sweden
Joined: February 19, 2010
KitMaker: 1,473 posts
AeroScale: 1,450 posts
Posted: Thursday, October 21, 2010 - 12:39 AM UTC
Hi Edo,

I'm sure you can use oilcolours and white spirits for the same effect if you're comfortable with this...

I think the gouache has some advantages, but also a couple of drawbacks:

The pigments are as strong and as good as oilpaint

It doesn't smell (this pleases my wife a lot, who hates strong smells).

It is easy to ammend, just use some water on a quetip for instance, to remove, or create new streaks – even after the paint has dried.

It dries very quickly, and to a matt finish.

The drawbacks:

Mostly that it pearls on gloss surfaces, perhaps distilled water could help this – I'm going to try when I work on the fuselage.

This means I apply it fairly thick, and then wipe the surface down with a lintfree cloth, repeating till I get the effect I'm after.

Here's a link to Winsor & Newton – in my opinion, the finest supplier of artists materials: W&N Gouache

Hope this is helpful to you.

Mikael
Kornbeef
_VISITCOMMUNITY
England - South East, United Kingdom
Joined: November 06, 2005
KitMaker: 1,667 posts
AeroScale: 1,551 posts
Posted: Thursday, October 21, 2010 - 04:15 AM UTC
Mikael


Gouache can be quite prone to lifting when masking, even when futured or painted over, and doesnt have the resiliance of oils to when handling.

Being water based and not really permanant means overpainting and laquering should be done in light coats...acrylics sometimes lift and muddy the pigments.

But with care it gives lovely results.

guitarlute101
_VISITCOMMUNITY
West Virginia, United States
Joined: December 18, 2006
KitMaker: 1,121 posts
AeroScale: 1,063 posts
Posted: Thursday, October 21, 2010 - 04:33 AM UTC


Looking great Mikael!!
OEFFAG_153
_VISITCOMMUNITY
Västra Götaland, Sweden
Joined: February 19, 2010
KitMaker: 1,473 posts
AeroScale: 1,450 posts
Posted: Thursday, October 21, 2010 - 07:32 PM UTC

Quoted Text

Mikael


Gouache can be quite prone to lifting when masking, even when futured or painted over, and doesnt have the resiliance of oils to when handling.

Being water based and not really permanant means overpainting and laquering should be done in light coats...acrylics sometimes lift and muddy the pigments.

But with care it gives lovely results.


Keith – Thank You for this info, I have not done too many benchtests as yet, and only used them as dirt and oil stains before – I'll keep testing with this in mind.

Best Regards

Mikael
OEFFAG_153
_VISITCOMMUNITY
Västra Götaland, Sweden
Joined: February 19, 2010
KitMaker: 1,473 posts
AeroScale: 1,450 posts
Posted: Thursday, October 21, 2010 - 07:33 PM UTC

Quoted Text


Looking great Mikael!!


Thank You Mark

Mikael
bstachel
Joined: March 04, 2007
KitMaker: 8 posts
AeroScale: 7 posts
Posted: Monday, October 25, 2010 - 11:41 AM UTC
WoW! I'm really looking forward to seeing this one come together! Quite the most impressive lozenge interpretation I've seen - particularily the upper colours -Well done! Good luck with the final stages, Best wishes, Richard Andrews
JackFlash
_VISITCOMMUNITY
Colorado, United States
Joined: January 25, 2004
KitMaker: 11,669 posts
AeroScale: 11,011 posts
Posted: Monday, October 25, 2010 - 01:54 PM UTC
Mikael let me say that the work over all has been beautiful. I have to admit that the lozenge is spot on! Nicely Done sir. This loz is from Doug Baumann? It came out very well. I might have done the propellers with the laminations curving to the leading edge. But all the same I really hope you finish this. It deserves it. Please Model On!
Repainted
_VISITCOMMUNITY
Östergötland, Sweden
Joined: April 04, 2006
KitMaker: 1,058 posts
AeroScale: 1,004 posts
Posted: Monday, October 25, 2010 - 09:35 PM UTC
First thing I´ll start up after the Tripehound is the Albie Dv after watching your work my friend Awesome. I Like the effect you create with the airbrush.

Larsa
OEFFAG_153
_VISITCOMMUNITY
Västra Götaland, Sweden
Joined: February 19, 2010
KitMaker: 1,473 posts
AeroScale: 1,450 posts
Posted: Tuesday, October 26, 2010 - 04:30 AM UTC

Quoted Text

Mikael let me say that the work over all has been beautiful. I have to admit that the lozenge is spot on! Nicely Done sir. This loz is from Doug Baumann? It came out very well. I might have done the propellers with the laminations curving to the leading edge. But all the same I really hope you finish this. It deserves it. Please Model On!


Stephen – Thank You for your very kind comments on my work – they really do mean a lot

The good news is that I'm pretty certain I'll finish this one in time Final coat of future is on, and I'm about to start pre-rigging and then on with the top wing. Whats even better, with my wife away on business, I have some time on my hands

I'll post some pics of where I am right now shortly...

Yes – the Loz is from Dougs work – but I did some tweaking to them to get them closer to my liking:

First I redrew the Loz pattern in vector graphics. – This allowed me to tweak the individual colours to suit my printer while crosschecking available sources. It also gives you perfect, sharp edges on the patterns and no pixels, that I can scale to any size without loosing quality.

I also "dimmed" the colours down a bit using a texture that I can control as a separate layer.

Being a graphic designer with access to Adobe Illustrator and an expensive inkjet printer made the above fairly easy for me.

Perhaps, also, I was lucky when I bought the white backed waterslide decals – my hobby shop carries Testors, and so far they have exceeded my expectations.

Anyway I'm very happy you like it – praise on lozenge from you is praise indeed


Oh – I never even thoght about the fact that the prop laminations goes a certain direction – Thank You for that pointer.

Best Regards

Mikael

OEFFAG_153
_VISITCOMMUNITY
Västra Götaland, Sweden
Joined: February 19, 2010
KitMaker: 1,473 posts
AeroScale: 1,450 posts
Posted: Tuesday, October 26, 2010 - 04:34 AM UTC

Quoted Text

First thing I´ll start up after the Tripehound is the Albie Dv after watching your work my friend Awesome. I Like the effect you create with the airbrush.

Larsa


Thank You so much Larsa – Looking forward to your albatros build already – I'm sure It'll be a stunner when its finished

P.S. I got my triplehound in the post the other day – sooo.....
OEFFAG_153
_VISITCOMMUNITY
Västra Götaland, Sweden
Joined: February 19, 2010
KitMaker: 1,473 posts
AeroScale: 1,450 posts
Posted: Wednesday, October 27, 2010 - 12:29 AM UTC
Hi Everyone

Work on this project is moving along quite well at the moment, and I think I’ll be able to make the deadline without problems. Im at the rigging stage, and last night I tied all lines to the lowerwings for more rigging once the the upperwing is in place.

Landing gear went on as well, with a lot less hastle than is usual for me. I think the WNW engineering here is very good, which allows you to position the struts in the correct angle very easily...

These four shots were taken a bit before though...


To my delight and surprise I found a shot of Helmut Dilthey sitting in the cockpit of this craft in one of my Osprey books. It gives a pretty good closeup of the cockpit area and revealed that he used a tubular sight for aiming, so this will be added in the last detailing stage just before the topwing goes on.

All and any comments are as usual most welcome

Thank You for looking

Mikael


Mgunns
_VISITCOMMUNITY
Arizona, United States
Joined: December 12, 2008
KitMaker: 1,423 posts
AeroScale: 1,319 posts
Posted: Wednesday, October 27, 2010 - 03:42 AM UTC
HI MIkael:

I like it, the weathering really is a nice touch. I am looking forward to more pictures as you progress on this outstanding build.

Best

Mark
OEFFAG_153
_VISITCOMMUNITY
Västra Götaland, Sweden
Joined: February 19, 2010
KitMaker: 1,473 posts
AeroScale: 1,450 posts
Posted: Wednesday, October 27, 2010 - 08:55 PM UTC
Hi Mark – Good to hear from you!

Thank You so much for your comments on the build – they mean a lot.

I was'nt sure about the waethring myself, and thoght I'd perhaps had overdone it... But looking at it now I think its OK – Glad you like it too.

Hope you get your basement sorted soon, and can get back to doing some building!

Best Regards

Mikael
OEFFAG_153
_VISITCOMMUNITY
Västra Götaland, Sweden
Joined: February 19, 2010
KitMaker: 1,473 posts
AeroScale: 1,450 posts
Posted: Thursday, October 28, 2010 - 11:10 PM UTC
Hi all,

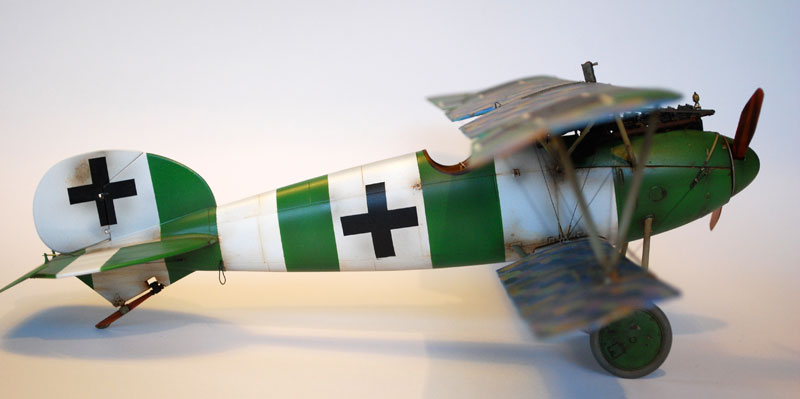
I had a very nervewrecking experience last night, trying to attach the upperwing...

Perhaps I should have done a more thorough dryfit before, but relying on WNWs engineering, I thought it would be plainsailing (the kit so far really has been).

But no! Once the cabanes were in place, it was clear that the gap between the wings and interplane struts were, well not only too great, but also warped sideways in some wierd way. I guess it must be from my own doing somehow, perhaps when I attached the lower wings into the fuseage?

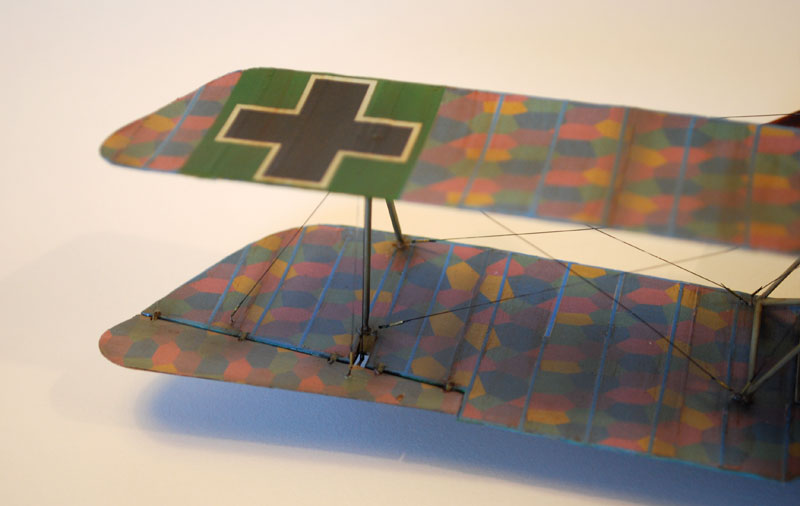
Some force and a strut that broke into a million pieces (well almost) I finally managed to wrestle the wing into place, using a spare strut from the DV kit. The struts, however, kept popping out – so I had to do some emergency rigging to keep everything in its place.

Finally I walked away, the winner of this scrap. Whats even better is that all was still in its place this morning when I woke up.

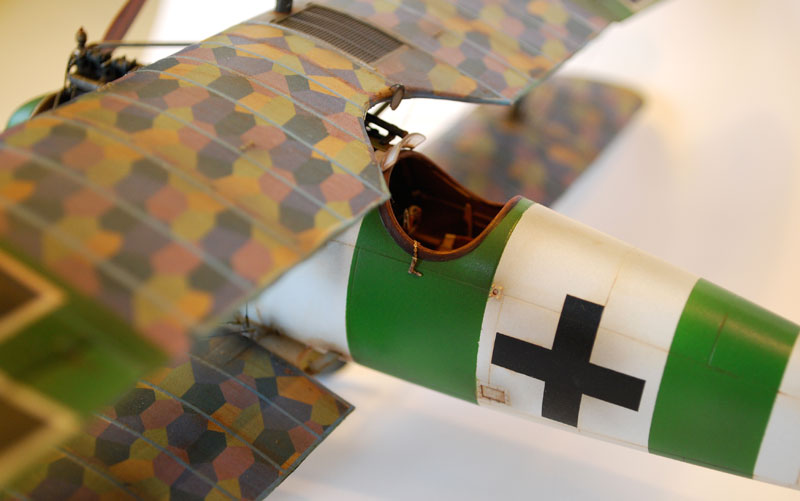
I do have some ugly joints to clean up, but it will not be too noticable once I’ve finished.

Well, this will, again , teach me to always, no matter how good the kit is, always be careful and dryfit.

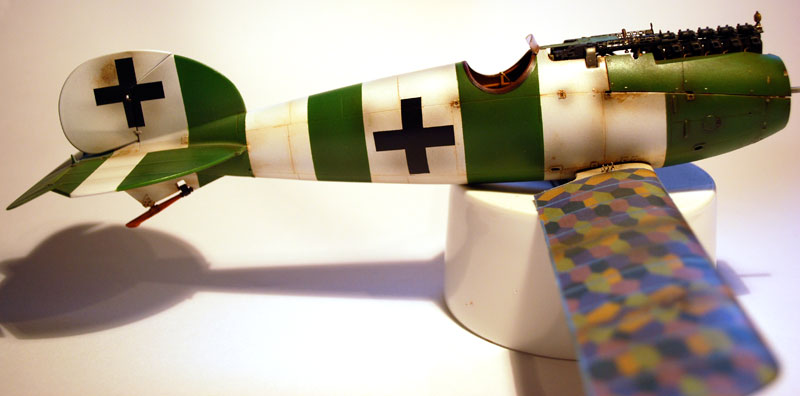
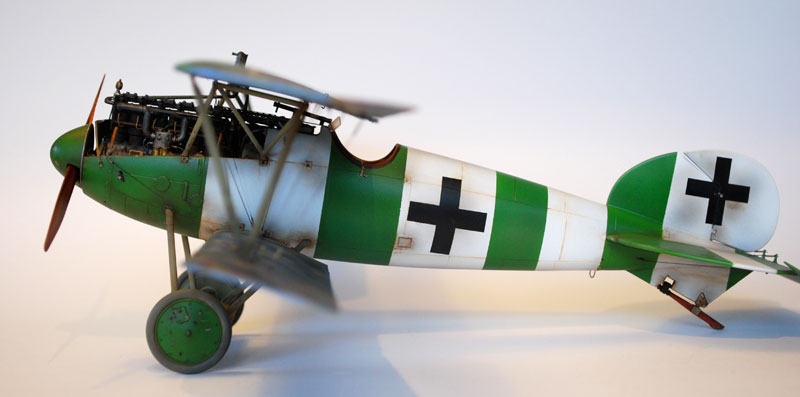
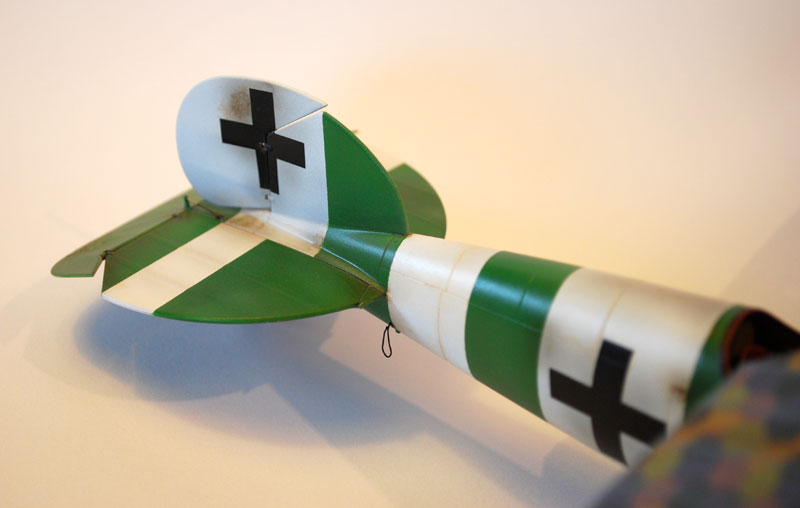
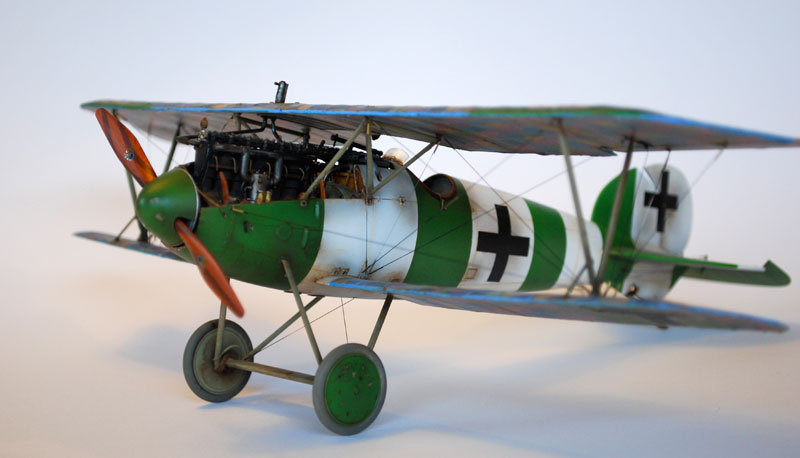
Almost finished now, just some small bits left to do, then I need some good daylight to shoot some pictures.

Next update will be pics of the finished model.

Best Regards

Mikael
JackFlash
_VISITCOMMUNITY
Colorado, United States
Joined: January 25, 2004
KitMaker: 11,669 posts
AeroScale: 11,011 posts
Posted: Thursday, October 28, 2010 - 11:35 PM UTC
It can be a bear sometimes. As you said usually because of the modeler. Forgeting that 2 degrees of dihedral in the lower wings can be the thing that drops the top wing too low. Sometimes for me its my brain cells wandering about looking for a cot to lay me down on and then ignoring them.
Kornbeef
_VISITCOMMUNITY
England - South East, United Kingdom
Joined: November 06, 2005
KitMaker: 1,667 posts
AeroScale: 1,551 posts
Posted: Friday, October 29, 2010 - 12:03 AM UTC
Michael,

I'm glad to hear you overcame this obstacle. Perseverance pays though.

I had similar issues with my 1st DVa, it took a lot of shaving and twisting of the locating lugs, the edges of the wingroots and the socket in the fuselage..I scraped all the paint from these areas and removed some plastic. I realised before you have, when fitting the lower wings that they drooped, even at the root and managed to correct it before fixing the lower wings.. To ensure it sat right I stood her on paintjars under the wingtips and skid and weighted the fuselage down till she had set. (I was very aware of the upper wing warping issue I had and didnt want it to ease its way back in)

The Joint is very tight even before painting and with the latest one I saw the natural tendancy for the locating stub to sit pointing up inside the fuselage and the tip of the wing to sit down correspondingly...as I dryfitted before I cut off and assembled the sawn off wingroots to the fuselage halves , I think the main former that carries the tank and ammo containers is supposed to trap that stub in a groove but in my opinion it isnt upto the job. (Of course on the real A/C these dont exist as the spar and wingroots are built integral into the fuselage structure.)

Looking forwards to the pics of her finished.

bestest

Keith
OEFFAG_153
_VISITCOMMUNITY
Västra Götaland, Sweden
Joined: February 19, 2010
KitMaker: 1,473 posts
AeroScale: 1,450 posts
Posted: Friday, October 29, 2010 - 01:10 AM UTC
Thank You both for your insights  – Keith I reccon you hit the nail on the head, with your observations, and also offered the sollution to this particular problem.

When I get to the wing attachment stage with the next DV, I shall be prepared

Best Regards

Mikael

OEFFAG_153
_VISITCOMMUNITY
Västra Götaland, Sweden
Joined: February 19, 2010
KitMaker: 1,473 posts
AeroScale: 1,450 posts
Posted: Sunday, October 31, 2010 - 09:26 PM UTC
Hi Everyone

Well, Ladies and Gentlemen – its finished!

If the upperwing was pretty eventfull, the finishing was a very much calmer experience.

Here are some pics of the compleated model – hope you like it


For some more visual interest, I let the ”key” hang over the side of the cockpit, as was suggested in the WNW instructions.


All in all, this as been a very pleasant build, and pretty fast by my standards. I think the WNW engineering is one of the reasons for this. For instanse, not having to drill out the rigging atatchments saves me a lot of time. Its also been fun to test homeprinted Lozenge, and I’m very happy to have a Loz covered albatros, and also, finally a DV series to add to my growing albatros lineup.

Well this is the end of this groupbuild for me, althogh I also have the DV in Paul Baumers colours to complete, I will not be able to finish this in time for the 11th. I will post some pics of it in this thread once its done and dusted.

All and any comments are as usual most welcome

Thank You for looking!

Mikael
JackFlash
_VISITCOMMUNITY
Colorado, United States
Joined: January 25, 2004
KitMaker: 11,669 posts
AeroScale: 11,011 posts
Posted: Sunday, October 31, 2010 - 09:36 PM UTC
Beautiful buld Mikael! Don't forget to put some images in the gallery.
warreni
_VISITCOMMUNITY
South Australia, Australia
Joined: August 14, 2007
KitMaker: 5,926 posts
AeroScale: 2,201 posts
Posted: Sunday, October 31, 2010 - 09:43 PM UTC
Congratulations on a lovely build Mikael. Now tell the truth, did you leave the cover off the engine to show off the marvellous detail, or did it not fit too well? I have had problems with all three WNW kits I have built in that regard..

But it is probably just me..
Mgunns
_VISITCOMMUNITY
Arizona, United States
Joined: December 12, 2008
KitMaker: 1,423 posts
AeroScale: 1,319 posts
Posted: Monday, November 01, 2010 - 12:37 AM UTC
Hi MIkael:

Excellent Build. Really looks neat, and a great scheme! Simple but striking.

Best

Mark
thegirl
_VISITCOMMUNITY
Alberta, Canada
Joined: January 19, 2008
KitMaker: 6,743 posts
AeroScale: 6,151 posts
Posted: Monday, November 01, 2010 - 02:23 AM UTC
Beautiful job done Mikael and outstanding job on the weathering ! This is a stricking scheme indeed . Going to have to do this in 48 scale for my stripe and band collection .

OEFFAG_153
_VISITCOMMUNITY
Västra Götaland, Sweden
Joined: February 19, 2010
KitMaker: 1,473 posts
AeroScale: 1,450 posts
Posted: Monday, November 01, 2010 - 03:40 AM UTC

Quoted Text

Beautiful buld Mikael! Don't forget to put some images in the gallery.


Stephen – Thank You for your kind complimnet I shall put some images in the gallery tonight when I get home.

Mikael
OEFFAG_153
_VISITCOMMUNITY
Västra Götaland, Sweden
Joined: February 19, 2010
KitMaker: 1,473 posts
AeroScale: 1,450 posts
Posted: Monday, November 01, 2010 - 03:42 AM UTC

Quoted Text

Congratulations on a lovely build Mikael. Now tell the truth, did you leave the cover off the engine to show off the marvellous detail, or did it not fit too well? I have had problems with all three WNW kits I have built in that regard..

But it is probably just me..


Thank You so much Warren, much appreciated Truthfully – I left the cover off on purpose to show off the engine. The panels fitted really well on this one.

Mikael