Kobenhavn, Denmark
Joined: April 13, 2007
KitMaker: 44 posts
AeroScale: 30 posts
Posted: Monday, October 04, 2010 - 05:22 AM UTC
Hello!
Today I've got this lovely kit. It's surprisingly detailed and crisp details everywhere.
Thank you Zvezda

I hope these will be an enjoyable and straightforward build

I'm going to start today, so hopefully will be some pictures later.
United Kingdom
Joined: January 02, 2008
KitMaker: 59 posts
AeroScale: 4 posts
Posted: Monday, October 04, 2010 - 05:30 AM UTC
I can`t hardly wait !
------------------------------------------
http://mykman.blogspot.co.uk/
Mesterhazy Karoly
Kobenhavn, Denmark
Joined: April 13, 2007
KitMaker: 44 posts
AeroScale: 30 posts
Posted: Monday, October 04, 2010 - 01:35 PM UTC
Texas, United States
Joined: June 29, 2010
KitMaker: 5,854 posts
AeroScale: 372 posts
Posted: Monday, October 04, 2010 - 01:55 PM UTC
Miklos: I'm looking forward to this build

Something you may wish to consider:
I read a review in FSM about this kit, and the author found that the cowl panels would not close around the engine once the engine was installed.
If you are not planning on leaving the cowl open, then I would consider displaying the engine separate from the aircraft.
Merlin
 Senior Editor
#017
United Kingdom
Joined: June 11, 2003
KitMaker: 17,582 posts
AeroScale: 12,795 posts
Posted: Tuesday, October 05, 2010 - 01:39 AM UTC
Hi Miklos
Nice start and great pics. I'm also looking forward to following your build.

Jeremy - the instructions are a little unclear, but do show the build with only partial engine detail if you want the cowls closed. To be honest, you could leave out even more than they suggest and just build enough of the engine-block to mount the exhausts and spinner on.
All the best
Rowan
BEWARE OF THE FEW...
As I grow older, I regret to say that a detestable habit of thinking seems to be getting a hold of me. - H. Rider Haggard
Kobenhavn, Denmark
Joined: April 13, 2007
KitMaker: 44 posts
AeroScale: 30 posts
Posted: Tuesday, October 05, 2010 - 12:46 PM UTC
Texas, United States
Joined: June 29, 2010
KitMaker: 5,854 posts
AeroScale: 372 posts
Posted: Tuesday, October 05, 2010 - 01:19 PM UTC
Rowan: The author actually used cardstock to mount the exhaust manifolds to
 Miklos
: I figured as much, good man!
Merlin
Senior Editor #017
United Kingdom
Joined: June 11, 2003
KitMaker: 17,582 posts
AeroScale: 12,795 posts
Posted: Tuesday, October 05, 2010 - 08:44 PM UTC
Hi again
Before the build goes too far, this seems a good point for a reminder of Vector's correction set:
https://aeroscale.kitmaker.net/review/5378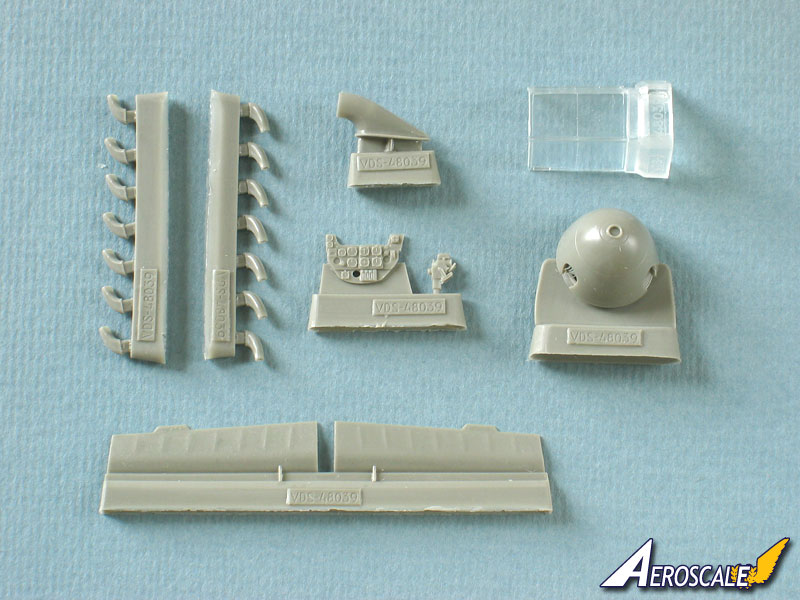
It's well worth getting, because Sergey's parts offer significant improvements over the kit originals.
All the best
Rowan
BEWARE OF THE FEW...
As I grow older, I regret to say that a detestable habit of thinking seems to be getting a hold of me. - H. Rider Haggard
Kobenhavn, Denmark
Joined: April 13, 2007
KitMaker: 44 posts
AeroScale: 30 posts
Posted: Tuesday, October 05, 2010 - 09:56 PM UTC
Quoted Text
Hi again
Before the build goes too far, this seems a good point for a reminder of Vector's correction set: https://aeroscale.kitmaker.net/review/5378
It's well worth getting, because Sergey's parts offer significant improvements over the kit originals.
All the best
Rowan
Thank you Rowan, you saved a lot of time for me
I've planed to make holes for exhausts today but the Vector parts looks way better what should I do with a knife at home

#041
Kobenhavn, Denmark
Joined: July 20, 2006
KitMaker: 10,069 posts
AeroScale: 3,788 posts
Posted: Wednesday, October 06, 2010 - 12:04 AM UTC
Miklos, looks good. This is definitle surprisingly good quality for Zvezda.
Looking forward to see more
Campaign'oholic - 252+ campaigns completed
Kobenhavn, Denmark
Joined: April 13, 2007
KitMaker: 44 posts
AeroScale: 30 posts
Posted: Wednesday, October 06, 2010 - 02:53 AM UTC
Thank you Jesper, I hope to see you at C4 soon.
I was thinking to make the rivets, but I'm not sure about it.
On some pictures is noticeable but on some picture those bf-109s looks smooth, no rivets at all.
What do you think about it ?
Should I use the riveter or not ...?

Kobenhavn, Denmark
Joined: April 13, 2007
KitMaker: 44 posts
AeroScale: 30 posts
Posted: Wednesday, October 06, 2010 - 12:01 PM UTC
Florida, United States
Joined: December 31, 2009
KitMaker: 399 posts
AeroScale: 132 posts
Posted: Thursday, October 07, 2010 - 01:24 AM UTC
I recently picked up this kit at my lhs so I will be following your progress. I was VERY impressed at the level of detail included with this model.
Too little time, too many models to build..........
Kobenhavn, Denmark
Joined: April 13, 2007
KitMaker: 44 posts
AeroScale: 30 posts
Posted: Saturday, October 09, 2010 - 11:37 AM UTC
Texas, United States
Joined: June 29, 2010
KitMaker: 5,854 posts
AeroScale: 372 posts
Posted: Saturday, October 09, 2010 - 02:16 PM UTC
Miklos, are you preshading with a paintbrush, or with an airbrush?
Kobenhavn, Denmark
Joined: April 13, 2007
KitMaker: 44 posts
AeroScale: 30 posts
Posted: Wednesday, October 13, 2010 - 12:13 PM UTC
Quoted Text
Miklos, are you preshading with a paintbrush, or with an airbrush?
The preshading is with an airbrush, mostly with balck color. Than the base color, drybrush and some dark oil in deeper areas.
Yesterday I've got the decals from Squadron and today the Tamiya Kubelwagen with 2 pilots.


Kobenhavn, Denmark
Joined: April 13, 2007
KitMaker: 44 posts
AeroScale: 30 posts
Posted: Wednesday, October 13, 2010 - 02:40 PM UTC
I was excited about this kit to see how it looks assembled, so I started to build and now it's done (ready to paint).
I'm in trouble because I have no idea about the color. It should be gray, but I don't have the large decal in white for left door. It's only in black.
In 1942 a Kubel could be painted in Yellow or Yellow with Brown Green camo ?


Kobenhavn, Denmark
Joined: April 13, 2007
KitMaker: 44 posts
AeroScale: 30 posts
Posted: Wednesday, October 20, 2010 - 03:05 PM UTC
Slovakia
Joined: October 15, 2010
KitMaker: 825 posts
AeroScale: 476 posts
Posted: Wednesday, October 20, 2010 - 08:58 PM UTC
It looks great, especialy the cockpit is realy nice. After seen your pictures, the need for an Me-109F in my cabinet is growing stronger every day. Gues I will have to pick up one of them.
As for the VW, I dont think that all of them had the white technical data on the doors.
Rigas, Latvia
Joined: July 04, 2007
KitMaker: 268 posts
AeroScale: 245 posts
Posted: Friday, October 22, 2010 - 03:07 AM UTC
Really nice looking Fridrich! I really like the repositioned surfaces - bringing more life to the finished model. Looking forward to see the progress


 ,
,