


Early Aviation
Discuss World War I and the early years of aviation thru 1934.
Discuss World War I and the early years of aviation thru 1934.
Hosted by Jim Starkweather
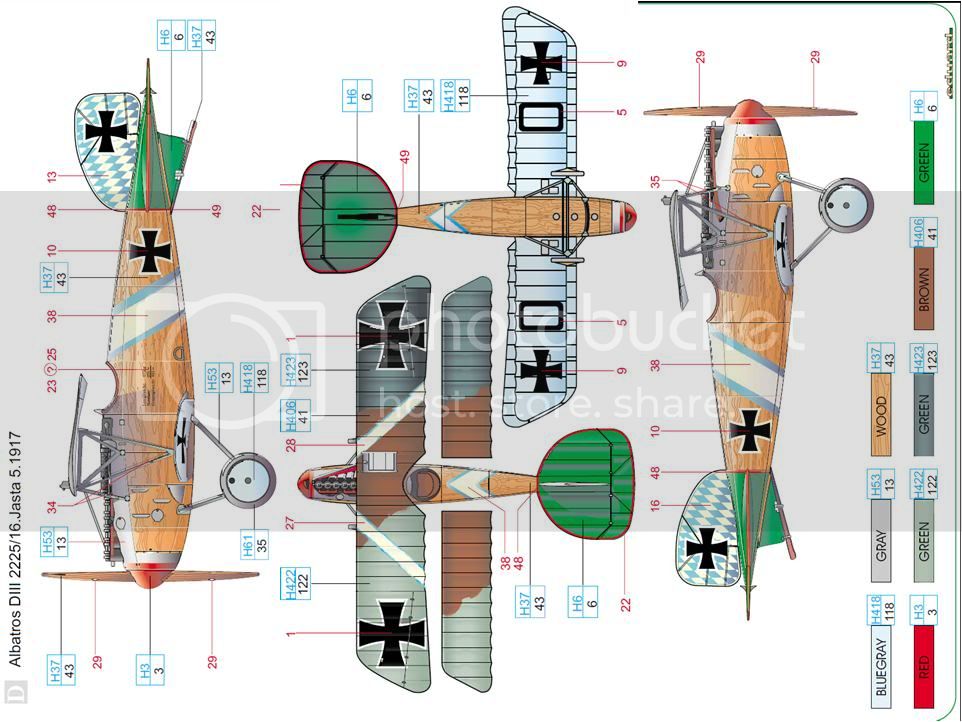
WNW 1:32 Albatros D.Va

thegirl

Joined: January 19, 2008
KitMaker: 6,743 posts
AeroScale: 6,151 posts
Posted: Thursday, December 16, 2010 - 04:25 AM UTC
Very nicely done Edo ! You really have your heart in this project , looking forward to the next up-date

edoardo

Joined: November 30, 2007
KitMaker: 642 posts
AeroScale: 382 posts
Posted: Friday, January 14, 2011 - 01:32 AM UTC
Hallo friends! 
I hope the new year started well for you all!
Thank you all for the kind worlds: as usual you are much more than kind!
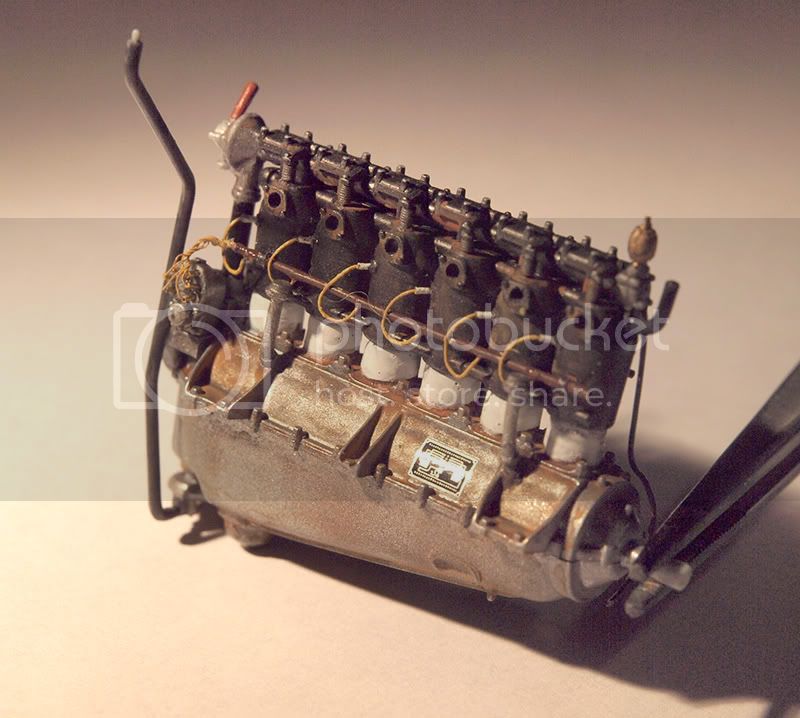
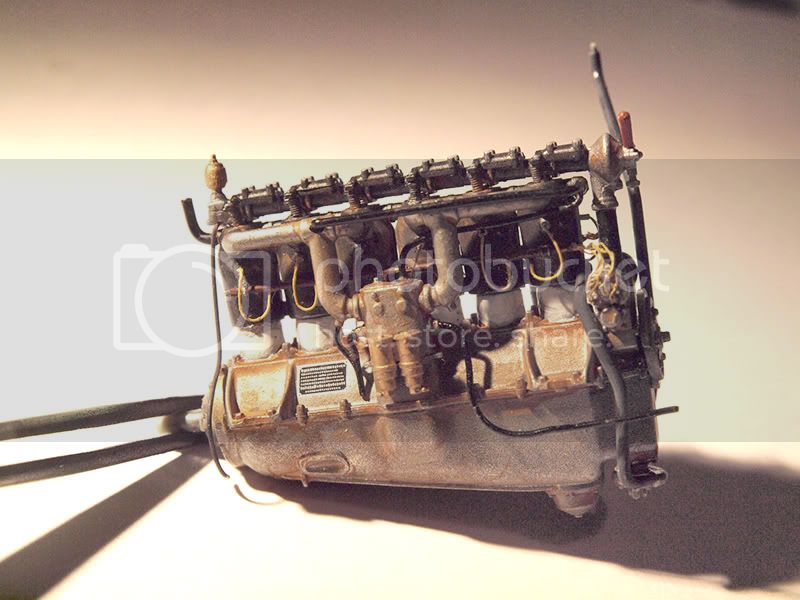
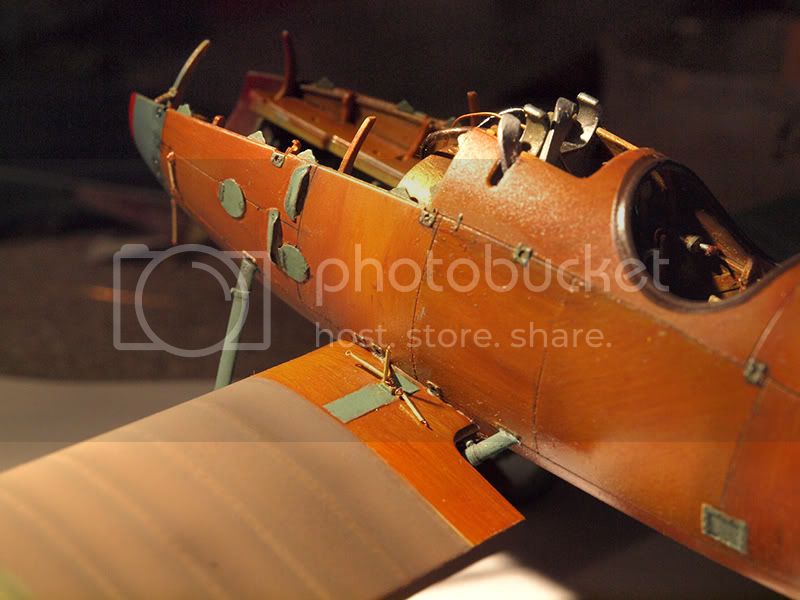
I have some new picture to share: first a couple of shots of the finished engine:
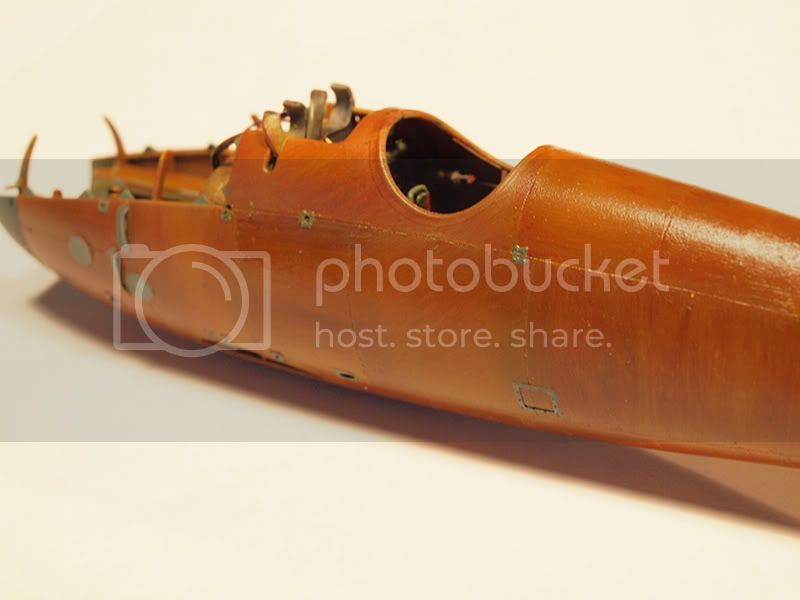
Then the fusolage. It is still unfinished but hou can see my effort on the wood grain. I first spryed a coat of very light cream-like acrilic paint, then I masked off each panel and painted it one by one appliing the wood grain with oils (sienna raw, ocre red and yellow, and a bit of raw umber - but just a touch or two as it is very dark). Lastly I applied a coat of acrilic clear yellow or clear orange.
To tell the truth I enjoyed evry single step of the process, working on a bigger canvas than 1:48 lets you work with a more easygoing approach. I find the final result tourned out a bit too on the dark side, but I do like it anyway.
Here is some sample:

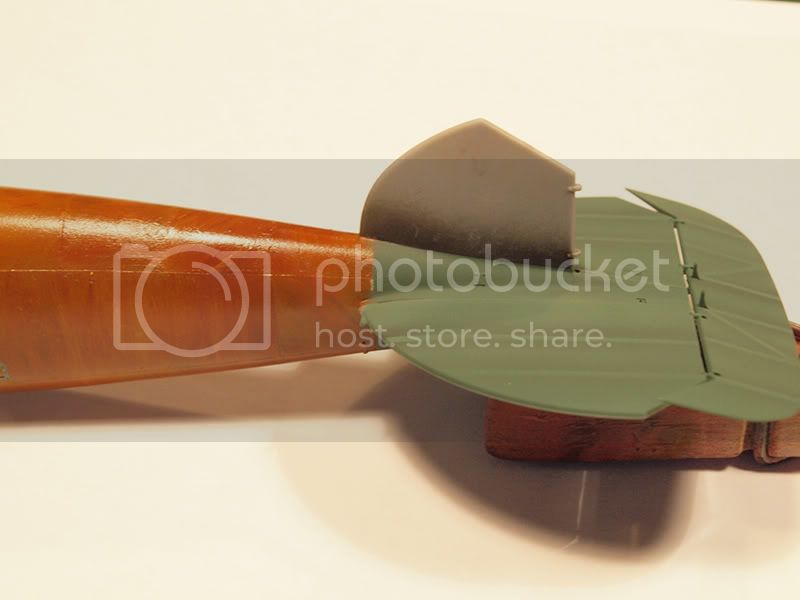
In this last picture you can see also my first attempt to the tail painting. As I was not convinced from the green, I have re done it since then, but you'll have to wait the next update to see the outcome
This is all for now
Ciao
Edo
I hope the new year started well for you all!
Thank you all for the kind worlds: as usual you are much more than kind!
I have some new picture to share: first a couple of shots of the finished engine:
Then the fusolage. It is still unfinished but hou can see my effort on the wood grain. I first spryed a coat of very light cream-like acrilic paint, then I masked off each panel and painted it one by one appliing the wood grain with oils (sienna raw, ocre red and yellow, and a bit of raw umber - but just a touch or two as it is very dark). Lastly I applied a coat of acrilic clear yellow or clear orange.
To tell the truth I enjoyed evry single step of the process, working on a bigger canvas than 1:48 lets you work with a more easygoing approach. I find the final result tourned out a bit too on the dark side, but I do like it anyway.
Here is some sample:
In this last picture you can see also my first attempt to the tail painting. As I was not convinced from the green, I have re done it since then, but you'll have to wait the next update to see the outcome
This is all for now
Ciao
Edo
thegirl
Joined: January 19, 2008
KitMaker: 6,743 posts
AeroScale: 6,151 posts
Posted: Sunday, January 16, 2011 - 03:11 AM UTC
Nice little up date
edoardo
Joined: November 30, 2007
KitMaker: 642 posts
AeroScale: 382 posts
Posted: Friday, January 21, 2011 - 05:21 AM UTC
Hi friends!
Thank you Terri for the nice worlds!
Being inspired by the wonderful work by Brad Cancian, but aiming a little lower, I opted for this skeme for my Albi (I know it is of a D.III... but l'et's call it artistic licence... )
)
The masking job has been tedious, but I am satisfied with the results
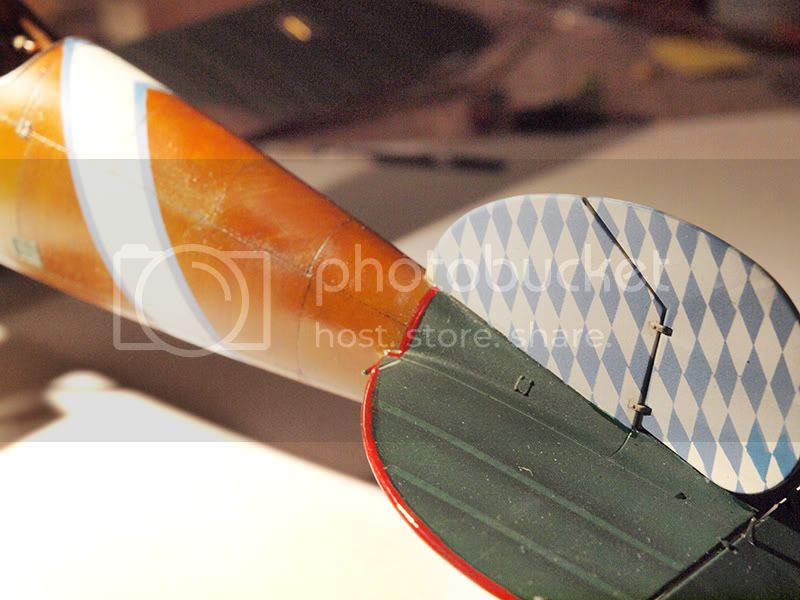
Also, the green of the tail has been redone, now it is much more greener (not sure if in the picture is clearly visible though...)
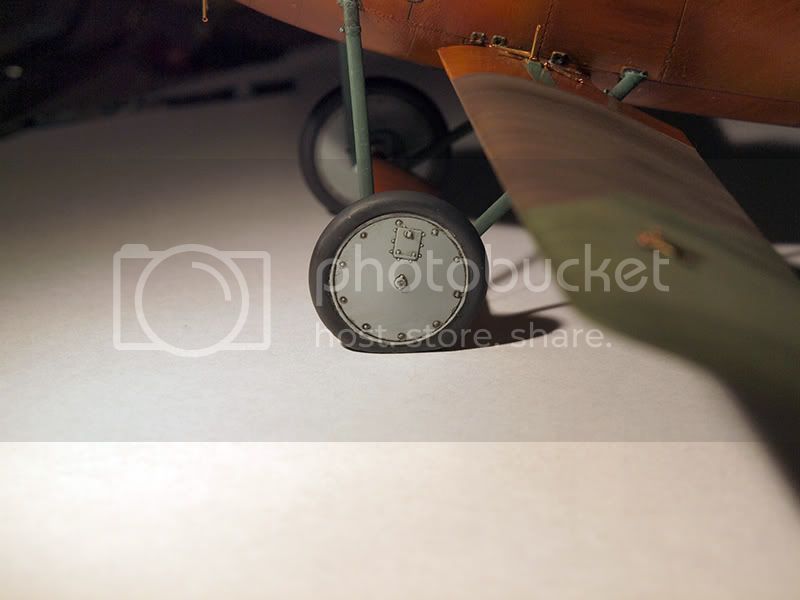
I fitted the lower wings next:
and the undercarriage which i tried to weight with uncertain results...
That is all for now!
hope you like it
ciao
edo
Thank you Terri for the nice worlds!
Being inspired by the wonderful work by Brad Cancian, but aiming a little lower, I opted for this skeme for my Albi (I know it is of a D.III... but l'et's call it artistic licence...
)The masking job has been tedious, but I am satisfied with the results
Also, the green of the tail has been redone, now it is much more greener (not sure if in the picture is clearly visible though...)
I fitted the lower wings next:
and the undercarriage which i tried to weight with uncertain results...
That is all for now!
hope you like it
ciao
edo

wombat58

Joined: March 26, 2009
KitMaker: 366 posts
AeroScale: 309 posts
Posted: Saturday, January 22, 2011 - 11:36 PM UTC
Hi Edo,
I just went through your build and I must say very impressive my friend. I like very much what you did with the engine, a very realistic result, your rust technique is something I have taken note of. The interior looks super, well detailed and beautifully painted. The fuselage wood grain has turned out excellent, a really nice colour. Overall, a credit to you Edo, you have so far achieved an incredible result, I'm looking forward to seeing the wings on and your rigging.
Des.
www.ww1aircraftmodels.com


JackFlash

Joined: January 25, 2004
KitMaker: 11,669 posts
AeroScale: 11,011 posts
Posted: Sunday, January 23, 2011 - 12:01 AM UTC
So far so good Edo. As Des and the others have pointed out your details are very impressive.

OEFFAG_153

Joined: February 19, 2010
KitMaker: 1,473 posts
AeroScale: 1,450 posts

Posted: Sunday, January 23, 2011 - 08:58 AM UTC
Very, very nice Edo I like that tone of wood and varnish you've got going there.
Best Regards
Mikael
I like that tone of wood and varnish you've got going there. Best Regards
Mikael
edoardo
Joined: November 30, 2007
KitMaker: 642 posts
AeroScale: 382 posts
Posted: Sunday, January 23, 2011 - 09:07 PM UTC
Hi guys!
Stephen, Mikael: thank you for the nice comments!
Des, my friend, you've been mch more than kind!
by the way: I encounter some problems in viewing the pics in my post (via iPad, to tell the truth) is it all right with you?
Thank you again
ciao
Edo
Stephen, Mikael: thank you for the nice comments!
Des, my friend, you've been mch more than kind!
by the way: I encounter some problems in viewing the pics in my post (via iPad, to tell the truth) is it all right with you?
Thank you again
ciao
Edo
thegirl
Joined: January 19, 2008
KitMaker: 6,743 posts
AeroScale: 6,151 posts
Posted: Monday, January 24, 2011 - 11:48 PM UTC
No trouble here Edo , she is looking very fine indeed !

CaptainA
Joined: May 14, 2007
KitMaker: 3,117 posts
AeroScale: 2,270 posts
Posted: Tuesday, January 25, 2011 - 01:49 AM UTC
Edo, you have a very, very fine build going on there. It looks great. I am doing the same profile using the Roden Kit, but my tail does not look as good as yours does. I think I am going to need to get my tail in gear and redo my tail. 
What are you going to do for the GB 2011?
What are you going to do for the GB 2011?

edoardo
Joined: November 30, 2007
KitMaker: 642 posts
AeroScale: 382 posts
Posted: Tuesday, January 25, 2011 - 11:45 PM UTC
Hi Carl!
Thank you, mate!
To tell the truth the .... mmmm.... how do you call those shapes in English? in Italian they are called 'losenge' (!)....
I printed some 'losenge' from my PC, placed the Tamyia tape on them and cut following the lines, this way I got *almost* consistent shapes. Problem was I started placing them from the center of the tail where the shape of the rudder made it easyer to get the alignment right but then they do not meet correctly at the edge of the tail, which I fear is not correct, so be careful there....
If you want I can send you the file I used as pattern (but how to upload a file?)
Do you already have some pics of your build?
As for the group build I am still undecided: just a couple of days ago arrived the LVG from WNW but I have also an Albatross from Eduard in the stash which I'd like to build... what about you?
ciao
Edo
guitarlute101
Joined: December 18, 2006
KitMaker: 1,121 posts
AeroScale: 1,063 posts
Posted: Wednesday, January 26, 2011 - 12:37 AM UTC
Fantastic work Edo. The wing and tail post-shading turned out nicely.
Mark

lcarroll
Joined: July 26, 2010
KitMaker: 1,032 posts
AeroScale: 1,025 posts
Posted: Wednesday, January 26, 2011 - 04:44 AM UTC
Edo,
I have been following your build from the start and add my compliments on spectacular results so far.
I am presently (and too slowly) working on the Roden DIII and have completed the engine.............how did you manage to reproduce the wiring harness where it joins the distributers? I found it very difficult and may rip them off and try again if you have a method I can follow.
I used very fine copper wire with a coat of Modelmaster Radome Tan to provide the used/faded insulation appearance and bulk on the wiring............am very happy with the results however my distributer portion looks like a bundle of wires as opposed to the neat wiring job as you have reproduced.
Looking forward to more as you complete this beauty! Very impressive detail; you are a truly a master craftsman!
Cheers,
edoardo
Joined: November 30, 2007
KitMaker: 642 posts
AeroScale: 382 posts
Posted: Wednesday, January 26, 2011 - 08:50 PM UTC
Hi Lance!
You do me honour, sir!
What I did is the following (sorry for my poor English, but I lack a lot of 'technical' vocaboulary, I hope I could get me understood anyway):
1- sand the magnetos' bolt flat
2- drill fine holes in it in place of the bolts
3- in each hole insert a small brass pipe (I use 0,4 mm brass pipe, lenght is not an issue as you can adjust it while you fit it)
4- now a fine copper wire can be easily inserted into the pipe (be careful not to use too much superglue when you glue the pipe to the magneto or the pipe itself will clog and the wire will not pass throu)
I replaced also the distribution pipe (the pipe from which the single wires to the candels depart) with a brass one (this time 0,6 mm) in this way it was easy to fit the 6 wires from the magnetos in it.
In previous attempts I used the rubber cover of a copper wire which is easy also to punch to make a hole throu which the wire to the candel can be fitted (buti it is difficult to make it straight...).
I hope this helps, but if you want to see a real master's work, do have a look at what Des Delatorre did (both here and in his own website): you'll find a lot of inspiration and insight on how to superdetail an engine!
Ciao
Edo
CaptainA
Joined: May 14, 2007
KitMaker: 3,117 posts
AeroScale: 2,270 posts
Posted: Thursday, January 27, 2011 - 06:17 AM UTC
I will post some pics of my build later next week. My back is still hurting, so I cant stay in my chair more than about an hour a day, Also, my work desk is kind of full and not ready for photos yet. Thanks for the offer but I will cut my stencils. The first ones I did were good, but slightly large. I used some old paint that didn't work well. I got new paint and I will strip the old tail later this week.
In english, those things have many names. I have heard them called diamonds, even though they are not diamond shaped. Lozenge. Parallelograms. Wappenschild.
As for my build. I think I am going to suprise a few people and do another Albatros or two. I might even do a bonus build of a Gotha. My son ordered one for me that was lost in the mail. So he ordered another one. I think there is a good possibility that there are two Gothas about to land at Casa Albatros.
CaptainA
Joined: May 14, 2007
KitMaker: 3,117 posts
AeroScale: 2,270 posts
Posted: Thursday, January 27, 2011 - 06:38 AM UTC
I forgot to post this on my last post. I think you have time to do both the albatros and the LVG. I have done both and I loved both of them.
I personally would love to see you do the LVG. I would have to say it is the best kit I ever built. I liked it so much, I bought another LVG as soon as I finished the first one.
I personally would love to see you do the LVG. I would have to say it is the best kit I ever built. I liked it so much, I bought another LVG as soon as I finished the first one.
lcarroll
Joined: July 26, 2010
KitMaker: 1,032 posts
AeroScale: 1,025 posts
Posted: Friday, January 28, 2011 - 08:27 AM UTC
Quoted Text
Hi Lance!
You do me honour, sir!
What I did is the following (sorry for my poor English, but I lack a lot of 'technical' vocaboulary, I hope I could get me understood anyway):
1- sand the magnetos' bolt flat
2- drill fine holes in it in place of the bolts
3- in each hole insert a small brass pipe (I use 0,4 mm brass pipe, lenght is not an issue as you can adjust it while you fit it)
4- now a fine copper wire can be easily inserted into the pipe (be careful not to use too much superglue when you glue the pipe to the magneto or the pipe itself will clog and the wire will not pass throu)
I replaced also the distribution pipe (the pipe from which the single wires to the candels depart) with a brass one (this time 0,6 mm) in this way it was easy to fit the 6 wires from the magnetos in it.
In previous attempts I used the rubber cover of a copper wire which is easy also to punch to make a hole throu which the wire to the candel can be fitted (buti it is difficult to make it straight...).
I hope this helps, but if you want to see a real master's work, do have a look at what Des Delatorre did (both here and in his own website): you'll find a lot of inspiration and insight on how to superdetail an engine!
Ciao
Edo
Edo,
Thanks for sharing your techniques, it's not too late so I'll try the brass tubing approach. I've viewed some of Des's stuff; his results are very spectacular as well.
By the way, it is the quality of your work that does you the honor. I'll be following this one for sure.
Also, your English is a heck of a lot better then my Italian! I studied Latin too long ago and that's rather outdated!
Cheers,
Lance
edoardo
Joined: November 30, 2007
KitMaker: 642 posts
AeroScale: 382 posts
Posted: Sunday, January 30, 2011 - 08:52 PM UTC
Hi Lance!
Glad to be of use!
Are you going to make a blog of your build?
ciao
Edo
Glad to be of use!
Are you going to make a blog of your build?
ciao
Edo
lcarroll
Joined: July 26, 2010
KitMaker: 1,032 posts
AeroScale: 1,025 posts
Posted: Monday, January 31, 2011 - 03:02 PM UTC
Quoted Text
Hi Lance!
Glad to be of use!
Are you going to make a blog of your build?
ciao
Edo
Edo,
I hope to do so...... I have taken what I hope are passable photos along the (slow!) way and will need to master the computer "smarts" to put that together. Right now I'm stalled out as I am wrapping up a busy Winter work schedule before fully retiring in the Spring when I hope to devote a lot more time to the hobby and start to enjoy it to the fullest.
I have completed the engine, cockpit and instruments, and inside fuselage components to about the 80% stage. Trouble is just when I think I'm happy with the results, I see something on this site I want to add....so much talent and information here.
Keep your eyes open for something in the April time frame.........Roden's DIII (early) in Berthold's markings is the final finish plan at this point.
Cheers

Emilio_Lizardo
Joined: November 10, 2009
KitMaker: 27 posts
AeroScale: 26 posts

Posted: Wednesday, February 02, 2011 - 09:02 AM UTC
What is the guage of wire you used for the ignition lines?
edoardo
Joined: November 30, 2007
KitMaker: 642 posts
AeroScale: 382 posts
Posted: Wednesday, February 02, 2011 - 09:06 PM UTC
Hi David,
I really don't know. I usually use 2 gauges:
from the magnetoes to the distribution line I used the smallest I could get (about 0,1 mm I guess) that comes from telephone wires.
From the distribution lines to the candles I used a thiker one stripped from multicable electical wire. I think this one is about 0,2 mm.
Hope this helps...
ciao
Edo
edoardo
Joined: November 30, 2007
KitMaker: 642 posts
AeroScale: 382 posts
Posted: Wednesday, February 02, 2011 - 09:16 PM UTC
By the way...
I am apllaying the decals right now, and they are very shiny... and to me this is a too sharp a contrast withe matt finish of the wings....
what do you do? do you let them as is or do you turn them down? and if you turn them down, how you do that?

Thank you
Edo
I am apllaying the decals right now, and they are very shiny... and to me this is a too sharp a contrast withe matt finish of the wings....
what do you do? do you let them as is or do you turn them down? and if you turn them down, how you do that?
Thank you
Edo

Kornbeef

Joined: November 06, 2005
KitMaker: 1,667 posts
AeroScale: 1,551 posts

Posted: Wednesday, February 02, 2011 - 10:42 PM UTC
Edo,
Hi there, lovely work by the way,
Personally I would let the decals dry thoroughly, a day or two at least them seal them in with a flat/satin varnish/laquer. I can't recommend which but I'm sure everyone has their own choice, I used Citadel with good results but NOT the aerosol variety it attacked my 1:48 Dr.I paint, so much for quick and easy. I'm sure some one Europe side will have a good choice though.
Keith.
lcarroll
Joined: July 26, 2010
KitMaker: 1,032 posts
AeroScale: 1,025 posts
Posted: Thursday, February 03, 2011 - 05:53 AM UTC
[quote]Edo,
Hi there, lovely work by the way,
Personally I would let the decals dry thoroughly, a day or two at least them seal them in with a flat/satin varnish/laquer. I can't recommend which but I'm sure everyone has their own choice, I used Citadel with good results but NOT the aerosol variety it attacked my 1:48 Dr.I paint, so much for quick and easy. I'm sure some one Europe side will have a good choice though.
Edo,
I've had good success in the past with an overall final coat of Micro Satin; also Modelmaster Clear Satin Finish #50159 mixed 50/50 with their #50499 Thinner. 8-10 years later it still looks great and no discoloration, fading, or cracking. I assume their glossier version, or a mix to adjust the sheen up or down would work just as well.
I have an Eduard D VIII with Microscale Lozenge that was really old and really nasty to work with. Microscale Gloss (enamel) on the Wings, cowling, and forward deck with the remainder in their Clear Satin Finish(acrylic) Both not only sealed the lozenge but has stood the test of time very well.
Hope this is helpful.
Cheers
edoardo
Joined: November 30, 2007
KitMaker: 642 posts
AeroScale: 382 posts
Posted: Sunday, February 13, 2011 - 10:58 PM UTC
Hi all!
My Albie is in the fast lane to be finished, but I have a problem.
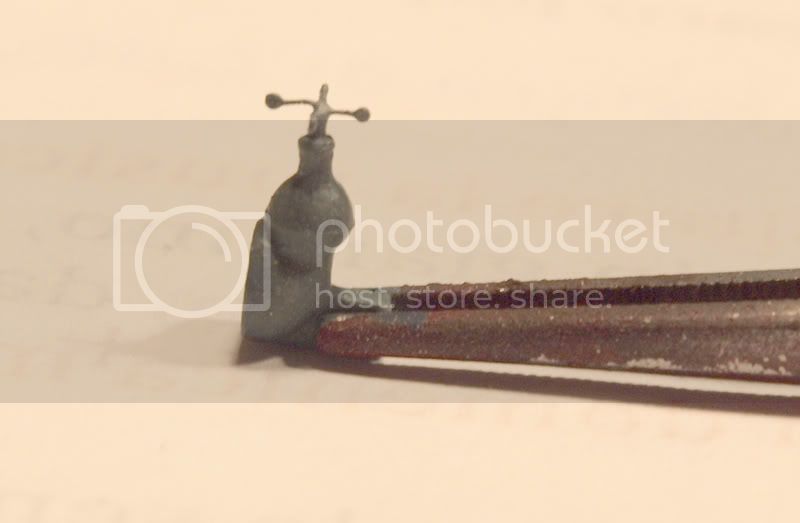
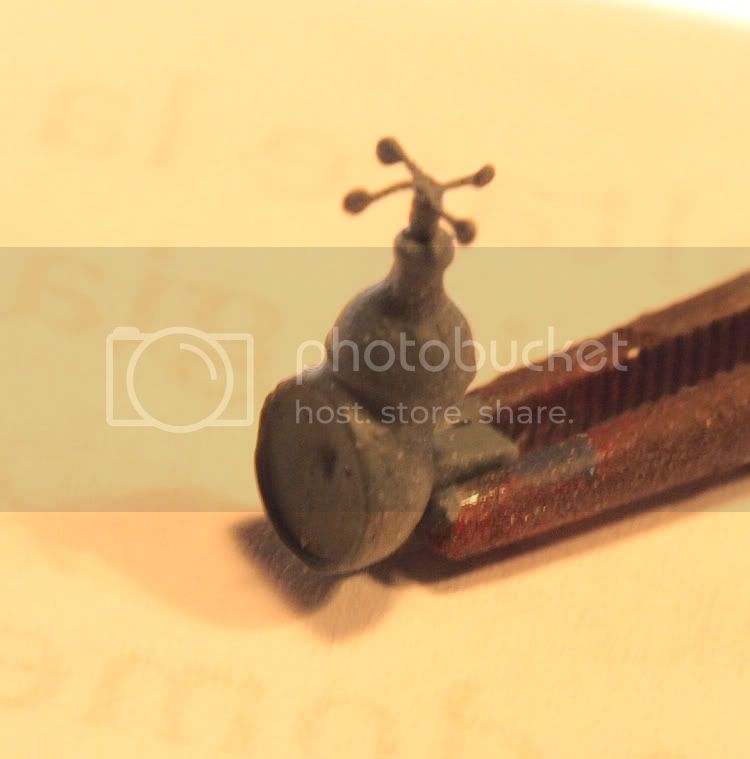
the anemometre has been ... ehm erm . . . crushed in the process, in excusation it is a real tiny and fragile piece. . . Anyway, I replaced it with a new one scrachbuilted in copper wire... my problem is: would you buy it? Is it convincing enough, or it is better just to leave it off? Any comment, as usual very velcome!! Here it s. . .
ciao
Edo
My Albie is in the fast lane to be finished, but I have a problem.
the anemometre has been ... ehm
erm . . . crushed in the process, in excusation it is a real tiny and fragile piece. . . Anyway, I replaced it with a new one scrachbuilted in copper wire... my problem is: would you buy it? Is it convincing enough, or it is better just to leave it off? Any comment, as usual very velcome!! Here it s. . .ciao
Edo
 |

WEB HOSTING BY


Copyright ©2021 AeroScale and Kitmaker Network, a subsidiary of Silver Star Enterprises
All Rights Reserved. Please read our Conditions of Use and Privacy Policy.
All Rights Reserved. Please read our Conditions of Use and Privacy Policy.