Early Aviation
Discuss World War I and the early years of aviation thru 1934.
Roden 1:32 DH 2 My first real stringbag
OEFFAG_153
_VISITCOMMUNITY
Västra Götaland, Sweden
Joined: February 19, 2010
KitMaker: 1,473 posts
AeroScale: 1,450 posts
Posted: Saturday, January 01, 2011 - 07:29 AM UTC

Quoted Text

Looking increasingly impressive Mikael, Pheons seat looks the business I must say too.

Excellent work so far, just as a thought though
(you know me and my thoughts )
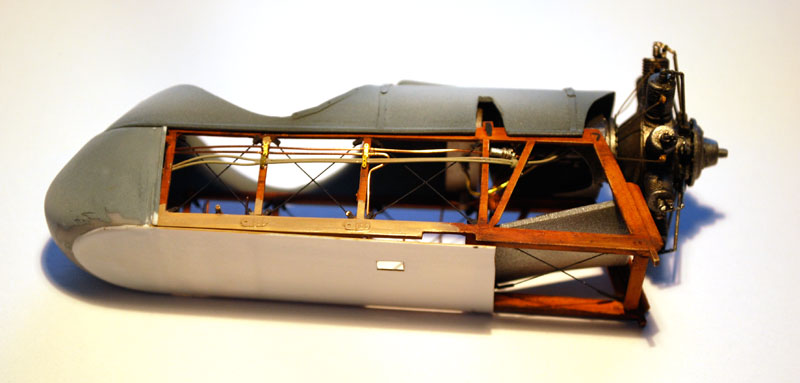
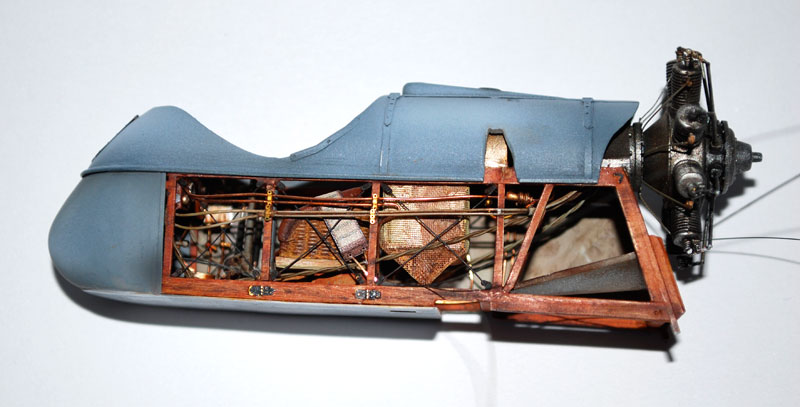
The floor/underside, dont forget in scale it will be very thin if you intend to show a side uncovered, I just noticed the thickness in the first set of pics posted.

I'm sure though you have taken that into consideration.

Beautiful work again
K


Keith – I always do find your thoughts very thought provoking

This particular thought has been bothering me a bit lately, but I think I have thoght of a way of how to solve this – (although I find myself in that place where – if I tinker in one end, It'll have some reprecusions in a few other ends...) I'll post something on this once I've cracked it for sure...

Also Thank You for your kind comments and a very Happy New Modelling Year 2011 to you!

Mikael
Kornbeef
_VISITCOMMUNITY
England - South East, United Kingdom
Joined: November 06, 2005
KitMaker: 1,667 posts
AeroScale: 1,551 posts
Posted: Saturday, January 01, 2011 - 08:02 AM UTC
OEFFAG_153
_VISITCOMMUNITY
Västra Götaland, Sweden
Joined: February 19, 2010
KitMaker: 1,473 posts
AeroScale: 1,450 posts
Posted: Tuesday, January 04, 2011 - 02:09 AM UTC
Right – after Keith confirmed my own nagging thoughts there really was no return – I had to do something to amend the scale thickness of the flooring to the narcelle.

As Keith pointed out, if (and I do) you want to leave one side of the narcelle uncovered a (in real life) 15cm thick floor would be a very visible feature that would spoil the overall effect...

At first though I had no easy nor quick fix to this problem. No matter of how I turned it around in my head any fix had many reprecussions further down the line.

After due consideration I figured the best way would be to amned the frame, making it deeper. Here's how it looks with a base coat of paint, together with some of the fuel pipes and cords...


As you can see the depth of the lower spar is probably a bit too great (it was a bit too thin originally).

Making a new frame would have been possible, but I also had to have a way to fasten the lower wings into the frame, so the difference would not have been that great in terms of the depth. Also I think this is easier to "buy" than a too thick floor...

As a bonus I'm now able to open up the lower hatch – Thanks Keith

Oh – and I've now painted the oils, and the repair now looks pretty invisible, and better in scale!

Any and all comments are most welcome

Regards

Mikael
Kornbeef
_VISITCOMMUNITY
England - South East, United Kingdom
Joined: November 06, 2005
KitMaker: 1,667 posts
AeroScale: 1,551 posts
Posted: Tuesday, January 04, 2011 - 02:23 AM UTC
I'm guiltily happy you did this, glad it wasnt too labour intensive too. I'm glad I pointed it out now rather than let you plod on then say too

Excellently done as expected though and looking more impressive as each update comes.

Keith
Mgunns
_VISITCOMMUNITY
Arizona, United States
Joined: December 12, 2008
KitMaker: 1,423 posts
AeroScale: 1,319 posts
Posted: Tuesday, January 04, 2011 - 04:00 AM UTC

Quoted Text

Thank You Mark – all my best wishes for 2011 (Oh and I'm hoping to see some pics form your Ninak build )


Hi Mikael:

I have been carrying my gear between my house in Wisconsin and my wife's in Minnesota. I will be taking some pictures and posting them. I have most of the interior done and moving on to the engine. I build mostly OOB so nothing spectacular, but it is an enjoyable build to this point.

I like what you are doing here, and will be following it as I will be tackling this kit one of these days.

Best

Mark
dmopath
_VISITCOMMUNITY
Kentucky, United States
Joined: July 02, 2010
KitMaker: 175 posts
AeroScale: 174 posts
Posted: Tuesday, January 04, 2011 - 09:01 AM UTC
It's coming along most excellently to my eye. I really like that wicker seat. I have the Eduard photoetch but the Pheon seat is much better. I'll have to get my hands on one (or more).
OEFFAG_153
_VISITCOMMUNITY
Västra Götaland, Sweden
Joined: February 19, 2010
KitMaker: 1,473 posts
AeroScale: 1,450 posts
Posted: Saturday, January 08, 2011 - 07:42 AM UTC

Quoted Text

I'm guiltily happy you did this, glad it wasnt too labour intensive too. I'm glad I pointed it out now rather than let you plod on then say too

Excellently done as expected though and looking more impressive as each update comes.

Keith


You don' have to feel guilty at all  – I very happy you pushed me into action on this one  – and Thank You for your kind comment!

Mikael
OEFFAG_153
_VISITCOMMUNITY
Västra Götaland, Sweden
Joined: February 19, 2010
KitMaker: 1,473 posts
AeroScale: 1,450 posts
Posted: Saturday, January 08, 2011 - 07:45 AM UTC

Quoted Text

I have been carrying my gear between my house in Wisconsin and my wife's in Minnesota. I will be taking some pictures and posting them. I have most of the interior done and moving on to the engine. I build mostly OOB so nothing spectacular, but it is an enjoyable build to this point.

I like what you are doing here, and will be following it as I will be tackling this kit one of these days.

Best

Mark


Thank You Mark  –I'm sure you'll enjoy this kit as well – it is so far very fun to do – but, rigging has not begun as yet

Mikael
OEFFAG_153
_VISITCOMMUNITY
Västra Götaland, Sweden
Joined: February 19, 2010
KitMaker: 1,473 posts
AeroScale: 1,450 posts
Posted: Saturday, January 08, 2011 - 07:49 AM UTC

Quoted Text

It's coming along most excellently to my eye. I really like that wicker seat. I have the Eduard photoetch but the Pheon seat is much better. I'll have to get my hands on one (or more).


Thank You so much Dennis. Yes that seat is very nice indeed – If you get more than one, and plan to use them on other builds than the DH2 though – check your references. Not all wicker seats were the same

Kind Regards

Mikael
OEFFAG_153
_VISITCOMMUNITY
Västra Götaland, Sweden
Joined: February 19, 2010
KitMaker: 1,473 posts
AeroScale: 1,450 posts
Posted: Thursday, January 20, 2011 - 01:09 AM UTC
Hi All,

I've been a bit absent from here lately (althogh I do peek in now and again) Mostly to do with the fact that I'm getting busy serching for new employment. But building has not been at a standtill either – and I've been concentrating on my DH2, leaving the started Nieuports a bit on the backburner.

I'm also hoping that the Hansa I ordered round X-mas is winding its way over here (though I have not had a shippment notice from WNW as yet?). I am planning to build this one as a small vignette by the sea, after some nice images I saw from the Zeebrugge station... But thats another story

The project in hand is coming along – the narcelle is more or less finished. It needs some more filing and filling on the outside, also mating it to the lower wing.

I had a lot of fun connecting all the fuel lines and wires inboard, creating a pretty busy inside look that I was after, with one of the sides removed...

Here are some pics of where I am at the momnet:


Everything internally in place and the lower bit of the outer shell in place. I dressed the lower part of the fueltank in a teabag (tip via Larsa I think) to simulate the canvas safety bag. It may have ended lookin a bit too loose – but I think it's OK...


The Linnen side – CDL on one side, with some staining towards the engine, and PC 10 on the outerside. In the end I used aluminium tape (for insulating heatducts) that I taped onto plain food foil. This gave a good base that was a bit thinner than led from a wine bottle – but behaved in a similar manner so to speak. I used all sorts of tools to get the folds and creases. The lacing is from Eduards etchset, which came in very handy here.


All together now....


The pre-printed dials from the Eduard set were pretty poor looking, and out of register – so I ended up using some decals from the spares box for much of the intruments instead.


Lower wings. I did some masking of the ribtapes after basepainting, then oversprayed with a darker tone. Not to show so much interior structure, but rather to show the subtle variation of the ribtapes, catching highlights on the upperside and the overlaying effect on the lower.


Well that's it for the time beeing – next job will be to mate the narcelle with the wings, then some filling, and final coats of paint – then we're almost at the rigging stage of this bird Ah Oh...

As usual any and all comments and hints are most welcome.

Thank You for looking!

Mikael
edoardo
_VISITCOMMUNITY
Milano, Italy
Joined: November 30, 2007
KitMaker: 642 posts
AeroScale: 382 posts
Posted: Thursday, January 20, 2011 - 01:35 AM UTC
Hey Mikael!
This is really coming along very well!
A Real good job!

ciao
Edo
JackFlash
_VISITCOMMUNITY
Colorado, United States
Joined: January 25, 2004
KitMaker: 11,669 posts
AeroScale: 11,011 posts
Posted: Thursday, January 20, 2011 - 12:59 PM UTC
You are steaming along Michael!

Come to think of it I remember seeing a bit about some general repairs they had to do to the DH 2 types. It involved the lower longeron and the landing gear forward leg socket there. If I can find the drawing and article (C&C Intl?) I'll post it for you.

Respects to a steely eyed model builder!
thegirl
_VISITCOMMUNITY
Alberta, Canada
Joined: January 19, 2008
KitMaker: 6,743 posts
AeroScale: 6,151 posts
Posted: Thursday, January 20, 2011 - 01:14 PM UTC
Excellent up-date Mikael !

You are coming along very well with this build and the attention to the details is outstanding . But I just can't help it though , in reguards to the wash on the seat around the buttons seems to be a little over done . For some reason it doesn't look right , then again it could be just me ..........

Looking forward to the next up-date
OEFFAG_153
_VISITCOMMUNITY
Västra Götaland, Sweden
Joined: February 19, 2010
KitMaker: 1,473 posts
AeroScale: 1,450 posts
Posted: Thursday, January 20, 2011 - 08:38 PM UTC

Quoted Text

You are steaming along Michael!

Come to think of it I remember seeing a bit about some general repairs they had to do to the DH 2 types. It involved the lower longeron and the landing gear forward leg socket there. If I can find the drawing and article (C&C Intl?) I'll post it for you.

Respects to a steely eyed model builder!


Thank You very much for your kind comments Stephen – they sure do mean a lot to me

That article on the DH 2 sounds very interesting, if you can find it and post it – that would be very apreciated indeed

Best Regards

Mikael
OEFFAG_153
_VISITCOMMUNITY
Västra Götaland, Sweden
Joined: February 19, 2010
KitMaker: 1,473 posts
AeroScale: 1,450 posts
Posted: Thursday, January 20, 2011 - 08:48 PM UTC

Quoted Text

Hey Mikael!
This is really coming along very well!
A Real good job!

ciao
Edo


Thank You so much Edo


Quoted Text

Excellent up-date Mikael !

You are coming along very well with this build and the attention to the details is outstanding . But I just can't help it though , in reguards to the wash on the seat around the buttons seems to be a little over done . For some reason it doesn't look right , then again it could be just me ..........

Looking forward to the next up-date


Thank You Terri for your very kind comments

In regards to the seat I think you're right – it does look a bit much – but in all fairness – the camera enhances the effect somewhat compared to the live item so to speak


My next Job will be to attach the lower wing – which was made a hole lot more difficult by an accident, where the thinned down centre section broke in half

I spent last night drilling in some pins in an effort to strenghten the "new" attachment points – We'll see how this will go, I need to get it the right angle (not one of my strongpoints I'm afraid), and also strong enough to be able to take some handling.

My best regards to you all

Mikael
JackFlash
_VISITCOMMUNITY
Colorado, United States
Joined: January 25, 2004
KitMaker: 11,669 posts
AeroScale: 11,011 posts
Posted: Thursday, January 20, 2011 - 11:07 PM UTC

Quoted Text

You are steaming along Michael!

Come to think of it I remember seeing a bit about some general repairs they had to do to the DH 2 types. It involved the lower longeron and the landing gear forward leg socket there. If I can find the drawing and article (C&C Intl?) I'll post it for you.

Respects to a steely eyed model builder!


Here it is;


This is from a 5 part article on the DH 2. The crack was usually found in these locations on either side. It was Major Lanoe Hawker himself that came up with the remedy / fix. Though it may have been easier to reinforce these spars from the factory, this seemed to be an in the field repair. The lower bolt heads would be visible out side the undersurface face of the spar & overlapping flooring.
thegirl
_VISITCOMMUNITY
Alberta, Canada
Joined: January 19, 2008
KitMaker: 6,743 posts
AeroScale: 6,151 posts
Posted: Thursday, January 20, 2011 - 11:30 PM UTC

Quoted Text


Quoted Text

Hey Mikael!
This is really coming along very well!
A Real good job!

ciao
Edo


Thank You so much Edo


Quoted Text

Excellent up-date Mikael !

You are coming along very well with this build and the attention to the details is outstanding . But I just can't help it though , in reguards to the wash on the seat around the buttons seems to be a little over done . For some reason it doesn't look right , then again it could be just me ..........

Looking forward to the next up-date


Thank You Terri for your very kind comments

In regards to the seat I think you're right – it does look a bit much – but in all fairness – the camera enhances the effect somewhat compared to the live item so to speak


My next Job will be to attach the lower wing – which was made a hole lot more difficult by an accident, where the thinned down centre section broke in half

I spent last night drilling in some pins in an effort to strenghten the "new" attachment points – We'll see how this will go, I need to get it the right angle (not one of my strongpoints I'm afraid), and also strong enough to be able to take some handling.

My best regards to you all

Mikael


I hear you on drilling holes at angle , not one of my strong points either . I do find what help is just to start the hole with a smaller bit then placing the bit size I need at the angle which is called for . The small hole drilled before aids in keeping the bit in place .
OEFFAG_153
_VISITCOMMUNITY
Västra Götaland, Sweden
Joined: February 19, 2010
KitMaker: 1,473 posts
AeroScale: 1,450 posts
Posted: Friday, January 21, 2011 - 04:19 AM UTC

Quoted Text

This is from a 5 part article on the DH 2. The crack was usually found in these locations on either side. It was Major Lanoe Hawker himself that came up with the remedy / fix. Though it may have been easier to reinforce these spars from the factory, this seemed to be an in the field repair. The lower bolt heads would be visible out side the undersurface face of the spar & overlapping flooring.e


Thank You very much Stephen for posting this info, I'll ad this detail – as I'm aiming to do a No 24 sqn DH, it would certainly have been present on this.


I have a bit of a dilemma though with the profile. It seems I've mixed and matched a bit in some of the details of an early and a later DH2... This sems to have been the case with some of the No 24 sqn planes though...

However, having done the narcelle in battleship grey and PC10, as I have seen in some profiles, I'm no longer sure this was the case as they seem all covered in PC10?

Or were some planes of the sqn finished in Btship grey and PC10 as I've done?

Answers on a postcard

Best Regards

Mikael
OEFFAG_153
_VISITCOMMUNITY
Västra Götaland, Sweden
Joined: February 19, 2010
KitMaker: 1,473 posts
AeroScale: 1,450 posts
Posted: Friday, January 21, 2011 - 04:21 AM UTC

Quoted Text

I hear you on drilling holes at angle , not one of my strong points either . I do find what help is just to start the hole with a smaller bit then placing the bit size I need at the angle which is called for . The small hole drilled before aids in keeping the bit in place .


Thanks Terri – I'll try this out
dmopath
_VISITCOMMUNITY
Kentucky, United States
Joined: July 02, 2010
KitMaker: 175 posts
AeroScale: 174 posts
Posted: Friday, January 21, 2011 - 04:56 AM UTC
I continue to enjoy following this build, and am glad to see that you are keeping one side open. I would be a shame to hide all that excellent work.

Keep the images coming when you get the chance.
Mgunns
_VISITCOMMUNITY
Arizona, United States
Joined: December 12, 2008
KitMaker: 1,423 posts
AeroScale: 1,319 posts
Posted: Friday, January 21, 2011 - 05:06 AM UTC


Hi Mikeal:

Interesting discussion here on the venerable DH-2. I have the Roden kit coming next month and will be referencing your work when I tackle the kit.

Best

Mark
JackFlash
_VISITCOMMUNITY
Colorado, United States
Joined: January 25, 2004
KitMaker: 11,669 posts
AeroScale: 11,011 posts
Posted: Friday, January 21, 2011 - 06:09 AM UTC
By the first battle of the Somme (summer 1916) all DH 2 aircraft of RFC 24 Sqn received a coat of PC10.
OEFFAG_153
_VISITCOMMUNITY
Västra Götaland, Sweden
Joined: February 19, 2010
KitMaker: 1,473 posts
AeroScale: 1,450 posts
Posted: Saturday, January 22, 2011 - 04:08 AM UTC

Quoted Text

I continue to enjoy following this build, and am glad to see that you are keeping one side open. I would be a shame to hide all that excellent work.

Keep the images coming when you get the chance.


Thank You very much Dennis – well it seemed like an interesting way to build this machine

I'll keep you all posted on my progress – right now I struggling with the pinning of the lower wing – its really giving me a hard time...


Quoted Text


Hi Mikeal:

Interesting discussion here on the venerable DH-2. I have the Roden kit coming next month and will be referencing your work when I tackle the kit.

Best

Mark


Thank You so much Mark – I think you'll enjoy this kit – I've heard some grumblings on the accuracy and quality of this kit, but I think its really good and great fun to do

Best Regards

Mikael
OEFFAG_153
_VISITCOMMUNITY
Västra Götaland, Sweden
Joined: February 19, 2010
KitMaker: 1,473 posts
AeroScale: 1,450 posts
Posted: Saturday, January 22, 2011 - 04:16 AM UTC

Quoted Text

By the first battle of the Somme (summer 1916) all DH 2 aircraft of RFC 24 Sqn received a coat of PC10.


Thank You Stephen for the info – as I suspected (and I think you mentioned over at your excellent thread).

Well I think I know how to progress with this... I'll display it as a DH2 of 24 Sqn in progress of being painted with PC10, while getting maintenance done, this could be an interesting setting – I'm thinking cans of paint and perhaps a ladder...

Best Regards

Mikael
thegirl
_VISITCOMMUNITY
Alberta, Canada
Joined: January 19, 2008
KitMaker: 6,743 posts
AeroScale: 6,151 posts
Posted: Saturday, January 22, 2011 - 02:31 PM UTC
Okay Mikael , now you went and done it ! Stephen has giving me a few ideas from his super build and now you with how you have choosen to display her . What a great idea and very fitting .

I feel some AMS heading on the lines of the Bluemax kit as my next pusher .

Also agree with you on Roden's kit . It is a nice kit , Des has shown us that already and Lars as well. Yeah, there has been some negative vibes out there aleady on the net .


Looking forward to seeing your solution for pinning the wings