Revell Arado 196A-3 build
betheyn
 Senior Editor
#019
England - South East, United Kingdom
Joined: October 14, 2004
KitMaker: 4,560 posts
AeroScale: 2,225 posts
Posted: Thursday, December 30, 2010 - 09:41 PM UTC
Well I have started Revell's 1/32nd scale Arado seaplane. This build will be OOB, as I really want to see how this kit goes together. Don't know how accurate the kit is, but it does look nice

.
The cockpit is done, no hitches and the fit is pretty good.
Paints are a mix of WEM Luftwaffe colours and Vallejo.
Comments welcome.


Andy

It's not the same, better, but not the same...
South Australia, Australia
Joined: August 14, 2007
KitMaker: 5,926 posts
AeroScale: 2,201 posts
Posted: Thursday, December 30, 2010 - 09:48 PM UTC
Keep up the good work Andy. I will be watching closely as I have two on their way from Blighty even as I type this.

You may be right, I may be crazy.
Holdfast
President #056
England - South West, United Kingdom
Joined: September 30, 2002
KitMaker: 8,581 posts
AeroScale: 4,913 posts
Posted: Thursday, December 30, 2010 - 11:20 PM UTC
Nice one Andy, that's a very nice cockpit. I'm looking forward to see the results of the rest of the is build.
Did I tell you that I have 2 of these on order
I plan on finishing one one the water and the other on a catapult; how do you plan on displaying yours?
MAL the MASK
BULLDOG # 6 (President)
BEWARE OF THE FEW
Sappers: First in, last out. (UBIQUE)
It's not the same, better, but not the same.
Attica, Greece / Ελλάδα
Joined: May 01, 2008
KitMaker: 1,437 posts
AeroScale: 1,241 posts
Posted: Friday, December 31, 2010 - 06:05 AM UTC
betheyn
Senior Editor #019
England - South East, United Kingdom
Joined: October 14, 2004
KitMaker: 4,560 posts
AeroScale: 2,225 posts
Posted: Friday, December 31, 2010 - 07:48 AM UTC
It seems everyone is getting an Arado, but mind you at that price, its well worth it.
Quoted Text
how do you plan on displaying yours
No idea, haven't thought that far ahead

.
Thanks Nick. Lessoned learned on that
.
The fuselage is together, the fit is quite good. There is a little filling to do, but not much.
Not sure how much I will get done over the weekend as the footies on
.
Andy
It's not the same, better, but not the same...
Tennessee, United States
Joined: September 20, 2005
KitMaker: 1,747 posts
AeroScale: 1,673 posts
Posted: Friday, December 31, 2010 - 08:02 AM UTC
Wow! What a kit. Can't wait to see it done. Russell
To Thine Own Self Be True
Siderius
A.K.A., RTA
England - South East, United Kingdom
Joined: March 07, 2005
KitMaker: 868 posts
AeroScale: 690 posts
Posted: Friday, December 31, 2010 - 02:43 PM UTC
first one I've seen started, well done so far Andy!
hope to get mine from MZ next week..
Moselle, France
Joined: May 15, 2005
KitMaker: 5,653 posts
AeroScale: 4,347 posts
Posted: Saturday, January 01, 2011 - 04:07 AM UTC
Hi Andy,
Nice start!

Knowing you, the kit will be finished next week...
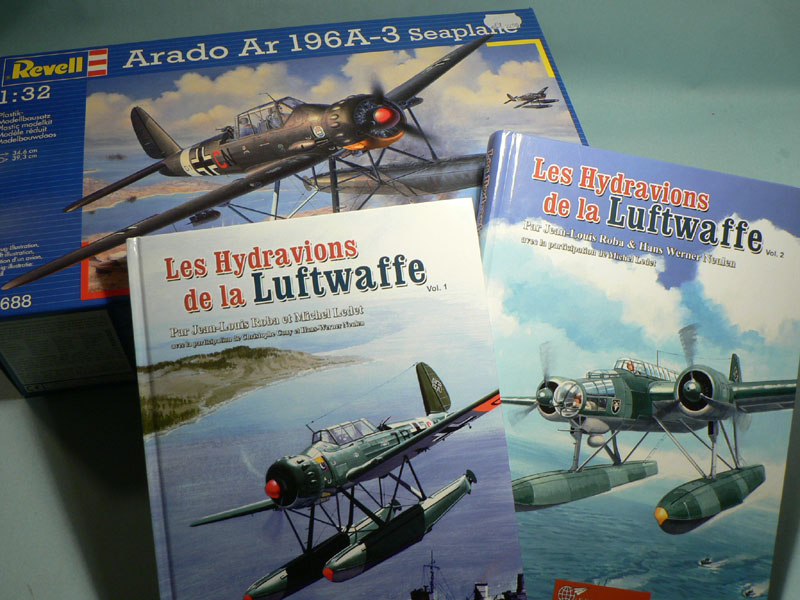
I found my sample at my LHS for 22,50 . Quite a good price! I have also purchased the two Luftwaffe Floatplane books Neil mentionned already.
Jean-Luc
Better think one hour and build five minutes...
Than think five minutes and build an hour!
betheyn
Senior Editor #019
England - South East, United Kingdom
Joined: October 14, 2004
KitMaker: 4,560 posts
AeroScale: 2,225 posts
Posted: Saturday, January 01, 2011 - 09:46 AM UTC
Quoted Text
Knowing you, the kit will be finished next week...
Could be.
Wings are built but not glued into the fuselage. The top of the floats are not glued either. Its bigger then I remember seeing it at Telford
.
There is a little filling to be done here and there but nothing to serious.


Andy
It's not the same, better, but not the same...
Holdfast
President #056
England - South West, United Kingdom
Joined: September 30, 2002
KitMaker: 8,581 posts
AeroScale: 4,913 posts
Posted: Sunday, January 02, 2011 - 10:56 PM UTC
Looking good Andy, I may start mine as soon as I get it, I've always wanted to build a float plane and put it on water.
MAL the MASK
BULLDOG # 6 (President)
BEWARE OF THE FEW
Sappers: First in, last out. (UBIQUE)
It's not the same, better, but not the same.
England - East Anglia, United Kingdom
Joined: November 16, 2009
KitMaker: 79 posts
AeroScale: 75 posts
Posted: Thursday, January 06, 2011 - 08:48 PM UTC
Looking good so far!
also see with a 2% vat rise here in the U.K some traders are now selling this kit at £24.99, or has Revell upped the price so soon!
Missouri, United States
Joined: November 24, 2008
KitMaker: 564 posts
AeroScale: 510 posts
Posted: Friday, January 07, 2011 - 02:08 AM UTC
cant wait for this kit to arrive stateside, your build is beautiful!
Nothing quite like getting lost in plastic
On the bench:Revell 1/48 P-38 Lightning built as an F-5B
Next:??
betheyn
Senior Editor #019
England - South East, United Kingdom
Joined: October 14, 2004
KitMaker: 4,560 posts
AeroScale: 2,225 posts
Posted: Friday, January 07, 2011 - 03:58 AM UTC
Thanks for your comments guys.
I would imagine that it is the new VAT increases that have put the price up. Its still exceptional value for money though.
Unfortunately I haven't been able to do any building as of late as I keep getting sidetracked
.
I'm hoping to get some done in the next couple of evenings (site updates permitting of course).
Andy
It's not the same, better, but not the same...
South Australia, Australia
Joined: August 14, 2007
KitMaker: 5,926 posts
AeroScale: 2,201 posts
Posted: Friday, January 07, 2011 - 06:52 AM UTC
Buying from Australia means I do not have to worry about VAT, so I bought two of them...
They arrived on Wednesday and have now joined 'The Stash' for a later campaign... sometime.. maybe...
You may be right, I may be crazy.
Holdfast
President #056
England - South West, United Kingdom
Joined: September 30, 2002
KitMaker: 8,581 posts
AeroScale: 4,913 posts
Posted: Friday, January 07, 2011 - 07:38 AM UTC
I got my 2 when I returned to work after the holidays; the pair cost me £30 including carriage
I hope to start one soon but I did started something else, just to be going on with until they arrived.
MAL the MASK
BULLDOG # 6 (President)
BEWARE OF THE FEW
Sappers: First in, last out. (UBIQUE)
It's not the same, better, but not the same.
Roma, Italy
Joined: January 28, 2006
KitMaker: 1,368 posts
AeroScale: 377 posts
Posted: Sunday, January 09, 2011 - 05:52 AM UTC
Great build Andy!
I've never built a 1/32 aircraft, but if this model has such a value for such a good price I'll definitely get one!
Just a question: is the gap indicated normal? I've seen it also in Revell's promo shots...

betheyn
Senior Editor #019
England - South East, United Kingdom
Joined: October 14, 2004
KitMaker: 4,560 posts
AeroScale: 2,225 posts
Posted: Sunday, January 09, 2011 - 06:04 AM UTC
Quoted Text
Just a question: is the gap indicated normal? I've seen it also in Revell's promo shots...
Hi,
Yes there is a little bit of a gap, as the fit of the cockpit and wing insert holders is all a little tight.
Since this picture was taken I have re-glued and clamped that part, and it does close up more, still a little filler is needed for some of the seams, but nothing to major.
Andy
It's not the same, better, but not the same...
Roma, Italy
Joined: January 28, 2006
KitMaker: 1,368 posts
AeroScale: 377 posts
Posted: Sunday, January 09, 2011 - 06:20 AM UTC
betheyn
Senior Editor #019
England - South East, United Kingdom
Joined: October 14, 2004
KitMaker: 4,560 posts
AeroScale: 2,225 posts
Posted: Wednesday, January 12, 2011 - 03:29 AM UTC
I have managed to get a little more done, mainly the engine.
I found that if you want the engine panels all open then the instruction sequence can be followed, but if like me, you only want one side open, then I found deviating from the instructions a little help the fit.
I found that following the instructions for it closed left great gaps around the inspection panels and it as all skew whiff (but that could be my building
).
Basically you have three engine cowling bars which fit onto the engine (parts 172), fit these to the engine as normal, then the rear cowling ring (part 171) can be glued into postion. Postion and glue the main inspection panels (which you want closed), then glue the forward cowling ring.

Andy
It's not the same, better, but not the same...
Roma, Italy
Joined: January 28, 2006
KitMaker: 1,368 posts
AeroScale: 377 posts
Posted: Wednesday, January 12, 2011 - 05:19 AM UTC
Very useful!
Just a question: how big is the box?
I'm considering of getting a copy from the Internet, and if it's big I would avoid Asian retailers as I'm afraid it could get stuck at the customs...
This happened to me once with a big enough box and the postaman made me pay a 10 customs tax!
betheyn
Senior Editor #019
England - South East, United Kingdom
Joined: October 14, 2004
KitMaker: 4,560 posts
AeroScale: 2,225 posts
Posted: Wednesday, January 12, 2011 - 06:12 AM UTC
Quoted Text
Just a question: how big is the box?
Here you go.

Andy
It's not the same, better, but not the same...
Roma, Italy
Joined: January 28, 2006
KitMaker: 1,368 posts
AeroScale: 377 posts
Posted: Wednesday, January 12, 2011 - 06:20 AM UTC
South Australia, Australia
Joined: August 14, 2007
KitMaker: 5,926 posts
AeroScale: 2,201 posts
Posted: Wednesday, January 12, 2011 - 07:29 AM UTC
Fantastic work Andy.
My two are sitting waiting patiently for me to start one of them. I have always loved this aircraft since I built my first Airfix kit of it.
There was an early prototype with a single central float and outriggers I have seen a video of during water handling trials.. They did not go too well and the engine broke off when taxiing in some waves!! I think it is on You tube.. Might make an interesting diorama..
You may be right, I may be crazy.


