Early Aviation
Discuss World War I and the early years of aviation thru 1934.
KotS GB 2011 Roland D.VIa Kb
Kitboy
_VISITCOMMUNITY
Gelderland, Netherlands
Joined: July 20, 2006
KitMaker: 258 posts
AeroScale: 256 posts
Posted: Wednesday, March 02, 2011 - 01:51 AM UTC
I am doing one right now, but cannot show any progress cause I am writing a review for a Dutch magazine. I can confirm thought the fit issues of the engine mountings. Therefor at this moment I am struggling a bit with the engine which is not completely centered.

Onze other thing which suprises me is the picture bottom left on page four of the instructions. It shows clearly a big stick at the left of the inside fuselage with the words "Spät - Früh" . It's even reffered to in the enclosed text. Why are the stick AND the stencils NOT included in the kit.

I will be doing mine in Jasta 23b version.

Cheers, Nico
Kornbeef
_VISITCOMMUNITY
England - South East, United Kingdom
Joined: November 06, 2005
KitMaker: 1,667 posts
AeroScale: 1,551 posts
Posted: Wednesday, March 02, 2011 - 03:14 AM UTC
Nico, the decal is there its No 51 and is shown in its location on page 5 of the instructions. But the stick you refer to is the one with the ring on the end I think.

Now to add confusion in the hope of showing detail, WNW added those photo's as inspiration. Now that cockpit is of a D.VIb not a D.VIa as the kit is and has quite a few differences..I believe this rod might be a control for the under nose vent or the Benz engine perhaps...if not it might not feature in a mark "a" anyway

I did mess the front former up on my engine mount assy, luckily I realised early and refitted it before the cememt set fully. It also helped that I had a preassembled engine (from a DVA) to dryfit whilst it set. But I have heard of others having issue with this part of the kit.

Cheers Keith
JackFlash
_VISITCOMMUNITY
Colorado, United States
Joined: January 25, 2004
KitMaker: 11,669 posts
AeroScale: 11,011 posts
Posted: Wednesday, March 02, 2011 - 06:48 AM UTC
Spät - Früh means to late-early. It refers to the the position that the lever needs to be at during the engine start. After it warms up the lever is pulled to the late position. A bit like a mechanical choke.
Kitboy
_VISITCOMMUNITY
Gelderland, Netherlands
Joined: July 20, 2006
KitMaker: 258 posts
AeroScale: 256 posts
Posted: Thursday, March 03, 2011 - 11:01 PM UTC
I 'd say a choke is meant to adjust the carburator. For me adjusting the ignition by this rod sounds most logical.

Cheers, Nico
thegirl
_VISITCOMMUNITY
Alberta, Canada
Joined: January 19, 2008
KitMaker: 6,743 posts
AeroScale: 6,151 posts
Posted: Friday, March 04, 2011 - 12:58 AM UTC
She is looking really nice Keith ! Your rigging is super as well , for some one who had this fear of doing it . I would say you have over come that in the last few builds . So how does it feel to build mostly out of box ?
Kornbeef
_VISITCOMMUNITY
England - South East, United Kingdom
Joined: November 06, 2005
KitMaker: 1,667 posts
AeroScale: 1,551 posts
Posted: Friday, March 04, 2011 - 01:35 AM UTC

Quoted Text

She is looking really nice Keith ! Your rigging is super as well , for some one who had this fear of doing it . I would say you have over come that in the last few builds . So how does it feel to build mostly out of box ?


Terri,

Thanks, yes rigging is now quite run of the mill, not sure I'll say that when I tackle the tripe though. I tried a few differing methods on this, many of the turnbuckles are much simpler with only one loop at one end of a length of SS wire then threaded through and used to fix it into the wing. Some of the double ended of course on places like the front points on the fuselage.

As for OOB well with a kit of this standard there really is very little to do to improve unless you get really nitpicky. Now as it draws to an end I have to say most my woes were likely self inflicted including lozenge issues.

Got to laminate the prop...once thats done its pretty plain sailing to finish over the next few days.

Ta K
OEFFAG_153
_VISITCOMMUNITY
Västra Götaland, Sweden
Joined: February 19, 2010
KitMaker: 1,473 posts
AeroScale: 1,450 posts
Posted: Friday, March 04, 2011 - 10:22 PM UTC
Keith

That is a very fine looking build you've got there – and the rigging – I can only second what Terri already said You'll be tackling a DH 2 soon I guess...

Best Regards

Mikael
Kornbeef
_VISITCOMMUNITY
England - South East, United Kingdom
Joined: November 06, 2005
KitMaker: 1,667 posts
AeroScale: 1,551 posts
Posted: Tuesday, March 08, 2011 - 05:36 AM UTC
Okay, so close to finishing it hurts...lol

Did the prop, fitted the guns and screen, added the top rad and its connection pipe complete with added thin pipe that shows on some pics of D.V!a's. I redid that slack control wire, fixed the big rip under the wing(needs a little weathering in)

All theres to do is secure the errant belts that seem to have sprung loose, add the rear view mirror then some minor paint Loz touchups, weathering in the shiny new bits and thats about it wrapped up.

So in pics...


And finally the comparison shot I promised Carl to show how small the Rolie is against the UberAlbi.


Any comments, ideas and *hey you missed...* welcome as always
JackFlash
_VISITCOMMUNITY
Colorado, United States
Joined: January 25, 2004
KitMaker: 11,669 posts
AeroScale: 11,011 posts
Posted: Tuesday, March 08, 2011 - 06:30 AM UTC
Beautiful Keith a fine build!
JackFlash
_VISITCOMMUNITY
Colorado, United States
Joined: January 25, 2004
KitMaker: 11,669 posts
AeroScale: 11,011 posts
Posted: Tuesday, March 08, 2011 - 06:44 AM UTC
Don't forget to post your finished build images here.
guitarlute101
_VISITCOMMUNITY
West Virginia, United States
Joined: December 18, 2006
KitMaker: 1,121 posts
AeroScale: 1,063 posts
Posted: Tuesday, March 08, 2011 - 07:05 AM UTC


Fantasic work, Keith!!
OEFFAG_153
_VISITCOMMUNITY
Västra Götaland, Sweden
Joined: February 19, 2010
KitMaker: 1,473 posts
AeroScale: 1,450 posts
Posted: Tuesday, March 08, 2011 - 07:44 AM UTC
Ah – a most handsome couple of models – Congartulations on (almost) finishing the Roland – you've certainly created an eyecatcher there

Best Regards

Mikael
Mgunns
_VISITCOMMUNITY
Arizona, United States
Joined: December 12, 2008
KitMaker: 1,423 posts
AeroScale: 1,319 posts
Posted: Tuesday, March 08, 2011 - 08:36 AM UTC
Hi Keith:

Yeah, it really turned out great, especially considering your bad luck with the decal vanishing. I do like the stripes and the lozenge combination.

Best

Mark
vulkanizer
_VISITCOMMUNITY
Croatia Hrvatska
Joined: December 26, 2009
KitMaker: 144 posts
AeroScale: 109 posts
Posted: Tuesday, March 08, 2011 - 09:10 AM UTC
Congratulations Keith on a beautiful, very realistic work
Kornbeef
_VISITCOMMUNITY
England - South East, United Kingdom
Joined: November 06, 2005
KitMaker: 1,667 posts
AeroScale: 1,551 posts
Posted: Tuesday, March 08, 2011 - 08:49 PM UTC
Thanks guys, by the weekend this one should be done and I intend to make a note of the few tweaks & mods I made and my findings and opinion on the build. I feel a Pfalz calling me from the other side of the world...there again so is a D.V

Thanks for the great comments guys. The old oak stump is very photogenic I have to admit


Keith
CaptainA
_VISITCOMMUNITY
Indiana, United States
Joined: May 14, 2007
KitMaker: 3,117 posts
AeroScale: 2,270 posts
Posted: Wednesday, March 09, 2011 - 11:49 AM UTC
Looks great. I am anxious to see what you might do next.
thegirl
_VISITCOMMUNITY
Alberta, Canada
Joined: January 19, 2008
KitMaker: 6,743 posts
AeroScale: 6,151 posts
Posted: Wednesday, March 09, 2011 - 02:34 PM UTC
Wow Keith , you have really done a fantastic job on this build ! I love everything about this aircraft and the Bluemax kit will be hitting my work bench here very soon . Thanks for the inspiration .


Yes do the Pfalz next ....please with icing on top !
lcarroll
_VISITCOMMUNITY
Alberta, Canada
Joined: July 26, 2010
KitMaker: 1,032 posts
AeroScale: 1,025 posts
Posted: Thursday, March 10, 2011 - 03:00 PM UTC

Quoted Text

Thanks guys, by the weekend this one should be done and I intend to make a note of the few tweaks & mods I made and my findings and opinion on the build. I feel a Pfalz calling me from the other side of the world...there again so is a D.V

Thanks for the great comments guys. The old oak stump is very photogenic I have to admit


Keith


Keith,
My compliments on a great (nearly) finish..........you really brought this one off well! Like your oak stump a lot, and the weather in the background makes me jealous as I contemplate the -26 C outside and blowing snow as well!
My previous thoughts on this kit were less then entusiastic, with your build to view I am re-considering.

Cheers,
RAGIII
_VISITCOMMUNITY
North Carolina, United States
Joined: June 19, 2007
KitMaker: 604 posts
AeroScale: 600 posts
Posted: Friday, March 11, 2011 - 03:16 AM UTC
Keith,
Excellent and quite striking build! I love the lozenge. This build will certainly make other modelers think again if they passed on this kit!
RAGIII
Kornbeef
_VISITCOMMUNITY
England - South East, United Kingdom
Joined: November 06, 2005
KitMaker: 1,667 posts
AeroScale: 1,551 posts
Posted: Sunday, March 27, 2011 - 10:28 AM UTC
Finally, I got my finger out, did the finishing touch's or so I thought till writing this.

This has been just about the most enjoyable build I've done especially for an almost OOB build. My hats off to WNW. Thank you


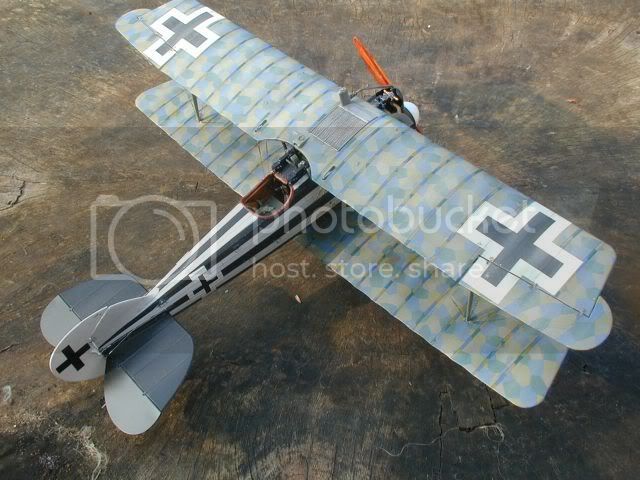
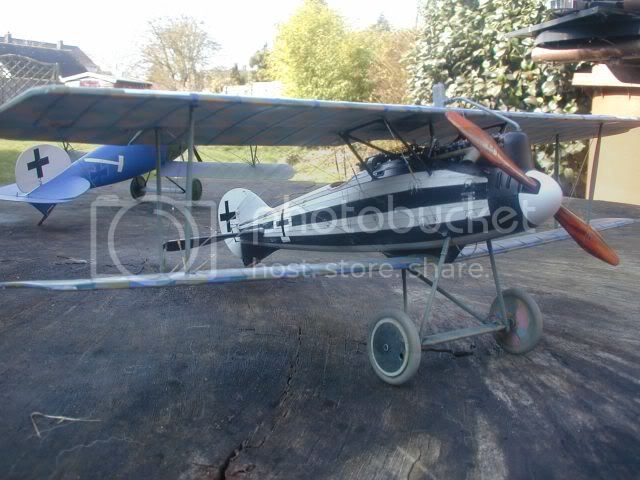
WNW Roland D.VIa My findings

Overall, before saying anything else I have to say... This is the best 1:32nd aircraft kit I’ve ever made, I’m not just talking WW1 A/C either. Pound for pound, detail for detail it beats the Tamiya Spitfire and any other in my mind. I’m sure there’s plenty will disagree of course.

I just really appreciated the extra details. Little details like the hose clips, the fit of parts (there were some issues of course which I will or have mentioned earlier. Generally the kit is well thought out, simple to assemble, well detailed OOB with no glaring errors. The decals are sublime, well printed, in perfect register and include some tiny ones like the Bosch logo for the magneto.
The whole package just oozes professional production and it was a joy to make with very few issues and caused many happy moments along the way. Now it’s very easy to forget and appreciate just how much extra we get in WNW’s products and far too easy to pick up the bad points.


Mods I made:
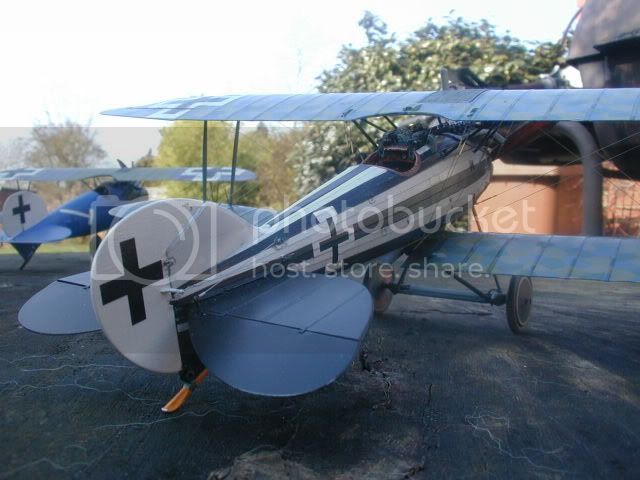
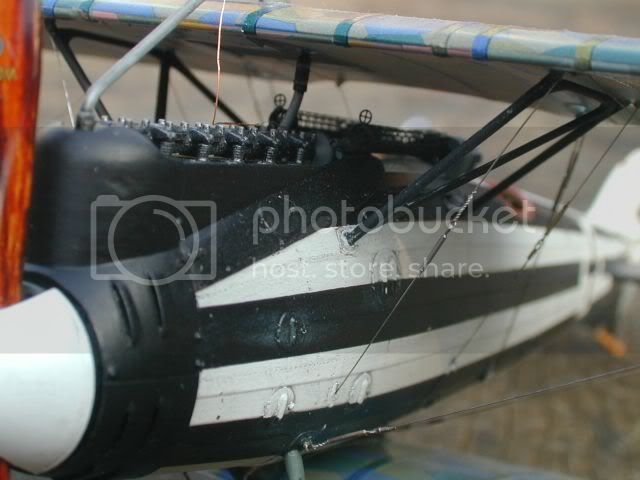
Reworked the rear Maxim mounts.
Simulated tarred asbestos wrap on the manifold with a scalpel and liquid poly.
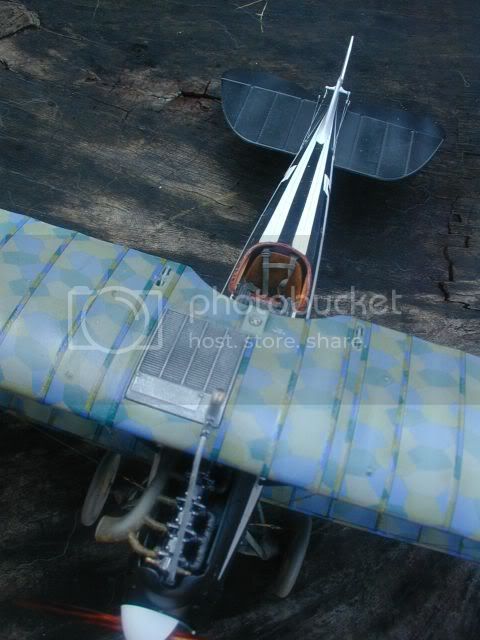
Opened up the hole a smidge around the rad and added the roll out screen under the rad on the upper wing.
Flatted the tyres to get a sit.
Repositioned some of the rigging points some are slightly misplaced for practicability/production reasons I think.
Added the thin pipe that drops from the coolant to rad pipe, seems prevalent on D.VIa’s and not on D.VIb’s
Opened the cooling louvres in the nose cowl and added the spring catches out of copper coil
Other minor tweaks to sharpen details where moulding constraints applied (very few)


Things I missed and realised while writing this..........Doh!
Missed the chain for the magneto key (must revisit that).
Missed the rear view Mirror and spotted a flake of loz to be repaired.


Issues:-

Please note some of these are my findings and all very minor, a little extra care and dryruns can eliminate many.

Pore over the instructions, the way they are done does make it easy to miss small or even large points (I have taken to using a highlighter to mark what I’ve done)

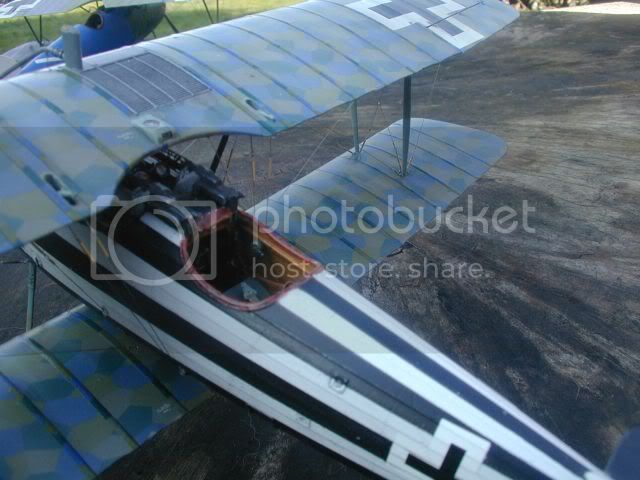
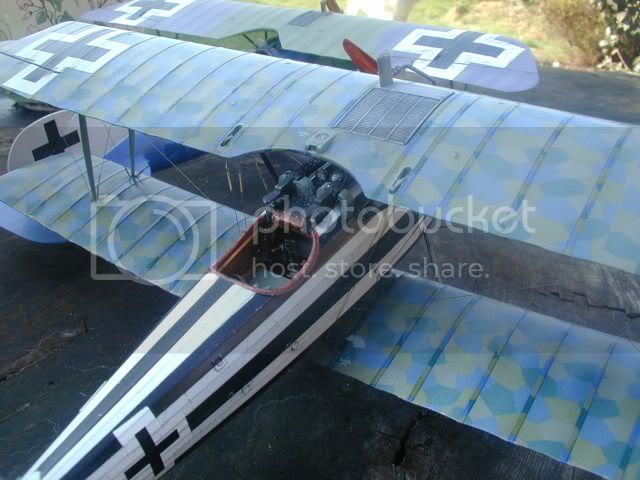
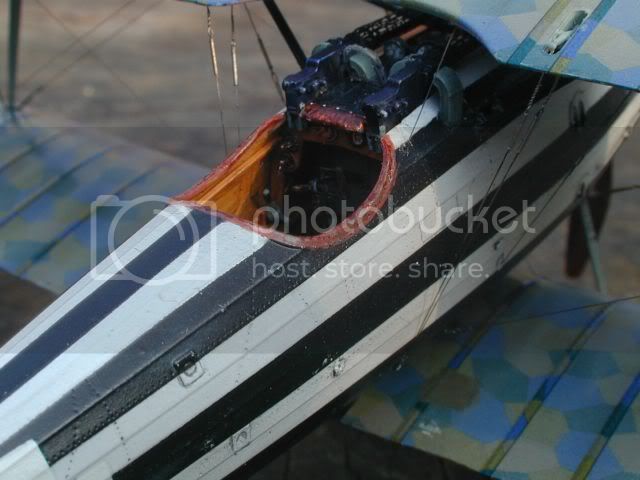
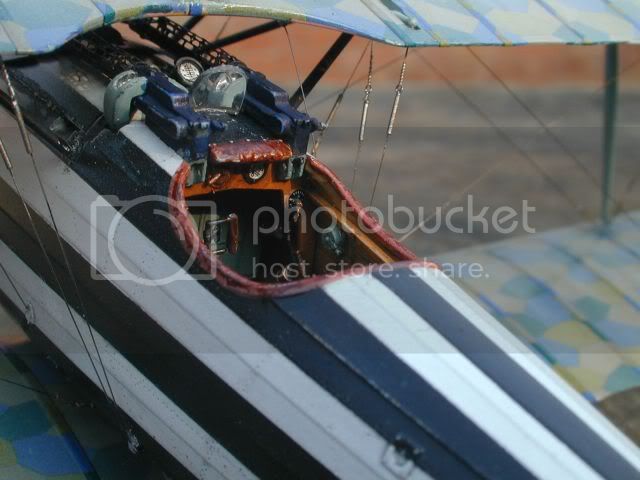
The missing fuel control panel levers...both in part and mention in the instructions.

It’s rather easy to fix pt F8 the wrong way round if you don’t fit the magneto assy straight away its easy not to notice till much later.

Really take care assembling the engine bearers, dryfit the block, dryfit the bearers in the fuselage, make sure everything lines up...let it dry and check again. I found I had pt F17 fixed slightly out twisting the assy, luckily by dryfitting I realised before too late.

Fuel gauge pt A7 should be sunk into the recess, the posn as fitted is for the D.VIb (easy fix, just drill out the location hole a little.)

Cowlings:
I found the fit here odd, while dryfitting everything seemed fine, once set and painted things seemed out, I had heard of others having issues here so was prewarned, Carb side pt F9 was easy, thinning the inside of the flange around the lower and rear edge where it mates with the fuselage and minor sanding got it to look tucked behind the nose cowl.
Exhaust side pt F11 required thought and minor surgery, I repeated the thinning as pt F9 but had to lose the upright portion behind the front cowl and remake it out of plasticard.

Fuel gauage pt A7 should be sunk into the recess, the posn as fitted is for the D.VIb (easy fix)
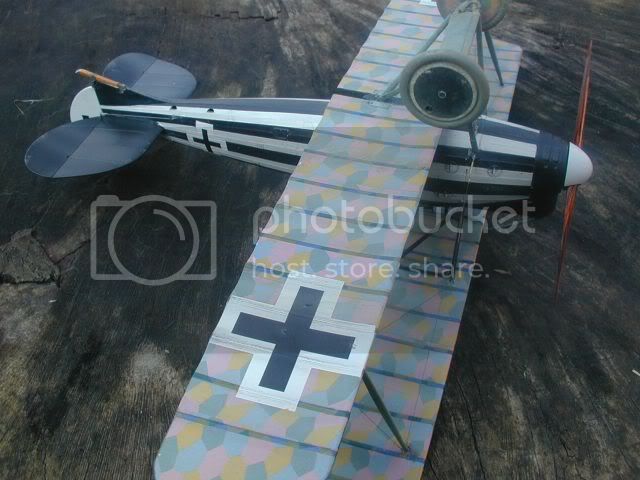
Lozenge:
Really a vast improvement in looks over the earlier Loz from WNW, I had issues with adhesion though which where more than likely my own making. (I didn’t follow WNW instructions) One thing though, the bolts (widths of decal) are not as wide as indicated in the instructions, I would advise anyone to rethink the application and work in from the tips on the upper wing so you can lose the extra joint around the radiator. And you still need to trim a sliver off the edges of each bolt to obtain a clean butt joint.


My wishes:-

1/ A little more etched options, the maxim rear mounts for one really are crying out to be done in etch. Separate clasps and buckles for the seatbelts as an option so you can make seatbelts as opposed to using brass belts. One extra Maxim jacket to allow for clumsy sods like me to destroy one.

2/ Those very few missing details added. The fuel control levers for one. I do wonder if they were meant to be an etch option that got missed?

3/ The Fokker DVII.

4/ An Albatros DIII with the correct interior not the DI/DII interior. Well I can but hope.


Concluding, as said above this is the best kit I’ve made, not my favourite subject but it’s quirkiness drew me to it, now I have to save my pennies and try the Pfalz unless WNW grant my wish above and sneakily release the DVII first (subtle as a brick hint there)


Keith (still grins when I loook at the assembled kit.) closes the Windsock datafile on this and begins poring through the Pfalz one

lcarroll
_VISITCOMMUNITY
Alberta, Canada
Joined: July 26, 2010
KitMaker: 1,032 posts
AeroScale: 1,025 posts
Posted: Sunday, March 27, 2011 - 11:47 AM UTC
Keith,
As earlier, absolutely beautiful work. Particularly thank you for the comments on mods, pitfalls, and your solutions; this is a keeper and once I get to this one (yes, you've changed my mind on this kit) it will be invaluable.
Now, good luck on and enjoy the Pfalz you mentioned. Looking forward to your coverage on that beauty.
BTW, I just re-read my last comment to you....I meant the "almost" word to mean almost finished as you had described your progress, not almost supurb / excellent or whatever term I employed to describe your build. "Mea Culpa"!!
Kornbeef
_VISITCOMMUNITY
England - South East, United Kingdom
Joined: November 06, 2005
KitMaker: 1,667 posts
AeroScale: 1,551 posts
Posted: Sunday, March 27, 2011 - 12:38 PM UTC
Laughs. Lance thanks, I never read it any other way.

Yes the Pfalz calls, a nice bright Jasta Raben profile too amongst the options.
OEFFAG_153
_VISITCOMMUNITY
Västra Götaland, Sweden
Joined: February 19, 2010
KitMaker: 1,473 posts
AeroScale: 1,450 posts
Posted: Monday, March 28, 2011 - 01:13 AM UTC
Hello Keith

– Nice finish, and congratulations on a very handsome looking model indeed – it'll certainly stand out on your display shelf,

Like Lance, you've wetted my apetite for the Roland, and I will be getting me one to ad to the growing pile of models to do...

Best Regards

Mikael
thegirl
_VISITCOMMUNITY
Alberta, Canada
Joined: January 19, 2008
KitMaker: 6,743 posts
AeroScale: 6,151 posts
Posted: Monday, March 28, 2011 - 01:24 AM UTC
Fantastic build Keith , she turned out very beautiful from start to finish .
your take on the kit will help out those who wish to build this kit giving them the highs and lows and what to watch for . The Bluemax kit just moved up a few in the to do pile !

Looking forward to your Pfalz build
lcarroll
_VISITCOMMUNITY
Alberta, Canada
Joined: July 26, 2010
KitMaker: 1,032 posts
AeroScale: 1,025 posts
Posted: Monday, March 28, 2011 - 09:38 AM UTC

Quoted Text

Laughs. Lance thanks, I never read it any other way.

Yes the Pfalz calls, a nice bright Jasta Raben profile too amongst the options.


My WNW Pfalz is still enroute along with a long overdue D.V to compliment the D.Va already in the queue. Looking seriously at a Raben scheme for the Pfalz or the D.Va (have the Pheon Vol 1 sheet for the D.Va option) for sure as it is a real eye catcher. Now, to formulate a scheme to get the Roland into the stash without precipitating a divorce; if I were really clever I'd retire a month early and get going on the stash backlog. (easier to hide any new arrivals!)
Look forward to your Pfalz thread.

Cheers!