Air Campaigns
Want to start or join a group build? This is where to start.
OFFICIAL: Battle of Midway, 1942 Campaign
Naseby
_VISITCOMMUNITY
Slovakia
Joined: October 15, 2010
KitMaker: 825 posts
AeroScale: 476 posts
Posted: Sunday, July 24, 2011 - 05:29 AM UTC
@ Aaron : If You continue like this, You are going to get a ticket for speeding

Mine Val has presented me with some minor troubles. The fit of the fuselage and the wing isnt as good as I expected from Hasegawa, but it could be also my own fault. Anyway I had to use some putty and I will rescribe the panel lines in the affected areas.


MichaelSatin
Staff MemberCampaigns Administrator
AEROSCALE
_VISITCOMMUNITY
Colorado, United States
Joined: January 19, 2008
KitMaker: 3,909 posts
AeroScale: 2,904 posts
Posted: Sunday, July 24, 2011 - 09:29 AM UTC
Naseby: That Crusader would have been a nasty little surprise for the Japanese if they had landed! Nice work on the D3A so far, good solution to the seat issue!

Sean: Onion reader, eh? That explains a few things. Nice job on the TBF to date, interesting ideas for battle damage! Looking forward to the result.

Aaron: Moving fast there! Nicely done too!

Here is some progress on the 1/32 F2A-3. The interior is done but not actually glued into the fuselage yet as I plan to do a little work to reinforce the wing joint and that's going to be easier to set up without the cockpit in the way.


The kit doesn't come with the fuel tank that should be under the cockpit in the -3, but I'm informed by none other that "Mr. Buffalo" Jim Maas that the underside window area is blanked off so it shouldn't show. Much.

Michael
611_sqd
_VISITCOMMUNITY
Ontario, Canada
Joined: January 24, 2011
KitMaker: 470 posts
AeroScale: 99 posts
Posted: Sunday, July 24, 2011 - 02:33 PM UTC
and done. Overall not bad to build. A little more practice and this would be a easier one for me. Paint chipping took so long that I was seeing striped paint in my sleep.

Where is the gallery for our build and I will upload a couple of pics.


MichaelSatin
Staff MemberCampaigns Administrator
AEROSCALE
_VISITCOMMUNITY
Colorado, United States
Joined: January 19, 2008
KitMaker: 3,909 posts
AeroScale: 2,904 posts
Posted: Sunday, July 24, 2011 - 02:49 PM UTC
Aaron,

Very nice! The gallery's at:

http://gallery.kitmaker.net/showgallery.php/cat/26450

Michael
windysean
_VISITCOMMUNITY
Wisconsin, United States
Joined: September 11, 2009
KitMaker: 1,917 posts
AeroScale: 563 posts
Posted: Sunday, July 24, 2011 - 03:32 PM UTC
I've been quiet for an entire week-- long for me, right? Busy, busy at home and work-- no great strides at the workbench, but here I've nearly completed the cockpit painting. Just some washes left there...
CockpitDets-20110723-1545.jpg
thanks again for looking!
-Sean.
611_sqd
_VISITCOMMUNITY
Ontario, Canada
Joined: January 24, 2011
KitMaker: 470 posts
AeroScale: 99 posts
Posted: Sunday, July 24, 2011 - 03:34 PM UTC
and done gallery images added. Thanks for putting on the campaign.
611_sqd
_VISITCOMMUNITY
Ontario, Canada
Joined: January 24, 2011
KitMaker: 470 posts
AeroScale: 99 posts
Posted: Sunday, July 24, 2011 - 03:38 PM UTC
@Naseby

mate looking at your images where you are/were having fit issues is exactly the same place that I had mine and like you I was a little surprised. Its not bad, and yes its not Tamiya, but still their kits are usually pretty decent. This one felt a little over engineered to me, especially the whole cockpit capsule kind of deal where you have to add the side walls of the cockpit and they are not molded into the fuse like on most kits. When I left the cockpit out the fit was much better. When i added it then it fitted like in your pics. I'm not disappointed, but I thought it would be a little better.
vonHengest
_VISITCOMMUNITY
Texas, United States
Joined: June 29, 2010
KitMaker: 5,854 posts
AeroScale: 372 posts
Posted: Sunday, July 24, 2011 - 05:23 PM UTC
Naseby: How is that Tamiya putty working for you? I've been mixing acetone with Squadron green putty myself.
potchip
_VISITCOMMUNITY
Australia
Joined: August 19, 2008
KitMaker: 85 posts
AeroScale: 14 posts
Posted: Monday, July 25, 2011 - 12:22 PM UTC
Dusted off the kits finally. Started on Hiryu, progress excruciatingly slow - 2 spoonsons under support done, next up hull plating before more hull work.
Naseby
_VISITCOMMUNITY
Slovakia
Joined: October 15, 2010
KitMaker: 825 posts
AeroScale: 476 posts
Posted: Tuesday, July 26, 2011 - 08:55 AM UTC
@ Aaron : I didnt get the whole cockpit idea either. To get the sidewalls in place was a challenge and in the end there is so little to see inside, that it wasnt probably worth the trouble.

@ Michael : Good start, the cockpit is done nicely and the instrument panel is especialy good looking.

@ Jeremy : Im happy with the putty. It dryes slowly and it bites int the plastic. It usualy takes one day to dry and after that You can sand, file or rescribe the pannel lines without any problem. But use it with caution, it makes the plastic soft like glue does.
611_sqd
_VISITCOMMUNITY
Ontario, Canada
Joined: January 24, 2011
KitMaker: 470 posts
AeroScale: 99 posts
Posted: Tuesday, July 26, 2011 - 02:32 PM UTC
@Naseby: The fun I had with the cockpit and by fun I mean getting hit in the groin by a Bull kind of fun was this... As it was a tight fit I thought i'd use superglue on the walls and fuse as it can be a tigher bonding agent and then use the bands to hold it together overnight. So I test fitted it a bunch of times and its a pain like we both found, but it did fit. It fitted every single time UNTIL the one time I glued it and then it wasn't fitting. Fun times, fun times.
potchip
_VISITCOMMUNITY
Australia
Joined: August 19, 2008
KitMaker: 85 posts
AeroScale: 14 posts
Posted: Sunday, July 31, 2011 - 12:58 AM UTC
Working on Hiryu's boats..


Building the island. In the picture are veteran model's 1/700 12cm binoculars in resin. Will need at least 30 odd of those for one ship...looks like I'll need another couple sets...


I'm enjoying gatecrashing your propeller heads' site with floaty bits...
MichaelSatin
Staff MemberCampaigns Administrator
AEROSCALE
_VISITCOMMUNITY
Colorado, United States
Joined: January 19, 2008
KitMaker: 3,909 posts
AeroScale: 2,904 posts
Posted: Sunday, July 31, 2011 - 03:43 AM UTC

Quoted Text

I'm enjoying gatecrashing your propeller heads' site with floaty bits...


Jim,

We're enjoying your invasion. Nice work, those boats are tremendous!!

Michael
windysean
_VISITCOMMUNITY
Wisconsin, United States
Joined: September 11, 2009
KitMaker: 1,917 posts
AeroScale: 563 posts
Posted: Tuesday, August 02, 2011 - 01:12 AM UTC
I took a breather from work (it's good when there's work to do, but it sure gets in the way of my little plastic things!). Finally put a wash on my cockpit parts so I could close up the fuselage. That's a major step-- progress you can see!
WashedTurretInt-20110801-2102.jpg
WashedCockpit-20110801-2104.jpg
I didn't think to take a pick of the fuselage together yesterday, but just a note here that I have found twisting pipe cleaner around it is stronger and easier than rubber bands. Also, I posed the turret cocked to the side in action.
Most importantly, I named my guys. Okay, they had names. What I mean is that referring to Earnest and Ferrier's account "Avengers at Midway" (found on-line), and choosing from the decal numbers I have, I've committed to 8-T-4, so my pilot is ENS Oswald Gaynier, the unseen navigator/radioman/lower gunner is ENS Joseph Hissem, and the turret gunner is Sea1/c Howard Pitt.
thanks!
-Sean.
flyboy92187
_VISITCOMMUNITY
Wisconsin, United States
Joined: March 30, 2011
KitMaker: 199 posts
AeroScale: 150 posts
Posted: Wednesday, August 03, 2011 - 09:27 AM UTC
Jim,
You sir are insane!!! Do you have a special tool for the pe on those boats? I look forward to seeing continued progress!
potchip
_VISITCOMMUNITY
Australia
Joined: August 19, 2008
KitMaker: 85 posts
AeroScale: 14 posts
Posted: Thursday, August 04, 2011 - 04:42 AM UTC
Michael, small, sharp pointed tweezers is all you need. The PE parts are just aftermarket bits all cut and fit the boats perfect.

Continue work on island, ~70%

potchip
_VISITCOMMUNITY
Australia
Joined: August 19, 2008
KitMaker: 85 posts
AeroScale: 14 posts
Posted: Sunday, August 07, 2011 - 12:22 AM UTC
Dustin off Akagi's smaller island for a parade of sorts


Maybe I will build the 4 carrier's island first..building sequence:- stochastic random walk style..
windysean
_VISITCOMMUNITY
Wisconsin, United States
Joined: September 11, 2009
KitMaker: 1,917 posts
AeroScale: 563 posts
Posted: Tuesday, August 09, 2011 - 01:04 AM UTC
Potchip, not a shipbuilder myself, it's cool to watch yours come together so well!
As for my build, I'm definitely not building Avenger 8-T-1, since it appears that EVERYONE else already has. I went to the EAA Museum in Oshkosh and saw their models, and their example of an Avenger was 8-T-1, then yesterday I read the latest FineScale Modeler magazine, and their preview of next month includes a build of 8-T-1. Besides that, the internet is crawling with pictures of previous modelers' 8-T-1's.
So, what I AM doing is working up to the drudgery of masking the canopies.
I took some before-paint shots though...
FillingCutPcs-20110803-2114.jpg
BareMetalFoil-20110804-2116.jpg
Tailtop-20110804-2141.jpg
Tailbottom-20110804-2144.jpg
I apologize for not taking that last picture better-- obviously my camera focused on the background and I couldn't tell on the tiny preview screen. I've been meaning to take a new one. You can vaguely see the metal punched out from the hole stabbed through it though-- or is that fabric?
Anyway, there's where I stand. More later.
-Sean.
flyboy92187
_VISITCOMMUNITY
Wisconsin, United States
Joined: March 30, 2011
KitMaker: 199 posts
AeroScale: 150 posts
Posted: Tuesday, August 09, 2011 - 04:47 AM UTC
Progress still looks good Sean! Can't wait to see more.
windysean
_VISITCOMMUNITY
Wisconsin, United States
Joined: September 11, 2009
KitMaker: 1,917 posts
AeroScale: 563 posts
Posted: Tuesday, August 09, 2011 - 04:15 PM UTC
Another quick update before life calls me away for a week or so...
All glass in and nose tacked on with some drops of white glue (to pull off after painting), here she is ready for the paint shop:
Before paint 1
Before paint 2
Before paint 3
thanks again for looking, and thanks Michael for the encouragement!
-Sean.
Naseby
_VISITCOMMUNITY
Slovakia
Joined: October 15, 2010
KitMaker: 825 posts
AeroScale: 476 posts
Posted: Sunday, August 21, 2011 - 06:55 AM UTC
@ Jim : Thats is one of the finest work I ever saw, If You continue like that, those boats will be magnificent!
@ Sean: Nice wirk with the angle, it gives the Avenger an agressive look.

I had only a few hours to work on the Val this week, but managed to put some thing together. The engine is done and I started the painting today. Hopefully I will finish it this week.


MichaelSatin
Staff MemberCampaigns Administrator
AEROSCALE
_VISITCOMMUNITY
Colorado, United States
Joined: January 19, 2008
KitMaker: 3,909 posts
AeroScale: 2,904 posts
Posted: Monday, August 22, 2011 - 08:28 AM UTC
More really great work there!

Jim: Very nice islands, can't wait to see the rest of the ships!

Sean: That TBF is starting to look very interesting indeed!

Naseby: I like how that D3A is coming along, looks like you've surmounted the fit issues nicely!

Here's some progress on the 1/32 F2A:


It's really fitting together far better than I was afraid it might. Now that I've gotten to this point, it's starting to look like an airplane. Or a beer barrel with wings.

Michael
windysean
_VISITCOMMUNITY
Wisconsin, United States
Joined: September 11, 2009
KitMaker: 1,917 posts
AeroScale: 563 posts
Posted: Tuesday, August 23, 2011 - 03:45 AM UTC
Back at it. Masked with a combination of cellophane tape and blue painter's tape. This is the first plane I finally painted the inside of the canopy framing-- I learned that here, and I remembered to do it on this one.
AllMaskedReady-20110822-2049.jpg
Primed last night-- no photos of that. More to follow!
-Sean H.
windysean
_VISITCOMMUNITY
Wisconsin, United States
Joined: September 11, 2009
KitMaker: 1,917 posts
AeroScale: 563 posts
Posted: Thursday, August 25, 2011 - 12:30 PM UTC
Assuming that too many posts is better than too few...
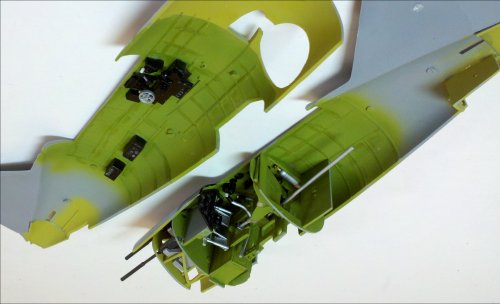
I don't use an airbrush (someday, probably), so I lightly brushed some darker low-lights to emphasize the joints. We'll see how this turns out...
BrushedUnderlights-20110823-2229.jpg

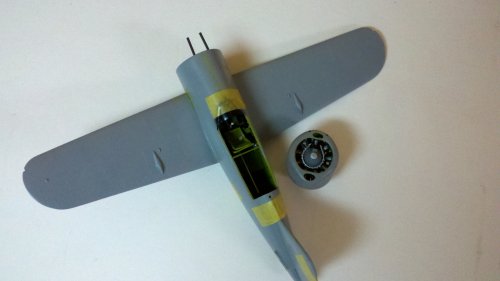
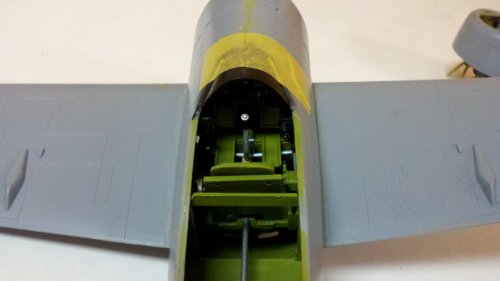
I used spray paint (Model Master? I see my Dullcote is Testor's brand) for the blue top color (yes, I cheated and used Intermediate Blue that I found instead of the proper Blue Gray, but they're very close). It sprays VERY heavy, so I don't think my attempt at surface prep mattered too much.
I masked with Sillyputty "worms" and LOTS of regular painter's masking tape.
PaintDrying-20110824-2158.jpg
What I didn't realize is that (a) the Sillyputty is not reusable after this application, and (b) that the heavy application, combined with squished "worms" put a heavy overlap of paint on the Sillyputty, so that when I pulled off the masks, there was a loose flap of paint in some places (hard to see in this out-of-focus photo).
PulledUpPaint-20110824-2214.jpg
I left it overnight to cure or shrink or whatever it's going to do, so I can handle it more aggresively and probably cut off the flap with my Xacto knife.
This time I'll remember to keep the window masked until after I've glossed, decaled, and Dullcoted. The last time, I had to mask over the windows again (although not every pane, just over the canopy as a whole).
Thanks for reading along, and despite my little gripes I think it's looking pretty decent.
-Sean.
Naseby
_VISITCOMMUNITY
Slovakia
Joined: October 15, 2010
KitMaker: 825 posts
AeroScale: 476 posts
Posted: Tuesday, August 30, 2011 - 09:35 AM UTC
Sloooooowly making headway on this one. Since I dont have any actual decals for Midway planes, I put something together from masks.
As I stated earlyer, Im doing the plane of Lt. Michio Kobayashi (1914-1942), leader of the Kanbaku Buntai. Kobayashi was leading the first strike against the Yorktown. I depicted the Val as it would stand on the flight deck of the Hiryu at about 1030 on june 4th with only the main bomb yet attached and the crew not yet in the cockpit, probably staring in disbelieve on the burning Soryu, Akagi and Kaga in the distance. Kobayashi, Flying the "BII-201", Kobayashi was able to find the Yorktown. From 18 Val that left the Hiryu, seven made it to the target. Kobayashi missed, but others were more lucky. Yorktown was damaged and lost speed. It was the beginning of her end. It is believed that Kobayashi was shot down by an F4F after the actual attack on Yorktown was over.