Early Aviation
Discuss World War I and the early years of aviation thru 1934.
KotS GB 2011 SPAD VII warreni
vulkanizer
_VISITCOMMUNITY
Croatia Hrvatska
Joined: December 26, 2009
KitMaker: 144 posts
AeroScale: 109 posts
Posted: Thursday, July 07, 2011 - 08:51 AM UTC
Man, you can make your personal GB.
No doubt, this will be another beautiful bird, I closely follow
warreni
_VISITCOMMUNITY
South Australia, Australia
Joined: August 14, 2007
KitMaker: 5,926 posts
AeroScale: 2,201 posts
Posted: Thursday, July 07, 2011 - 09:25 AM UTC
Thanks for that Dani.. I wonder if anyone else has ever done that.. I have slowed down a bit lately due to working again.

I got the decals on the SPAD at 2am this morning. Pheon aren't bad but can tear if you are not careful.

Photos later
warreni
_VISITCOMMUNITY
South Australia, Australia
Joined: August 14, 2007
KitMaker: 5,926 posts
AeroScale: 2,201 posts
Posted: Thursday, July 07, 2011 - 10:12 PM UTC
Well the Pheon decals arrived earlier in the week and I got them on in the wee hours of last night.. Couldn't sleep..


Pheon said you didn't need decal softeneing agent but I used it anyway..
Decals are not too bad at all. I did manage to tear one a tiny bit but you can't see it after the decal dried.
Hopefully will get all the eyelets in place and the wings glued on over the weekend.
Cheers and thanks for looking.
CaptainA
_VISITCOMMUNITY
Indiana, United States
Joined: May 14, 2007
KitMaker: 3,117 posts
AeroScale: 2,270 posts
Posted: Saturday, July 09, 2011 - 04:57 AM UTC
Great build. Gotta love those Pheon Decals.
gajouette
_VISITCOMMUNITY
Texas, United States
Joined: February 01, 2007
KitMaker: 365 posts
AeroScale: 356 posts
Posted: Saturday, July 09, 2011 - 09:02 PM UTC
Warren,
She's shaping up to be one beautiful SPAD. Great work my friend,
Regards,
Gregory Jouette
warreni
_VISITCOMMUNITY
South Australia, Australia
Joined: August 14, 2007
KitMaker: 5,926 posts
AeroScale: 2,201 posts
Posted: Saturday, July 09, 2011 - 09:27 PM UTC
Thank you Gregory.
Unfortunately a bad thing happened to the SPAD today...
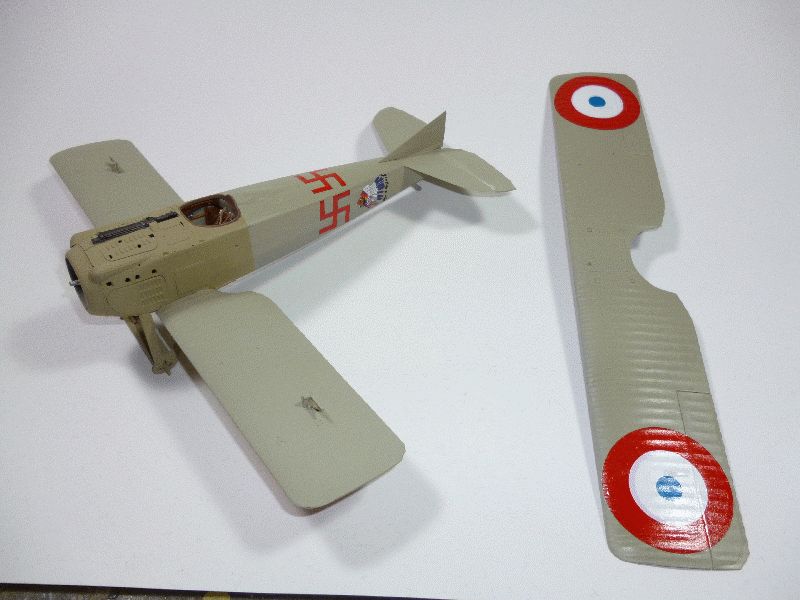
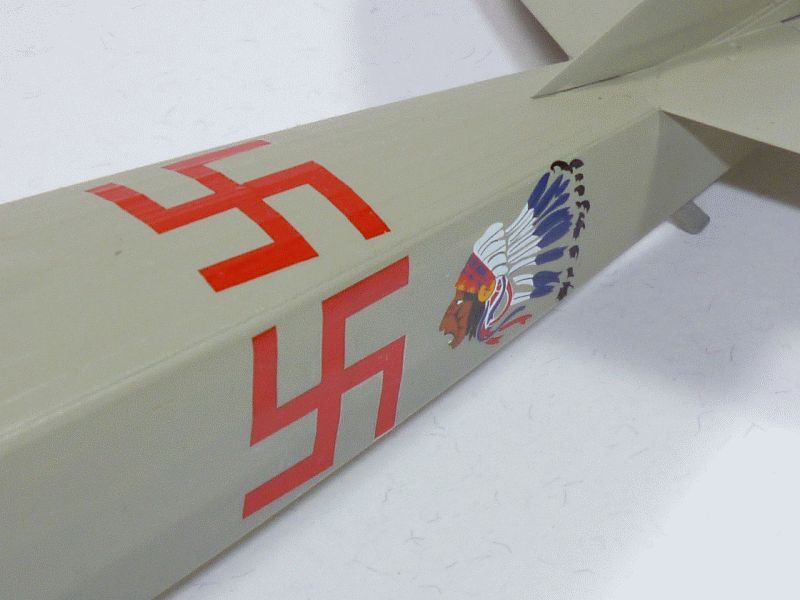
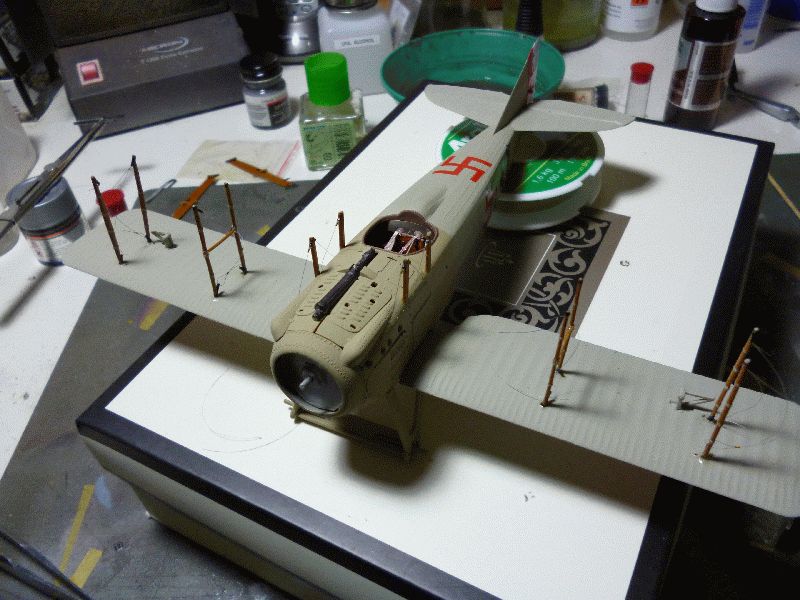
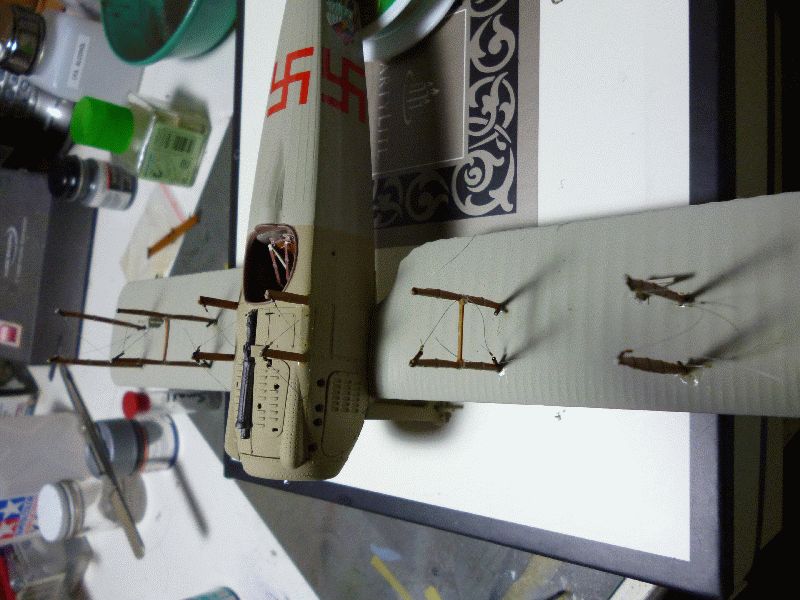
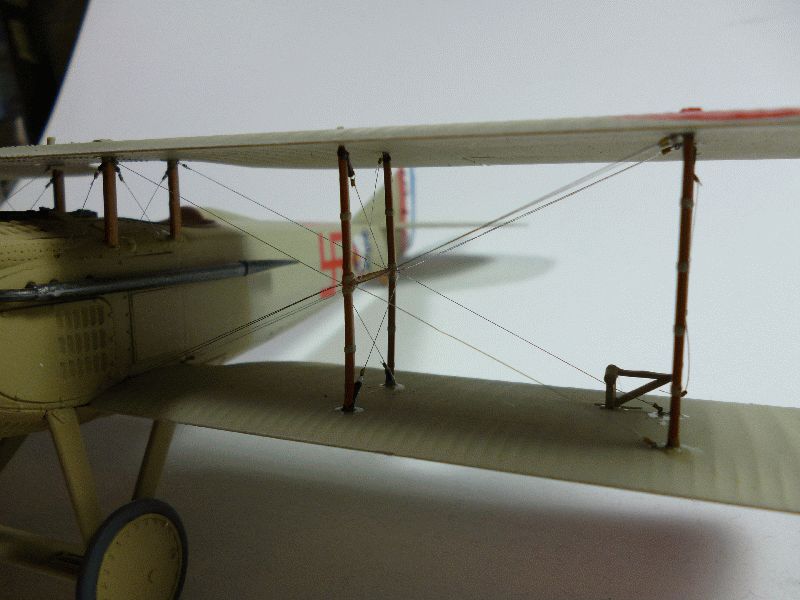
I had all the struts on and the bracing rigging loosely in place. I had glued four of the struts into position on the top wing and was about to repair where one of the struts had come away.Then for some reason or another something heavy fell off something and got a direct hit on the hapless SPAD which resulted in every strut detaching itself, the starboard lower wing breaking off, aileron actuating levers all breaking and various chips and scrapes to the paint. Amazingly the undercarriage survived unscathed. That was the good news.
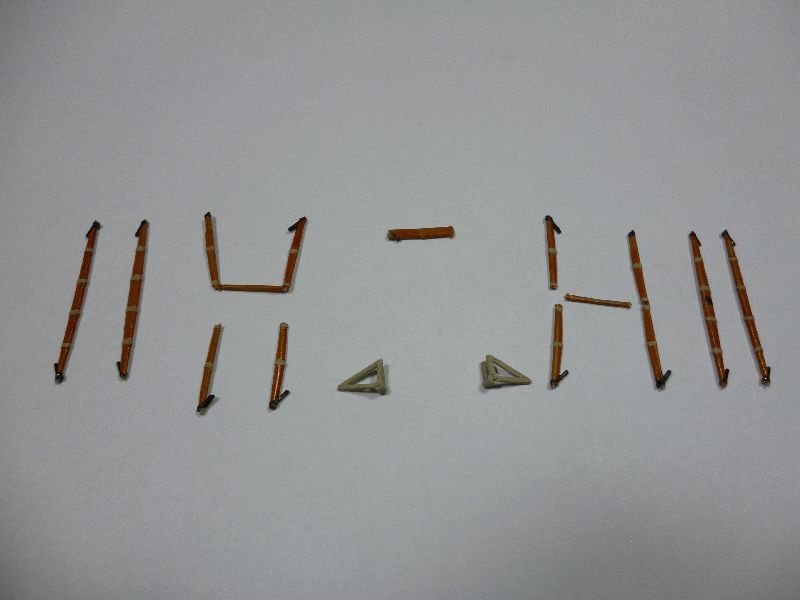
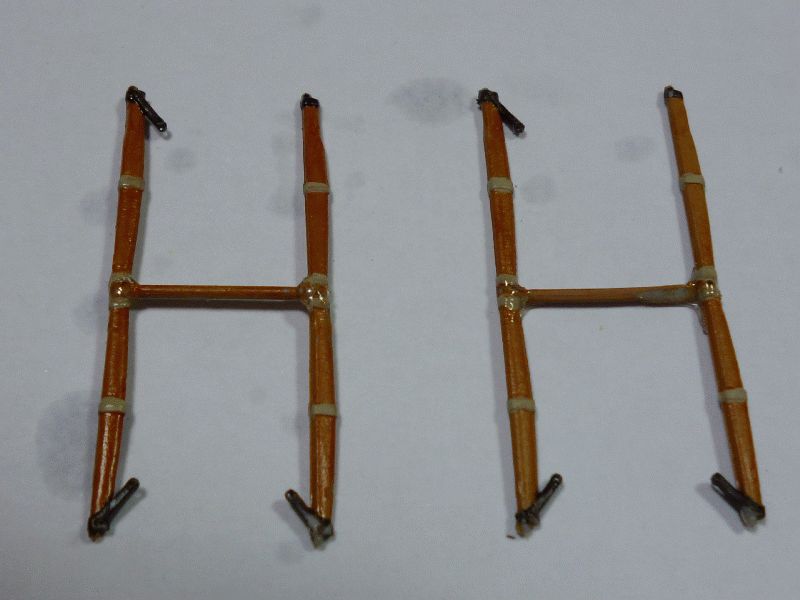
The bad news is that one of the interplane struts snapped in half and I can't find the other half. Two of the outer struts both snapped in half, which I fixed already. But the main problem is that the inner struts, the ones joined in the middle all broke up, and the middle section and two strut halves of one of them have also disappeared.
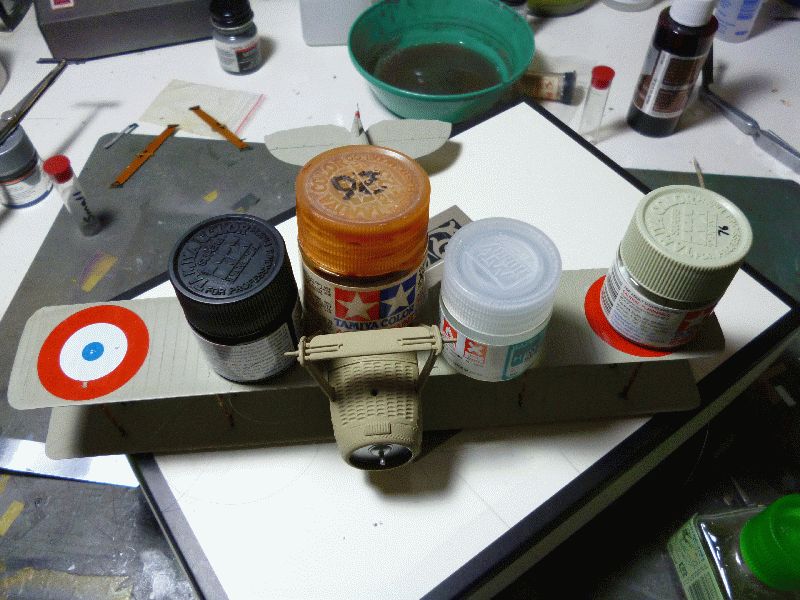
I managed to fix the snapped off wing, remembering that the lower wings are a single moulding with the bottom of the fuselage so it was a big hit, by drilling some holes in the wing and its root and glueing some lengths of piano wire in place in the wing and sliding the wire into the holes in the root, then liberally applying CA glue to make hopefully a strong joint.
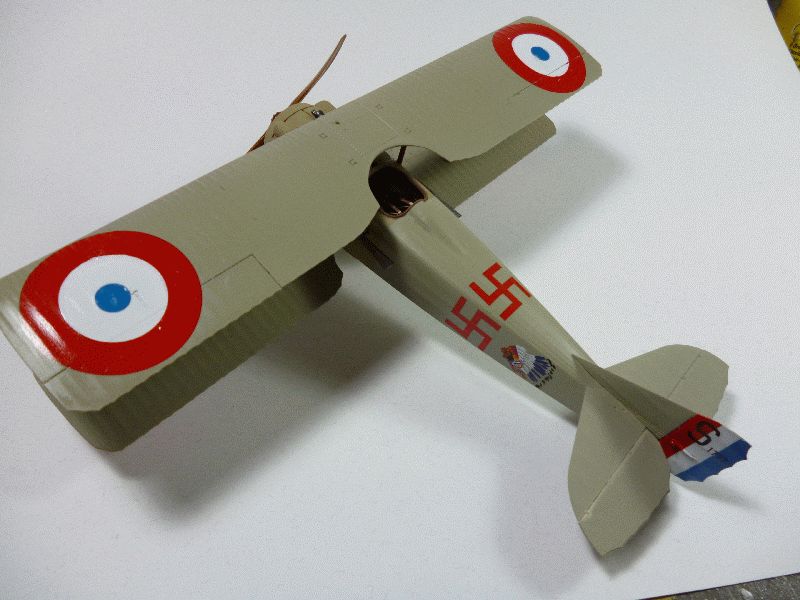
So that means the SPAD is not going to be finished unless I can source some new struts as those inner ones will not be glueable as they were already weakened bu my drilling holes in them for the rigging. I am hoping and praying that Mr Roden will let me buy a sprue or two with the struts on them.
It was so close and is now dead in the water.
Moral of the story, make sure you don't have heavy things on top of drawers on your modelling bench, unless you like crunched models.
Signing off..
I think I need
JackFlash
_VISITCOMMUNITY
Colorado, United States
Joined: January 25, 2004
KitMaker: 11,669 posts
AeroScale: 11,011 posts
Posted: Sunday, July 10, 2011 - 03:06 AM UTC
Wow! Sounds like a situation several modelers here have described previously. The good thing is we early aviation modelers have a resolve that helps us survive catastrophes like this. Consider replacements from real wood as an alternate. You certainly can approach Roden as they are great people. And don't be surprised if they respond positively.

Be sure to point them to this thread and explain exactly what you want. Snail mail address is a must as well. Give them everything. Offer to pay for the sprues and postage. This is only courteous.
mtnflyer
_VISITCOMMUNITY
Alberta, Canada
Joined: March 08, 2009
KitMaker: 394 posts
AeroScale: 360 posts
Posted: Sunday, July 10, 2011 - 04:13 AM UTC

Quoted Text

Then for some reason or another something heavy fell off something and got a direct hit on the hapless SPAD


It wasn't a cat was it?

Your the most prolific modeler I've ever seen, Warren. Hoping Roden can help you out with this issue. But, I'm sure they will; its just darn good PR.
thegirl
_VISITCOMMUNITY
Alberta, Canada
Joined: January 19, 2008
KitMaker: 6,743 posts
AeroScale: 6,151 posts
Posted: Sunday, July 10, 2011 - 04:13 AM UTC
Ouch !
Sorry to hear about the mishap Warren . If i had the kit I would send you the parts needed so you can continue on with your build . Stephen has made an excellect suggestion on using wood and making your own replacements .
Like Stephen has said let them know what happened .....
lcarroll
_VISITCOMMUNITY
Alberta, Canada
Joined: July 26, 2010
KitMaker: 1,032 posts
AeroScale: 1,025 posts
Posted: Sunday, July 10, 2011 - 05:07 AM UTC
Warren,
Man, do I feel for you!! You must be beside yourself. On the bright side I'll bet Roden steps up to the plate; you've got a number of their kits on your record here and as Guy says, giving you a helping hand is just good PR and business sense
I'll be watching this one closely as I have 3 Roden's in my "someday" pile and foresee no end of decal problems at the very least.

Good luck with your request,
Cheers,
Lance
warreni
_VISITCOMMUNITY
South Australia, Australia
Joined: August 14, 2007
KitMaker: 5,926 posts
AeroScale: 2,201 posts
Posted: Sunday, July 10, 2011 - 05:31 AM UTC
Thanks Stephen, Guy, Terri and Lance.
I sent an email to Roden last night. There is no contact us email address on the site but I used the only one there I could find. I got one to them before and they came through really well with bits for my Fokker D.VI, and I have offered to buy the sprues I need.
Only problem with making my own is I am missing some vital parts to the middle struts and have no plans in 1/32, not to mention I am as good at carving as speaking Latin..
I also did an Internet search but couldn't find anyone who makes after-market replacements for the struts.
Oh well.. maybe, if Roden don't come through, I can make my own.. Must have patience now and wait for Mr or Mrs Roden to get back to me.
Thanks again guys and girls...
CaptainA
_VISITCOMMUNITY
Indiana, United States
Joined: May 14, 2007
KitMaker: 3,117 posts
AeroScale: 2,270 posts
Posted: Monday, July 11, 2011 - 09:06 AM UTC
Stephen has had a few mishaps in the past. He has posted updates showing how he repaired them. So fear not the battle damage, it is just another chance to excell at something new.
warreni
_VISITCOMMUNITY
South Australia, Australia
Joined: August 14, 2007
KitMaker: 5,926 posts
AeroScale: 2,201 posts
Posted: Monday, July 11, 2011 - 09:17 AM UTC
I found two more pieces this morning, the cross brace from one of the inner struts and a complete outer strut, still with the rigging line attached..
warreni
_VISITCOMMUNITY
South Australia, Australia
Joined: August 14, 2007
KitMaker: 5,926 posts
AeroScale: 2,201 posts
Posted: Friday, July 15, 2011 - 07:20 PM UTC
Well, I found the last piece of the jigsaw puzzle that the SPAD's struts turned into.

As you can see the inner strut assemblies where not in too good condition, some may say stuffed. But I thought to myself I may be able to fix them using CA Glue to hold the whole shebang together... So... I taped parts of the struts down and slid plastic under them to stop them sticking to the paper and..

Now the only problem is I am not sure if I will be able to drill through the centre sections of the struts to let me rig it with some authenticity, but we shall see.
I was looking online the other day and noticed that Part of Poland makes a set for this kit that has the strut ends and middles that I need, but I am too poor to buy it at the moment so I will just take my chances with the ones I have.
warreni
_VISITCOMMUNITY
South Australia, Australia
Joined: August 14, 2007
KitMaker: 5,926 posts
AeroScale: 2,201 posts
Posted: Saturday, July 16, 2011 - 10:00 PM UTC
Like a phoenix rising from the ashes...


The repaired struts are again mounted on the lower wing. I used Extra Thin Tamiya Cement first up, and then when that dried I applied CA glue to reinforce the joints as there is only a very small area for the plastic to weld to plastic.
After doing all the interstrut and cabane strut rigging I decided to go for it and put the upper wing in place again. Oh, and none of the interstrut rigging was tightened yet but the cabane stuff was.
So there you have it, back to the point I was at before the catastrophe struck.
lcarroll
_VISITCOMMUNITY
Alberta, Canada
Joined: July 26, 2010
KitMaker: 1,032 posts
AeroScale: 1,025 posts
Posted: Sunday, July 17, 2011 - 02:26 AM UTC
Nice recovery Warren. Per the old expression, you have "snatched victory from the jaws of defeat" !

Cheers,
Lance
CaptainA
_VISITCOMMUNITY
Indiana, United States
Joined: May 14, 2007
KitMaker: 3,117 posts
AeroScale: 2,270 posts
Posted: Sunday, July 17, 2011 - 04:50 AM UTC
Nice recovery. I always like to see the wounded warrior come back with a new wife. So, what exactly did fall on it?

And to set the record straight, my cats have never broken one of my models. I do occasionaly have to chase them down to get one of the pieces back. The pieces slide real nice on the oak floors.
warreni
_VISITCOMMUNITY
South Australia, Australia
Joined: August 14, 2007
KitMaker: 5,926 posts
AeroScale: 2,201 posts
Posted: Sunday, July 17, 2011 - 08:52 AM UTC
Thank you.
Cats love playing with things that is for sure, but mine don't seem to anymore, and they had nothing to do with this. What fell on it was a book I had used once to put another model on so I could move it easily while it was drying so I could continue with another build. Hardcovers can be very heavy even when small.
thegirl
_VISITCOMMUNITY
Alberta, Canada
Joined: January 19, 2008
KitMaker: 6,743 posts
AeroScale: 6,151 posts
Posted: Tuesday, July 19, 2011 - 04:15 PM UTC
Nice to see you back on track and you found the missing items for the struts .
Will be looking forward to your next up-date
JackFlash
_VISITCOMMUNITY
Colorado, United States
Joined: January 25, 2004
KitMaker: 11,669 posts
AeroScale: 11,011 posts
Posted: Tuesday, July 19, 2011 - 09:50 PM UTC
Excellent! The black hole under your desk has spewed forth the bits and bobs! You have successfully joined the broken parts and with luck the CA webs will hold true.
Mgunns
_VISITCOMMUNITY
Arizona, United States
Joined: December 12, 2008
KitMaker: 1,423 posts
AeroScale: 1,319 posts
Posted: Wednesday, July 20, 2011 - 01:37 AM UTC
Great recovery Warren: Looking good and looking forward to more.

Best

Mark
wing_nut
_VISITCOMMUNITY
New Jersey, United States
Joined: June 02, 2006
KitMaker: 1,212 posts
AeroScale: 468 posts
Posted: Wednesday, July 20, 2011 - 03:12 AM UTC
No doubt about it a hell of a come back.
vulkanizer
_VISITCOMMUNITY
Croatia Hrvatska
Joined: December 26, 2009
KitMaker: 144 posts
AeroScale: 109 posts
Posted: Wednesday, July 20, 2011 - 06:24 AM UTC
Congratulations, it looks great. So good to see a happy ending
gajouette
_VISITCOMMUNITY
Texas, United States
Joined: February 01, 2007
KitMaker: 365 posts
AeroScale: 356 posts
Posted: Thursday, July 21, 2011 - 01:50 AM UTC
Warren,
Great save my friend .Now you got her going your way.Looking forward to the next update.
Highest Regards,
Gregory Jouette
warreni
_VISITCOMMUNITY
South Australia, Australia
Joined: August 14, 2007
KitMaker: 5,926 posts
AeroScale: 2,201 posts
Posted: Friday, July 22, 2011 - 11:39 PM UTC
Well, after the disaster of a week or so ago the SPAD has risen like a phoenix from the flames of ruin and is finished. The rigging is not as I WAS going to do it but I didn't want to put much pressure on the repaired struts.

Hmm.. I didn't notice that glossy bit before.. Might have to give it another flat coat..

Pheon decals nice to use.

Complicated rigging job. Just when you think you have it all goodly one goes a bit out of shape.. (Right hand side of picture)
Well, that is it for this one. I would dearly like to see WNW put there hands to one of these. But this Roden one might take a bit more work, and after-market decals, but it came out well.
I still haven't heard anything from Roden re the replacement bits. Oh well...