_GOTOBOTTOM
Pre-Flight Check
Constructive critique of your finished or in-progress photos.
Building the Supermodel Blohm und Voss Bv-138
GazzaS
#424
_VISITCOMMUNITY
Queensland, Australia
Joined: April 23, 2015
KitMaker: 4,648 posts
AeroScale: 1,938 posts
Posted: Thursday, April 23, 2015 - 10:58 AM UTC
Hi everyone!
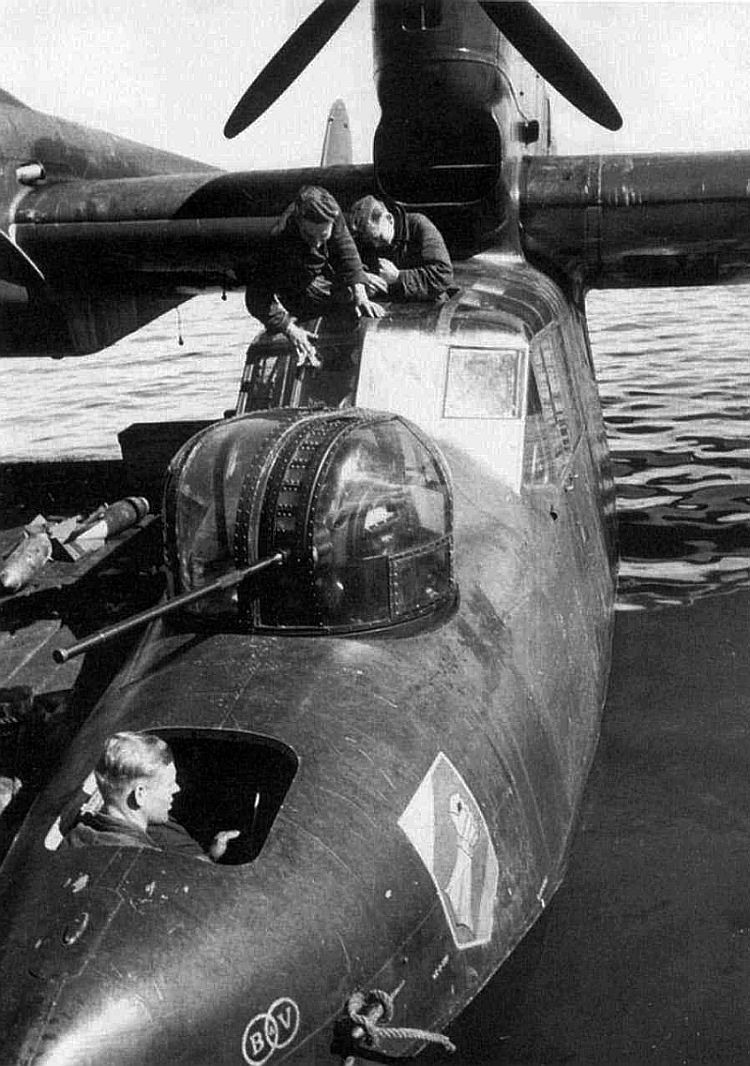
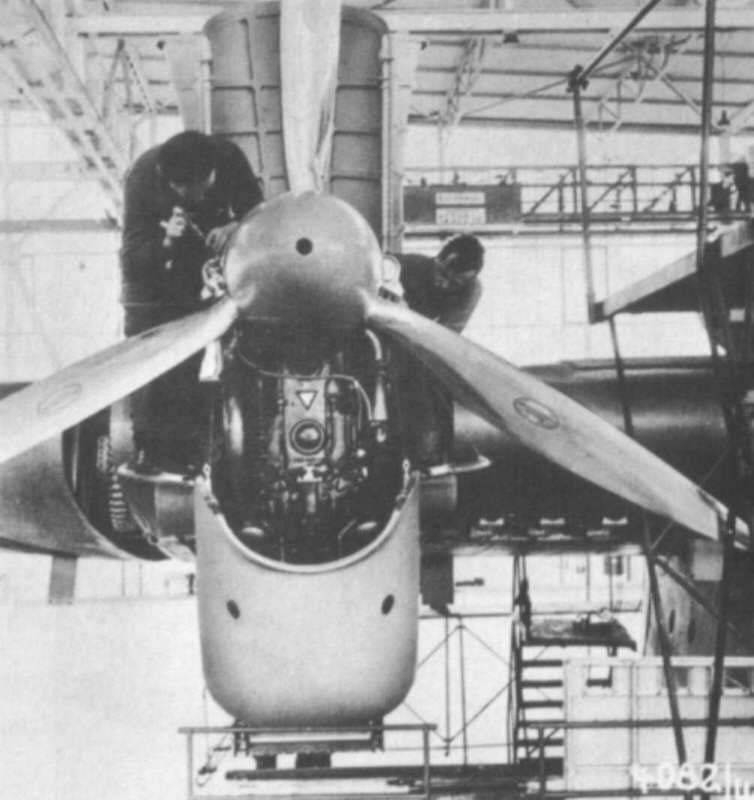
After some some small prompting I've decided to post some of my building effort of the titled aircraft. Here is the box shot:


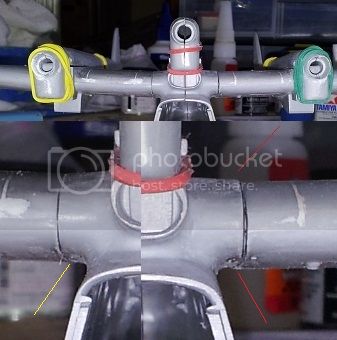
The moldings look pretty good except for these raised panel and rivet lines everywhere.

GazzaS
#424
_VISITCOMMUNITY
Queensland, Australia
Joined: April 23, 2015
KitMaker: 4,648 posts
AeroScale: 1,938 posts
Posted: Thursday, April 23, 2015 - 11:05 AM UTC
I started with the wings this past weekend. I don't get much modelling done during the week. I taped off everything I didn't want to remove or damage and went to work with 600grit wet/dry paper and finished with 1200 grit.


I later removed the tape, exposing the details I wanted to remain, and the bits of raised panel line that were also covered by the masking tape. Also near the wing root, inboard of the port nacelle/fuselage, you can see two deeply marked access panels. I imagine if I were 1/72nd scale, I could lose a a foot in there. So, they'll be filled with putty and I'll decide whether to re-scribe, or use a different technique to highlight them.
JClapp
#259
_VISITCOMMUNITY
Massachusetts, United States
Joined: October 23, 2011
KitMaker: 2,265 posts
AeroScale: 1,715 posts
Posted: Thursday, April 23, 2015 - 06:52 PM UTC
Off and running. You clearly have a good hold of the art. Will be watching.

I quite like the old Supermodel kits, I built all their Italian fighters years ago, but I never had the BV138.
AussieReg
Staff MemberAssociate Editor
AUTOMODELER
#007
_VISITCOMMUNITY
Victoria, Australia
Joined: June 09, 2009
KitMaker: 8,156 posts
AeroScale: 3,756 posts
Posted: Thursday, April 23, 2015 - 08:25 PM UTC
Welcome to Aeroscale Gazza!

I've got this one in the stash, so I will be following on your journey here.

Cheers, D
Joel_W
Staff MemberAssociate Editor
AUTOMODELER
_VISITCOMMUNITY
New York, United States
Joined: December 04, 2010
KitMaker: 11,666 posts
AeroScale: 7,410 posts
Posted: Thursday, April 23, 2015 - 08:49 PM UTC
Gary,
Welcome to the Aeroscale family.

I'll be following your build with much interest, as one doesn't see many builds these days where raised panel lines need to be dealt with.

Joel
JPTRR
Staff MemberManaging Editor
RAILROAD MODELING
#051
_VISITCOMMUNITY
Tennessee, United States
Joined: December 21, 2002
KitMaker: 7,772 posts
AeroScale: 3,175 posts
Posted: Friday, April 24, 2015 - 03:11 AM UTC
Gary,

Yes, welcome to the Aeroscale family.

I too have built and enjoy some of the Supermodel kits. Not many, but I like them.

One day I'll build the 'Flying Cog".
GazzaS
#424
_VISITCOMMUNITY
Queensland, Australia
Joined: April 23, 2015
KitMaker: 4,648 posts
AeroScale: 1,938 posts
Posted: Friday, April 24, 2015 - 04:37 AM UTC
Thank you for the warm welcomes! Except for a couple of warships recently, I'd been out of modelling for a long time. My goal with this kit is to make it closer to lifelike than any previous efforts. By this, I mean:


Even this close, the machine is amazingly clean. Panel lines only lightly appreciable.

Since I've been out of model building for a while, most of what I have is either recently acquired and as cheap as I can get it. One of my main concerns is how fine need my sandpaper be to avoid showing striations after painting. My local hardware carries up to 1200grit.

Here are the access panels at the wing root after filling and sanding.

My preferred putty at the moment is milliput, but I'm thinking a second putty would be nice to have for very small applications. Milliput is a two part putty that is very thick when mixed and I waste a lot of it because I always seem to mix more than I need. Long ago I used Testors white putty and Squadron Green with varying results.

Here are two shots taken from different angles after sanding the wing with 1200grit wet dry whilst wet and then sprayed with Tamiya flat black acrylic which I had purposely over-thinned. No striations seem to show and I took the photos at high resolution.


I may try to go to a slightly higher grit if I can find it cheap enough.

I'm also switching from Tamiya acrylics to Testors Model Master enamels.

Thank you for reading! As always I'm glad to hear your opinions, corrections, and insights.

Gary
GazzaS
#424
_VISITCOMMUNITY
Queensland, Australia
Joined: April 23, 2015
KitMaker: 4,648 posts
AeroScale: 1,938 posts
Posted: Friday, April 24, 2015 - 05:27 PM UTC
A lot of sanding today. All that remains of panel lines are on the control surfaces and the floats. Found some undesirable dimples on the boom nacelles:


They were revealed as soon as the panel lines were gone and the plastic there is very thin, tapering to a knife edge where the front of the nacelle meets the propeller boss. Already messed up one. Dry fitting the boom halves shows lots more putty work.

Glued dorsal and ventral main wing halves together and dry fitted to the fuselage halves. Not a snug fit, so getting the proper dihedral will be important. Lots of putty work to do here as well.

Ordered some aftermarket MG 151 barrels in brass as well as some resin MG 131's.

Thank you for reading!
Joel_W
Staff MemberAssociate Editor
AUTOMODELER
_VISITCOMMUNITY
New York, United States
Joined: December 04, 2010
KitMaker: 11,666 posts
AeroScale: 7,410 posts
Posted: Friday, April 24, 2015 - 06:57 PM UTC
Gary,
I'm not a big fan of using Milliput or any 2 part putty for filling small seams, dimples, etc. For years I've used Squadron Green Stuff, or Tamiya Putty. These days I've switched to Bondo Glazing and spot body putty. It's an automotive product, comes in a tube,and is fairly cheap. It's big advantage over modeling putties is that it doesn't shrink, dries rock hard, sands and scribes perfectly. Unlike most putties, I haven't found it to be porous where a primer coat was needed to seal it before painting.

I'm also very fond of Vallejo's White Acrylic putty for certain situations such as decreasing the size of recessed panel lines, or working around clear parts since you put it on, then wipe across it to remove the excess. It does shrink quite a bit, so a few applications are necessary.

Strange that you should be looking to switch from Tamiya Acrylics to Model Master Enamels, as most of us have gone the other way. Enamels take forever to dry, Acrylics the exact opposite. I can mask over Tamiya Acrylics after letting it dry for a few hours. Enamels, I always seem to need a few days. But the smell of Model Master enamels is something I really don't miss the most.

As for sanding. I only sand with Emery Cloth, not dry side sand paper. I use #320 grit wet, followed by #600 wet. Then I use a 4,000 polishing pad or cloth. If I'm going to be doing a NMF, I'll continue the polishing with 6,000, 8,000, and finally 12,000.

Joel

JClapp
#259
_VISITCOMMUNITY
Massachusetts, United States
Joined: October 23, 2011
KitMaker: 2,265 posts
AeroScale: 1,715 posts
Posted: Friday, April 24, 2015 - 10:43 PM UTC
I dont care for Model master enamels either. They do indeed take weeks to cure fully.

also, take note, DO NOT apply any Tamiya product over Model Master, The Tamiya will attack and destroy the Model Master.
The otherway around seems to be safe - you can use Model master enamel over Tamiya primer.
magnusf
_VISITCOMMUNITY
Stockholm, Sweden
Joined: May 02, 2006
KitMaker: 1,953 posts
AeroScale: 1,902 posts
Posted: Friday, April 24, 2015 - 11:36 PM UTC
Gary! Lots of interesting action going on that I haven't had time to comment on (spent the day on my road bike, even though I bring my smartphone it is a bit too dangerous writing from the peloton...)

Milliput was my first love (yes, I knew Milliput long before I met my wife but now it has lost a bit of ground to both Ulrika and the kids 
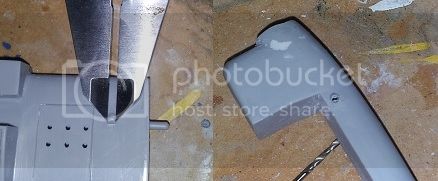
!) and it is excellent for all big jobs where you need to really build something or fill in a big hole (check my 262-thread later tonight for a good example. Milliput doesn't shrink (like all epoxies), doesn't attack the plastic (unlike solvent based putties that needs to be applied in thin layers and with a certain amount of care in order to not distort and melt the plastic) but it also doesn't adhere as well as the solvent based ones and can be tricky to "feather" into surrounding areas. As Joel, I also use an automotive solvent-based body putty (I suppose these can be found in automotive supply stores around the world, different labels but probably more or less the same stuff inside) for filling tiny seams and blemishes. I think it still shrinks a bit but nowhere near Green Putty for instance that is also very porous.

Acrylics or enamels: I remember enamels as a bit more "sturdy", they bit better to the plastic and they were less prone to scratching. What I also remember was the smell and the petroleum-based cleaning procedure of the airbrush and that's what tips the scales for me: I find the acrylics so much easier to handle that I do a lot more painting than before ("before" was a LONG time ago, I bought my first Gunze bottles in 1994) and that added practice improves my skills. During my Humbrol days, airbrushing was a chore that I preferred to avoid...

Back to the flying boat: your project looks promising (and very enjoyable!) and I think your sanding-approach is entirely right! Sand off, fill in, rescribe what's necessary!


Magnus
GazzaS
#424
_VISITCOMMUNITY
Queensland, Australia
Joined: April 23, 2015
KitMaker: 4,648 posts
AeroScale: 1,938 posts
Posted: Saturday, April 25, 2015 - 01:32 PM UTC
Today...after Sunday chores to prepare for the next week...and a trip to my local hobby store I experimented with lines and paint.

I went with the RLM scheme of 72/73/65. After priming the lower hull of a ship I had water-lined with white primer I marked lines across it with a sharpie, a pencil, and a ballpoint pen, alternating the three along the length of the hull.


I admit that I have limited experience with airbrushing. The RLM 72 and RLM 73 went down too thick, almost blotting out the lines I'd made. With the RLM 65 I went over thin, but think the result might have justified it. I also hadn't lightened the RLM 72 and 73 enough for scale. They still look way too dark. I didn't lighten the 65 at all. Just thinned it to something too close to tinted turpentine.

I went with enamels for a couple of reasons. One of which was being free from that tiny but expensive bottle of Tamiya thinner and all of it's Japanese writing. I can buy Turpentine and mineral spirits for a lot less. Another was that my local hobby store's Master Model rack is kitted out a lot better than the Tamiya rack. It has all of the RLM colors I should ever need.

After work I'll hit the car parts place on the way home for some filler.

Thanks for reading!

Gary

After work t
pbhawkin
_VISITCOMMUNITY
New South Wales, Australia
Joined: November 23, 2009
KitMaker: 179 posts
AeroScale: 170 posts
Posted: Saturday, April 25, 2015 - 05:42 PM UTC
Gary,
Looking good!
I have just discovered a putty called 'perfect Plastic Putty' by Deluxe Materials. It is water based in a tube and goes on easily and smooth beautifully with a wet finger or cloth. Worth a look.
Joel_W
Staff MemberAssociate Editor
AUTOMODELER
_VISITCOMMUNITY
New York, United States
Joined: December 04, 2010
KitMaker: 11,666 posts
AeroScale: 7,410 posts
Posted: Saturday, April 25, 2015 - 08:04 PM UTC
Gary,
I use Tamiya X-20A Thinner for small paint jobs and interiors, but switch to their Yellow cap Lacquer Thinner for all major exterior air brushing jobs. I buy both in their 250ml plastic bottles for less then $10 each, and that's enough for each to last several years. The smaller bottles are just outrageous in price. Same goes for their pants. Whenever the color is available in the larger 23ml jar, I buy it rather then the smaller 10ml jar which turns out to be much more expensive.

I've tried thinning MM enamels with a multitude of Store generic Odorless Thinners, Mineral Spirits, and Turps. They work ok, but nothing comes close to their Universal enamel thinner which I buy in the 236ml red can.

When cleaning my air brushes or brushes I use the store brands, never the thinning agents as it's much too expensive to waste even a drop of them on cleaning.

If you haven't tried it, I use Iwata air brush cleaner during a session to change colors, and cheap nail polish remover with Acetone afterwards. If I shot enamels then I switch to a big box brand of Lacquer cleaner.

Joel
GazzaS
#424
_VISITCOMMUNITY
Queensland, Australia
Joined: April 23, 2015
KitMaker: 4,648 posts
AeroScale: 1,938 posts
Posted: Sunday, April 26, 2015 - 09:58 AM UTC
Thanks for sharing your experience, fellas! Hopefully I can apply what you've shared and turn out a decent model. There's so much more available now than there was when I was a teen trying to scratch together a few dollars to afford a kit and some supples.
GazzaS
#424
_VISITCOMMUNITY
Queensland, Australia
Joined: April 23, 2015
KitMaker: 4,648 posts
AeroScale: 1,938 posts
Posted: Tuesday, April 28, 2015 - 02:10 PM UTC
Dry-fitting for fun! No...not really.
Because of this bird's unique shape, I haven't been in a rush to complete the cockpit, Propeller assemblies, or gun turrets. Regarding the latter two, I'm going to install them last no matter how much I have to modify them. I just can't see myself puttying, Scraping, and sanding without ruining them if they were in place. I don't need them to spin or rotate.

this is the bow shot with two insets.

On the port wing, I'll have to expand the hole for one locator pin and pivot the forward edge upwards to get it into place. Note the red lines. On the starboard wing, I'll have to reduce the thickness of the inner wing so that it matches the wing root.

On this dorsal shot, you can see that all four corners of the wing roots are gonna need some kind of treatment.

At this time, I'm not sure where to add, and where to remove.

On this port view, you can see that at both front and rear edges of the wings, I have to decide what I'll keep and what I'll remove. Do I bring the wing up to the boom, or the boom down to the wing?

What scares me most, is that once I think the plane is ready for painting, my eyes will notice that the plane's (generally) square shape is twisted.

It's sort of opposite on the starboard side.

The portion of the lower wing that joins with the starboard boom is actually thinner than that of the port wing...challenges...challenges.

I really wasn't counting on things being this difficult. The last time I built a twin-boom aircraft was in the seventies. I think it was the 1/48 scale Monogram P-38. Back then I could build a plane in an afternoon. Heh...but I'd never even had a tube of putty.

Finally a 3/4 shot. On both dorsal and ventral sides of both booms are long skinny pieces {note yellow brackets} that are probably way-over scale in width. I'd like to replace them with something thinner without too much need for putty and sanding. I have lead and brass sheet available, but during cutting it would probably turn into curlicues. I have wire, too but being round, it would take filling, and like the sheet would be difficult to straighten perfectly. Their only benefits over sheet styrene is that they can take punishment while the filling and sanding is going on. Any ideas?

The red brackets just show more gaps or ledges to ponder and fix.

Thank you for reading!

And as usual, your critiques or helpful ideas are appreciated.

Gary

Edit: Typos
Joel_W
Staff MemberAssociate Editor
AUTOMODELER
_VISITCOMMUNITY
New York, United States
Joined: December 04, 2010
KitMaker: 11,666 posts
AeroScale: 7,410 posts
Posted: Tuesday, April 28, 2015 - 06:33 PM UTC
Gary,
Certainly a most challenging build for sure. Right now I would approach it as 3 separate sub assemblies, and prepare each one as perfectly as you can, so that once they're joined, there will be only those major joints to deal with.

The engine boom to the wing joints if where I would start. I would modify it so that the leading edges all line up. The trailing edges will now both be short on either side of the boom. Since the inner wing section does indeed line up with the fuselage, I would add a filet of sheet plastic to blend it in. As for the engine boom to the wing, just file and sand till the joint is smooth. Clean and fill in the gap with sheet plastic and putty. Sand and contour. Repeat as necessary.

Honestly, you're going to have to do some major rescribing on both wing sub assemblies from the looks of it.

As for the fuselage subassembly, it looks rough, but not that bad. Careful sanding and shaping, and you should be fine.

Joel
GazzaS
#424
_VISITCOMMUNITY
Queensland, Australia
Joined: April 23, 2015
KitMaker: 4,648 posts
AeroScale: 1,938 posts
Posted: Wednesday, April 29, 2015 - 10:45 AM UTC
Thank you for your thoughts and words, Joel. One thing I'm trying to avoid is too much re-scribing. My hope is to make it look like it does in the pictures from this distance. I will scribe access hatches and covers etc, but the rest I hope to do under the camo painting.

I spent some time thinking about some jigs for the assembly of this beast. Then I came to the realization that there are a few things that will get in the way of future body work:

Under the inside of each wing and on each side of each nacelle there is a small exhaust port. I know that there is no way with my clumsy hands and lack of skill that they will survive. Being closed, they looked wrong anyway. Opening them with a drill and pin-vise left some very fragile remains.

The only answer was to drill out the rest of the material, leaving only an angled hole in which I will later put some fine tubing.

I'm still trying to think my way around the fillets that adorned both dorsal and ventral areas of the booms.

Thank you for reading!

Gary
magnusf
_VISITCOMMUNITY
Stockholm, Sweden
Joined: May 02, 2006
KitMaker: 1,953 posts
AeroScale: 1,902 posts
Posted: Wednesday, April 29, 2015 - 11:07 AM UTC
Gary! I've seen the kit on many shelves but I have never seen one built - now I know why ! It is just the kind of spectacularly odd kind of flying machine that would appeal to me, I might pick one up the next time I see one! They did many more of those "big and odd" aircraft but those were mostly then of Italian origin. Those kits, together with the ones from Italaeri/Italeri, would make up a fantastic collection of flying oddities !


Magnus
GazzaS
#424
_VISITCOMMUNITY
Queensland, Australia
Joined: April 23, 2015
KitMaker: 4,648 posts
AeroScale: 1,938 posts
Posted: Wednesday, April 29, 2015 - 12:00 PM UTC
Hey Magnus! Interestingly enough, the instruction sheet contains advertisements of Italian planes in 1/72 supermodel:

Cant Z 506b floatplane
SM-81
Cant Z1007bis single tail
Cant Z1007bis twin tail

Unfortunately this instruction sheet is from 2008. Probably something available on eBay.

Gary
magnusf
_VISITCOMMUNITY
Stockholm, Sweden
Joined: May 02, 2006
KitMaker: 1,953 posts
AeroScale: 1,902 posts
Posted: Wednesday, April 29, 2015 - 12:23 PM UTC

Quoted Text

Hey Magnus! Interestingly enough, the instruction sheet contains advertisements of Italian planes in 1/72 supermodel:

Cant Z 506b floatplane
SM-81
Cant Z1007bis single tail
Cant Z1007bis twin tail

Unfortunately this instruction sheet is from 2008. Probably something available on eBay.

Gary


I checked the Italeri site and at least the SM-81 (in Italeri boxing) and the Z1007 twin tail (in Supermodel boxing) are available right now. Italeri owns Supermodel so those old moulds are probably rotated between the brands and I have seen many of them during the years!

The 506 would look SO nice moored besides your B&V!


Magnus
GazzaS
#424
_VISITCOMMUNITY
Queensland, Australia
Joined: April 23, 2015
KitMaker: 4,648 posts
AeroScale: 1,938 posts
Posted: Sunday, May 03, 2015 - 12:17 PM UTC
Well, now I can show my first efforts to take parts to irreversible failure.

I haven't built a plane in years. I had always hand-painted my canopies before. This was my first attempt at masking. And well...digital photos don't lie...it looks pretty bad. At one point in time, there had been nylon masks for this kit. They would have been handy.

There are two HDL 151 turrets as well as the canopy. The frame lines on both turrets were very ambiguous. At times, even with 3X magnification there was nothing to see. The frames on the canopy were better but in neither case did my effort bring a nice result.


The first layer of paint was a gray I mixed to match the decal for the instrument panel. I thought it a little light for RLM 02, but carried on with the color irregardless. Unfortunately it shows through at the edges of the frames. Now I see why some genius made inner and outter nylon masks.

Not very happy at the moment. Anyone got a remedy that isn't buying a new kit?

Thanks for reading!
Joel_W
Staff MemberAssociate Editor
AUTOMODELER
_VISITCOMMUNITY
New York, United States
Joined: December 04, 2010
KitMaker: 11,666 posts
AeroScale: 7,410 posts
Posted: Monday, May 04, 2015 - 08:44 PM UTC
Gary,
I feel your frustration, believe I do. I've messed up more then my fair share of canopies over the years. If you're that unhappy with them, then strip off the paint, re-mask, and paint again. I know that's a lot of work, and a lot of back tracking, but the final results will make that worth the effort. Just checkout my Spitfire build for evidence of that statement.
Joel
GazzaS
#424
_VISITCOMMUNITY
Queensland, Australia
Joined: April 23, 2015
KitMaker: 4,648 posts
AeroScale: 1,938 posts
Posted: Monday, May 04, 2015 - 11:16 PM UTC
Hi Joel,
Thanks for your response. I fear staining/fogging the canopy with whichever solvent I might use. Seems to my memory that was what would happen years ago. I imagine I could experiment by painting on some sprue.

Thank you for reading!

Gary
GazzaS
#424
_VISITCOMMUNITY
Queensland, Australia
Joined: April 23, 2015
KitMaker: 4,648 posts
AeroScale: 1,938 posts
Posted: Tuesday, May 05, 2015 - 10:33 AM UTC
This kit gives the builder the opportunity to hone his skills. ON the nacelle of each engine is a small raised square where some large square vent holes should be.


An interesting variation are these two small holes to the outer corner of each nacelle.


I'll stick with the squarish hole and support since it seems to be more common. I always hate cutting and drilling into a visible surface of the model.
 _GOTOTOP