_GOTOBOTTOM
Pre-Flight Check
Constructive critique of your finished or in-progress photos.
F/A-18A+ Hornet, USMC
frank1833
_VISITCOMMUNITY
Virginia, United States
Joined: May 26, 2009
KitMaker: 16 posts
AeroScale: 8 posts
Posted: Tuesday, September 08, 2015 - 05:35 PM UTC
An F/A-18A+ Hornet of VMFA-312, Checkerboards, May 2007, Operation Enduring Freedom.

A+ refers to Hornets where the original Hughes AN/APG-65 radar was replaced with the Raytheon AN/APG-73. You'll also see reference to A++. Visually speaking, the way to tell the difference between an A and C model is absence of RHAW antennas on the "turtleback" (the hump/spine behind the cockpit) and a couple on the fuselage forward of the cockpit.

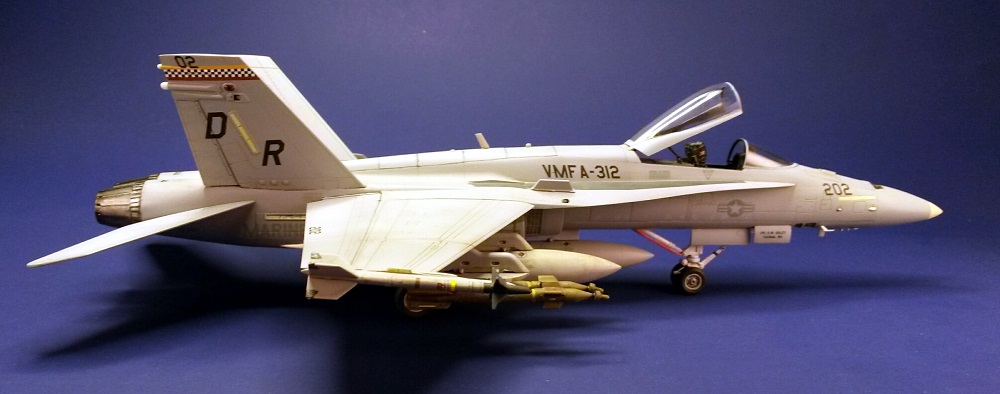
Completed a couple of weeks ago. 1/72 scale Academy kit with Wolfpack-Design ejection seat and MAW Decals ("Alphabet Soup"). Testors Model Master acrylics, Vallejo acrylics, AMMO Panel Line Wash, Mig and Vallejo pigments.

The empty station (no. 7) on the port wing is intentional as it/was SOP for Hornets to leave the station empty (or loaded with a small bodied piece of ordnance like a GBU or missile) The FLIR pod's line of sight is blocked when a fuel tank is mounted on station 7.

The exhaust nozzles' insides come smooth. I added the petals using styrene strips, applying a suitably brownish appearance due to high operational tempo. No doubt the plane captain and the maintenance staff are eager to change them out the first chance they get!

I almost went crazy with the weathering but they didn't get as dirty in 2007 as they did in 2003-04.

Overall, the kit is a good build. There are some issues to overcome, but patience and test fitting help. In fact, my next Hornet build will be another one of these but as a C model. I'll add Wolfpack-Designs dropped flaps/folded wings set.


Littorio
_VISITCOMMUNITY
England - South East, United Kingdom
Joined: September 15, 2004
KitMaker: 4,728 posts
AeroScale: 1,351 posts
Posted: Tuesday, September 08, 2015 - 11:10 PM UTC
Frank very nicely done, no longer my scale nor an aircraft I like but I do like what you have done and await your next one.
Joel_W
Staff MemberAssociate Editor
AUTOMODELER
_VISITCOMMUNITY
New York, United States
Joined: December 04, 2010
KitMaker: 11,666 posts
AeroScale: 7,410 posts
Posted: Thursday, September 10, 2015 - 07:26 PM UTC
Frank,
When I build Jets, it's in 1/48 scale as I just can't see well enough to work in 1/72 scale, so I do really appreciate when others can still produce exceptional builds in that scale. And your build is truly outstanding.

1st off, your introduction to the aircraft, helps those of us who are, shall I say, jet insufficient in knowledge of the "beast". Being a modeler, not a aircraft enthusiast has some strange limitations for me. Your explanation of the meaning of the A+ made a lot of sense. Also the often confusing layout of loads outs makes a lot of rational sense.

As for your actual build, it does look rock solid. From what I can see of the paint, it looks quite good. Your decaling weathering is just outstanding. the bottom pictures really shows the attention to detail and weathering that you added.

What I was referring to about the painting, is your lighting. The strong direct top light washes out the variations in tone and whatever weathering you did on the top side.

I've always struggled with the red stripping on the gear doors. I'm not using fine tip markers. Yours is very consistent in color and application. What method did you use to apply it? Are the exhaust cans finished in Metalizers, as they really do look quite convincing.

Looking forward to your F18C build.

Joel
chris1
_VISITCOMMUNITY
Auckland, New Zealand
Joined: October 25, 2005
KitMaker: 949 posts
AeroScale: 493 posts
Posted: Monday, September 14, 2015 - 12:04 PM UTC
Hi Frank,
Looks like you had fun with this build congrats.
I won't comment on quality etc as firstly I'm mainly a painter of busts and figures,any aircraft build starts well then I get bored and return to what I love.case in point my 1/48 scale Bf 109 the old airfix one. Joel for example has completed 2 full builds to my 1 no yet finished.

As Joel asked the red door surrounds were they painted or sharpie? Also any photos of the cockpit and ones of how you detailed the engine cans?

Apologies for the long winded reply.

Chris
SGTJKJ
#041
_VISITCOMMUNITY
Kobenhavn, Denmark
Joined: July 20, 2006
KitMaker: 10,069 posts
AeroScale: 3,788 posts
Posted: Monday, September 14, 2015 - 05:49 PM UTC
Great build, Frank. Really nice painting nd details. Especially considering the scale.
Redhand
#522
_VISITCOMMUNITY
New Jersey, United States
Joined: January 20, 2013
KitMaker: 1,460 posts
AeroScale: 1,443 posts
Posted: Monday, September 14, 2015 - 06:03 PM UTC
I agree with prior comments. Not my scale or interest, but VERY nicely done, and commentary on A+ etc. is appreciated, so we know what we're seeing.
frank1833
_VISITCOMMUNITY
Virginia, United States
Joined: May 26, 2009
KitMaker: 16 posts
AeroScale: 8 posts
Posted: Monday, September 14, 2015 - 06:13 PM UTC
@Luciano: Thank you.

@Joel: Thank you. I'll fix the lighting issue for the next set of photos.

The red edging of the gear doors is use of a no. 0 Raphael paintbrush and Model Master Insignia Red. I use a little Liquitex Flow Aid to lend smoothness to the painting. It takes several coats (2-3) for an even finish.

All the metals are a combination of Alclad II, Vallejo metal acrylics, and Citadel (Games Workshop). Metals look better when they're layered (smoothly) rather than one or two coats. I also use Vallejo Game Color Inks to bring out details in metallic. They dry slower but are smooth. All these techniques were used by Phil Stucinskas in the Forge World book Model Masterclass vol. I. However, I'm not happy with the exhausts' finish. Next time...

@Chris: Thank you. See my reply above to Joel about the red edging and metals. I'll have to take some photos of the cockpit. The Academy cockpit comes with actual detail so I used it. The ejection seat, however, while slightly better than the Hasegawa one, needs work or replacement.

@Jesper: Thank you.

@Brian: Thank you.

chris1
_VISITCOMMUNITY
Auckland, New Zealand
Joined: October 25, 2005
KitMaker: 949 posts
AeroScale: 493 posts
Posted: Monday, September 28, 2015 - 09:27 AM UTC
Hi there Frank,
Thanks for the reply,the doors are an area I struggle with which given, I'm mainly a figure painter, you'd think I'd find it easy.

I guess the problem is if you make a mistake,it's much more difficult to paint a very light colour over a very bold colour.

Anyway waiting on your next build.


Cheers


Chris
spaarndammer
_VISITCOMMUNITY
Noord-Holland, Netherlands
Joined: January 28, 2007
KitMaker: 1,945 posts
AeroScale: 388 posts
Posted: Monday, September 28, 2015 - 10:47 PM UTC
Just a simple Wow! The Hornet looks absolutely great. I am looking forward to your next Hornet.


Jelger
AmTrac1833
#431
_VISITCOMMUNITY
Florida, United States
Joined: February 20, 2014
KitMaker: 376 posts
AeroScale: 39 posts
Posted: Tuesday, September 29, 2015 - 12:52 AM UTC
Awesome build! Always nice to see some Marine Air in scale form.
 _GOTOTOP