

Rotary Wing
Discuss helicopters and other rotary wing aircraft from any era.
Discuss helicopters and other rotary wing aircraft from any era.
Hosted by Gino P. Quintiliani
Trumpeter 1/35th Hind Buid log

Tiger101

Joined: March 02, 2002
KitMaker: 902 posts
AeroScale: 0 posts
Posted: Saturday, July 24, 2004 - 02:58 AM UTC
MLD I have been watching your build. Great job so far. I plan on building both the Hind and the Hip. I am putting it off as I am moving shortly and I want room to spread it out. Any major issues with the fit on this kit? I have heard that there are a few. What is your opinion?


MLD
Joined: July 21, 2002
KitMaker: 3,569 posts
AeroScale: 419 posts
Posted: Saturday, July 24, 2004 - 07:28 AM UTC
Quoted Text
MLD I have been watching your build. Great job so far. I plan on building both the Hind and the Hip. I am putting it off as I am moving shortly and I want room to spread it out. Any major issues with the fit on this kit? I have heard that there are a few. What is your opinion?
Scott,
Issues with the Hip or the Hind?
Other than where to store them when finished?

I'm a little disappointed with the Hip and have not even opened the box yet.
No pylons, no weapons, no cargo compartment troop seats.. very vanilla...
I think I am waiting for Cobra Co or someone else to do resin braces and weapons pylons and I'll use spare Hind ordinance.
The Hind is great, I mean when did you EVER expect to have a 1/35th Hind in injection plastic?
Having said that....there are problems..
The rivets are sunk and should stand proud of the fuselage.
The back of the pilots instrument panel is blank, and the ATGM sight is missing from the sidewall. Something Monogram had in their 1/48th version.
But it does have the passage leading back into the passenger area, but is missing detail here too.
the Transmission is grossly oversimplified and even though the engines are 15+ parts and well molded, they still do not quite capture the rats nest of wiring present on the real thing.
Wheel wells are bare.
The troop compartment sidewalls are missing lots of detail, especially the gun crutches for the passengers to fire out the side windows...
I could go on, but you get the point..
I've been finishing up other projects lately, and am really torn how far to town to go on this one..
At US$100+ I will probably NOT build too many more, but if I go whole hog, I'll never finish it.
More progress next week.
Mike
Tiger101
Joined: March 02, 2002
KitMaker: 902 posts
AeroScale: 0 posts
Posted: Wednesday, August 11, 2004 - 09:10 AM UTC
MLD How goes the build? I guess the oversimplification issues would be there no matter who produced the kit. A new company is listed on PMMS. Warhammer Productions ..... I thought you might like to see the future release list.
WH 002 Cockpit Set for Hind Mi 24E 1/35 (Trumpeter) coming soon
WH 003 Exterior Detailing Set for Hind Mi 24E 1/35 (Trumpeter) coming soon
WH 004 Crew Set 1 (2 figures) for Hind Mi 24E 1/35 (Trumpeter) coming soon
WH 005 Interior Compartment Set for Hind Mi 24E 1/35 (Trumpeter) coming soon
WH 002 Cockpit Set for Hind Mi 24E 1/35 (Trumpeter) coming soon
WH 003 Exterior Detailing Set for Hind Mi 24E 1/35 (Trumpeter) coming soon
WH 004 Crew Set 1 (2 figures) for Hind Mi 24E 1/35 (Trumpeter) coming soon
WH 005 Interior Compartment Set for Hind Mi 24E 1/35 (Trumpeter) coming soon

china_sunyu

Joined: August 23, 2004
KitMaker: 8 posts
AeroScale: 0 posts
Posted: Monday, August 23, 2004 - 09:50 AM UTC
the 1/35 hind is big size, better no fine. you must do your work with more care. 
MLD
Joined: July 21, 2002
KitMaker: 3,569 posts
AeroScale: 419 posts
Posted: Wednesday, September 08, 2004 - 09:47 PM UTC
Quoted Text
MLD How goes the build? I guess the oversimplification issues would be there no matter who produced the kit. A new company is listed on PMMS. Warhammer Productions ..... I thought you might like to see the future release list.
WH 002 Cockpit Set for Hind Mi 24E 1/35 (Trumpeter) coming soon
WH 003 Exterior Detailing Set for Hind Mi 24E 1/35 (Trumpeter) coming soon
WH 004 Crew Set 1 (2 figures) for Hind Mi 24E 1/35 (Trumpeter) coming soon
WH 005 Interior Compartment Set for Hind Mi 24E 1/35 (Trumpeter) coming soon
Arrrgghhhh... I'd hoped to be well and truly done, or at least built past the ability to add aftermarket parts by the time these were announced/released.
If there are new seats and an ATGM sight in the cockpit set, I might pick that one up (he says breaking his word to build the kit quickly and out of the box)
Figures I'll probably pass on.
But did you hear Linden Hill is doing their "Bush WAr Hinds" decals , sets 1 and 2 AND a seperate set of stenciling in 1/35th.
I won't build enough hinds to need all of both sets or even all of one set , but LOVE the 1/72 set and will probably use that one up.
What with summer work this year, the start of the school year, and trying to finish up something for AMPS east, the Hind has sat neglected since the spring.
Hopefully, I'll get back to it soon and not wait for aftermarket...

Mike

OllieC-FWOL

Joined: March 31, 2004
KitMaker: 446 posts
AeroScale: 0 posts
Posted: Thursday, September 09, 2004 - 12:51 AM UTC
MLD, how big is the Hind? Can you quote dimensions?
I might be interested in buying one as a future project along with a Hip, but I need to know if I'll be able to display them!


I might be interested in buying one as a future project along with a Hip, but I need to know if I'll be able to display them!
MLD
Joined: July 21, 2002
KitMaker: 3,569 posts
AeroScale: 419 posts
Posted: Saturday, September 18, 2004 - 07:53 PM UTC
Quoted Text
MLD, how big is the Hind? Can you quote dimensions?
I might be interested in buying one as a future project along with a Hip, but I need to know if I'll be able to display them!
Sorry, been crazy busy with new school year and house guest.
boxtop says main rotor diameter 494mm
overall lenght w rotors 565mm
wingspan 187mm
Mike
Tiger101
Joined: March 02, 2002
KitMaker: 902 posts
AeroScale: 0 posts
Posted: Saturday, September 18, 2004 - 11:48 PM UTC
MLD, Look on the bright side you can now get crew for that beast to show human scale. At the very least the interior cargo compartment might make your work a little easier. You have done so much work on the cockpit and it looks so good. Now I hope they do some sets for the HIP as well. I intend to build both in time. I am not as talented as you as a scratch builder so I need all the help I can get.
Ollie, I am wondering how I will display them as well. The HIP is larger than the HIND as far as I can tell. Both are HUGE! But I can see a nice Diorama being done with either and the ground troops you can find.
Warhammer Productions HIND crew solves one problem for me. I always like to provide crew with what I build (mostly armor) just to show scale. Now we need crew for the HIP.
OllieC-FWOL
Joined: March 31, 2004
KitMaker: 446 posts
AeroScale: 0 posts
Posted: Sunday, September 19, 2004 - 02:45 AM UTC
Excellent!
If I see it relatively cheap, I'll be getting one!
If I see it relatively cheap, I'll be getting one!
MLD
Joined: July 21, 2002
KitMaker: 3,569 posts
AeroScale: 419 posts
Posted: Wednesday, June 01, 2005 - 02:31 PM UTC
All right, so I have been working on a lot of other projects and am finally getting back to this thing..
Along the way, I've aquired some but not all of the Cobra Co interior parts- very nice- Their seats are much better than the kit seats and since the ATGM sight is completely missing from the kit, that is a bonus.
The Eduard interior set arrived today... yeah, I know I borke my word to build quickly and OOTB.. but didn't I say something about being distracted by shiny new things in the inital post.
The Eduard set is nice, but like most aftermarket stuff, not perfect.
The instruction sheets are viewable through the Eduard website www.eduard.cz in PDF format.
I like the idea of the structural framing for the troop compartment, but as the real thing is 3d, with some elements perpendicualr to the walls, the addition of the etched framing only partly corrects the missing bits.
The window frames and hinges look pretty good, but will complicate the interior painting and masking.
The gun crutches are a nice addition, but are beefier looking in real life. The addition of the crutch rails should be replaced with round stock. Even though they are a 2-sided piece, the troop door handles are still pretty flat also.
There are some other boxlike fittings for the interior of the troop compartment, mostly lining the floor area.
No belts for the troop seats are supplied, but we can make those if we want them, can't we?
Still unaddressed are the wiring and hydraulics for the left and right rear corners of the troop compartment.
I was pretty sceptical about the pre-painted instruments, but these look really good. They are done as 2 parts with the dial faces painted in the lower, all you need is a drop of krystal kleer or Future and they'll look great. I got most of those built tonight and the fit is spot on so far. My additions of the air vents below the mail panel interfered with the main panel fitting, but a little trimming and we're back in buisness.
Some of the instrument panel details are almost Aber-esque in their fiddly bits. PE knobs and switches will strain my eyes even WITH the optivisor.
The set includes pre-painted seat belts, but since I'm using the Cobra Co ones, I'll pass on those.
I -lost- about 2 hours tonight getting reaquainted with the kit and pre-folding the box parts, abotu 1/2 of the instrument panels and wall framing.
The set also includes some small panels and fittings for the cockpit, including rear view mirrors, I have not gotten to yet.
If nothing else , this set has brought the kit out of the stash and back into rotation.
We'll see how long my attention lasts this time...
Mike
MLD
Joined: July 21, 2002
KitMaker: 3,569 posts
AeroScale: 419 posts
Posted: Sunday, June 12, 2005 - 03:59 AM UTC
Back to work on the hind..
I've gotten most of the troop compartment etch parts into place, just need to finish up for front office to get the sides buttoned up.

Picture from the Verlinden book showing the rear comaprtment framing. What you get from the Eduard set is good but not perfect.
You are supposed to fold the doorframe at the righthand edge of the pic over onto itself 3 times. The picture shows a solid framing menber, but Eduard has it as a 3-layer thick flat piece.
However, if you folded the etch bit into a box, you could not get it to curve to fit the inside of the fuselage.
The guncrutches and window handles are included as well, but are not completly convincing. I formed mine around a #76 drill bit to get the rounded edges of the gun clamp portion.
You do get convincing replicas of the floor box structure, and the boxes at the upper edge of the sidewall.
The window framing and hinges are also pretty nice.
the boxy structure between the windows is inclided, but you will of course have to add your own wiring.
Interestingly, they also have a framing member pictured in the instructions (part # 31) listed as being placed on this side, which should be on the opposite side of the compartment in side piece A1.
No seatbelts for the troop seats are provided.
The Eduard website shows the cockpit parts in place, but does not include an image of the troop compartment, which is too bad because the interior as the kit provides it is pretty bare compared to reality.
With this detail, I will now try to model one set of side doors open to show off the work.
Mike
I've gotten most of the troop compartment etch parts into place, just need to finish up for front office to get the sides buttoned up.
Picture from the Verlinden book showing the rear comaprtment framing. What you get from the Eduard set is good but not perfect.
You are supposed to fold the doorframe at the righthand edge of the pic over onto itself 3 times. The picture shows a solid framing menber, but Eduard has it as a 3-layer thick flat piece.
However, if you folded the etch bit into a box, you could not get it to curve to fit the inside of the fuselage.
The guncrutches and window handles are included as well, but are not completly convincing. I formed mine around a #76 drill bit to get the rounded edges of the gun clamp portion.
You do get convincing replicas of the floor box structure, and the boxes at the upper edge of the sidewall.
The window framing and hinges are also pretty nice.
the boxy structure between the windows is inclided, but you will of course have to add your own wiring.
Interestingly, they also have a framing member pictured in the instructions (part # 31) listed as being placed on this side, which should be on the opposite side of the compartment in side piece A1.
No seatbelts for the troop seats are provided.
The Eduard website shows the cockpit parts in place, but does not include an image of the troop compartment, which is too bad because the interior as the kit provides it is pretty bare compared to reality.
With this detail, I will now try to model one set of side doors open to show off the work.
Mike

Logan
Joined: September 30, 2004
KitMaker: 523 posts
AeroScale: 18 posts

Posted: Saturday, June 18, 2005 - 07:03 AM UTC
Hi
MLD, you are really gonna need to have yer crew doors open. I added lotsa detail to my interior and ask me how much you can see now ... LOL
Looking good ....
Can't wait to see it FINISHED ...
T
MLD, you are really gonna need to have yer crew doors open. I added lotsa detail to my interior and ask me how much you can see now ... LOL
Looking good ....
Can't wait to see it FINISHED ...
T
Logan
Joined: September 30, 2004
KitMaker: 523 posts
AeroScale: 18 posts
Posted: Wednesday, June 22, 2005 - 12:34 PM UTC
HI
MLD, any updates? What country you planning on doing?
Lots of wicked schemes out there now.
Tom
MLD, any updates? What country you planning on doing?
Lots of wicked schemes out there now.
Tom
Tiger101
Joined: March 02, 2002
KitMaker: 902 posts
AeroScale: 0 posts
Posted: Wednesday, June 22, 2005 - 12:53 PM UTC
MLD I'm glad to see you got going on the beast again. Mine is still in the box waiting for a long free space of time for a good build. I know it will not get done straight thru but I will have to finish a few campaigns first.
I hope you will include a few build photos soon. Again glad your back at it.
I hope you will include a few build photos soon. Again glad your back at it.

fallsmodeler
Joined: August 23, 2005
KitMaker: 11 posts
AeroScale: 0 posts
Posted: Monday, October 03, 2005 - 10:19 AM UTC
MLD
Any word on your Hind? I'm actually using your build log as inspiration for my Hind.
Any word on your Hind? I'm actually using your build log as inspiration for my Hind.
MLD
Joined: July 21, 2002
KitMaker: 3,569 posts
AeroScale: 419 posts
Posted: Monday, October 17, 2005 - 11:03 AM UTC
Hi gang,
Sorry for the delays.. I just checked back in on this thread on the way to post a new one for the KA-50.
I've set the Hind aside for awhile... again... Still not satisfied with my efforts between the cockpit and troop compartment, but I did see a Polish verison with a canvas cover on the rt side.. hmmm...
Tom,
I'm thinking of doing the bumblebee tail Chechnya version with the blacked out bort # from the Linden Hill decal set. But am also partial to the Northern Alliance vers too..
now that the show season is mostly over for me, I just might get the gumption up to get back to work on it.
There were only 3 helos at Granitecon last Sun.. and 2 from the same guy... :-)
More soon, and since we just got a digicam, I can post more pics.
Mike

Blade26

Joined: October 06, 2005
KitMaker: 364 posts
AeroScale: 54 posts

Posted: Wednesday, October 19, 2005 - 08:32 AM UTC
Hi Mld
I've been trying to build te Hind-d FRom MiniHobbyModels (Today Trumpeter) in 1/48 and i'm facing the same problems!
The interior is VERY empty!!!
The part fitting unexceptable!!!
and since i'm not the best modeller and with not much bibliography and talent in scratch building to create the cockpit details i just made it OOTB and got a little dissapointed!
I'll try to post some pics with the so far progress and so you what i've done!!
Anyway i admire your courage to get down and create all that from the start!
Also your knowlegde are stanning!
Good job!!!
Hope you finally get it done and admire this lovely and amazing Huge Helicopter!!!!
Cheers!!!
MLD
Joined: July 21, 2002
KitMaker: 3,569 posts
AeroScale: 419 posts
Posted: Saturday, October 22, 2005 - 08:27 AM UTC
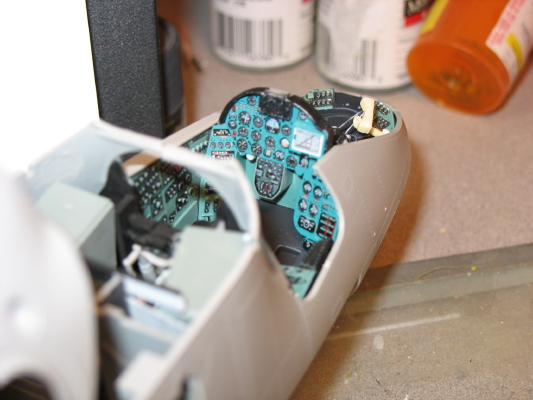
Ok, so after a little surfing and some reference diving, I got to work on the corridor between the pilots and the troop compartment.


A couple of shots showing the overhead and through view of the old kit bits, plus a little framing.
And a pic of each side with the new construction.
The pilots left side seems mostly covered with a large multipart panel, but the right has a large electronics console and loads of wiring.
I'll paint them tonight and post some more images now that we have a decent digicam.
Mike
MLD
Joined: July 21, 2002
KitMaker: 3,569 posts
AeroScale: 419 posts
Posted: Saturday, October 22, 2005 - 12:55 PM UTC
More work on the cockpit/interior tonight.
Added the reaminder of the etched parts to the floor of the gunners seat area.
Most of the Eduard's intrument panel is in place now, just need to paint and detail the back (front) side.
Eduard's beautiful etched and prepainted instrument panel.
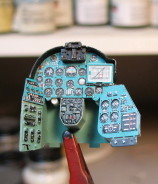
The old front end (back side ) of the pilots instrument panel after being blanked off with sheet styrene, crummy pic, but there is nothing there for the camera to focus on.

Now with the quilting and pencil scribed lines (still need to double the number of lines) and the basic a/c line running across the front.

A head on shot of the unfinished gunners seat and the panel behind his head.

Next up, I think is tackling the back wall of the troop compartment and the visable plumbing at the cockpit end.
Mike
Added the reaminder of the etched parts to the floor of the gunners seat area.
Most of the Eduard's intrument panel is in place now, just need to paint and detail the back (front) side.
Eduard's beautiful etched and prepainted instrument panel.
The old front end (back side ) of the pilots instrument panel after being blanked off with sheet styrene, crummy pic, but there is nothing there for the camera to focus on.
Now with the quilting and pencil scribed lines (still need to double the number of lines) and the basic a/c line running across the front.
A head on shot of the unfinished gunners seat and the panel behind his head.
Next up, I think is tackling the back wall of the troop compartment and the visable plumbing at the cockpit end.
Mike
fallsmodeler
Joined: August 23, 2005
KitMaker: 11 posts
AeroScale: 0 posts
Posted: Monday, October 24, 2005 - 10:25 AM UTC
Hi MLD
Very nice build. I'm actually working on mine in this timeframe.
Just an observation - you may want to check the fit of the right body half, your electronics council, behind the pilot may not agree with the fuselage curve in the top section just behind the bulkhead.
Other than that, please keep going, your what's keeping me going on mine.
 |

WEB HOSTING BY


Copyright ©2021 AeroScale and Kitmaker Network, a subsidiary of Silver Star Enterprises
All Rights Reserved. Please read our Conditions of Use and Privacy Policy.
All Rights Reserved. Please read our Conditions of Use and Privacy Policy.