Early Aviation
Discuss World War I and the early years of aviation thru 1934.
A right Royal Fokker!
JackFlash
_VISITCOMMUNITY
Colorado, United States
Joined: January 25, 2004
KitMaker: 11,669 posts
AeroScale: 11,011 posts
Posted: Sunday, May 14, 2006 - 08:47 PM UTC
Greetings all;

When you work with models like this and you follow the directions without some other references you can get in trouble. Eduard recommends the early fuselage for the following scheme. But here is what you need to know about the problems you will face. Remember folks you saw it here first.
BadBoyFLSTC
_VISITCOMMUNITY
California, United States
Joined: November 20, 2005
KitMaker: 96 posts
AeroScale: 53 posts
Posted: Monday, May 15, 2006 - 06:23 AM UTC
OK Stephen, stupid newbe question. What are you telling us here? Is the exhaust port not capped, and do we not cut down the top? If I want to feel dumb, all I have to do is read you posts Stephen
JackFlash
_VISITCOMMUNITY
Colorado, United States
Joined: January 25, 2004
KitMaker: 11,669 posts
AeroScale: 11,011 posts
Posted: Monday, May 15, 2006 - 09:22 AM UTC

Quoted Text

OK Stephen, stupid newbe question. What are you telling us here? Is the exhaust port not capped, and do we not cut down the top? If I want to feel dumb, all I have to do is read you posts Stephen


For the newbie, it is easy to get lost in this kind of topic. But thats what I am here for. Eduard implied in their artwork, but they did not include it in their instructions. To do this scheme / profile as photo-evidence provides;

A. Instead of using the early production fuselage you need to use the late and cut off select louvres and add the photoetch metal louvres to match the profile. ( Also don't forget That even though Eduard shows the capped exhaust port - in the known images you can not see this. A new side panel may have been fabricated in the field) or;

B. If you use the early production fuselage you have to cap off the the side exhaust exit and carve out the rim on the upper cowling to allow for the high exit exhaust . Then add the Eduard photoetch louvres.

Anthology 2 has some very interesting images of this bird in British captivity (with 84 RAF 1918 -1919.) The altered side panels are a strong indication that this early Albatros built Fokker D.VII had not only both of the side and one upper panel altered BUT had its exhaust changed out from the "early side exit " type to the "later high exit" type. There is not enough evidence to prove that the engine was changed out and exhausts were a fairly common item.

The next question is why? For those of you are less familar with the story, The hot summer months of 1918 manifested a problem with early Fokker D.VII types. Heat build up in the engine compartment and the lack of venting led to the premature cook off of the ammunition stores - inflight. This concerned especially the phosporous capped tracer rounds.

The answer was better air induction to, and venting from, the engine compartment. The early bird in question was probably at the front and the ground crew may have used this airframe to see what they could do in the field to overcome this problem.

The easy answer in many instances was that the upper cowling panels were simply removed in the summer months. But it had to be a sacrifice in performance as it took away from the design characteristics of the machine to do this.

JackFlash
_VISITCOMMUNITY
Colorado, United States
Joined: January 25, 2004
KitMaker: 11,669 posts
AeroScale: 11,011 posts
Posted: Wednesday, May 17, 2006 - 03:34 PM UTC
Greetings all;

I have closed up my fuselages and beginning the war paint application. The kit provided photoetch under the chin-pan access door on my example is off set and should be centered. The hing was at the forward edge on the original machines. These are easy to replicate with a couple of .005 thou plastic sheet /card scraps cut to shape.

Hey Mal have you chosen your paint scheme? (Man I have got to check on myself more often! Its back on page 2 where Mal discusses his chosen scheme... gadzooks Matihilda! Thats what I get for typing at 3am.)
JackFlash
_VISITCOMMUNITY
Colorado, United States
Joined: January 25, 2004
KitMaker: 11,669 posts
AeroScale: 11,011 posts
Posted: Sunday, May 21, 2006 - 12:59 PM UTC
Greetings all;

How many times have you been surprised by the decals that come with your kit? It happens all the time. Sometimes it is a good surprise and seometimes it is not so good. Here is a bit of a heads up on The "Albatros" Johannistahl build decal applications;

While the lozenge is very sturdy as far as decals go the national, unit and personal markings sheet needs to be discussed for a bit of clarification.

On the Jasta 46 machine the white zig-zag fuselage stripes are a bit oversized by about 1/4 of an inch. Cutting them at the apex of two of the spikes will allow you to better fit the sections on the fuselage. Also there is some good evidence that the front of the Jasta 46 machines were black instead of red. Taking this approach you will note also that the white zig-zag fuselage stripes are also a bit translucent. I touched them up with thinned flat white enamel. The yellow fuselage band is not included in the sheet so be prepared to manufacture your own. The white worm decal for the top wing goes down in good shape. But keep it wet on the paper backing until its positioned and then slide it off carefully.

The red stripes for the Jasta 43 machine of Ltn Keller (pages 34-35) are a bit thin in the clear area between the stripes and care should be exercised when applying these two sections ( for the left and right side.) Always use warm water and keep the decal on the paper backing until ready to slide it off into place on the model. Carefully spread the decal out to the right location. Do one side at a time and using sol and set and you will have very good results.

The applications to Heinrich’s machine (pages 36 -37 ) are fairly straight forward.

The red bands for von Greim’s machine (pages 38 -39 ) are not included. And according to photographic evidence we have of this machine, these red bands were roughly applied. There are some ragged edges to their borders over the white areas.

The crosses apply nicely but do benefit from sol & set as well. All of the small serial numbers (in white and black characters) for the ailerons, struts fin , rudder and wheels are represented by one aircraft “Fok. (Alb) 8425/18" The problem is that this is a serial for a late model OAW (Schneidemuhl) machine not an Albatros (Johannistahl) machine. Fortunately Eduard has included individual numbers in very small characters to build your own serial should you desire.
TedMamere
_VISITCOMMUNITY
Moselle, France
Joined: May 15, 2005
KitMaker: 5,653 posts
AeroScale: 4,347 posts
Posted: Sunday, May 21, 2006 - 04:14 PM UTC
Hi Stephen!

It's good you are talking about the decals as this is just what I plan to do next on my Fokker!
What do you think? For the lozenge decals of the wings, can I apply them directly on the plastic or is it better to spray an undercoat of paint? If yes, should the paint be glossy or matt? It's the first time I'll use such big decals...
I didn't worked much for the Royal Class build lately but since I've cleared my bench out of another biplane, I can concentrate fully on this one now! So expect to see daily updates from now on!

Jean-Luc
JackFlash
_VISITCOMMUNITY
Colorado, United States
Joined: January 25, 2004
KitMaker: 11,669 posts
AeroScale: 11,011 posts
Posted: Sunday, May 21, 2006 - 08:26 PM UTC

Quoted Text

Hi Stephen! It's good you are talking about the decals as this is just what I plan to do next on my Fokker! What do you think? For the lozenge decals of the wings, can I apply them directly on the plastic or is it better to spray an undercoat of paint? If yes, should the paint be glossy or matt? It's the first time I'll use such big decals...


Greetings Jean-Luc!

Always apply lozenge on a semi gloss painted surface. The next concern is with what as a base coat.

Clear lacquer is ok but it needs to be hot enough to have a slight bite into the plastic or resin. Otherwise a flat coat of a neutral colour then a semigloss will do. Just using "High Gloss" may fracture or become brittle over time.

I use Testors spray Gloss-Coat on a slighty sanded plastic surface. This gives me a nice surface that has never failed me. For resins I spray a flat coat then the semi gloss.

Many WWI (and other subject) modelers are using Future Floor polish. This is a liquid polymer that dries thin and hard and smooth. Wetslide decals always work better on a smooth surface. The larger the decal the more surface that needs to bond.
BadBoyFLSTC
_VISITCOMMUNITY
California, United States
Joined: November 20, 2005
KitMaker: 96 posts
AeroScale: 53 posts
Posted: Monday, May 22, 2006 - 12:08 AM UTC
Stephen,
You mentioned before (somewhere) about using Eagle Strike decals. Is this a better option than going with the kit decals? I do not want to screw this up.

Nils
Holdfast
Staff MemberPresident
IPMS-UK KITMAKER BRANCH
#056
_VISITCOMMUNITY
England - South West, United Kingdom
Joined: September 30, 2002
KitMaker: 8,581 posts
AeroScale: 4,913 posts
Posted: Monday, May 22, 2006 - 01:52 AM UTC
Sorry for not posting any pics but I have been grappling with getting them into the frames that jean-Luc supplied. I have now got that sussed so here are a few pics taking me to where I am at the moment.
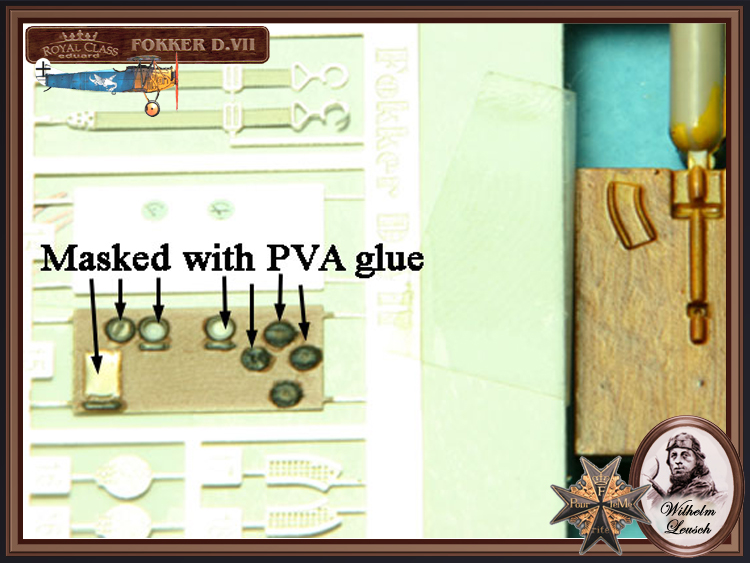
This first pic shows how I “cleverly” masked off the elements on the etched instrument panel so that I could give it a better representation of wood. It is painted by Eduard but and it isn’t bad but it can never be as good as being painted by someone who knows how to paint a wood effect. Unfortunately that isn’t me, yet 
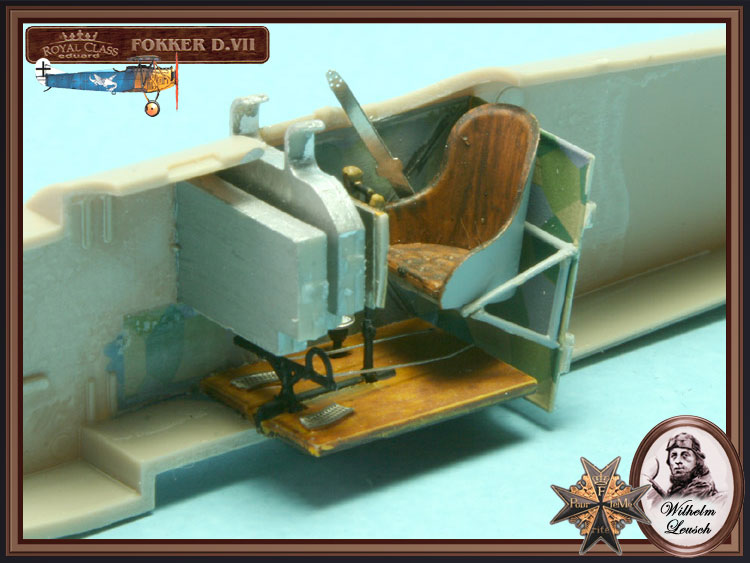
I then descovered, via Stephen, that It is the wrong instrument panel for my Fokker. However the masking did work quite well. I also painted the floor which actually came out pretty good, although this pic doesn’t do it justice, honest. I first of all painted it with yellow enamel paint and, when dry, streaked on well thinned brown madder artist oil paint, then used yellow oacher to lighten it a little. I then used little dabs of brown madder to make swirls and other woody looking effects


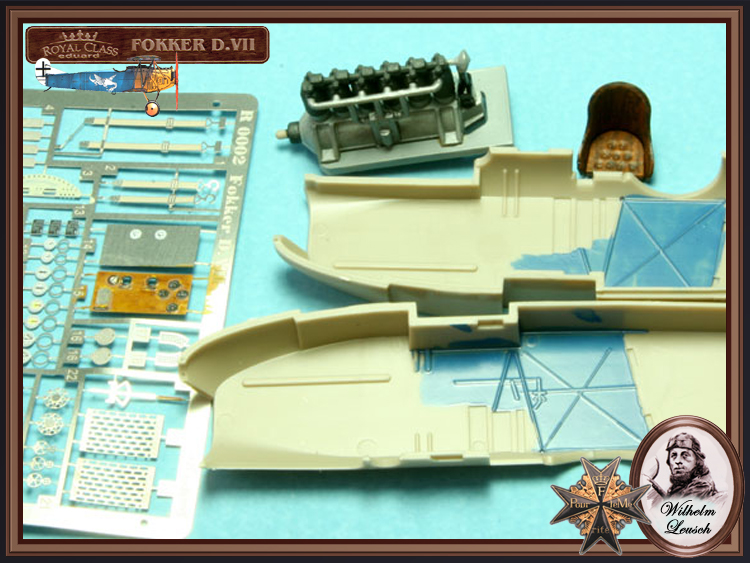
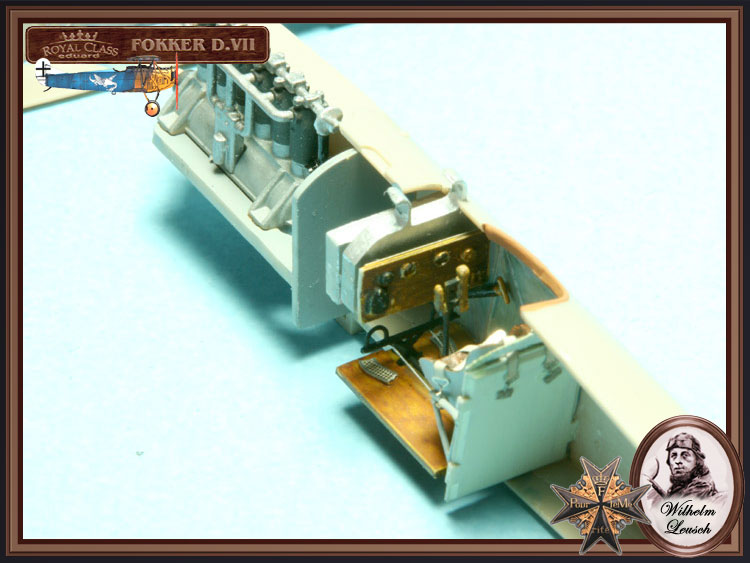
In this next pic I have painted the cockpit interior blue. The idea of this was to try and simulate the external colour showing through the fabric covering. Again Stephen put me right, as the method of producing the covering prevented the external, painted on colour showing through. You can also see some of the excellent colour photo etch.


I have applied the “interior decals” to the fuselage sides. They are actually the same as the upper surface decals, which I assumed would be OK for the 2 items behind the seat but the fuselage sides would show the back of the fabric which was printed on one side only. This as you know would therefor just be a shadow of the pattern. To simulate this I applied a highly diluted coat of light grey, which wasn’t a total success, but does show up differently to the areas behind the seat. I painted the frames and picked out the bracing wires with a pencil. Not the most convincing way to do it? But as not a lot can be seen, when everything is together it looks OK. I would be tempted to replace the moulded on frame and wires with scratch built items on future builds. The Decals went on extreamly well, you just have to be careful because once they grab they don’t want to move. This is OK as I simply used lots of water to “re-float” and reposition the first one, then, forworned, I kept further decals on the backing until one edge was correctly positioned. I’ll be much happier doing the wing lozenge decals knowing this. The decals certainly “snuggled” down well.


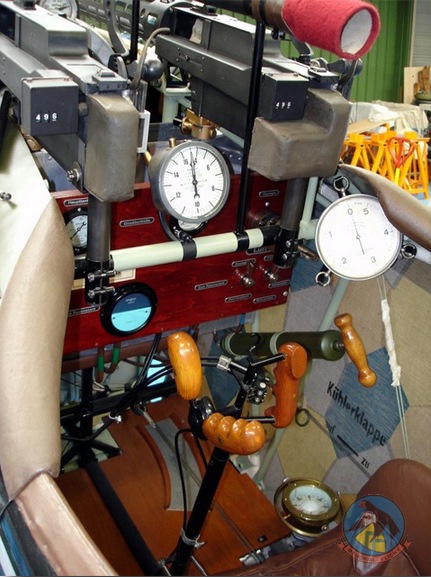
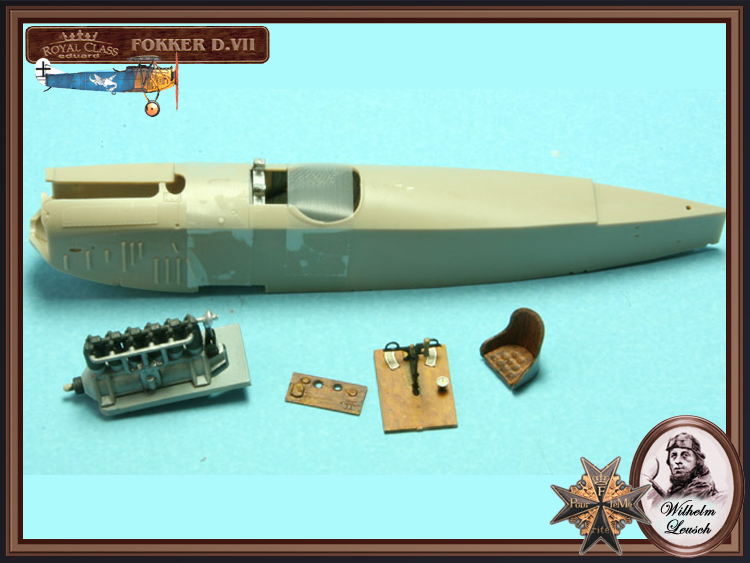
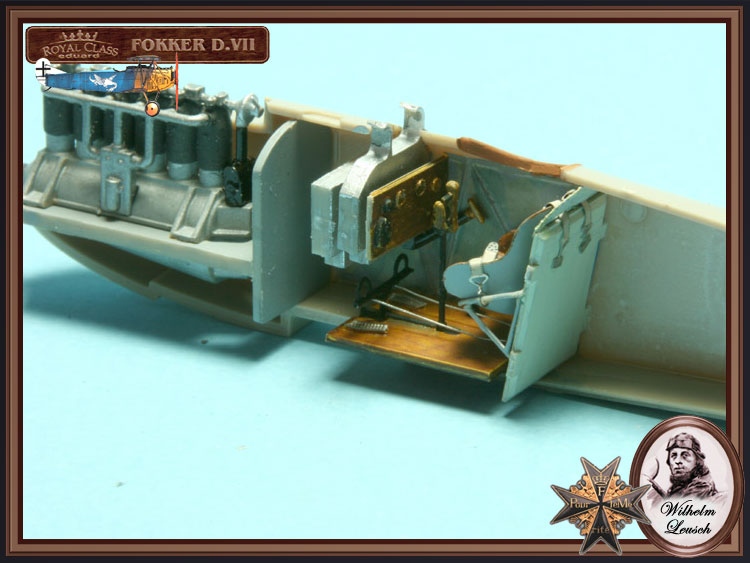
I painted the seat as per the instructions, for the leather I first of all painted it Humbrol “leather” then, when dry streaked on thinned burnt umber artist oil paint. The instrument panel is the plastic item, thinned by sanding and I have drilled out what I took to be 2 instruments (now I’m not so sure). They lined up with the etched dials for the etched panel so I used them, after “glazing” the bezzels with Klear. The engine is coming together and very nice it is too, plus the floor is getting bits added. The Ammo can is glued into the right fuselage half and the other side is taped in position to make sure this was correctly lined up. I did this with each of the cockpit components in turn. Doing it one item at a time is time consuming but it does really help in getting every item to sit properly. If the fuselage halfs won’t go together properly you know that it’s because of the last piece you added and that’s all you need to worry about.


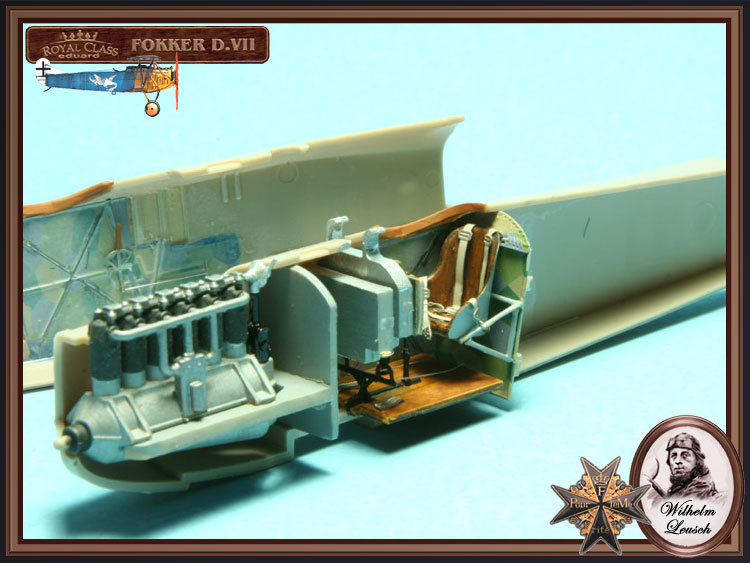
The engine all but complete about to be positioned and glued. I saw your explanation of the correct angle of the firewall, Stephen, but as not much can be seen of it, and so I didn’t cock up my first WW1 build I left well alone. The engine mount and firewall were a nice tight fit and had to be fitted fully into the fuselage halves, particularly the firewall, to allow the halves to close.


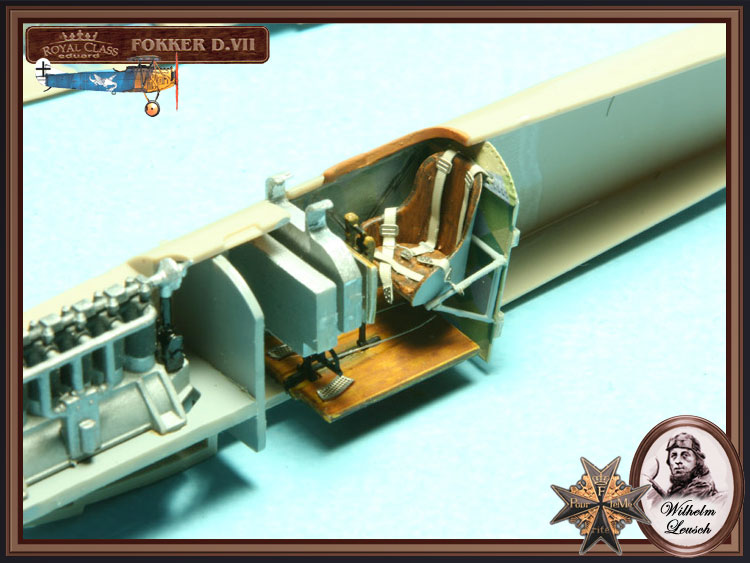
Other views of the interior.


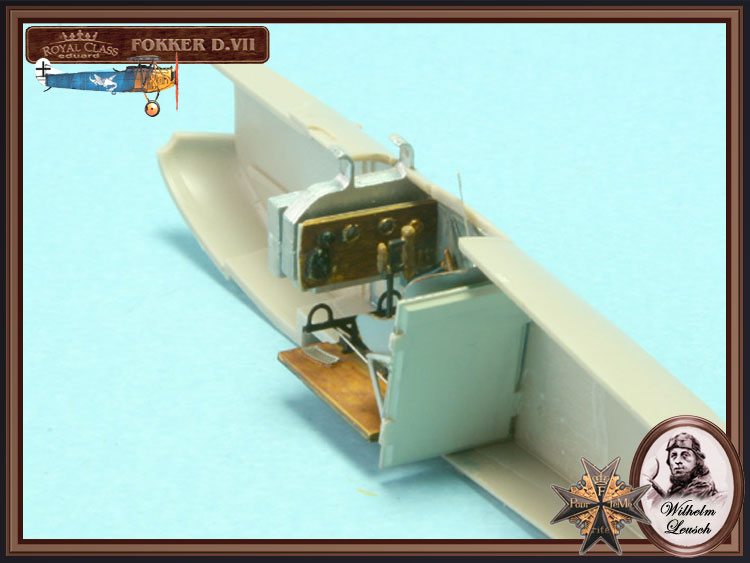
Engine and the rest of the interior in place, I used wire to replicate the rudder linkage, the colour etch seat belts are superb.


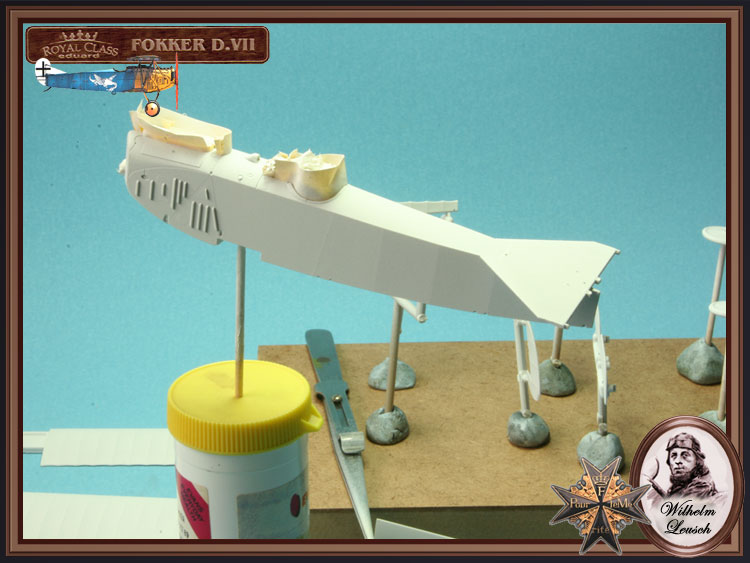
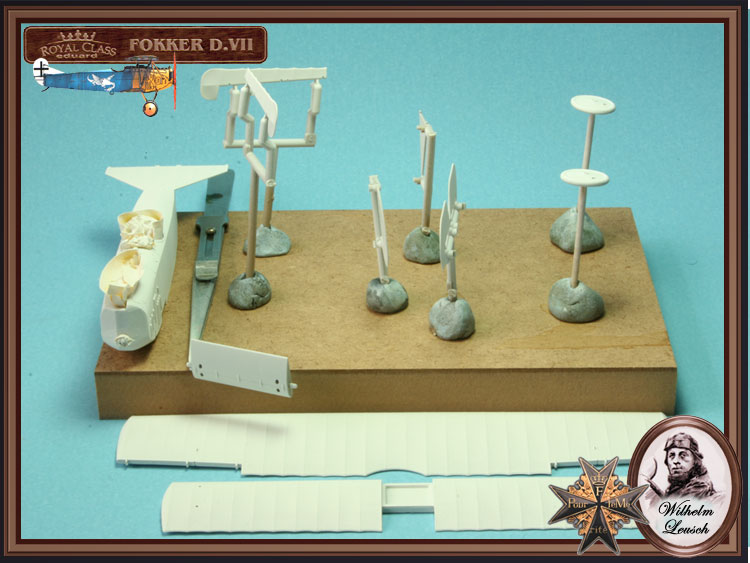
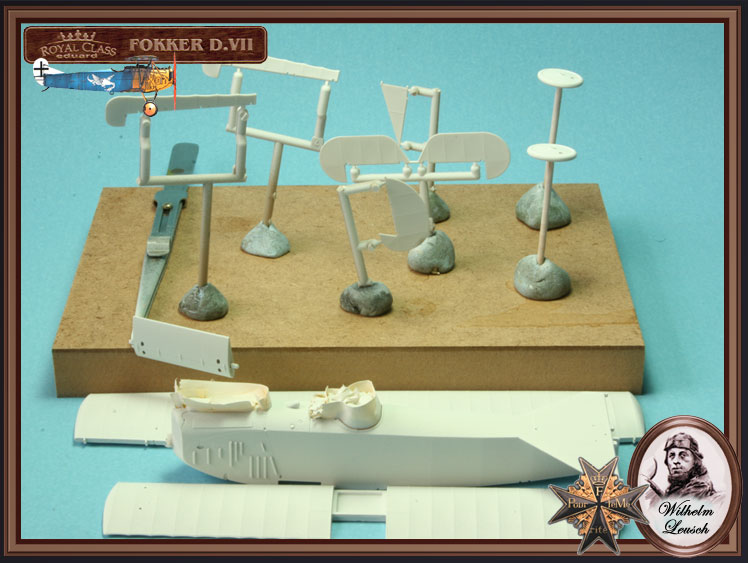
Having got the interior in I joined the wings. I could have done this while getting the interior in and could have been applying the lozenge decals but I was just being cautious in case of a “heads up” from Stephen.


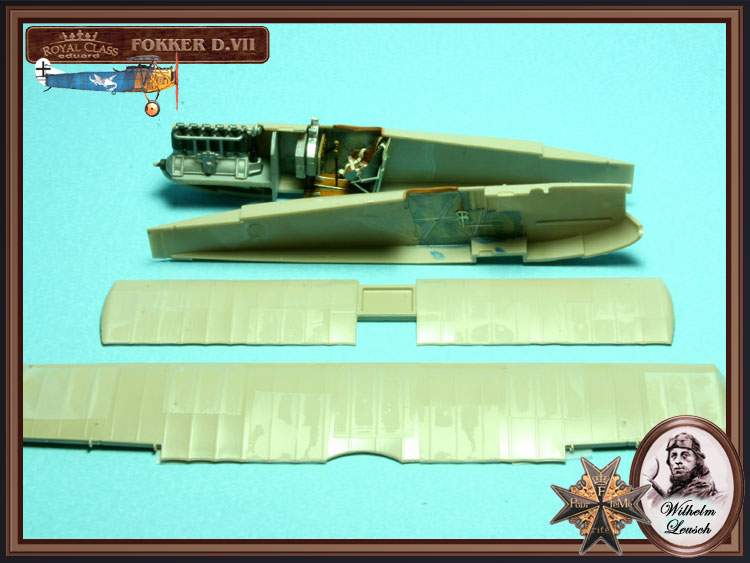
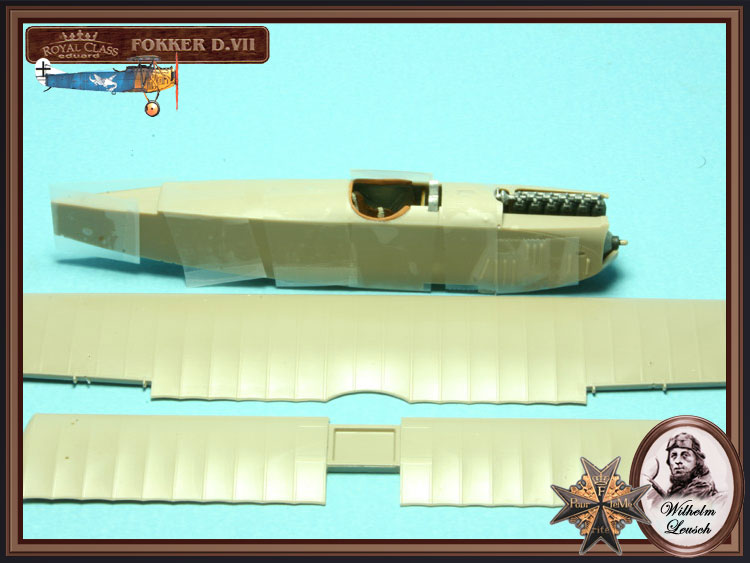
The wings are all but cleaned up, the fuselage halves are glued together, and they went together beautifully. I left out the gun support bar (?) as I checked and this can go in after the fuselage is together. This will aid in masking the cockpit when I come to add the fuselage colour, nice one Eduard.


What can I say, I have really enjoyed this and I’m looking forward to the rest of it no end. This is a great kit for a first, of what I know will be more WW1 aircraft models (I have 2 more Eduard kits). The delicacy of the parts does mean you have to take care, but if I can take care anyone can.
I will be prepping the wings and fuselage for painting and decalling through the rest of the week, hopefully, so I can paint and decal over the weekend.

Mal
JackFlash
_VISITCOMMUNITY
Colorado, United States
Joined: January 25, 2004
KitMaker: 11,669 posts
AeroScale: 11,011 posts
Posted: Monday, May 22, 2006 - 06:03 AM UTC

Quoted Text

Stephen,
You mentioned before (somewhere) about using Eagle Strike decals. Is this a better option than going with the kit decals? I do not want to screw this up. Nils


Greetings Nils. Absolutely I highly recommend the Eagle Strike Lozenge. I helped consult on the colours. I have no other connection other than they have me listed as a resource. Gaston Bernal painstakingly reviews each batch to make sure the colours stay right from batch to batch. He is a great fellow and I pick up sheets whenever I can...Yes even though my name is on them I have to buy them too. But for colouring you can't beat them.
JackFlash
_VISITCOMMUNITY
Colorado, United States
Joined: January 25, 2004
KitMaker: 11,669 posts
AeroScale: 11,011 posts
Posted: Monday, May 22, 2006 - 06:32 AM UTC
Greetings Mal! Nicely done. Typically, in most cases the seat just had the lozenge fabric on the backing. But pilots did customize their aircraft interiors at times. Pilots carried all sorts of talismen in to patrol duties. A customized leather seat is possible. Especially for a commander. On the original airframe the cushion was the parachute pack, though most modern replica's have padded cushions. I like your wood grain effect. Aritist Oils?

Everyone is keeping a nice tight formation on this effort. Though each of us has our own style and our own approach. Judging from the large number personal messages I have gotten and number of reads on this thread we have a good following. Merlin is bringing up the rear in not only building his kit but editing the build notes we are contributing for a final posting. He will make the call on that.

Fortunately all of the current build gremlins have been easy to overcome. Eduard has given us a great kit to work from. Don't worry about me I am having fun. That is after all why we build.

Let me invite any of you who are following along on this build to post some images of your own Eduard Fokker D.VII. Don't worry about being under a microscope we are glad to have you along on patrol.
TedMamere
_VISITCOMMUNITY
Moselle, France
Joined: May 15, 2005
KitMaker: 5,653 posts
AeroScale: 4,347 posts
Posted: Tuesday, May 23, 2006 - 12:50 AM UTC
Hi all!

Here's a little status report:


I painted the airframe and the wings in grey because it's a neutral color. I used Tamiya Acrylics. I will spray a coat or two of Future later.
I noticed the small rudder was offset. I suppose this was a feature of the real plane to counter the torque effect of the engine and to "trim" the aircraft straight. It's nice that Eduard reproduced that!

Jean-Luc
Holdfast
Staff MemberPresident
IPMS-UK KITMAKER BRANCH
#056
_VISITCOMMUNITY
England - South West, United Kingdom
Joined: September 30, 2002
KitMaker: 8,581 posts
AeroScale: 4,913 posts
Posted: Tuesday, May 23, 2006 - 02:18 AM UTC
I'm just in the process of getting mine ready for paint Jean-Luc. The bottom wing is such a good fit the I'm considering leaving it off when painting the fuselage. What have you used to mask off the engine? After gluing the fuselage halves together I realised that it might have been a good idea to paint the interior of the engine bay, as although the engine hides 99% of it a little of the port side can be seen, on my build.

I have started drilling out the slots for the control cables but there isn't a location for the aileron wires on the fuselage, any clues Stephen?

Another question about colour Stephen. My aircraft is basically blue and yellow and I have a couple of each that I could use. My question is were the RLM colours used in WW II in use in WW I? if not what is your suggestion for the best blue and yellow to use? I have Xtracolor "true blue" and Humbrol chrome yellow, which are a good match for the blue and yellow on the colour profile.
Thanks
Mal
JackFlash
_VISITCOMMUNITY
Colorado, United States
Joined: January 25, 2004
KitMaker: 11,669 posts
AeroScale: 11,011 posts
Posted: Tuesday, May 23, 2006 - 03:54 AM UTC
Greetings Mal! Here is an image to help out on the aileron control cables. Its the same on each side. More later tonight on the colours. I have to take the family out to celebrate now. #3 son has graduated high school! (only two left at home after June 13, Heh heh!)


JackFlash
_VISITCOMMUNITY
Colorado, United States
Joined: January 25, 2004
KitMaker: 11,669 posts
AeroScale: 11,011 posts
Posted: Tuesday, May 23, 2006 - 05:44 AM UTC

Quoted Text

"...Another question about colour Stephen. My aircraft is basically blue and yellow and I have a couple of each that I could use. My question is were the RLM colours used in WW II in use in WW I? if not what is your suggestion for the best blue and yellow to use? I have Xtracolor "true blue" and Humbrol chrome yellow, which are a good match for the blue and yellow on the colour profile. Thanks Mal


Greetings Mal;

The images I have from Greg VanWyngarden's books on Fokker Aces and JG.II ( Jasta grouping of #12, 13, 15 & 19) are a good resource. Fortunately enough for me I have another as well. Rick Duiven co-author to several Grub Street book s on WWI aviation and the leading authority to my mind on JG II is a close good friend.

The images we have of Ltn. Leusch's machine though taken at different times (during and after the war) give us the impression of a medium blue tending to the slightly darker end of the range.

You may remember my effort with the first issue of the Eduard Fokker D.VII kit #8131
https://armorama.kitmaker.net//features/780
(To read the first paragraph yopu have to go to reviews and prop aircraft.)

I did two machines. One from Jasta 13 and the hypothetical version of the aircraft flown by the Jasta 19 commander before Ltn. Leusch, Ltn. Olivier von Beaulieu-Marconnay. The two blues I decided on were very similar and I began with Testors sea blue and added gull gray to acquire a muted version. For the Jasta 19 bird if memory serves it was 10 parts flat sea blue to 2 parts flat gull gray and 2 parts flat black.

The blues used for JG II (Jagdgeschwader 2 = Fighter wing 2) varied widely as to what stores were available in the field. Most often this was the medium blue described to a very dark prussian blue seen on many aircraft from Jasta 15 (another JG II component.) Though late in the war a lighter blue was deinately seen on several Jasta 13 aircraft. Jasta 12 is believed to have has a brighter version of the medium blue with little or no lamp black in it mix.

By the way I am adding my top wings tonight. With a little luck the landing gear and rigging next. Then the touch up and photos.
TedMamere
_VISITCOMMUNITY
Moselle, France
Joined: May 15, 2005
KitMaker: 5,653 posts
AeroScale: 4,347 posts
Posted: Tuesday, May 23, 2006 - 11:36 PM UTC
Hi all!

Just a small update... I had a busy day at work today so I just managed to spray a coat of Future. The model is ready for decaling though, at least the upper wing. I'm looking forward to it but I'm also a little bit anxious...


Jean-Luc
BadBoyFLSTC
_VISITCOMMUNITY
California, United States
Joined: November 20, 2005
KitMaker: 96 posts
AeroScale: 53 posts
Posted: Wednesday, May 24, 2006 - 04:24 AM UTC
Do the deed Jean-Luc, do the deed. Looking good my friend.

Nils
JackFlash
_VISITCOMMUNITY
Colorado, United States
Joined: January 25, 2004
KitMaker: 11,669 posts
AeroScale: 11,011 posts
Posted: Wednesday, May 24, 2006 - 01:03 PM UTC
Having built three previously and the two here let me offer everyone a small tip to the top wing attachment. Depending on just exactly the manner of your build steps you may find that the forward (and inverted) V shaped cabane struts (PP C 30 & 31) don't seem to line up correctly with the single forward cabane struts (PP C 1 & 6) at the under side of the top wing? The answer is to either open up the hole for the rear leg of the inverted V struts (PP C 30 & 31) or sharpen the rear leg tip to insert slightly deeper into its locator hole (on the upper cowling of the fuselage.)

This is a a matter of a couple of millimeters but can save you a bit of frustration.
TedMamere
_VISITCOMMUNITY
Moselle, France
Joined: May 15, 2005
KitMaker: 5,653 posts
AeroScale: 4,347 posts
Posted: Wednesday, May 24, 2006 - 10:49 PM UTC
Hi all!

Small update and still no decals!

I thought it would be better to paint the fuselage first and decal after. I don't want to mask the wings with the lozenge decals on them. To do so I placed the additionall PE louvres on the engine sides first. if you have to use them like me for the version you are building, you must know that they are in relief (see picture) and that you must be carefull not to glue them the wrong side. I used Blu-Tak to handle them...


Once done, I masked the plane and sprayed a coat of white...


... then a coat of blue...


... next will be the red nose. And still no lozenge decals used

Jean-Luc

P.S. Mal, I used Tamiya masking tape to mask the engine and cockpit... forgot to answer last time, sorry!
JackFlash
_VISITCOMMUNITY
Colorado, United States
Joined: January 25, 2004
KitMaker: 11,669 posts
AeroScale: 11,011 posts
Posted: Thursday, May 25, 2006 - 03:00 PM UTC
Greetings all;

For those of you craving more images of restored or original format Fokker D.VII here is abit of fun.

http://memorial.flight.free.fr

There are whole build sequences there for all of the organizations fine aircraft. This is one of my favorite sites by the way.
Holdfast
Staff MemberPresident
IPMS-UK KITMAKER BRANCH
#056
_VISITCOMMUNITY
England - South West, United Kingdom
Joined: September 30, 2002
KitMaker: 8,581 posts
AeroScale: 4,913 posts
Posted: Friday, May 26, 2006 - 01:08 AM UTC
Thanks Stephen, sounds like my "True Blue" will be good. Thanks for the reply ref masking Jean-Luc, I was just curious, I too used Tamiya masking tape.

I will have more pics tomorrow, I have applied a coat of white primer to all main parts today, so I will be checking for any further work that is required and taking pics tomorrow. As the fuselage crosses are over painted, but faintly visable, I plan on painting these on. I think the decals may show up a bit too proud if I were to use them, any thoughts on this anyone?

My solution to masking the decals on the wings is to actually leave the lower wings off until after the fuselage is painted, they are a very good fit. Stephen, do you have any pics of the underside wing joint? Although fitting the wing after painting will work there will still be faint joint lines, so I'd like to know if any were on the real aircraft. Leaving the wings off will also allow me to decal the wings while painting the fuselage, not at the same time of course only women can do more than one thing at a time
Stephen, another joint question; is there a visible joint between the fuselage upper decking and the tail plane? The profiles seem to show a rib tape?

Mal
JackFlash
_VISITCOMMUNITY
Colorado, United States
Joined: January 25, 2004
KitMaker: 11,669 posts
AeroScale: 11,011 posts
Posted: Friday, May 26, 2006 - 03:02 AM UTC
Concerning the joint or gap between the upper rear deck and the horizontal stabilizer is a tight fit but not covered.

By the was folks I have had the recent pleasure to see the impressive work of a young...French student. I have show cased his work under the Roden 1/48 Fokker D.VII thread as that is what he began with. But it is entirely possible to apply these techniques to the Eduard kit as well.
TedMamere
_VISITCOMMUNITY
Moselle, France
Joined: May 15, 2005
KitMaker: 5,653 posts
AeroScale: 4,347 posts
Posted: Friday, May 26, 2006 - 04:29 PM UTC
Hi all!

I finished painting the fuselage...


... and at last started to apply the decals! For a test I decided to do the ailerons first.


It worked like a dream. The decals did adhere to the parts as if their life would have depended on it! In fact it did... because if they wouldn't have worked, they would have ended in the dustbin! :-)


After that, I was confident enough to tackle the bigger pieces of decals and they also worked very well. I still have the upper decals and the rib tapes to do though...


Jean-Luc
JackFlash
_VISITCOMMUNITY
Colorado, United States
Joined: January 25, 2004
KitMaker: 11,669 posts
AeroScale: 11,011 posts
Posted: Friday, May 26, 2006 - 06:03 PM UTC
Nicely done Jean-Luc! My birds are on their wheels curing up. Next rigging then the touch up. Hopefully the images will be ready by middle of the coming week.
Holdfast
Staff MemberPresident
IPMS-UK KITMAKER BRANCH
#056
_VISITCOMMUNITY
England - South West, United Kingdom
Joined: September 30, 2002
KitMaker: 8,581 posts
AeroScale: 4,913 posts
Posted: Friday, May 26, 2006 - 08:28 PM UTC
Nice work there Jean-Luc, the paint looks spot on. Did you trim the decals close or did you leave on the carrier film? Did you line them up with the centre of the wing leading edges or did you line them up at the rear?
Can you tell me if the fuselge crosses are thin enough that I will be able to paint over them without it being obvious they are decals, or do you recomend that I do as I had intended and paint them on?

I have applied a cout of white primer which just needs a little rubbing down with wire wool to make sure it is nice and smooth. I will be applying a coat of Klear to the wings and starting the decalling of them on Sunday, hopefully. I think I will be painting on the fuselage crosses, even if they decals are thin so I will try and do that on sunday as well.


Stephen, another colour question; the profile shows the undercarriage wing to be Dark Green, is this correct? It just seams odd that the wheels and struts are painted yellow and not the wing, unless just the top half was painted yellow which makes even more sense?
Mal