_GOTOBOTTOM
World War II: Germany
Aircraft of Germany in WWII.
Hosted by Rowan Baylis
Afrika Korps Bf109 near complete
Wad_ware
_VISITCOMMUNITY
Illinois, United States
Joined: September 09, 2002
KitMaker: 537 posts
AeroScale: 437 posts
Posted: Wednesday, July 19, 2006 - 04:24 AM UTC
Hi all
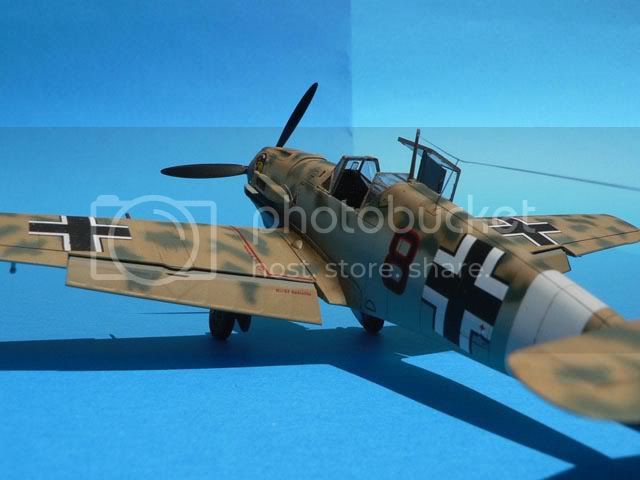
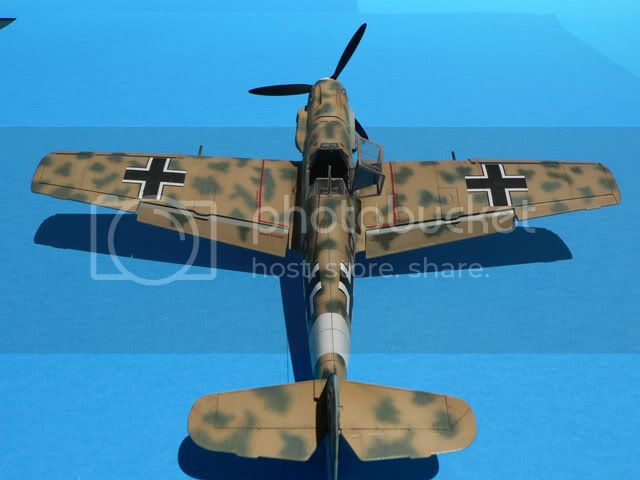
I am nearing completion of my Bf109 for the duel in the sky campaign and thought I'd go ahead and post some pics. I just completed painting the camo and have the exterior all detailed up as far as gun barrells, grills, grates, filters, etc... I just need to let this set up really good so I can clear coat it an apply decals.
This was my first very serious attempt at preshading and the camo was a new experience for me. I used liquid mask which I am not sure was the best choice. I would like to hear any of the different ways the rest of you would mask or attempt this type of camo. With my, so far, limited practice and experience there is no way I could have free handed it. Being masked off, the only -slight- dissappointment is that the spots have a sharper edge than I would have liked. But I am still very happy with the outcome.
Any comments welcome and good modeling,
Wayne


Coolaznkid
_VISITCOMMUNITY
Texas, United States
Joined: August 11, 2006
KitMaker: 74 posts
AeroScale: 25 posts
Posted: Saturday, August 19, 2006 - 06:28 AM UTC
Its looks good. I also new to preshading, in fact I haven't even done it yet. I plan on doing it for my next project. How did you preshade yours: with acrylic flat black or enamel? and did you airbrush it on?

Also, do you plan on putting on some weathering?

anyways, nice bird!
Wad_ware
_VISITCOMMUNITY
Illinois, United States
Joined: September 09, 2002
KitMaker: 537 posts
AeroScale: 437 posts
Posted: Saturday, August 19, 2006 - 10:04 AM UTC
Thanks Christopher,
I preshaded with Model Master flat black enamel using an airbrush.
I usually use enamels to paint the whole model but you could do the exact same thing with acrylics. That is just a matter of which you prefer to use.
Basically all you do is use your airbrush to paint over all the panel lines, any low areas where there would be shadows, and things like that. You don't really have to be too neat about it. For a little sloppyness and randomness will add to the good effect of the preshading. When you apply the actual color onto your plane, airbrush very lightly from the center of each individual panel and work your way to the edges in kind of a circular motion. For the first coat don't spray much over your preshading lines yet.
Once you get that first coat done in all the different panels and areas then slowly and lightly airbrush over everything and blend your preshading in. Do this slowly and very light with the airbrush. Keep on doing that until you feel that your preshading has the effect and subtleness that you are wanting. It is kind of difficult at first to know when to stop. You want to see the preshading but you want the overall effect to be blended in and look natural. It will just take a little practice.
This Bf-109 was my first attempt at preshading and it didn't come out too bad but I always want to try the next time around to do even a little better.

I have this plane done and if you would like to see some pics of it there are some in my gallery. Or if you go to the model of the month thread or also the Duel Newtothegame & Bilko vs Wad-ware thread there are some of the same pics in there too. Right now I am not planning on any weathering but later on I might end up doing some. I am thinking possibly one day of making a small diorama with this one and seeing what I can do.

I hope this helps you out. There are some good features here on the sight about preshading that you might check out too if you have not seen them yet - very informative.

Good modeling,
Wayne
Antoni
_VISITCOMMUNITY
England - East Midlands, United Kingdom
Joined: June 03, 2006
KitMaker: 574 posts
AeroScale: 573 posts
Posted: Saturday, August 19, 2006 - 03:47 PM UTC

Quoted Text


With my, so far, limited practice and experience there is no way I could have free handed it. Being masked off, the only -slight- dissappointment is that the spots have a sharper edge than I would have liked. But I am still very happy with the outcome.


To get a feathered effect you can:

Punch holes in a piece of card, hold it a short distance away from the model and spray though that. You can even get brass stencils for doing this.

or

Paint the model the colour of the spots and then mask out the spots with small pieces of Blu-tac. Spray on the other colour. I saw this done on a desert Stuka and it was very effective.
Wad_ware
_VISITCOMMUNITY
Illinois, United States
Joined: September 09, 2002
KitMaker: 537 posts
AeroScale: 437 posts
Posted: Saturday, August 19, 2006 - 06:10 PM UTC
Thanks for the tips Antoni.
I will remember these on the next time I need to get that feathered look.
I very much appreciate all help and advice.

Good modeling,
Wayne
Darson
_VISITCOMMUNITY
Victoria, Australia
Joined: June 14, 2005
KitMaker: 247 posts
AeroScale: 60 posts
Posted: Saturday, August 19, 2006 - 07:00 PM UTC
Hey Wayne, great looking build you've got coming along there, it should look awesome with some decals on.

If you're not happy with the hard edge camo you've got there's nothing to stop you touching it up (carefully) with your to take away some of the sharpness.

The pre-shading on the bottom of the bird looks spot on, but I must admit that the undersides are the only place I can get pre-shading to look any good. As soon as I spray any camo combination on the upper surfaces I loose the effect altogether.

As to how to mask to do this camo, well I personally prefer to do these freehand basically because I'm an idiot Not that I’m an expert, but with a little practice you can get reasonable results.

This is a freehand job I did for a North African Group Build last year.


Cheers
Wad_ware
_VISITCOMMUNITY
Illinois, United States
Joined: September 09, 2002
KitMaker: 537 posts
AeroScale: 437 posts
Posted: Saturday, August 19, 2006 - 07:39 PM UTC
Hi Darren and thanks for the compliment.
I am afraid it might be too late to touch up my 109. I have all the decals in place. You are right about the preshading not really showing up on top. After painting the sand gelb and then the spots it just kind of loses the effect. I suppose post shading might be something for me to learn about too.

Your 109 looks awesome and gives me the incentive to definitely keep practicing with the airbrush. When you were spraying the spots were you using a fine tip or medium. Plus did you use lower air pressure to help control overspray and have better contol with making the spots. I am always ready, willing, and eager to learn.

There are some pics of my 109 with finished decals in my gallery if you woul like to check it out.

Thanks again,
Wayne


Darson
_VISITCOMMUNITY
Victoria, Australia
Joined: June 14, 2005
KitMaker: 247 posts
AeroScale: 60 posts
Posted: Saturday, August 19, 2006 - 07:52 PM UTC
Wayne,

Thanks and when I was spraying the camo on the 109 I used a very low pressure and a highly thinned paint to avoid overspray and a fine tip on my airbrush. It took a long time and lots of aches in the wrist, but hey that's what modeling is all about.

Also, I'm having a brain fade, how do I access your gallery?
Wad_ware
_VISITCOMMUNITY
Illinois, United States
Joined: September 09, 2002
KitMaker: 537 posts
AeroScale: 437 posts
Posted: Saturday, August 19, 2006 - 08:19 PM UTC
Thanks for the airbrush tips Darren.
Next time I have my airbrush out I am going to start experimenting and practicing.

Quoted Text

Also, I'm having a brain fade, how do I access your gallery?


You are not the only one. My brain does a lot of fading too
To check out my pics just clink on the 'My Photos' at the bottom of any one of my posts.
Coolaznkid
_VISITCOMMUNITY
Texas, United States
Joined: August 11, 2006
KitMaker: 74 posts
AeroScale: 25 posts
Posted: Monday, August 21, 2006 - 04:52 AM UTC

Quoted Text

Thanks Christopher,
I preshaded with Model Master flat black enamel using an airbrush.
I usually use enamels to paint the whole model but you could do the exact same thing with acrylics. That is just a matter of which you prefer to use.


Hey Wayne, how difficult was it for you to use enamel paints for airbrushing? I've tried so many times and I can't seem to get it thinned properly and if it seems like a good mixture, it gets clogged in my airbrush no matter what psi I set it to...(its probably my god-forsaken airbrush, its a piece of cheap junk, 10 bucks...I don't think I'm going to get a decent airbrush because my parents probably won't pay for the cost...)


btw, Darren, that's also a good lookin' Messerschmit(?)...all these Bf-109 on this forum makes me want to do my own, they just look so aggressive and cool.
Wad_ware
_VISITCOMMUNITY
Illinois, United States
Joined: September 09, 2002
KitMaker: 537 posts
AeroScale: 437 posts
Posted: Monday, August 21, 2006 - 05:36 AM UTC
Hi Chris,
How thin do you end up mixing your paint? If you get your paint about the consistancy of milk that is about where you want it. Plus you always want to make sure you stir it up really well. If you are having trouble with it clogging your airbrush you should also try straining your paint after you thin it. Art supply stores sometimes have paint strainers just for that kind of thing but one of the best things to use is just a piece of a ladies nylon stocking if you can possibly talk your mom out of some old ones.
Even if you have to thin down your paint a little more that would be OK. You will just have to put a few more coats on whatever you are painting to cover it really well with the thinner paint.
If you are more comfortable with acrylics and those work fine in your airbrush I would recommend staying with those. Acrylics work just as good as enamels and in ways they are a little easier to work with.

I hope that helps you out. You can PM me any time you have questions. I am no expert but will be glad to help you out with whatever I can or direct you to someone or someplace that can help you out.

Good modeling,
Wayne
ladymodelbuilder
_VISITCOMMUNITY
Virginia, United States
Joined: February 26, 2002
KitMaker: 1,218 posts
AeroScale: 424 posts
Posted: Monday, August 21, 2006 - 06:48 AM UTC
Hi Wayne...
You've done a good job there so far... Keep up the good work....

BTW.... What did you use for the mask?


Wad_ware
_VISITCOMMUNITY
Illinois, United States
Joined: September 09, 2002
KitMaker: 537 posts
AeroScale: 437 posts
Posted: Monday, August 21, 2006 - 08:38 AM UTC
Thanks Penny
I used liquid mask on this. After the fact I don't know if that was the best way to have done it even tho the end result came out well.
It took me a lot of time but I liquid masked around all the spots on the body and the wings.
Once I got the spots painted and let them set up for a while I started working at taking the mask off with a toothpick. That was going to take me quite a long time doing it that way. The paint was set up pretty good so I started carefully rubbing on the mask with my fingers. This warmed up and softened the mask and it started to peel and roll off. That still took a while even to do it that way but it all came off pretty good.
I got a little carried away on spraying the spots. I was really wanting to try to get a little bit of a feathered edge on all of them. But instead of carefully working from spot to spot I sprayed over large areas at a time which destroyed any chance of feathering. I am really happy with how it turned out but wish I could have got it just a little more 'accurate' on the camo.

Good modeling,
Wayne
 _GOTOTOP