Germany
Joined: September 07, 2005
KitMaker: 5,609 posts
AeroScale: 5,231 posts
Posted: Saturday, September 23, 2006 - 03:10 AM UTC
Quoted Text
Steffen, I think I'll do that! You are right by saying it will add a little colour spot!  If it doesn't look good at the end, I can still buy another "Käfer" and replace it!
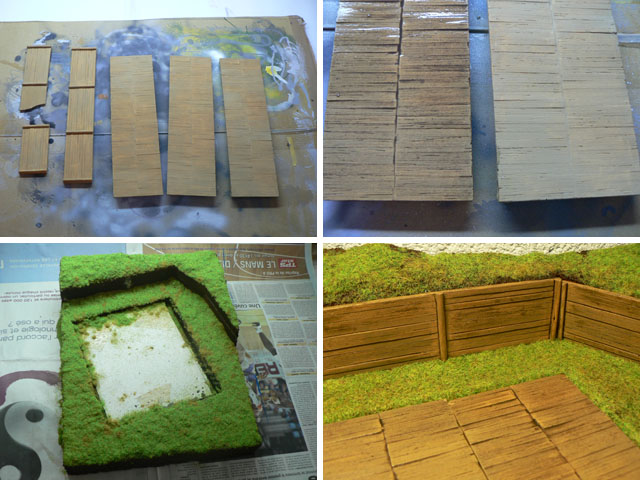
By the way, the base isn't concrete but wood planking.
Hi Jean-Luc
yeah I read about the wood planking ... but I forgot when I wrote my comment and all photos I remember show the 309 on a standard Lw airfield with hangars (...) and no hard stand in the woods, so I thought of other circumstances than you chose for your dio .. sorry.
You could still change the chassis for a type 60 and make it grey ... although I like the sand yellow finish in this case as it also emphasises the "late war theme"
BTW your Me 309 is looking great!!!!best wishes
Steffen
DULCE ET DECORUM EST PRO HOBBY MORI
Moselle, France
Joined: May 15, 2005
KitMaker: 5,653 posts
AeroScale: 4,347 posts
Posted: Saturday, September 23, 2006 - 11:10 AM UTC
Quoted Text
You could still change the chassis for a type 60 and make it grey ... although I like the sand yellow finish in this case as it also emphasises the "late war theme"
Hi Steffen!
I agree with you! Sandgelb is the way to go. And as you said it's a late war scheme. The Me 309 project was cancelled in late 1943 so the plane could be in this situation (heavy wheatered and abandonned) in 1944. At this time the Germans switched to Sandgelb for their ground vehicles.
Thanks Jan for the kind words. Maybe I should leave the plane all aluminium... :-)
Jean-Luc

Better think one hour and build five minutes...
Than think five minutes and build an hour!
Moselle, France
Joined: May 15, 2005
KitMaker: 5,653 posts
AeroScale: 4,347 posts
Posted: Sunday, September 24, 2006 - 01:54 AM UTC
Hi all!
A small update to show the painting process:
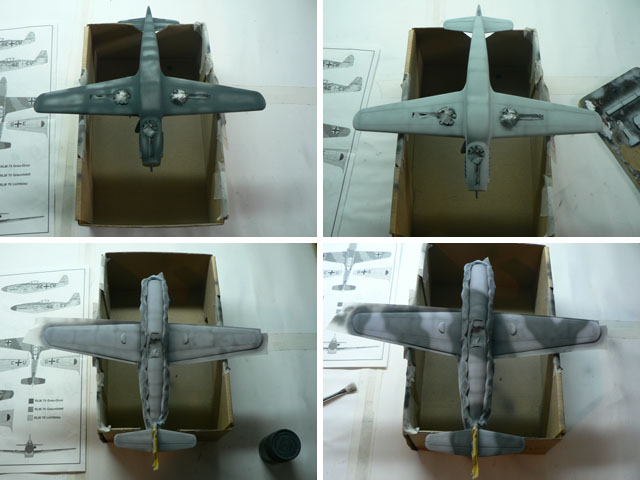
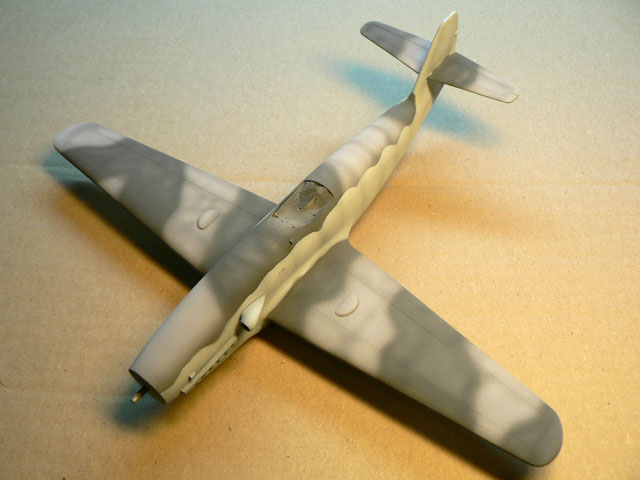
I still have to add the blotches and tone down the fuselage "wave". Next will be heavy weathering!
Jean-Luc
Better think one hour and build five minutes...
Than think five minutes and build an hour!
Moselle, France
Joined: May 15, 2005
KitMaker: 5,653 posts
AeroScale: 4,347 posts
Posted: Friday, September 29, 2006 - 12:45 AM UTC
Hi all!
I had some problems with my Aztec Airbrush lately...

I managed to repair a broken part inside the airbrush but I don't get satisfying results with it anymore. Humidity level is also very high in the east of France these days and my compressor keeps spitting water rather than paint after a few minutes of use! It's a basic machine, without pressure regulator and obviously a bad moisture trap.

Step one: I bought a new airbrush. It's a Revell Double Action and it is all metal. I think I'm fed up with the plastic from Aztec. It's just to difficult to clean up. But I will keep it for basic paintwork.
Step two: I ordered the new Master Class compressor... from Revell too. Why Revell? Because if I have a problem with it or need replacement parts, I can call my LHS and they can order stuff within a week. I know there are probably better products out there but I will buy the really high end stuff when I will be ready for it... in some years! :-)
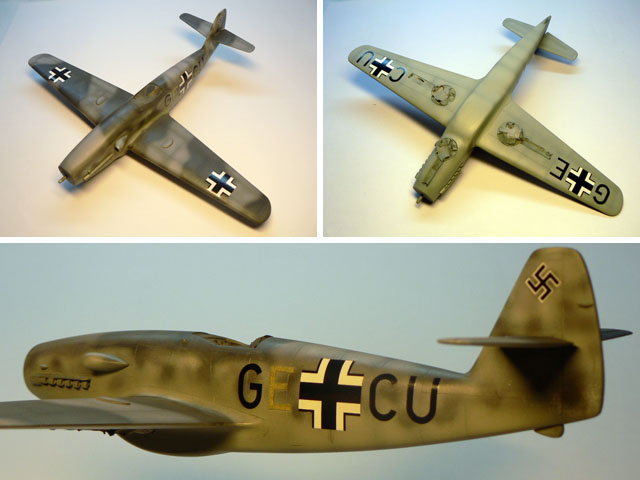
Back on topic, I made slow progress on the Me 309 but I've managed to apply the decals and I hope to weather it this week-end... if I can control my new airbrush!

Otherwise I'll concentrate on the diorama base wich only needs some grass and painting for the parts that are supposed to be wood. And there is still that Käfer to start!
Wish me luck with my new airbrush...
Jean-Luc
Better think one hour and build five minutes...
Than think five minutes and build an hour!
Germany
Joined: September 07, 2005
KitMaker: 5,609 posts
AeroScale: 5,231 posts
Posted: Friday, September 29, 2006 - 01:04 AM UTC
Quoted Text
Hi all!
I had some problems with my Aztec Airbrush lately... I managed to repair a broken part inside the airbrush but I don't get satisfying results with it anymore. Humidity level is also very high in the east of France these days and my compressor keeps spitting water rather than paint after a few minutes of use! It's a basic machine, without pressure regulator and obviously a bad moisture trap.
Step one: I bought a new airbrush. It's a Revell Double Action and it is all metal. I think I'm fed up with the plastic from Aztec. It's just to difficult to clean up. But I will keep it for basic paintwork.
Step two: I ordered the new Master Class compressor... from Revell too. Why Revell? Because if I have a problem with it or need replacement parts, I can call my LHS and they can order stuff within a week. I know there are probably better products out there but I will buy the really high end stuff when I will be ready for it... in some years! :-)
Hi Jean-Luc
seems were encountering similar problems at the moment. I'll go to Leipzig Hobby Fair on sunday and I'll buy my new air brush there (hopefully) ... it will be a Gabbert Triplex with 0,25 nozzle . I'll also keep my Aztek (and I'll try to get a replacement for my other old Aztek, because i like the plastic ) I also took out my old Badger 200 and cleaned it up ... maybe I'll try it again ..BTW I use my Revell Omega for years and had no problems (once something broke, but it could be repaired)
and finally nice progress on your Lw 46 project
cheers
Steffen
DULCE ET DECORUM EST PRO HOBBY MORI
Moselle, France
Joined: May 15, 2005
KitMaker: 5,653 posts
AeroScale: 4,347 posts
Posted: Saturday, September 30, 2006 - 04:02 AM UTC
Hi all!
Steffen, I hope you are lucky with your new airbrush.

I used my new revell one today to dullcoat the Me 309 and to paint the Käfer. So far so good, it worked fine. But after 5 mn of use it started spitting water again! Damn compressor!
Once I've changed it, I will be a happier modeler I think.
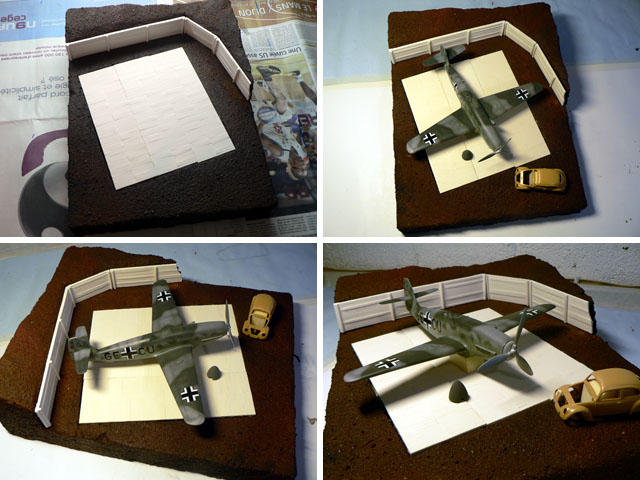
Anyway, I almost finished my diorama base. The Mark58 accessories are top class! I only brush painted them with Tamiya Acrylics and then added a wash of tinted Future, that's all. The result looks very convincing with a minimum of efforts. These products have a great potential and are easy to work with.
I don't think I will have the time to work on this project tomorrow as I will be away... but maybe monday.
Jean-Luc
Better think one hour and build five minutes...
Than think five minutes and build an hour!
betheyn
 Senior Editor
#019
England - South East, United Kingdom
Joined: October 14, 2004
KitMaker: 4,560 posts
AeroScale: 2,225 posts
Posted: Saturday, September 30, 2006 - 04:10 AM UTC
That is really starting to look the part now Jean-Luc. Can't wait to see this finished.
Roll on Monday with some more progress pics.
Andy
It's not the same, better, but not the same...
Moselle, France
Joined: May 15, 2005
KitMaker: 5,653 posts
AeroScale: 4,347 posts
Posted: Sunday, October 01, 2006 - 11:58 PM UTC
Quoted Text
Roll on Monday with some more progress pics.
Hi Andy!
Since you asked
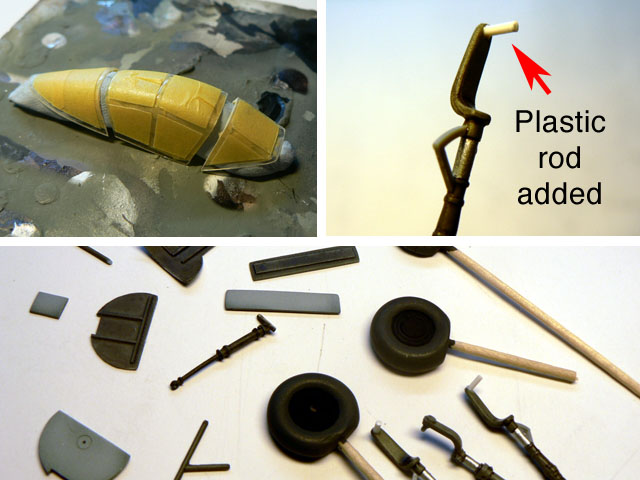
I worked on the vacuformed canopy of the Me 309 and also on the rather complex tricycle undercarriage. I had to add some plastic rods to give the landing gear more strength. Maybe tomorrow the plane will stand on it's feets!
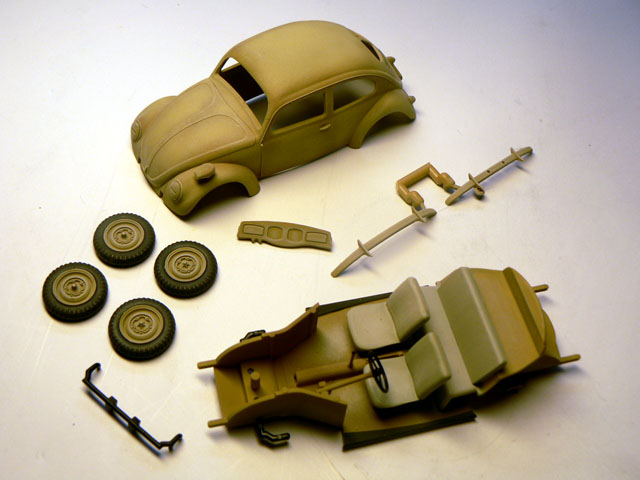
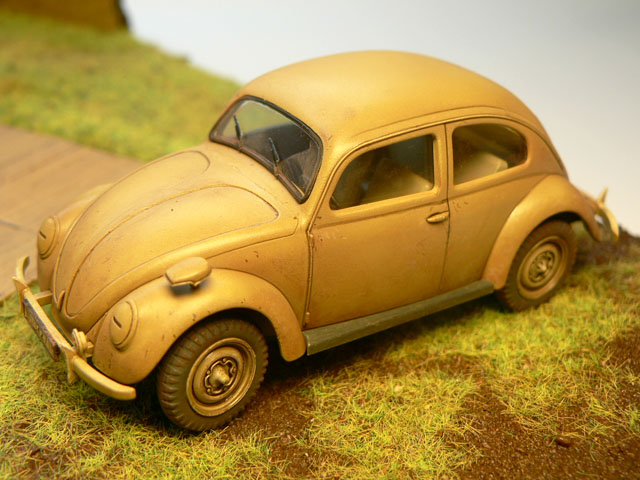
I also made some progress on the Volkswagen. It was not difficult as it is really a simple kit. I'm pretty satisfied with my new airbrush. I mean, if I managed to paint that little Käfer with it, bigger planes shouldn't be a problem! :-)
I still have to weather the car. I will do that at the end, together with the aircraft...
Jean-Luc
Better think one hour and build five minutes...
Than think five minutes and build an hour!
Scotland, United Kingdom
Joined: June 01, 2006
KitMaker: 1,707 posts
AeroScale: 1,119 posts
Posted: Monday, October 02, 2006 - 12:16 AM UTC
Looking exceptionally good Jean-Luc!
"I´m going back to the front to relax"
"THE BLACK CATS FLIES TONIGHT"
"Find your enemy and shoot him down - everything else is unimportant"
"When you're out of F-8's... You're out of fighters!"
Moselle, France
Joined: May 15, 2005
KitMaker: 5,653 posts
AeroScale: 4,347 posts
Posted: Sunday, October 08, 2006 - 12:42 AM UTC
Hi all!
This is my week-end update!
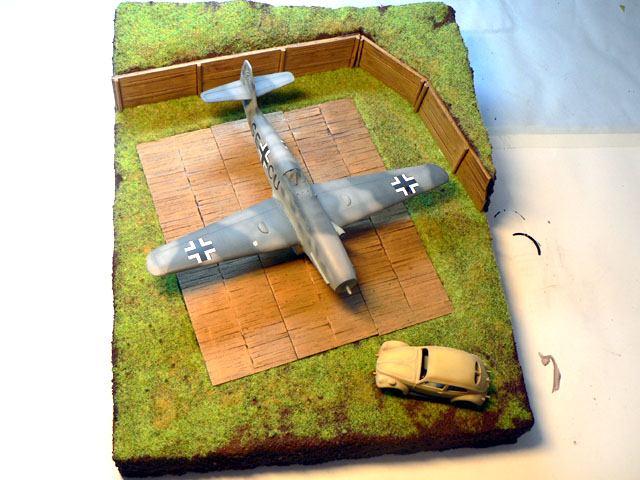
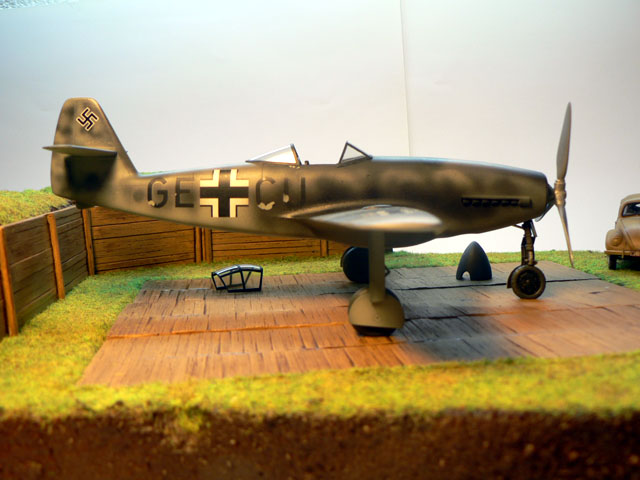
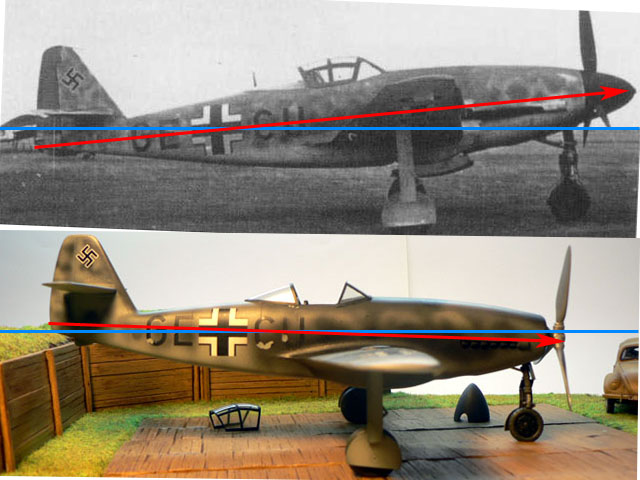
The Me 309 is standing on it's feets but I noticed a BIG problem with the landing gear! They are way too long! It's very noticable on the second picture...
I will have to find a wy to shorten them tomorrow.
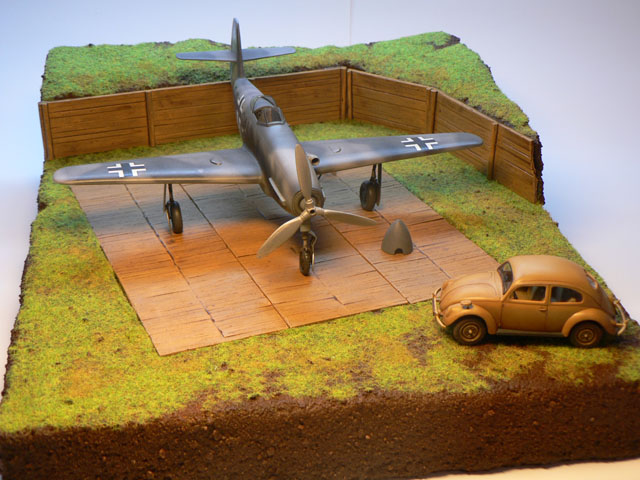
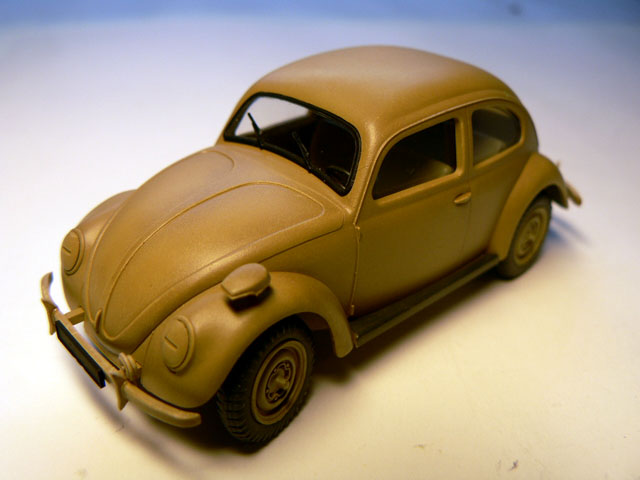
Good news is that the "Käfer" is finished (wasn't the most complicated part of the diorama though...) and I must say Tamiya made a lovely little kit.
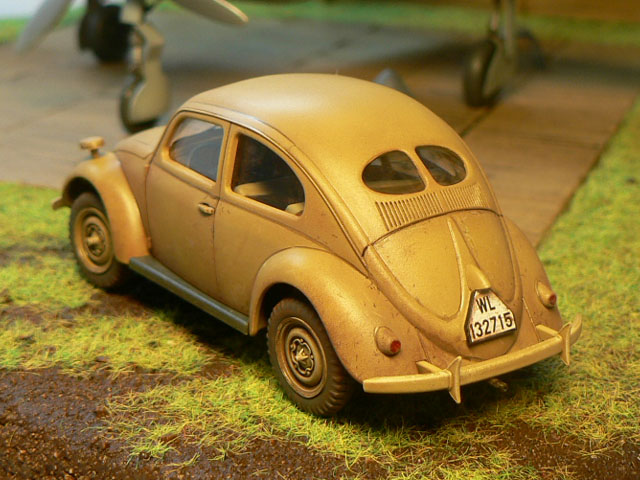
I still have to do some work on the aircraft and then I will do the details and the figures...
Jean-Luc
Better think one hour and build five minutes...
Than think five minutes and build an hour!
Merlin
Senior Editor #017
United Kingdom
Joined: June 11, 2003
KitMaker: 17,582 posts
AeroScale: 12,795 posts
Posted: Sunday, October 08, 2006 - 04:04 AM UTC
Hi Jean-Luc
It's all looking superb! I see what you mean about the undercarriage!... have you found where the problem lies (I've got one of these in the stash, so forewarned it forearmed...
)
All the best
Rowan

BEWARE OF THE FEW...
As I grow older, I regret to say that a detestable habit of thinking seems to be getting a hold of me. - H. Rider Haggard
betheyn
Senior Editor #019
England - South East, United Kingdom
Joined: October 14, 2004
KitMaker: 4,560 posts
AeroScale: 2,225 posts
Posted: Sunday, October 08, 2006 - 04:19 AM UTC
Looking great so far Jean-Luc.
I see what you mean about the aircraft sitting high, its as though the manufacturers of the model company measured the undercarriage while it was in flight (which is impossible in numerous ways :-) ). Perhaps cutting some of the cylinder ( the silver piston bit ) off might help

.
Andy
It's not the same, better, but not the same...
Moselle, France
Joined: May 15, 2005
KitMaker: 5,653 posts
AeroScale: 4,347 posts
Posted: Sunday, October 08, 2006 - 10:34 AM UTC
Quoted Text
I've got one of these in the stash
Hi Rowan!
Really!? Now that's a surprise! :-)
Andy is right, the main undecarriage legs are way to long. I will have to shorten them quite a bit. The plane should sit a little back and point the nose up, not the contrary! See the pictures below...
Sometimes I wonder if kit manufacturers test build their own models...
If not, they can send a test shot to Aeroscale were, I'm sure of that, there are many modelers who could see these kind of things before the the kit hits the shelves!
Jean-Luc
Better think one hour and build five minutes...
Than think five minutes and build an hour!
Merlin
Senior Editor #017
United Kingdom
Joined: June 11, 2003
KitMaker: 17,582 posts
AeroScale: 12,795 posts
Posted: Sunday, October 08, 2006 - 11:38 AM UTC
Hi Jean-Luc
It's not just the shock struts - the disparity looks so great, you'll have to shorten the main legs by more than they could physical extend in real life. I wonder if the kit legs are actually positioned too far outboard? It might just be the angle of your photo, but the nosewheel doesn't look quite right either - the retraction arm seems positioned too high compared with the reference shot.
All the best
Rowan
BEWARE OF THE FEW...
As I grow older, I regret to say that a detestable habit of thinking seems to be getting a hold of me. - H. Rider Haggard
Moselle, France
Joined: May 15, 2005
KitMaker: 5,653 posts
AeroScale: 4,347 posts
Posted: Sunday, October 08, 2006 - 09:47 PM UTC
Quoted Text
It might just be the angle of your photo, but the nosewheel doesn't look quite right either - the retraction arm seems positioned too high compared with the reference shot.
Hi Rowan!
I think the angle of the photo makes it look worse but you are right. All the retraction arms, including those of the main wheels, look wrong on the model compared to the pictures!
But I can assure you I followed the instructions carefully and there is no other way to position the forward retraction arm with the parts provided... and I think I will live with it.
The height of the forward landing gear looks ok though, so I will only shorten the main gears because the plane just looks odd right now!
Jean-Luc
Better think one hour and build five minutes...
Than think five minutes and build an hour!
Scotland, United Kingdom
Joined: June 01, 2006
KitMaker: 1,707 posts
AeroScale: 1,119 posts
Posted: Sunday, October 08, 2006 - 09:49 PM UTC
I always thought that it was a good thing when "birds" had long legs.... :-) :-)
"I´m going back to the front to relax"
"THE BLACK CATS FLIES TONIGHT"
"Find your enemy and shoot him down - everything else is unimportant"
"When you're out of F-8's... You're out of fighters!"
Moselle, France
Joined: May 15, 2005
KitMaker: 5,653 posts
AeroScale: 4,347 posts
Posted: Sunday, October 08, 2006 - 10:13 PM UTC
Quoted Text
I always thought that it was a good thing when "birds" had long legs.... :-) :-)
Not this one!!! :-)
Better think one hour and build five minutes...
Than think five minutes and build an hour!
Merlin
Senior Editor #017
United Kingdom
Joined: June 11, 2003
KitMaker: 17,582 posts
AeroScale: 12,795 posts
Posted: Sunday, October 08, 2006 - 10:20 PM UTC
Quoted Text
The height of the forward landing gear looks ok though, so I will only shorten the main gears...
Hi Jean-Luc
Absolutely! I wouldn't touch the nose-leg; it'd only mean even more work shortening the main gear!
All the best
Rowan
BEWARE OF THE FEW...
As I grow older, I regret to say that a detestable habit of thinking seems to be getting a hold of me. - H. Rider Haggard
Moselle, France
Joined: May 15, 2005
KitMaker: 5,653 posts
AeroScale: 4,347 posts
Posted: Monday, October 09, 2006 - 12:16 AM UTC
Quoted Text
I wouldn't touch the nose-leg; it'd only mean even more work shortening the main gear!
Hi again Rowan!
I think I couldn't have spent another night with the Me 309 sitting on it's long legs! I shortened the landing gears by 4 mm a few minutes ago:

I think it looks better but it's still not enough compared to the picture. Anyway, I'll leave it that way otherwise only small stubs would remain and it would look even worse. I suppose there must be other factors involved, such as dihedral or landing gear position.
When you look at the picture of the real plane, you can also notice the horizontal tailplanes are much to high on the model! Damn! I think I'll stop comparing the kit to the references, otherwise I will finish this project in 2012!
Jean-Luc
Better think one hour and build five minutes...
Than think five minutes and build an hour!
Germany
Joined: September 07, 2005
KitMaker: 5,609 posts
AeroScale: 5,231 posts
Posted: Monday, October 09, 2006 - 01:05 AM UTC
Hi Jean-Luc
I think you did a great job on the model.
As for the pic: Yopu do not know if the camera and the a/c are in the same level and the oleos might be weigted or have lost pressure as it looks "down by stern" (thats what I found for "hecklastig")
Well done, mate!!As a side note; I 've done some progress on my Käfer too. I thought it to be finished, but i was advised to do a darker wash .. thats what I did .. I'll take pix of that tomorrow

 Link
Linkbest wishes
Steffen
DULCE ET DECORUM EST PRO HOBBY MORI
Moselle, France
Joined: May 15, 2005
KitMaker: 5,653 posts
AeroScale: 4,347 posts
Posted: Monday, October 09, 2006 - 01:42 AM UTC
Quoted Text
I 've done some progress on my Käfer too.
Hi Steffen!
Dein Käfer hat mehr Kilometer auf dem buckel als meiner! :-)
You did a great job on the weathering. I especially like the traces of the wipers on the windshield. I think I didn't get it quite right on mine and I'll have to change them...
Jean-Luc
Better think one hour and build five minutes...
Than think five minutes and build an hour!
Germany
Joined: September 07, 2005
KitMaker: 5,609 posts
AeroScale: 5,231 posts
Posted: Monday, October 09, 2006 - 01:49 AM UTC
Quoted Text
Dein Käfer hat mehr Kilometer auf dem buckel als meiner! :-)
Yes I wanted mine to look pretty used ...
cheers
Steffen
DULCE ET DECORUM EST PRO HOBBY MORI
Germany
Joined: September 07, 2005
KitMaker: 5,609 posts
AeroScale: 5,231 posts
Posted: Monday, October 09, 2006 - 03:43 PM UTC
Now it is dirtier .. almost a Mistkäfer :-)
i should have left off one or two hub caps to improve the used look

 Link
Linkcheers
Steffen
DULCE ET DECORUM EST PRO HOBBY MORI
Moselle, France
Joined: May 15, 2005
KitMaker: 5,653 posts
AeroScale: 4,347 posts
Posted: Tuesday, October 10, 2006 - 10:39 AM UTC
Quoted Text
i was advised to do a darker wash .. thats what I did ..
Hi Steffen!
I was afraid you would overdone the weathering!
But the difference, although noticable is subtle. I think you achieved the desired effect and the car looks as if he did go through a lot of punishment. What about adding some bumps on the mudguard next?
Jean-Luc
Better think one hour and build five minutes...
Than think five minutes and build an hour!
Germany
Joined: September 07, 2005
KitMaker: 5,609 posts
AeroScale: 5,231 posts
Posted: Tuesday, October 10, 2006 - 12:34 PM UTC
Quoted Text
I think you achieved the desired effect and the car looks as if he did go through a lot of punishment. What about adding some bumps on the mudguard next?
Hi Jean-Luc
many thanks for your kind and forgiving comment ! I am not totally satisfied .. but there are other models, where I can improve my "style" Lu (the guy who advised me to do darker wash) has done and excellent Käfer which is together with yours my benchmark! Way to go...
(if you like to have a look:
VW Typ 82E)
I though about giving the car some dents, but I have never practiced that, so i'll leave it for another project
Thanks again and
best wishes
Steffen
DULCE ET DECORUM EST PRO HOBBY MORI


