

I have just recieved Dragon's 1/48 Mistel-2/S-2 with the FW-190 F-8 and JU 88G-1. Have a quick question about the 190. Those guns that is angled 45 degrees in the nose, are they somekind of Shragemuzik and the 190 is a nightfighter version of the F-8?
Thanks for your time fellas....
Hosted by Rowan Baylis
Dragon 1/48 Mistel -2/S-2?

Lucky13

Joined: June 01, 2006
KitMaker: 1,707 posts
AeroScale: 1,119 posts

Posted: Sunday, December 24, 2006 - 07:14 AM UTC

Brigandine

Joined: July 12, 2006
KitMaker: 553 posts
AeroScale: 86 posts

Posted: Wednesday, December 27, 2006 - 10:06 AM UTC
Those angled MG 131s are, as far as I can tell, completely fictional - there was little room in the 190's nose as it was and angling the MGs would have bee near impossible without a lot of redesign. There may well have been some consideration given to such a conversion
Holdfast

#056

Joined: September 30, 2002
KitMaker: 8,581 posts
AeroScale: 4,913 posts

Posted: Wednesday, December 27, 2006 - 08:31 PM UTC
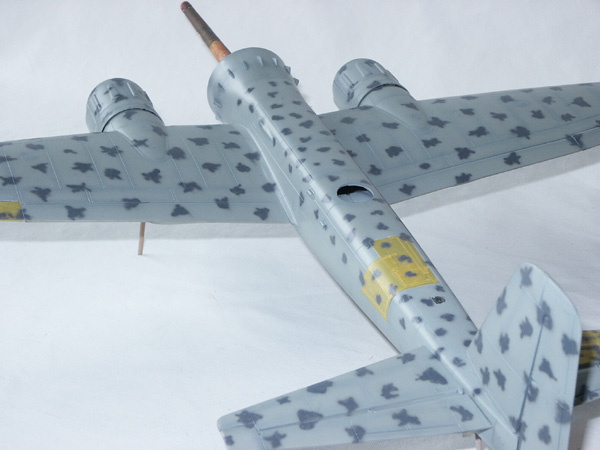
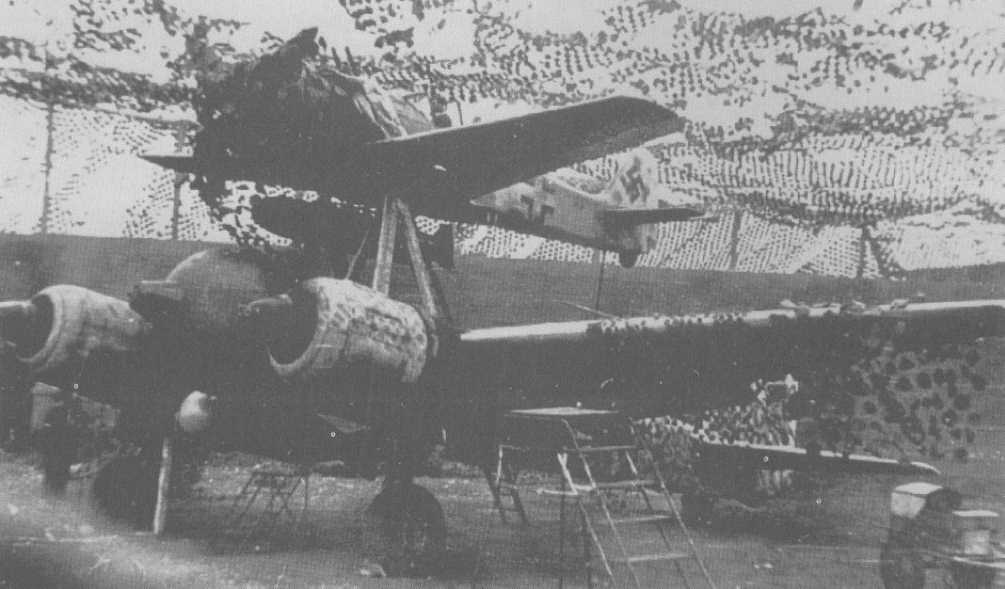
Yes those guns are completely fictional. Somehow Dragon interpreted the ends of the ladder, used to enter the 190, show in a picture, as upward firing guns. I have the picture somewhere, if I find it I'll post it. Also note that the dappled camo, on the 190 is also fictional. The same picture is of a Mistel under a camo net and the shadows of it have been mistaken for the camo. Also the 190 in the kit is actually an A8 and, although the instructions tell you to remove the outer gun barrel fairings, for an F8 all remnants of the outer guns should be removed. That is, fill in the ejection openings and panel lines for the access hatches, top and bottom.
I am building this kit, I have the Ju 88 nearly finished and the 190 stripped of paint, to re-paint it. No I didn't add dappled camo I just wasn't happy with it.
Mal
Found the picture, you can clearly see the tops of the ladder.
I am building this kit, I have the Ju 88 nearly finished and the 190 stripped of paint, to re-paint it. No I didn't add dappled camo
I just wasn't happy with it. Mal
Found the picture, you can clearly see the tops of the ladder.

SGTJKJ
#041

Joined: July 20, 2006
KitMaker: 10,069 posts
AeroScale: 3,788 posts

Posted: Wednesday, December 27, 2006 - 11:02 PM UTC
Thanks for sharing that information. Embaressing for Dragon to make a mistake like that.
Your project looks good. Keep us updated on your progress.
Your project looks good. Keep us updated on your progress.

Lucky13
Joined: June 01, 2006
KitMaker: 1,707 posts
AeroScale: 1,119 posts
Posted: Thursday, December 28, 2006 - 12:29 AM UTC
Fellas,
Thanks for all the info, much appreciated! True, must have been embarrassing for Dragon to make a mistake like that. Build is looking great Mal... How was it to build?
Thanks again...

Thanks for all the info, much appreciated! True, must have been embarrassing for Dragon to make a mistake like that. Build is looking great Mal... How was it to build?
Thanks again...
Holdfast
#056
Joined: September 30, 2002
KitMaker: 8,581 posts
AeroScale: 4,913 posts
Posted: Thursday, December 28, 2006 - 04:26 PM UTC
Quoted Text
Build is looking great Mal... How was it to build?
Ha ha
I new you were going to ask me that 
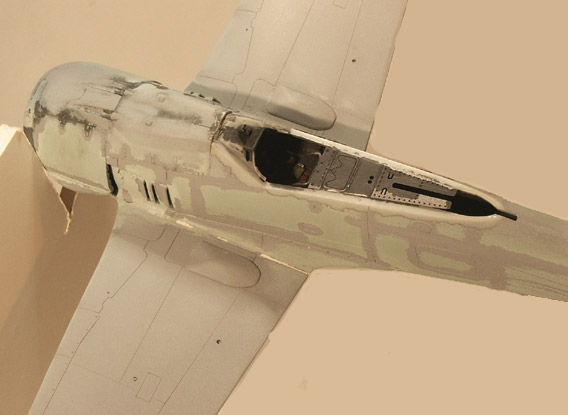
The 190 went together OK but the cowl is multi part and takes patience. There is quite a step, between the top engine cover and the fuselage. I didn't attempt to correct it at first, but subsequently tried filler. I think the answer may be to cut it down the middle and add plastic until it is wide enough. You can see in the picture that the 190 has it's undercarriage raised. All models, that I have seen completed, have the undercarriage down, on the 190. True, there are pictures of this configuration, but having the undercarriage down would simply add drag. There are in flight shots of Mistels, showing the "mother ship" (190) with it's undercarriage down. I believe though that these shots only show the training veriant. Anyway I decided that I would build my 190 with raised undercarriage. Not an easy option as it took allot of test fitting and cutting to achieve but I did it. My main problem with the 190 was that I wasn't completely happy with the painting so, having got to the decal stage, I stripped it of all paint. That is the state it is now in, waiting for me to re-paint it.
The Ju 88 has it's own problems and you will likely need quite a bit of filler, here and there, but it builds into a nice model. Mine had a great chunk missing out of the starboard fuselage, caused by a "short shot". I simply added a shelf of plasticard, inside and filled the hole with putty. The hole was just forward of where the masking tape is on the fuselage. The reason for the masking tape (the starboard elevator and port aileron are also covered) is because I will be painting these areas as if they were from a cannibalised aircraft. I will also be adding a blanking plate to the direction finder location, surmising that all none essential equipment would have been removed, to save weight.
I will try and get this finished but it has been on going for some years now.
 Part of the problem was trying to confirm trim colours for the 190. Mine will now have a white rudder, but I'm still not sure about codes or markings.
Mal
 |

WEB HOSTING BY


Copyright ©2021 AeroScale and Kitmaker Network, a subsidiary of Silver Star Enterprises
All Rights Reserved. Please read our Conditions of Use and Privacy Policy.
All Rights Reserved. Please read our Conditions of Use and Privacy Policy.