

1⁄35Focke-Wulf Fw 190 D-9 - Part 2
7
Comments
"HOT KNIFE" CUT-UP CAPER
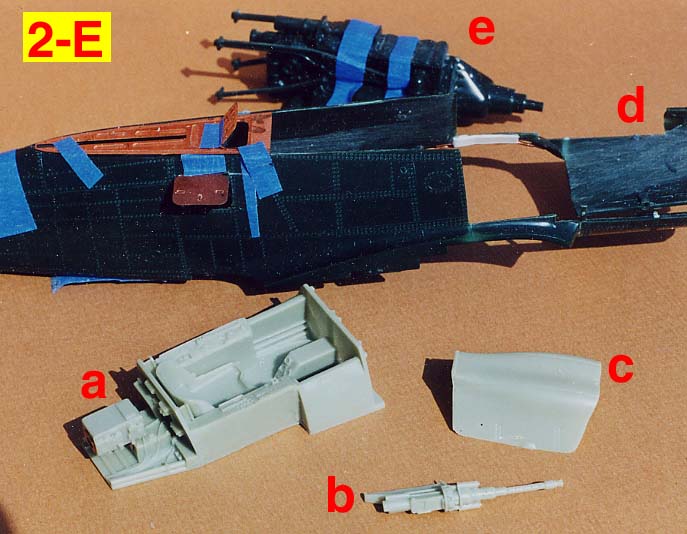
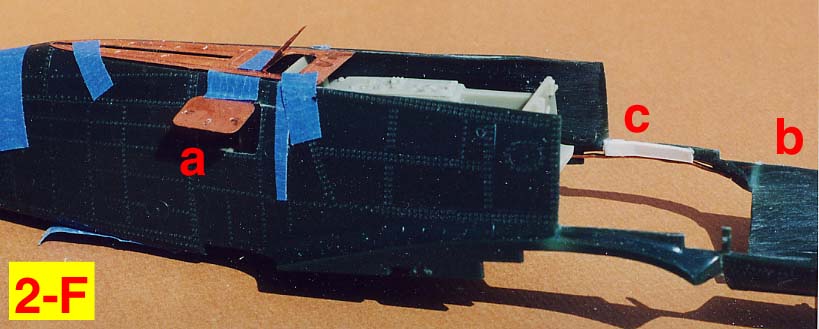
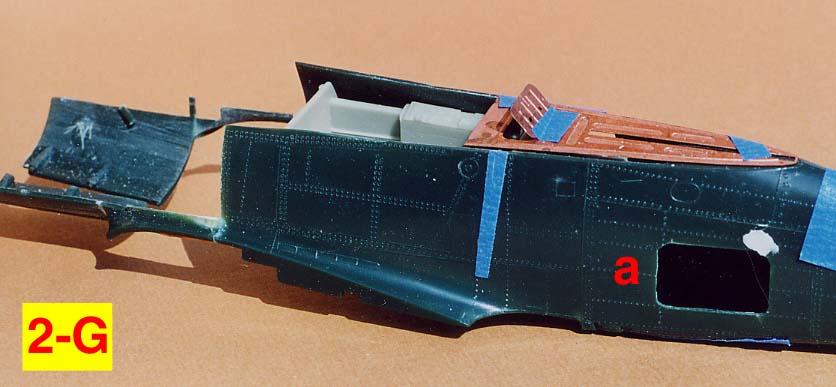
Now turn your attention to Photos 2-E through 2-G. Photo 2-E shows the two fuselage halves taped together on the second Revell Dora kit, the one I would use to build the finished model. Lower case a, b, and c show respectively, "a" the Verlinden gray resin detail set's cockpit and aft radio compartment; "b" shows one of the two Verlinden machine guns that would be mounted above the engine; "c" shows the Verlinden machine guns access cowling. Later, this resin piece would be attached in the raised position, resting on the cockpit windscreen. At letter "d", you see the area that was cut away using the hot knife, mentioned in the section above.In Photo 2-F you can see more of the dry fitting process, using low tack blue masking tape to hold the pieces in place. The bronze colored pieces are part of the PE from the Verlinden detail set. At letter "a", you can see that I've taped the starboard side PE access hatch in place. I did this to get a better idea how it would look in regards to the opening I'd cut into the kit fuselage for the Verlinden PE hatch door. The inside of the starboard fuselage kit part had to be sanded down a great deal to make it closer to a scale thickness, for when the fuselage halves were glued together. (Contest judges look at any area on a kit like this where you've cut something open, to see if you've altered the kit plastic to be closer to a scale thickness. And many contest modelers fail to pass muster because they didn't thin any exposed area, down to a scale thickness.) Letter "b" in the photo indicates, again, where a large portion of the forward section of the kit was cut away with the hot knife. Letter "c" indicates where, on the port side, that a length of brass wire and sheet styrene support pieces had to be super glued, to that very thin portion of the fuselage. That area cracked apart during the period when the vigorous hand sanding was done. In the completed model that area is not visable, I'm glad to say. Photo 2-G also shows the two fuselage halves taped together, when I was dryfitting the Verlinden cockpit and PE decking aft of the cockpit where the radio compartment access hatch is located. It was necessary to be continually checking the fit of everything, inserting the resin parts between the fuselage halves, then more sanding, more dryfitting. A well developed discipline is required for these kinds of mundane tasks. So I tried to keep in mind what I stated in Part I. "Nothing Worth Having Is Easily Achieved".
Back to Photo 2-G. The PE decking is situated under the sliding portion of the cockpit canopy. You can see I taped the radio compartment access hatch in the open position. At letter "a" you see that the port access hatch has been cut open, with the same procedures used on the starboard side access hatch.
INTERIOR DECORATING: DORA ON MY MIND. . .
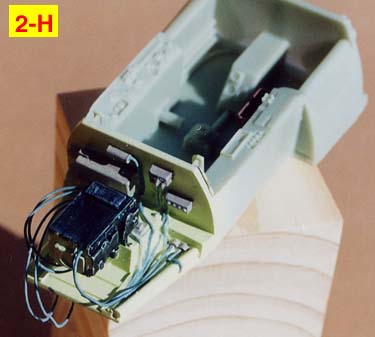
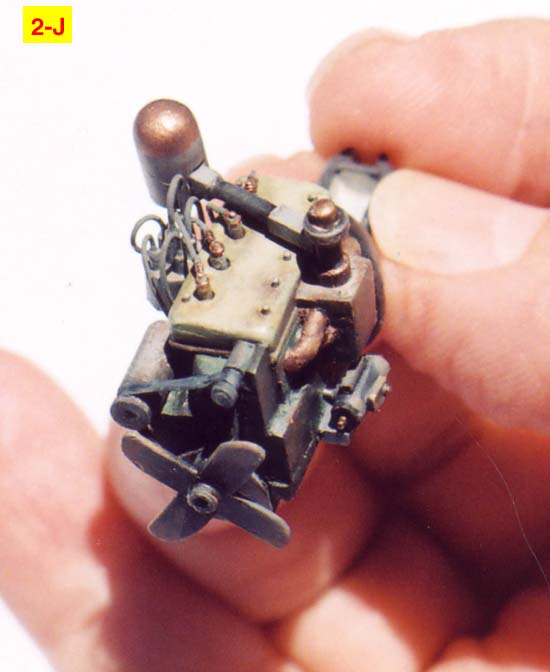
Next I'll discuss the interior, aft of the engine compartment; how the cockpit was done. As you look at Photo 2-H you see the Verlinden resin cockpit/radio compartment piece. I painted the radio black and added connecting wires to the appropiate places. I used the excellent reference photographs from the Squadron Signal Walk Around book on the FW 190 D-9, once again. At the end of Part One of this article, I said I'd mention the advice I got from Ed Boll (my good modeling friend since 1972, who lives in the Los Angeles area of California, USA) a master aircraft modeler. Also, in Part One, I mentioned using copper or steel wire in the wheel wells, and the problems I had making an "L" shaped bend with copper or steel wire. In front and behind of the bend, the wire was so difficult to get straight and true, as on a real aircraft. Boll told me to use solder wire instead of copper or steel wire. So I went to Radio Shack (a retail chain store in the USA that sells electronic and electrical supplies, equipment) and bought spools of solder wire with diameters of .015, .025, .032, .050, and .062. Bill Pettyjohn, like Ed Boll, is a good friend of many years. Like Ed Boll, Bill is also a master modeler who has won first in aircraft categories at the IPMS/USA National Conventions for many years. Ed Boll has done the same. (Their hobby room walls are filled with first place plaques from many IPMS/USA National Conventions.) Bill recently told me that it is possible to also purchase solder wire in a diameter as small as .009. He orders this .009 solder wire from www.buffiesbest.com. "Buffies best" also stocks a large number of 1:48th scale engines of most all of the famous WWII era power plants. Buffies Best's web site will be listed again at the end of this Part Two article. So for the wiring in the aft radio compartment, I used solder wire and was very pleased with the results. You can bend it in a very tight, small loop or circle and it doesn't kink or bend in a way that copper or steel wire will. In other words, using solder wire helps me to create that illusive "illusion of reality" I trying to achieve.So, here in Photo 2-J is another use of that solder wire, on an automobile engine. (There is no Photo 2-I since the capital "i" looks like a numeral one; creating confusion, so I've skipped the capital "i".) Photo 2-J is a picture of a 1:35th scratchbuilt four cylinder flat head engine I made for my WWII Ba-20 Russian Armored Car model. If you look closely at the spark plug wires going into the distributor you can see that although the bending of each wire is a very small radius, IMO the bend looks fairly natural as would be seen in a full sized auto engine compartment. In other areas of the Revell Dora engine compartment, I used a thicker diameter solder wire for hoses (which I will discuss later). Now in using solder for the building of this model, I did notice that it is easy to accidently chip off the paint from the solder wire. Enamel paint doesn't bite into solder wire the way it does into styrene plastic. But it is easy to touch up those areas again later. Generally for me, I rarely paint any hoses or insulated wire black. To me, in scale, black is too stark and stands out visually, too much. I use a dark gray for painting hoses and insulated wire.
About the Author


FROM: KANSAS, UNITED STATES
I am primarily a figure painter and have been painting figures about 3 years now; still consider myself a novice. However, I started building models in 1965 and as a retired newspaper artist, I now have time to build models all the time, just for the fun of it and as a way to express my creative inn...
Comments
Hey Rick,
Great second installment! Talk about great reading! I hope you realise that now I expect the same quality of writing over on HFM :-)
Can't wait for part 3!!!
Rudi
OCT 15, 2006 - 02:21 AM

Hi Rudi!
:-) :-) No - Rick's ours now! - OK, we'll share!
But seriously - Rick's ability to explain everything in everyday language, while inspiring us all to reach for the highest standard is something to be treasured! Passing Forward is my new watchword (or 2!) for Aeroscale - it's an outstanding concept that underpins everything we stand for.
All the best
Rowan
OCT 15, 2006 - 02:46 AM
Rowan.... LOL for some reason when reading this you sounded just like Sith Master Darth Sidious :-) :-)
Could not agree with you more!!! Pay-it-forward is becoming the underlying spirit of HFM as well
Rudi
OCT 15, 2006 - 03:49 PM

Gentleman; to M.E. Merlin and M.E. Tarok:
@ Rudi: Thank you for your gracious remarks about my 1:32nd Dora
series, Rudi. Even though I realized I had a lot to say when I started the
first article, I was concerned that it would be so boring and dull to most
everyone. Candidly, it's a time consuming task, but fortunately I'm retired.
I felt if there were beginners who might get some value from my
ideas and concepts, it would be worth the time. Like the effort you've
put into Historicus Forma, Rowan is a very hard working editor. He has a
passion for this hobby. We're fortunate that he is willing to devote his time
to develop Aeroscale into the informative, timely, and exciting
information gathering site that it is becoming. But more importantly,
he is a very nice person and so easy and a lot of fun to work with. Part III
is a wrap and I'm now rolling the final part IV out on to the flightline. But I
also hope at some point to be able to do some more articles for HFM.
We will see.
@Merlin: Your comments are most appreciated, Rowan. In Part I I
I mentioned my late mentor and great friend Dick Clay and when I thought
of what his example meant to me and connected it with the "Pay-it-forward"
way of sharing with others, it just became something I felt needed to be
said. Unfortunately, we live in a confrontational world. It is easy to forget
what binds us all together as caring people. But I'll quote your words here:
Pay-it-forward is my new watchword (or 2!) for Aeroscale - it's
an outstanding concept that underpins everything we stand for.
Indeed, well chosen words. It "underpins" everything we stand for.
Thanks again,
Rick Brownlee
The Miami Jayhawk
OCT 15, 2006 - 05:27 PM

Well spoken Rick. The Feature is prime reading. Some of your techniques are applicable in other areas of modeling as well. You have a bit of something for everybody. Nicely done. I look forward to the engine fabrication. You are also right about "buffiesbest" The owner has a real eye for detail. But then again he is a multiple winner of the IPMS Judges Grand Award.
OCT 20, 2006 - 03:09 PM
Hi Stephen:
I certainly appreciate your kind remarks about my Dora series, "Jack".
And also, your imput about Buffiesbest. I am not famililar with the
individual personally but am certainly familiar with IPMS/USA's Judges
Grand Award, as I've seen up close at various Nationals, the models who
. . . . ah . . . duh? . . . let's make that "models THAT have received. . . .
those awards. The Grim Reaper, a Kansas City friend of
many many years ordered some of the very small diameter solder
wire from Buffiesbest just the other day, via a phone order and
got to talk with the gentleman. Grim says he's a stand up guy!
Thanks again,
OCT 20, 2006 - 05:03 PM

At last, finaly got a chance to read it.
Great part two Rick, well written with some interesting and useful tips and tricks.
Loking forward to part three.
Take it steady
Vic
NOV 01, 2006 - 08:10 PM
Copyright ©2021 by Rick Brownlee. Images also by copyright holder unless otherwise noted. The views and opinions expressed herein are solely the views and opinions of the authors and/or contributors to this Web site and do not necessarily represent the views and/or opinions of AeroScale, KitMaker Network, or Silver Star Enterrpises. Images also by copyright holder unless otherwise noted. Opinions expressed are those of the author(s) and not necessarily those of AeroScale. All rights reserved. Originally published on: 2006-10-15 00:00:00. Unique Reads: 9384

WEB HOSTING BY


Copyright ©2021 AeroScale and Kitmaker Network, a subsidiary of Silver Star Enterprises
All Rights Reserved. Please read our Conditions of Use and Privacy Policy.
All Rights Reserved. Please read our Conditions of Use and Privacy Policy.