1⁄35Focke-Wulf Fw 190 D-9 - Part 2
7
Comments
AFT OF COCKPIT: WORKING WITH VERLINDEN PHOTO ETCHED
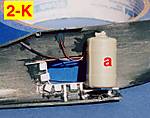
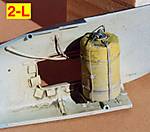
After I finished painting the basic colors with Humbrol enamels in the cockpit and the radio compartment, I used Super Glue to attach the Verlinden PE pieces in both the port and starboard interior aft of the cockpit. This would include the various interior PE longerons, bulkheads, framing, electirical wiring, Verlinden resin auxiliery 115 liter fuel tank, resin remote compass and resin remote starter crank. Photo 2-K shows the port side interior aft of the cockpit, where the access hatch area had been cut out of the kit fuselage half. I added wire, and at letter "a", the Verlinden resin 115 liter fuel tank and some white styrene pieces around the inside of the access hatch to give the look from the outside, of a lip on which the hatch door would close over. Photo 2-L shows the port side interior after I've airbrushed the interior color. At this point in my aircraft modeling, I used oil washes over the sprayed on Humbrol enamel. Since the mineral spirits in the oil wash would attack the base enamel painted surfaces, it was necessary to put a barrier layer over the Humbrol enamel to protect it. At that point in time, I made the barrier layer using 3 parts mineral spirits to 2 parts clear flat varnish. This mixture was applied with an air brush in several thin layers and allowed to fully dry for 48 hours. After two days I used Winsor Newton tube oil paints to make the washes that were applied with a brush by hand. I mixed the washes in a plastic palette with dimpled recesses. Raw Umber, Flake White, Paynes Gray (just small amounts of Paynes as it is almost black in color) straight out of the tube were mixed with mineral spirits. (I don't use turpentine or turpenoid with oils) Mixing the washes I wanted to keep in mind that it should not be too dark, more of a brownish-gray then a dull black. Photo 2-M shows the starboard side interior aft of the cockpit. Letter "a" shows the Verlinden resin remote starter crank and letter "b" shows the remote compass. The PE interior framing pieces are part of the Verlinden detail set. Also, various diameter thicknesses of copper wire were used. The white styrene electrical box was scratch built with copper wire. (Again, the copper wire was attached long before I got Ed Boll's suggestion of the solder wire.) And the horizontal gray rods were stretched sprue. After cutting out the starboard access hatch, the interior wall of that area on the kit fuselage half was sanded a great deal to thin the plastic for scale. Photo 2-N shows this same area after it was painted and weathered with the oil washes, previously mentioned.This Dora model was done some years ago. However, in reference to barrier layers and oil washes, I now use acrylic washes instead, as the acrylic washes do not attack what ever kind of paint you use as the base coat, as long as the base coat is allowed to get completely dry, cured, hard. Thus you do not need a barrier layer to protect the painted model.
YO BARTENDER, TWO SHOTS WILL DO IT!
Here are the last two photo shots for Part II. In Photos 2-O and 2-P you see the Verlinden resin cockpit installed in the interior. The fuselage halves had been glued together. I like to paint/weather my larger scale models in an attempt to create the illusion that they've actually been flown, a great deal. To show wear and tear in the cockpit and the radio platform area behind the pilot's seat, I used the same type of oil washes as mentioned in the previous section of this article. I tried to keep in mind how the play of sunlight would have affected the highlights and shadows in the real aircraft. So at the bottom of cockpit, floor and side wall which I considered as being further from the light souce above, I made those areas darker. And in the areas closer to the top edges of the cockpit I made those areas lighter. I realize that some modelers would not agree with this "style" of painting a model, but I use this approach in an attempt to add more realism and contrasts in those recessed areas. In Photo 2-O you see letter "a". That cream colored resin piece is also a part of the Verlinden detail set. It is a fairly accurate scale representation of the firewall aft of the engine and the twin magazines for the two MG 131, 13mm machine guns that are placed atop and aft of the engine. I'll have more to say about the difficulty with aligning the resin 13mm machine guns over the top of the resin magazines later. Letter "b" indicates the seat belts. These belts were made from wine bottle foil. I usually sand the printed side of that foil to accept paint easier. The foil is easy to super glue or bend into casual, more candid positions. Personally, I don't care for the decal printed seat belts or seat belts molded into the pilot's seat. IMO, those kinds of belts aren't as realistic. In the picture, you only see the lap area seat belts with PE buckles. The shoulder harness belts with attachment hardware were added much later. Photo 2-P shows the same area photographed from the starboard side. You can also see the pieces of low tack blue masking tape on the fuselage. I kept tape over the cutout openings of both port and starboard access panels to keep sanded particles out of those areas.In Part III of this article, I intend to cover the fabricating of the engine and the engine compartment. And will hopefully, have a few more surprises.
To order .009 diameter solder wire online contact: Buffiesbest.
Buffiesbest also stocks a large number of 1:48th scale engines from the WWII era.
Comments
Hey Rick,
Great second installment! Talk about great reading! I hope you realise that now I expect the same quality of writing over on HFM :-)
Can't wait for part 3!!!
Rudi
OCT 15, 2006 - 02:21 AM
Hi Rudi!
:-) :-) No - Rick's ours now! - OK, we'll share!
But seriously - Rick's ability to explain everything in everyday language, while inspiring us all to reach for the highest standard is something to be treasured! Passing Forward is my new watchword (or 2!) for Aeroscale - it's an outstanding concept that underpins everything we stand for.
All the best
Rowan
OCT 15, 2006 - 02:46 AM
Rowan.... LOL for some reason when reading this you sounded just like Sith Master Darth Sidious :-) :-)
Could not agree with you more!!! Pay-it-forward is becoming the underlying spirit of HFM as well
Rudi
OCT 15, 2006 - 03:49 PM
Gentleman; to M.E. Merlin and M.E. Tarok:
@ Rudi: Thank you for your gracious remarks about my 1:32nd Dora
series, Rudi. Even though I realized I had a lot to say when I started the
first article, I was concerned that it would be so boring and dull to most
everyone. Candidly, it's a time consuming task, but fortunately I'm retired.
I felt if there were beginners who might get some value from my
ideas and concepts, it would be worth the time. Like the effort you've
put into Historicus Forma, Rowan is a very hard working editor. He has a
passion for this hobby. We're fortunate that he is willing to devote his time
to develop Aeroscale into the informative, timely, and exciting
information gathering site that it is becoming. But more importantly,
he is a very nice person and so easy and a lot of fun to work with. Part III
is a wrap and I'm now rolling the final part IV out on to the flightline. But I
also hope — at some point — to be able to do some more articles for HFM.
We will see.
@Merlin: Your comments are most appreciated, Rowan. In Part I I
I mentioned my late mentor and great friend Dick Clay and when I thought
of what his example meant to me and connected it with the "Pay-it-forward"
way of sharing with others, it just became something I felt needed to be
said. Unfortunately, we live in a confrontational world. It is easy to forget
what binds us all together as caring people. But I'll quote your words here:
Pay-it-forward is my new watchword (or 2!) for Aeroscale - it's
an outstanding concept that underpins everything we stand for.
Indeed, well chosen words. It "underpins" everything we stand for.
Thanks again,
Rick Brownlee
The Miami Jayhawk
OCT 15, 2006 - 05:27 PM
Well spoken Rick. The Feature is prime reading. Some of your techniques are applicable in other areas of modeling as well. You have a bit of something for everybody. Nicely done. I look forward to the engine fabrication. You are also right about "buffiesbest" The owner has a real eye for detail. But then again he is a multiple winner of the IPMS Judges Grand Award.
OCT 20, 2006 - 03:09 PM
Hi Stephen:
I certainly appreciate your kind remarks about my Dora series, "Jack".
And also, your imput about Buffiesbest. I am not famililar with the
individual personally but am certainly familiar with IPMS/USA's Judges
Grand Award, as I've seen up close at various Nationals, the models who
. . . . ah . . . duh? . . . let's make that "models THAT have received. . . .
those awards. The Grim Reaper, a Kansas City friend of
many many years ordered some of the very small diameter solder
wire from Buffiesbest just the other day, via a phone order and
got to talk with the gentleman. Grim says he's a stand up guy!
Thanks again,
OCT 20, 2006 - 05:03 PM
At last, finaly got a chance to read it.
Great part two Rick, well written with some interesting and useful tips and tricks.
Loking forward to part three.
Take it steady
Vic
NOV 01, 2006 - 08:10 PM
Copyright ©2021 by Rick Brownlee. Images also by copyright holder unless otherwise noted. The views and opinions expressed herein are solely the views and opinions of the authors and/or contributors to this Web site and do not necessarily represent the views and/or opinions of AeroScale, KitMaker Network, or Silver Star Enterrpises. Images also by copyright holder unless otherwise noted. Opinions expressed are those of the author(s) and not necessarily those of AeroScale. All rights reserved. Originally published on: 2006-10-15 00:00:00. Unique Reads: 9384


