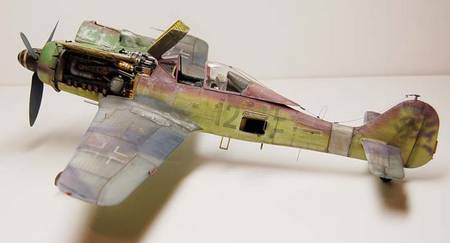
1⁄35Focke-Wulf Fw 190 D-9 - Part 3
...
Post a Comment

INTRODUCTION
So here is Part III about how I built the very old RevellUSA kit of the 1:32nd scale FW 190 D-9 Dora. As I said in the introduction of Part I, the kit was originally released in 1973. Part 1 explained how I used a resin detail set to replace the wheel well area in the orginal kit, as it was inaccurate. And Part 2 discussed using the Verlinden detail set for the kit interior and the scratchbuilding of various parts in the forward, nose section of the model. And, the process of thermaforming certain parts was explained; as a means of creating new thinner engine cowling access panels. The engine cowlings would be attached in the raised position to show off the kit engine with all its added scratchbuilt parts.MY OPINION: SCRATCHBUILDING IS STILL IMPORTANT FOR MODELERS
In this Part III, I will be spending some time discussing the making of parts from scratch. Yes, I started modeling long before there were resin detail sets or PE sets that are so popular today. We called that scratchbuilding process "super detailing" an aircraft model. And in order to add a lot of extra details in the cockit, engine compartment, wheel wells, etc. to make our models more accurate, we learned to scratchbuild those parts from thermaforming/vacuforming them, from carved wood master molds, plastic sheet styrene, plastic rod,tubing and various sizes of wire. I realize the mention of this approach to aircraft model building is foreign to many of the Aeroscale members. I remind you that one of my main points in Part I, was to challenge those who want to grow and improve as model builders. And as a part of that challenge, I asked that you be willing to leave your comfort zone in an attempt to learn new and different ways of expressing your creative side in modeling; to be willing to risk failure knowing that we learn as much or more from our failed attempts as from our successes. So for a lot of you, the scratchbuilding of cetain parts on a model, may be an approach you have not considered. My hope is that what's written here will give you the the "can do" spirit to give scratchbuilding a try.It is a strong held opinion of mine that a model builder needs to keep their hand in scratchbuilding. With the scratchbuilding of parts, there is so much more original thinking required. IMO, it sharpens your powers of observation and your problem solving abilities. Again, these are all valuable traits to possess. And that would include the exhibiting of these traits at the workplace as well as with our journey through the experiences of life. So I see scratchbuilding as something we should do on a regular basis. Developing skill in scratchbuilding various parts, also gives us a new perspective on what is possible in modelbuilding. We're not restricted by what is or is not available in resin/PE sets in the scale we need. The exercise of fabricating parts from scratch helps us refine our talents. It asks more of our abilities; pushes the envelope. In my view, the challenge of scratchbuilding definitely helps us tobecome more skilled as modelers. And if you want to consider Economics 101, which I flunked in high school, the scratchbuilding of parts is less expensive than paying for the high cost of resin and PE sets currently available.
FEELING GOOD IN THE INSTRUMENTATION HOOD
At this point the cockpit, radio compartment, and interior areas aft were completed and the two fuselage halves were glued together. See Photos 3-A and 3-B. I then had to remove the kit combing or "hood" over the area that housed the cockpit instrument panel and Revi 12 gun sight. The Verlinden resin part, indicated at letter "a", in photo 3-A (showing the starboard side) was glued in place. You can see the evidence of white putty to fill in some small gaps where the parts were mated. Letter "b" shows the Verlinden PE platform glued in place. The two MG 131 resin machine guns would be attached on top of this platform. Photo 3-B is the same area from the port side of the fuselage.Copyright ©2021 by Rick Brownlee. Images also by copyright holder unless otherwise noted. The views and opinions expressed herein are solely the views and opinions of the authors and/or contributors to this Web site and do not necessarily represent the views and/or opinions of AeroScale, KitMaker Network, or Silver Star Enterrpises. Images also by copyright holder unless otherwise noted. Opinions expressed are those of the author(s) and not necessarily those of AeroScale. All rights reserved. Originally published on: 2007-01-20 00:00:00. Unique Reads: 9076


