

1⁄48Kawasaki Ki-45 Toryu
7
Comments

Final construction
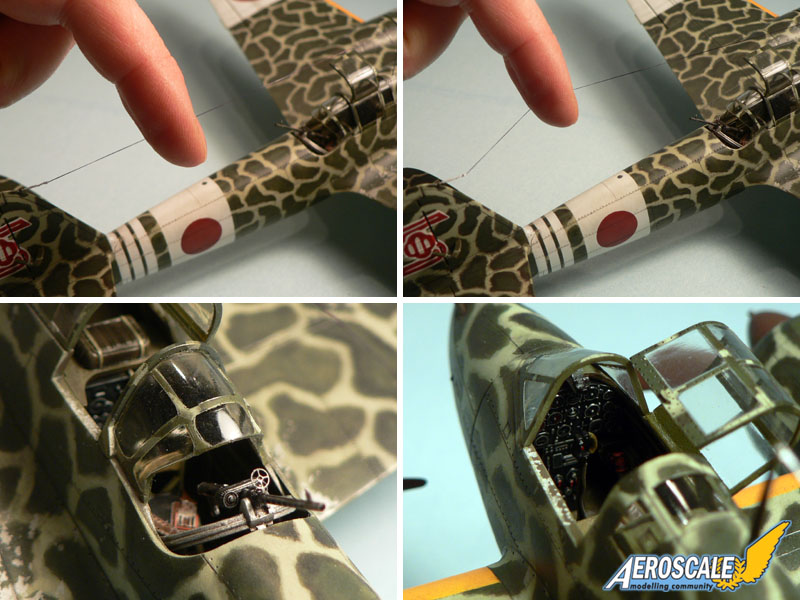
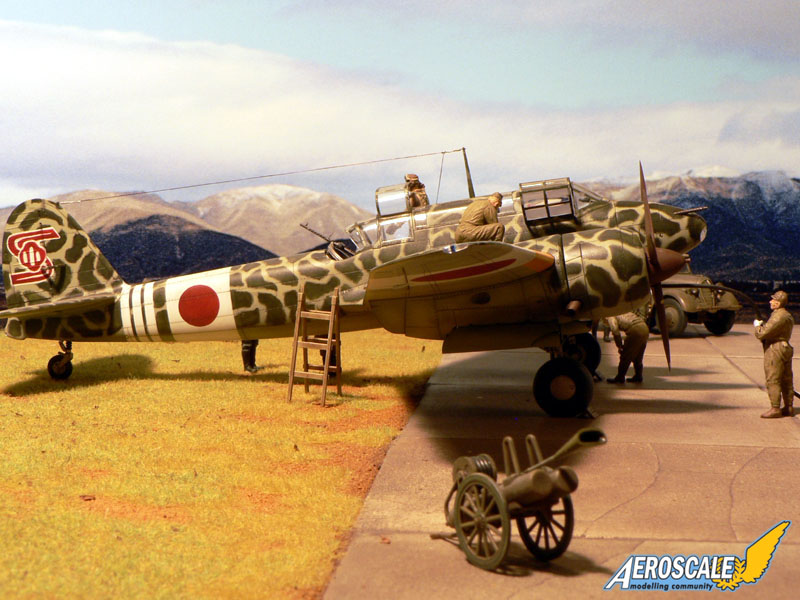
Before spraying some Klir (Future) over the model, I glued the cockpit greenhouse to the fuselage except for the movable parts. I sprayed several coats of Klir to obtain a glossy finish. This is important because when applying a wash, it helps the paint to flow into the recesses by capilarity action.Fitting the undecarriage was very easy. I also glued the engine cowlings and placed the propellers. The model received a final coat of satin to blend the camouflage and panel lines together. After that I glued all the detail parts (gear doors, antennas, radio wire, open cockpit parts, guns, navigation lights etc...), added some pastels and made the aerial wire out of elastic thread. Once in place, it is still bendable and therefore less fragile than everything else.
Finally, the only things I've added to the kit are PE seatbealts and a gunsight from the spare box for the rear gun. Otherwise it was built out of the box. The kit was a pleasure to build and the painting, even if challenging, was very interesting to do.
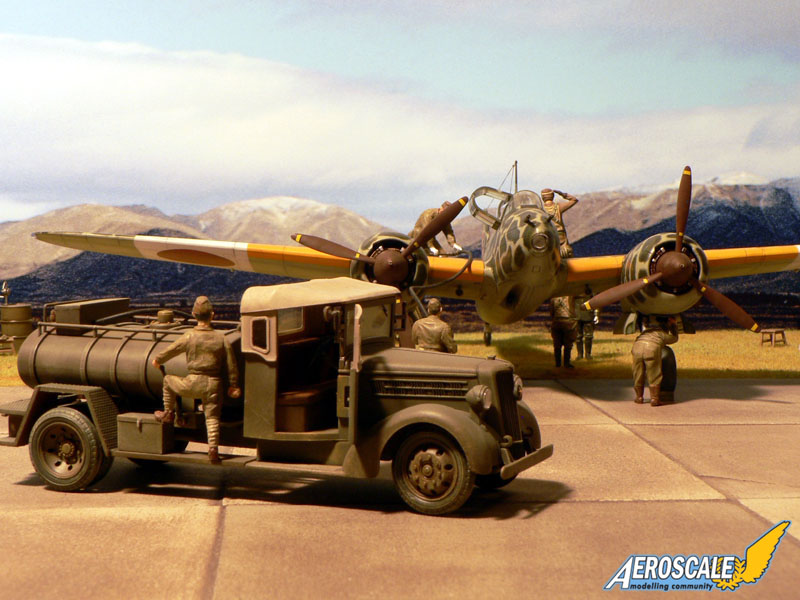
Isuzu TX40 Fuel truck
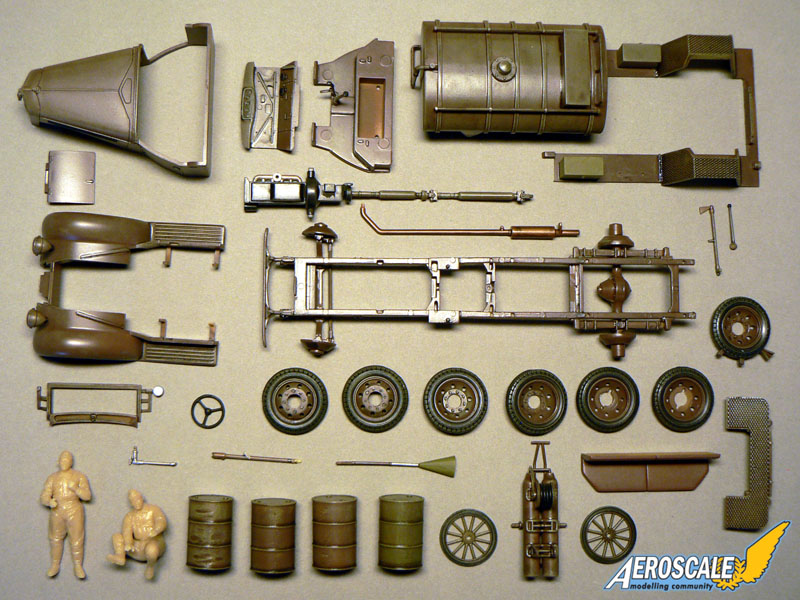
Included in the first boxing of the Ki-45 kit by Hasegawa is a nice Isuzu Fuel Truck, some acessories and some figures. Firstly, I test fitted the main parts without using glue and I found no construction difficulties. The interior of the cabin is somewhat simplified though and the thickness of some parts not always realistic. There is some room for improvement here for sure but nothing that can't be compensated with a nice paint job. The little fire extinguisher cart is a nice addition and the two figures are very good. they are easy to assemble (no filler is needed because there are no gaps) and they have very realistic poses.To start with the fuel truck I applied a coat of paint, drybrushed and then added a wash to all the sub-assemblies. After that, the build was easy and trouble free. I still think some areas could have been improved by Hasegawa. Just look at the thickness of the doors and you will know what I mean. Anyway, with the canvas cover fitted over the cabin, most of the weaker points of the model are hidden anyway. A flat coat and some weathering and the model was finished.
The vinyl fuel hose of the kit was too thick for my taste and it was difficult to bend it to shape. I replaced it by a more flexible and thinner rubber band. I also scratchbuilt a fuel tank access hatch on the wing of the Ki-45 to represent the plane while being refueled.
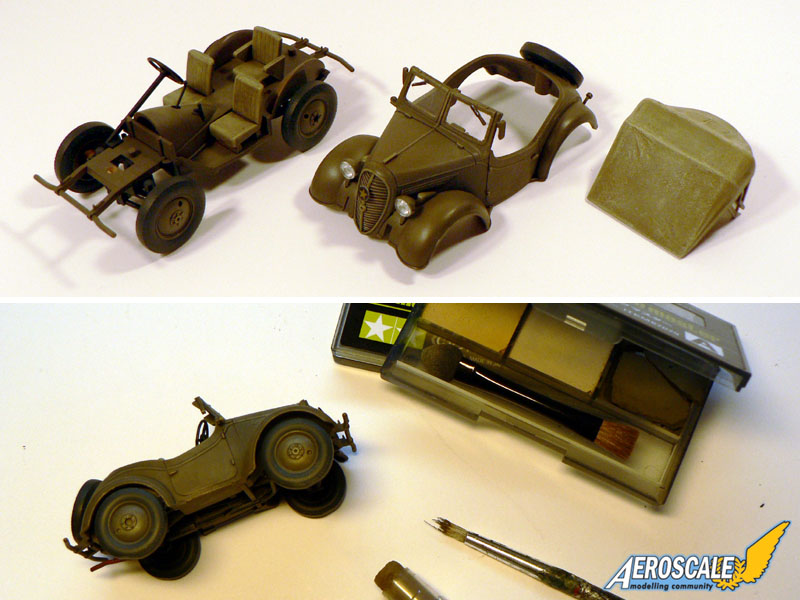
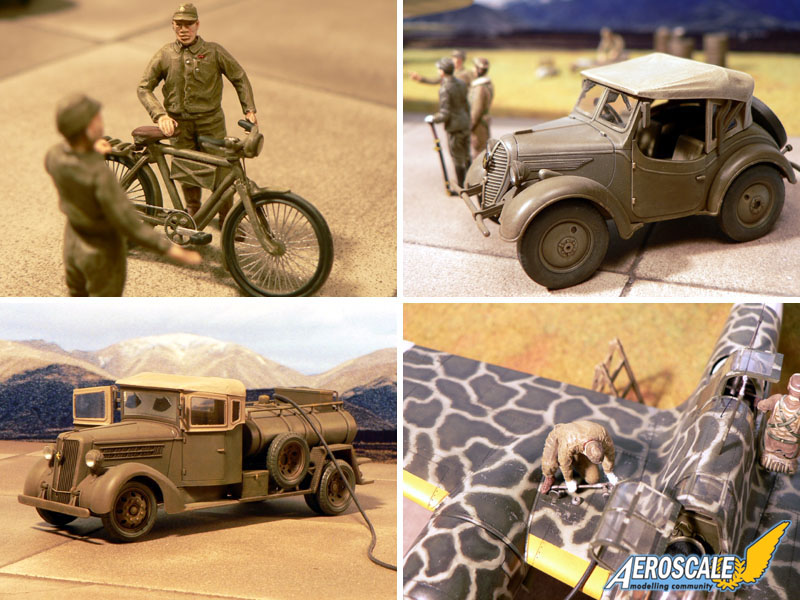
Type 95 Kurogane
Tamiya's Kurogane came as a surprise while I was working on the Ki-45. It wasn't planed for the diorama I wanted to do but I couldn't resist to include it. There's really not much to say about the build of the model. I pretty much used the same techniques as for the Fuel Truck. The build took even less time. In fact, if you work with acrylic paints, you can build it in one afternoon. Weathering was done with Tamiya weathering sticks and pastelsFigures and accessories
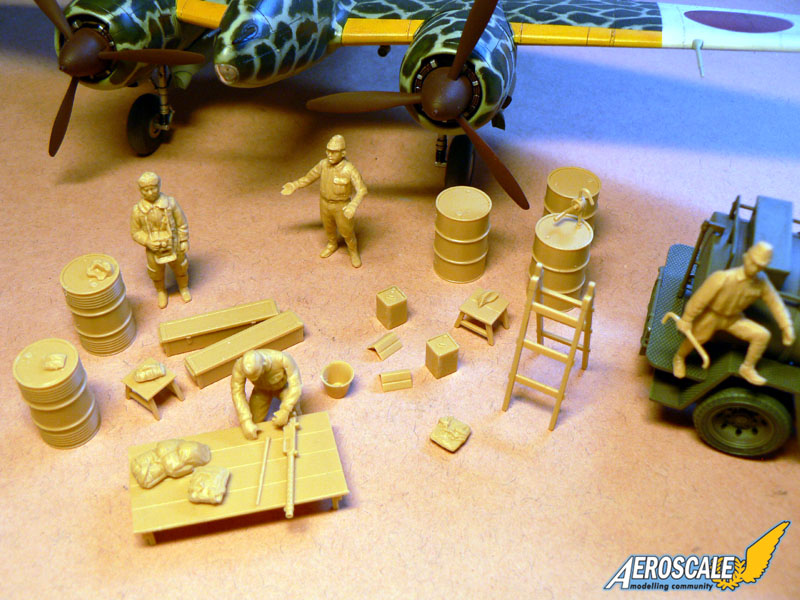
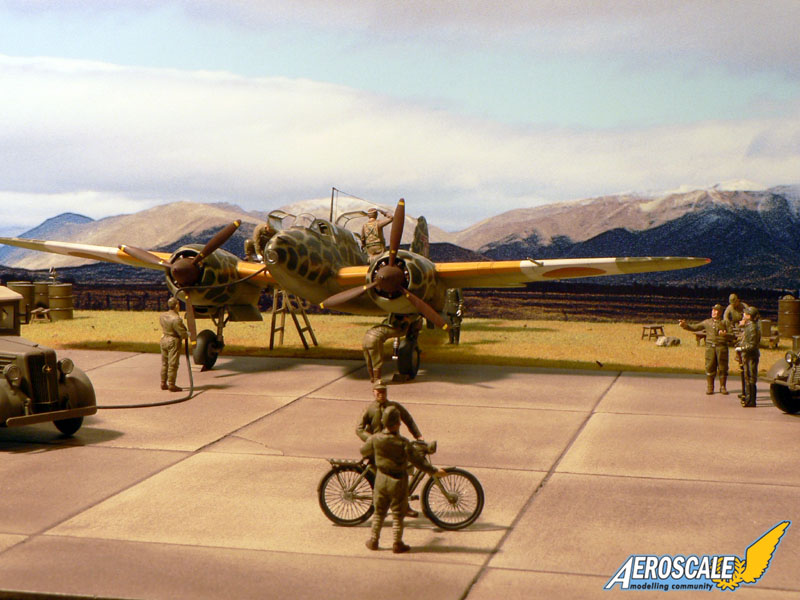
As I've said, the two figures included in the Hasegawa kit are very nice. However, I decided to use everything I could find to depict a busy airfield around the Ki-45. Some figures and accessories can be found in the two Fine Molds Ki-10 "Perry" kits. Each boxing has a different sprue and when adding both together, the result is a complete Japanese WW2 set. I also included the figures and the bicycle of Eduard's Japanese Army Personnel set. All together, with the driver and the officer included in Tamiya's Kurogane kit, this makes 14 figures I had to paint., and I hate to paint figures!I always use the same method to do them. First I apply a basic coat of paint with the airbrush. Of course I spray the color of the uniform. Then I drybrush the figure with a lighter version of the basic color. After that I do the detail painting with a small brush. Finally I apply a wash to blend everything together.
The accessories have been painted in a similar way than the figures. In total I gathered the following items for the diorama: several fuel drums, a manual fuel pump, an extinguisher cart, a bicycle, a ladder, a table, two ammunition boxes, two oil drums, two stools, a bucket, several bags and pouches etc... Quite a lot in fact and all of it wasn't available only a couple of years ago!
The diorama
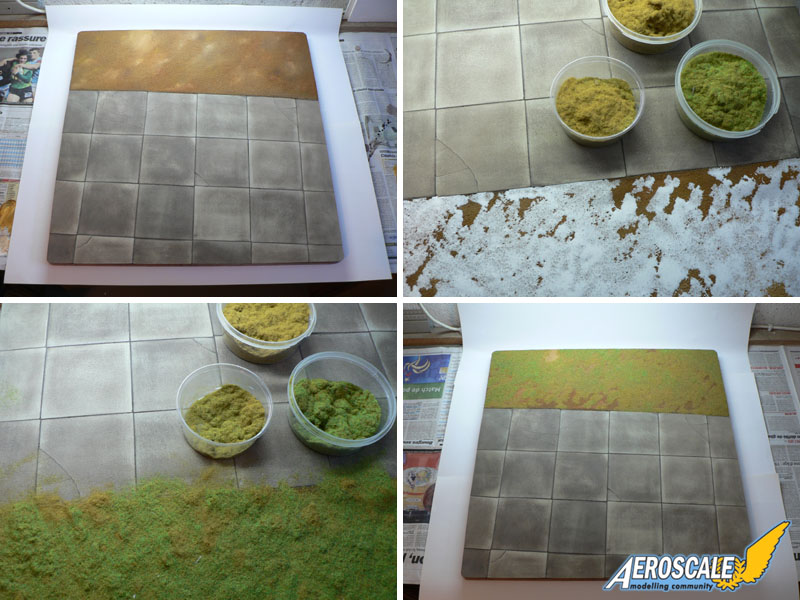
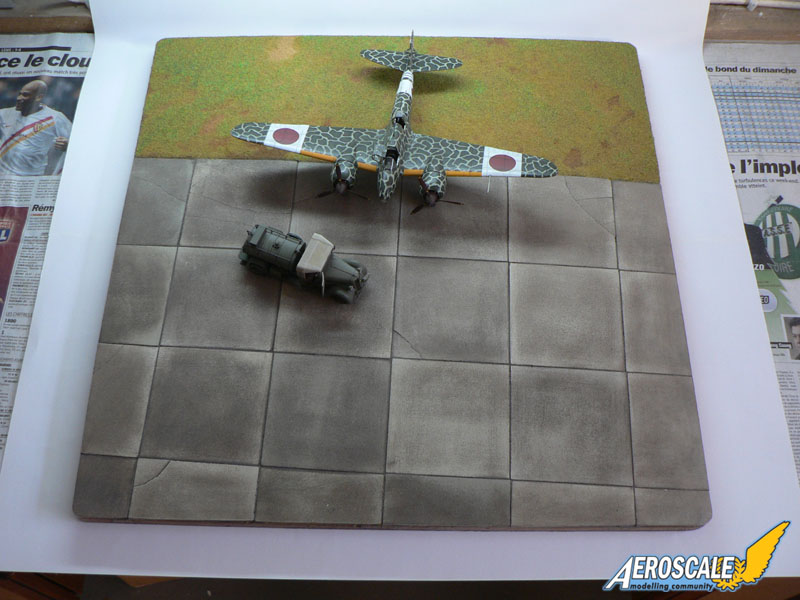
To get the aircraft, the vehicles, the figures and the accessories all together on the same diorama and since I wanted to have some space between all the "actors", I needed a large base. I used a sturdy plate of laminated wood on which I glued several pieces of Mark58 concrete tilings. These have a very realistic appearence with only a wash applied to weather them.For the grass area I used the following method: first I applied a coat of sand over white glue. After it was dry, I brush painted several shades of light brown color. Again I applied some white glue and finally strew some Faller railroad grass over it... et Voila! I decided to keep the diorama base as simple and neutral as possible so I could re-use for other photographic sessions later.
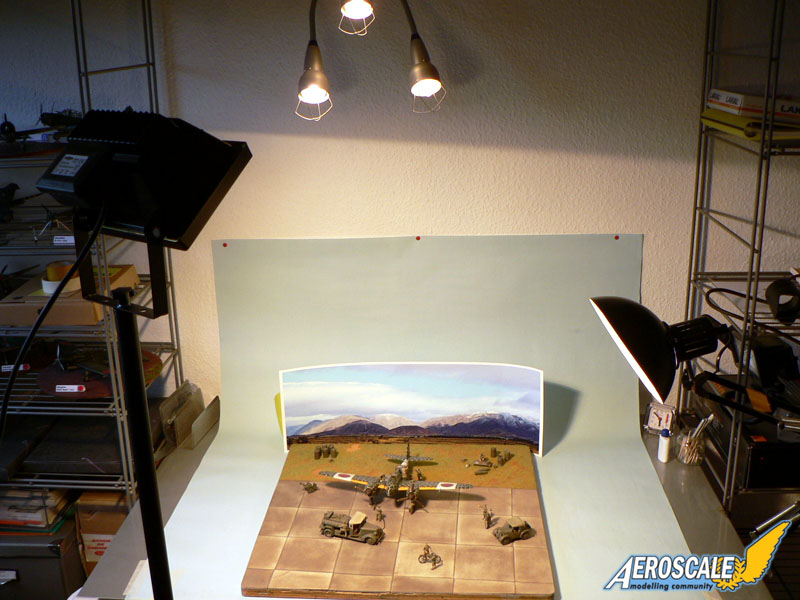
To shoot the pictures I used a background picture I found on the internet. I resized it and printed it with an A3 ink jet printer on semi gloss photographic paper. I used one bright 500 Watt Lamp as primary light source and other lamps for indirect lightning.
I hope you enjoy the pictures as much as I enjoyed shooting them.


About the Author


FROM: MOSELLE, FRANCE
I'm mainly interested in WW2 aircraft and I build them in 1/48 scale.
Comments

WOW! Very nice, from the opening banner,which is very cool by the way to the last photo. The build is excellent,the dio looks busy and the photography is right on. I think good photos really add to the presentation and really shows the build well. Good lighting is KEY. Thank you for showing your lighting set up. Where did you get your backround photo? Again, great job, Wingman out.
FEB 20, 2009 - 02:55 AM

I was wondering when you would finally post that feature .... the TMM France must be loong sold out ...
looking forward to your Lanc ... though I will never build such a beast it has something ...
as written in the original thread: fantastic build
all the best
Steffen
FEB 20, 2009 - 03:43 AM
I grabbed the next boxing of this kit as a result of your build thread, Jean Luc. Hasegawa OWES you! Wonderful work, my friend!
FEB 20, 2009 - 05:43 AM

Hi all,
Thanks for your kind words.
I never really found the time to publish it but I had to do it for you at least since you wanted to do the same aircraft. The paper article was in Replic, not in TMM.
Jean-Luc
FEB 22, 2009 - 06:42 AM
Hi Jean-Luc
could be a Chinese mag ... unreadable for me .... still the Toryu is one of your best OOB projects!
For those who want to know more; here is the link to the original thread:
https://aeroscale.kitmaker.net/forums/111745&page=1
Hope to see the next with flaps and slats!!!
all the best
Steffen
FEB 22, 2009 - 07:07 AM

An absolutely beautiful build, Jean-Luc! Excellent in every way and very inspiring!
FEB 27, 2009 - 06:52 PM
Copyright ©2021 by Jean-Luc Formery. Images also by copyright holder unless otherwise noted. The views and opinions expressed herein are solely the views and opinions of the authors and/or contributors to this Web site and do not necessarily represent the views and/or opinions of AeroScale, KitMaker Network, or Silver Star Enterrpises. Images also by copyright holder unless otherwise noted. Opinions expressed are those of the author(s) and not necessarily those of AeroScale. All rights reserved. Originally published on: 2009-02-20 00:00:00. Unique Reads: 22940

WEB HOSTING BY


Copyright ©2021 AeroScale and Kitmaker Network, a subsidiary of Silver Star Enterprises
All Rights Reserved. Please read our Conditions of Use and Privacy Policy.
All Rights Reserved. Please read our Conditions of Use and Privacy Policy.