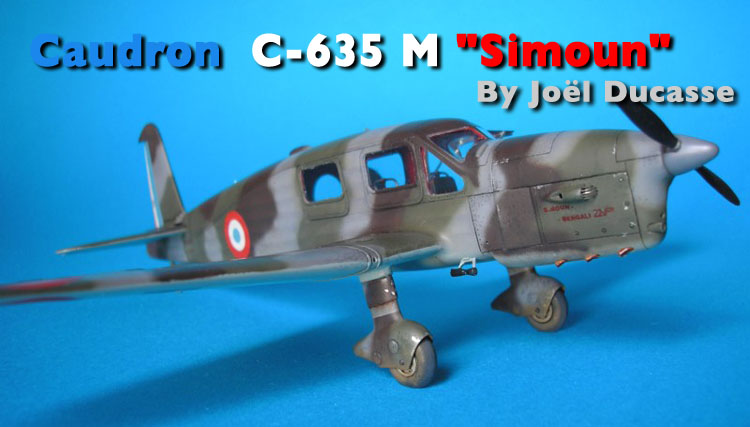
1⁄48Caudron C-635 M Simoun
6
Comments
Engine and propeller
The propeller blades are made of white metal in the JMGT kit. They were copiously refined. The nose cone was too pointed so I had to give it a more rounded shape.On the left fuselage half, the frontal air intake had to be opened. Since the first cylinders of the engine were very visible through it on the original aircraft, I have added two resin cylinders from the spare box which received self made pushrods. Once this was done, the illusion was perfect (only one cylinder would have been enough though, but better more than less).
On the engine cowlings, the side vents were made with fine pieces of plastic and the right air intake was opened and protected with a small mesh. The white metal exhaust pipes have been replaced by copper tubes. Under the nose, the oil radiator is made from a fine piece of plastic card in which I've drilled a succession of regular holes. I had to try four times to obtain regular holes. The radiator was glued in place at the very end of the build. Finally, a Venturi tube was made from a round section of plastic. It's shape was achieved by using a mini drilling machine.
Main assembly
In each half wing, I have added sections of plastic as guides for the fuselage spars. Before gluing the wing together, it is necessary to decide which type of landing gear one will put on his model. Indeed, JMGT have provided unspatted landing gears consisting of two white metal legs and resin wheels, or landing gears made up of four vacuformed half trousers and same resin wheels. For my version, I chose the latter with the frontal area of the fairing removed. Once the trousers were glued together two by two, they were sanded smooth and details were added. Their axis were drilled and the resin wheels inserted in the fairings and maintained in place with plastic axles. The landing gear sub assemblies were dry fitted under the half lower wings (through their respective openings) and their upper part were cut in order to fit to the wing spars with just the right angle of inclination. Once this was done, the landing gears were put aside to be fixed after painting.The half wings were finally glued together and sanded smooth. The surface detail was ameliorated at this stage. For example, the two parallel reinforcements ribs located where the dihedral of the wings is changing and the reinforcements for the fuel tanks. Two small water drop shaped fairings are added near the ailerons. The control surfaces were then glued in place in a slightly offset position to make the model look more dynamic. Don't forget to glue the pilot's control stick in the corresponding position before closing the fuselage. The white metal tailwheel had to be remade in scratch because the original part was damaged in my sample of the kit.
Interior painting
I have started with the instrument panel. After having masked the instruments with Maskol I have sprayed a layer of tyre black (Gunze H77) then I have dry-brushed the part with Testor Metalizer. A dark brown oil wash (diluted in White Spirit) was then applied. The details were picked out with Prince August white, red and yellow.In the French publication "Les Ailes de Gloire" n°5, one can see a color photo of the interior of a Simoun, preserved at the "Musée de l'Air", which show the original red color of the cockpit. This plane is the n°428, delivered to the "Armée de l'Air" on October 6, 1939. If the ministerial directive for the color of the interiors of military aircraft was also applied to the Simoun planes, it seems as if it was the case at least after this one. Thus I can reasonably think that the interior of the n° 350 (selected version) was probably red. For my model I have used Gunze H86.
Unfortunately, for the floor, I had no color indications so I arbitrarily decided to do it in natural wood. I first sprayed a layer of H318 (chamois) with the airbrush, then once well dry, I brush painted some transparent brown oil paint. I have tried to represent the wood veins by letting the under layer of the paint show through. Then, the seats and various details of the side walls were painted and glued in place.
Now the fuselage could be definitively closed over the interior work, the engine front, the fixed horizontal tailplane, the wing spars, etc... Of course, all the interior protections for the glazings had to be removed at this point. I say this because, as you can imagine, I managed to forgot one mask (half right windshield). Fortunately I was able to take it away through the opening of the pilot's window. It's good that I chose to represent the latter in the opened position!
Once the glue had dried on the fuselage, the wings were fixed on the protruding spars. The seams at the wing roots were eliminated with Mr Surfacer 500 then sanded smooth. The radiator under the nose (remember, the one with many holes) was glued in place at this stage as well. Overall, only a limited amount of putty was necessary, confirming the precision of the vacuform molds made by Mister JMGT.
Painting and markings
All the colours used, unless indicated, are Gunze acrylic paints. I don't systematically pre-shade my models, so I started by painting the under-surface in light blue grey (70% of H67 and 30% of H1 white, diluted to 60% with 90°alcohol and sprayed with a pressure of 0,5 bar). Then I lightened the interior of some panels with random spots of the basic colour to which I've added white. Some panel lines received some sprays of pure H67. Then using Post-it, I emphasized the panel lines with Tamiya Smoke (X19) diluted to 80%.The exhaust stains are made with a mixture of Smoke Tamiya and brown Pébéo ink. The interior of these traces have been lightened with H313. The roundels were painted using self made masks. The white is Prince August air, the red is H23 and the blue a mixture of H45 + H68 + H56 + Tamiya X14.
The upper camouflage was painted freehand with the same techniques used for the underside. First, I applied the dark blue grey (50% of H53 and 50% of H305) with lighter spots of H53. Then I sprayed the Khaki (H73) and the same color with a hint of white. Finally the brown (90% of H84 and 10% of H12) with lighter spots of H84. Once the camouflage was done, the model was entirely varnished in Johnson Klir. The panel lines received an oil wash diluted with White Spirit. A lighter shade for the underside and a darker shade for the upper surfaces. I have also added some weathering (traces of oil, stains, gasoline, etc...) with diluted brown and Black oil paints as well as sepia ink.
The decals were self made using a computer and a printer. I have used the police Arial black (size 3) for the stencils and Arial narrow (size 8) for the numbers located on the vertical tailplane. I made two sets, one black and the other red, in case the latter wouldn't be visible on the dark camouflage. Finally, the black was not used because the red decals worked very well.
Traces of mud are represented on the sides of the tyres, the landing gear spats and the underside by spraying some Gunze Dark Earth (H72). The final touch is composed of micro spots of aluminium paint (Humbrol metal cote 27002) and Tamiya Smoke. The paint chipping must be located on the engine cowlings, the roof and the lower part of the fuselage, the wings being of wood and the fuselage and control surfaces made of fabric. The model then received a final coat of Microscale flat varnish.
To finish off the model, I removed the various masks, applied a 1 mm band of aluminium on the circumference of the openings and fixed the access door, the pilot's window, the propeller, the rudder, the landing gear and the tailwheel.
Conclusion
I was a little frightened when I have tackled my first vacuform model, but in the end it was a very enjoyable experience. If one takes care to prepare the parts well, the assembly is not more difficult than that of an injected short run model. The adjustments are even much more precise than some of them.Comments
Hi Joël
Absolutely stunning - a real masterpiece!
I've never spotted this kit on the shelves over here, but I did build JMGT's Caudron-Renault CR-714 back in the '90s - another good qualty vacuform with nice resin and white-metal details. I just wish I could have built it half as well as you...
All the best
Rowan
OCT 03, 2009 - 08:06 PM
Wow, your build is absolutly stunning! I like this plane very much with its extensive interior...
It looks very difficult to get these vacuform kits together, I have never tried to build one, perhaps in 100years I'm going to try this
And I always wanted to try your post-shading technique. Very nice weathering you achieved there!
Looking forward to see your next build!
OCT 03, 2009 - 11:12 PM
Top notch workmanship. It is a pleasure to see such a spectacular build.
Mark
OCT 04, 2009 - 01:50 AM
The level of craftsmanship is stunning. Way to go on such a difficult build... and what a cool looking plane!
OCT 04, 2009 - 02:49 AM
Copyright ©2021 by Joël Ducasse. Images also by copyright holder unless otherwise noted. The views and opinions expressed herein are solely the views and opinions of the authors and/or contributors to this Web site and do not necessarily represent the views and/or opinions of AeroScale, KitMaker Network, or Silver Star Enterrpises. Images also by copyright holder unless otherwise noted. Opinions expressed are those of the author(s) and not necessarily those of AeroScale. All rights reserved. Originally published on: 2009-10-03 00:00:00. Unique Reads: 12732


