

1⁄35Black Gold Washes - Oil Washes That Is
9
Comments
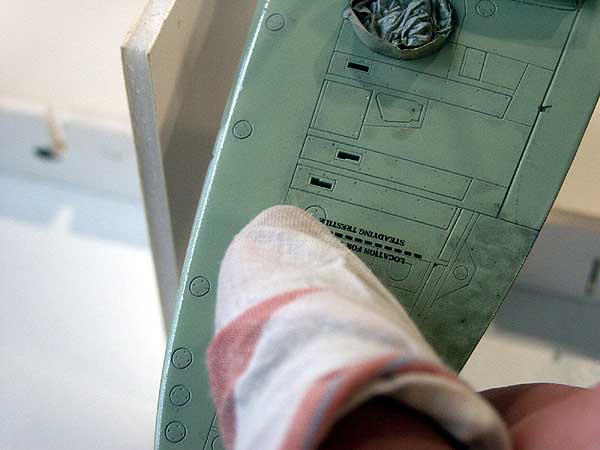
When the wash has had sufficient time to dry, the excess needs to be wiped off. Any cloth will do but its best to use one that wont leave to many fibres behind, I use an old handkerchief. I would suggest that you first of all test the wash by wiping with a dry cloth. The ideal situation is that the wash has dried enough to leave pigment in the panel lines, but not so much that the excess doesnt want to be wiped off. There is a quite small window of opportunity for this to occur, of course each time you apply a wash this window of opportunity, will be different. Because of this I have stopped worrying about it, if it happens, great, but generally it wont. This test will also determine if the wash is still to wet, if it is you will wipe it out of the panel lines as well as removing the excess.
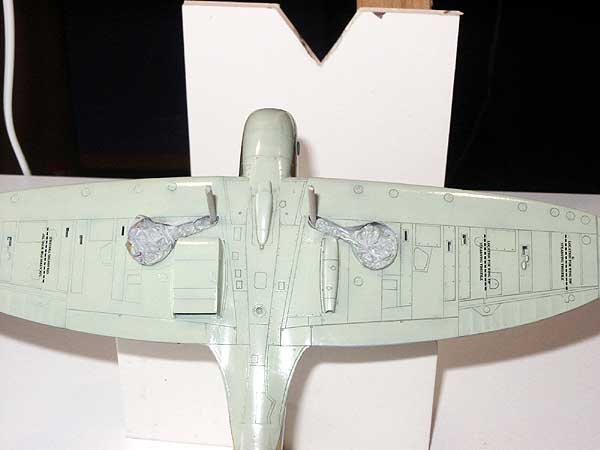
If this happens simply re-apply the wash and leave for longer. As stated earlier this wash was left on for 2 hours, the window of opportunity had been missed. In fact I had other things to do, which is another reason for not worrying about this. So now we need to add just a hint of thinner, white spirit in this case, to the cloth. Dont soak it, you just need the merest dab. Then wipe off the excess, in the direction of the airflow. (8) You may still wipe some of the wash out of the panel lines, dont worry, finish wiping off the excess, then reapply the wash to any areas that require it, leave, then wipe off later. I think you will agree that the final affect is reasonably subtle, but adds to the overall appearance, the difference between the washed and unwashed halves is clear (9) (of course you would complete the whole of the underside, Ive done one half to highlight the difference). I think you will agree, black would just look wrong?
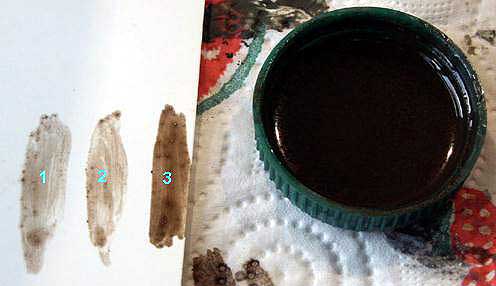
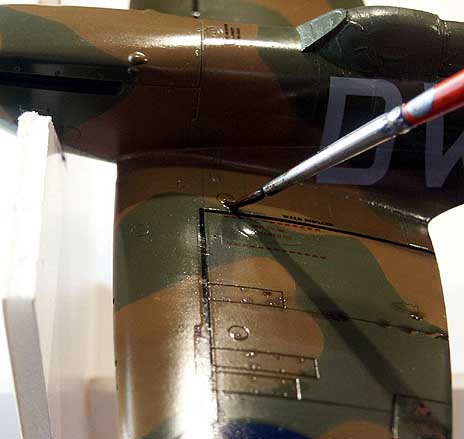
I tackle the uppersurface next, For this I use a darker colour, in this instance Raw Umber. In this picture I have tested the Davy Grey, used on the undersurface, on the upper wing, it looks very light. If I had used the Raw Umber on the undersurface it would be, almost as bad as using black (10). This is why I use different colours, top and bottom, unless of course the aircraft is one colour overall. I mixed the Raw Umber wash the same as before. You can see, from the wash applied to the card how the strength can, easily, be controlled. The final strength was between 2 and 3, but at first I was using it as strength 2. I wasnt happy with it, so I increased the strength, this was then to strong, so I cut it back, a little (11).
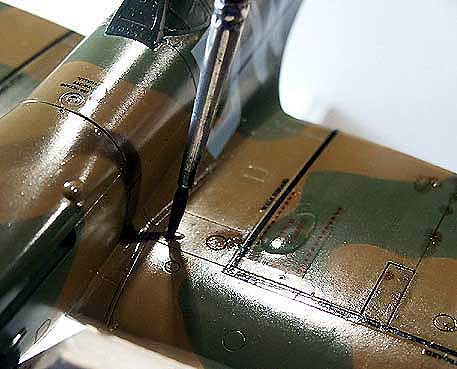
The uppersurface wash is applied exactly as before. (12) (13) (14). I came to wipe off the excess, again after 2 hours, but it needed longer (this was probably due to this being normal oil paint which takes longer to dry). Because I had wiped some of the wash out of some of the panel lines, I simply re-applied it. (Dont throw your wash away until you are done). I reckoned that I needed to wait at least 5 hours, but as it was about 9.00pm I simply left it until the following morning. (I have left washes over 24 hours), but washes left this long will be all but dry. This means that when you wipe off the excess you need more thinner on your cloth, but this then takes away one of the advantages of an oil wash. It doesnt leave that slight smear. If you dont want that smear, you now know what to do.
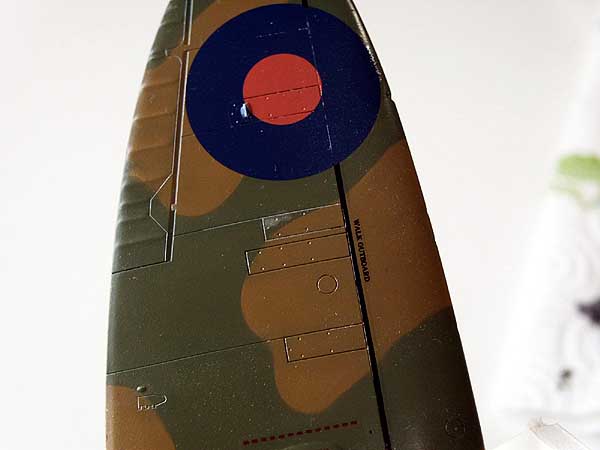
Of course to be convincing the wash needs to be applied over the decals. Even with careful application of the decals, though, the wash wont always behave. The decals will make the panel lines shallower and therefore you may wipe the wash out of them, in places. This happened here, as it usually does, I simply added more wash (which is now thicker, because some of the thinner has evaporated) leave it a while and wipe it off, but go gently. When you are happy with the wash leave it to dry completely, a couple of days should do it, then on to the next stage, further weathering, the next article in line.
I hope you agree that the overall affect is better by applying the decals before the wash, so that they can get the same treatment. If they were applied after they would stand out and wouldnt look as if they belonged to the aircraft.
When doing this it is very easy to forget the bits that you will add at the final assembly stage, undercarriage doors, antenna and the elevators, which were separated. These bits may look at odds to the rest of the model, if not treated the same, at the same time.
The next page contains images of the upper surfaces after the wash was applied and then excess removed.
If this happens simply re-apply the wash and leave for longer. As stated earlier this wash was left on for 2 hours, the window of opportunity had been missed. In fact I had other things to do, which is another reason for not worrying about this. So now we need to add just a hint of thinner, white spirit in this case, to the cloth. Dont soak it, you just need the merest dab. Then wipe off the excess, in the direction of the airflow. (8) You may still wipe some of the wash out of the panel lines, dont worry, finish wiping off the excess, then reapply the wash to any areas that require it, leave, then wipe off later. I think you will agree that the final affect is reasonably subtle, but adds to the overall appearance, the difference between the washed and unwashed halves is clear (9) (of course you would complete the whole of the underside, Ive done one half to highlight the difference). I think you will agree, black would just look wrong?
I tackle the uppersurface next, For this I use a darker colour, in this instance Raw Umber. In this picture I have tested the Davy Grey, used on the undersurface, on the upper wing, it looks very light. If I had used the Raw Umber on the undersurface it would be, almost as bad as using black (10). This is why I use different colours, top and bottom, unless of course the aircraft is one colour overall. I mixed the Raw Umber wash the same as before. You can see, from the wash applied to the card how the strength can, easily, be controlled. The final strength was between 2 and 3, but at first I was using it as strength 2. I wasnt happy with it, so I increased the strength, this was then to strong, so I cut it back, a little (11).
The uppersurface wash is applied exactly as before. (12) (13) (14). I came to wipe off the excess, again after 2 hours, but it needed longer (this was probably due to this being normal oil paint which takes longer to dry). Because I had wiped some of the wash out of some of the panel lines, I simply re-applied it. (Dont throw your wash away until you are done). I reckoned that I needed to wait at least 5 hours, but as it was about 9.00pm I simply left it until the following morning. (I have left washes over 24 hours), but washes left this long will be all but dry. This means that when you wipe off the excess you need more thinner on your cloth, but this then takes away one of the advantages of an oil wash. It doesnt leave that slight smear. If you dont want that smear, you now know what to do.
Of course to be convincing the wash needs to be applied over the decals. Even with careful application of the decals, though, the wash wont always behave. The decals will make the panel lines shallower and therefore you may wipe the wash out of them, in places. This happened here, as it usually does, I simply added more wash (which is now thicker, because some of the thinner has evaporated) leave it a while and wipe it off, but go gently. When you are happy with the wash leave it to dry completely, a couple of days should do it, then on to the next stage, further weathering, the next article in line.
I hope you agree that the overall affect is better by applying the decals before the wash, so that they can get the same treatment. If they were applied after they would stand out and wouldnt look as if they belonged to the aircraft.
When doing this it is very easy to forget the bits that you will add at the final assembly stage, undercarriage doors, antenna and the elevators, which were separated. These bits may look at odds to the rest of the model, if not treated the same, at the same time.
The next page contains images of the upper surfaces after the wash was applied and then excess removed.

About the Author


FROM: ENGLAND - SOUTH WEST, UNITED KINGDOM
Hi, my name is Mal Mayfield and I have been modelling seriously for about 25 years. My main interest is 1/48 scale second world war. I build all types and all combatants. I have built 1/35 scale "targets" and 1/72 scale modern aircraft, plus a couple of cars. I have also dabbled with figure painting...
Comments

Excellent article Mal, I've never gotten the hang of doing a wash properly, now I will feel more confident about tackling them. These step by step articles are great.
MAR 19, 2004 - 06:43 PM

A brilliant series...
Truly excellent guides for us all.
Thanks and Cheers
Peter
:-)
MAR 19, 2004 - 10:49 PM

Awesome stuff Mal!
A great explanation of the technique accompanied by detailed pictures of every stage... what more could I ask?!... well, maybe you could come over and build my next kit for me!
All the best
Rowan
MAR 20, 2004 - 10:12 AM

Nice friend, great job...It's a simple way for to help us.
Thanks a lot...from South America
Leal Antoniazzi Pedro.
[email protected]
MAR 21, 2004 - 12:44 AM

Having been thinking about this subject for the last day or two, nice to see the thing in a concrete form. Thanks Holdfast and thanks for posting it up....Jim
MAR 21, 2004 - 01:16 AM

:-) Thanks guys. The final part of this will be final weathering and finishing. It should have been done by now, but as you may have noticed these articles are utilizing My Tamiya Spitfire Mk I. I have had a bit of a disaster with it And have spent some time trying to rectify the problems. That's also why the on line build of this model has ground to a halt, if you've been following that. I can now report that things, appear, to be getting back on track. These problems and, I hope, there solutions, will be included in the next article and the online build.
I do have a couple more articles on the go, Re-scribing panel lines, Using kitchen foil and of course the one on final weathering and finishing. Is there anything that anyone would like me to tackle? I am trying to see if I can get my head around one on air brushing, but I can't find a way of taking pics and spraying (my spray both aint big enough for 2). Is there a need for articles on the very basics, such as removing and cleaning up parts, Applying liquid cement and that sort of thing?
Mal
MAR 21, 2004 - 08:51 AM
Hi Mal,
there are a lot of beginners so the more simple tasks, would definitely be of great benefit.
And its just as nice for the more experienced to have a refresher course or two every now and again also. And doing them the way you've done the features so far would be excellent.
Cheers
Peter
:-)
MAR 21, 2004 - 06:10 PM

Simply very nice article helpful and nice written and presented . Thanks for sharing !!!
MAR 22, 2004 - 10:28 PM
Copyright ©2021 by Mal Mayfield. Images also by copyright holder unless otherwise noted. The views and opinions expressed herein are solely the views and opinions of the authors and/or contributors to this Web site and do not necessarily represent the views and/or opinions of AeroScale, KitMaker Network, or Silver Star Enterrpises. Images also by copyright holder unless otherwise noted. Opinions expressed are those of the author(s) and not necessarily those of AeroScale. All rights reserved. Originally published on: 2004-03-20 00:00:00. Unique Reads: 19863

WEB HOSTING BY


Copyright ©2021 AeroScale and Kitmaker Network, a subsidiary of Silver Star Enterprises
All Rights Reserved. Please read our Conditions of Use and Privacy Policy.
All Rights Reserved. Please read our Conditions of Use and Privacy Policy.