

1⁄35Black Gold Washes - Oil Washes That Is
9
Comments
Washes are used to accentuate panel lines and detail and to add a bit of interest to the surface of the model. Some say that you would not see any detail, least of all panel detail, on an aircraft at a distance away from the viewer. This may be true, but to me a model represents the full size machine and when you get up close to the full size machine you can see all the detail, including the panel detail. Again, as far as I am concerned, an aircraft model without a wash is quite boring. If it werent for the pre-shading it would be difficult to see the detail on the wing undersurface on the left in the picture (1). The wash is also an integral part of the weathering. One of the reasons I use artist oil colour is that, when it is wiped off, it leaves a very thin film of colour. This affect is enhanced at the next stage.
Sometimes it doesnt want to flow, or flows only a short distance. If this is the case and your wash is the correct consistency, simply touch your brush at intervals along the line. You will likely find that it will flow in some lines but not in others, or not at all. This is not a problem, if when dry, there is sufficient pigment left in the panel lines to achieve the look you desire. I find that the wash will flow more readily in the deeper lines (6). Each time you go back for more wash agitate the mix and touch the brush to the side of the cap. Work your way along the underside until all panel lines are filled and all raised detail has the wash surrounding it. You may need to go back over some areas, either because you missed them, there had not been sufficient wash in the brush, at that point, or the lines need to be darker, such as the aileron and flap hinge lines. Once you are happy with the wash, leave it. (7)
You can continue to wash the uppersurfaces, but I, usually, use a different colour on the darker uppersurfaces. So I finish the undersurfaces first. The next stage is to wipe off the excess wash. Some suggest that you do it immediately, but I let this undersurface wash dry for 2 hours before continuing. This timing can depend on several factors, the oil paint I was using was the quick drying type. If using the normal type 2 hours may still have been sufficient, but it might have needed longer. Only wiping it off will give you the answer. You will see later that there is no rush, so dont panic.
What to use?
Any medium can be used, enamel, watercolour, acrylics or artists oil colour, I havent tried acrylics, I think they might dry to fast, but each to their own. The main criteria are that the medium, or the thinner used, doesnt affect the paint, or protective coat, that has already been applied. I have successfully used watercolour and enamel paints for washes, but I far prefer artist oil colour, for the reason stated above, and the ease of application. I use cheap white spirit as the thinner.How to do it.
As stated in the previous article, The Future is Klear, I use Johnsons Klear (Future) over the decals to protect them and the paint from the washes. Klear will protect from most mediums, but do test before trying something new.Choose the colour.
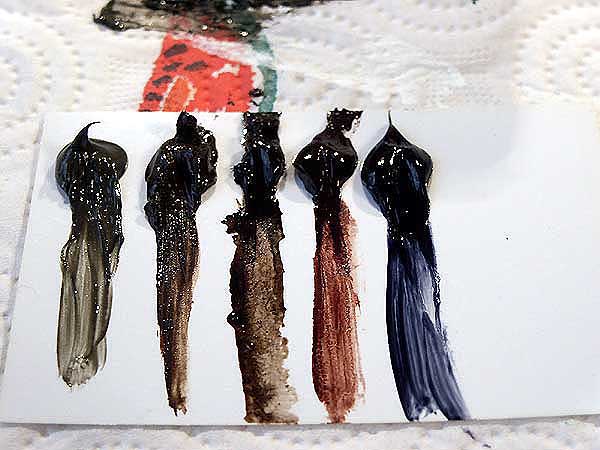
First thing to do is to choose what colour to use. I try and compliment the paint colour, so I never use black. Black would undoubtedly accentuate the panel lines, but, in my opinion, looks totally wrong. For the undersurface of my Battle of Britain Spitfire, which is painted Sky, a greeny grey colour, I used Davy Grey. Its at the left in the picture and has a greeny brown hue, on the right is Paynes Grey, which looks blue. (2)Mix the wash
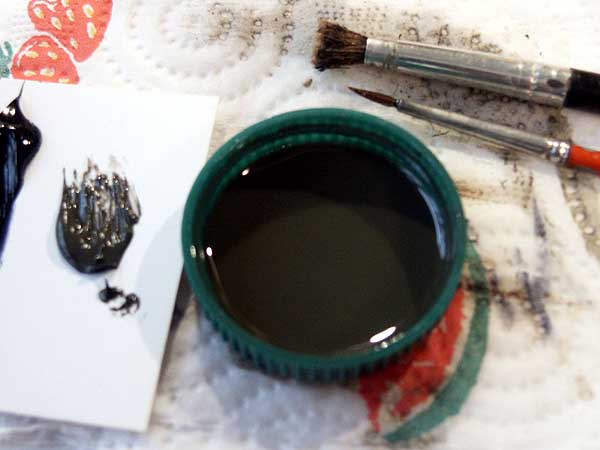
From what I have read and heard my washes must be much thicker than normal. The term tinted thinner is used a lot and my washes are much thicker than that (or my idea of tinted thinner is different). One of the reasons for this may be so my washes leave a film when wiped off, as stated above. I have not been able to get tinted thinner to work so this is the main reason for using more oil colour in my washes. You dont need much wash to complete an aircraft model, so I mix mine in a milk bottle cap (3). I add an eyedropper-full of white spirit to the cap, add a dollop of my chosen oil paint and mix thoroughly. I then add a couple more eyedroppers full of white spirit. When I start the wash process I adjust the mix by adding more paint or thinner.Applying the wash.
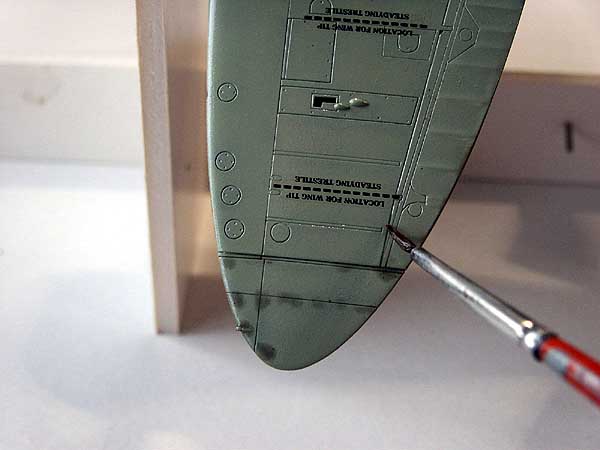
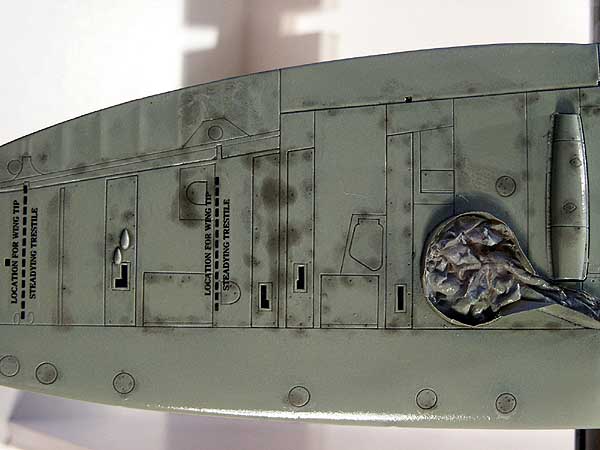
I use a No 1bog standard brush to apply the wash. Dip the brush into the wash and agitate the mix (4) (this is to make sure that the pigment is always thoroughly mixed), touch the brush to the edge of the bottle cap (5) (this removes excess thinner, from the brush). Touch the brush to a panel line on the model. Generally the wash will flow, via capillary action, along the panel lines. If it doesnt then it might be to thick, so add more thinner to the mixture. The ideal situation is that the mix flows and leaves the pigment in the panel lines.Sometimes it doesnt want to flow, or flows only a short distance. If this is the case and your wash is the correct consistency, simply touch your brush at intervals along the line. You will likely find that it will flow in some lines but not in others, or not at all. This is not a problem, if when dry, there is sufficient pigment left in the panel lines to achieve the look you desire. I find that the wash will flow more readily in the deeper lines (6). Each time you go back for more wash agitate the mix and touch the brush to the side of the cap. Work your way along the underside until all panel lines are filled and all raised detail has the wash surrounding it. You may need to go back over some areas, either because you missed them, there had not been sufficient wash in the brush, at that point, or the lines need to be darker, such as the aileron and flap hinge lines. Once you are happy with the wash, leave it. (7)
You can continue to wash the uppersurfaces, but I, usually, use a different colour on the darker uppersurfaces. So I finish the undersurfaces first. The next stage is to wipe off the excess wash. Some suggest that you do it immediately, but I let this undersurface wash dry for 2 hours before continuing. This timing can depend on several factors, the oil paint I was using was the quick drying type. If using the normal type 2 hours may still have been sufficient, but it might have needed longer. Only wiping it off will give you the answer. You will see later that there is no rush, so dont panic.


About the Author


FROM: ENGLAND - SOUTH WEST, UNITED KINGDOM
Hi, my name is Mal Mayfield and I have been modelling seriously for about 25 years. My main interest is 1/48 scale second world war. I build all types and all combatants. I have built 1/35 scale "targets" and 1/72 scale modern aircraft, plus a couple of cars. I have also dabbled with figure painting...
Comments

Excellent article Mal, I've never gotten the hang of doing a wash properly, now I will feel more confident about tackling them. These step by step articles are great.
MAR 19, 2004 - 06:43 PM

A brilliant series...
Truly excellent guides for us all.
Thanks and Cheers
Peter
:-)
MAR 19, 2004 - 10:49 PM

Awesome stuff Mal!
A great explanation of the technique accompanied by detailed pictures of every stage... what more could I ask?!... well, maybe you could come over and build my next kit for me!
All the best
Rowan
MAR 20, 2004 - 10:12 AM

Nice friend, great job...It's a simple way for to help us.
Thanks a lot...from South America
Leal Antoniazzi Pedro.
[email protected]
MAR 21, 2004 - 12:44 AM

Having been thinking about this subject for the last day or two, nice to see the thing in a concrete form. Thanks Holdfast and thanks for posting it up....Jim
MAR 21, 2004 - 01:16 AM

:-) Thanks guys. The final part of this will be final weathering and finishing. It should have been done by now, but as you may have noticed these articles are utilizing My Tamiya Spitfire Mk I. I have had a bit of a disaster with it And have spent some time trying to rectify the problems. That's also why the on line build of this model has ground to a halt, if you've been following that. I can now report that things, appear, to be getting back on track. These problems and, I hope, there solutions, will be included in the next article and the online build.
I do have a couple more articles on the go, Re-scribing panel lines, Using kitchen foil and of course the one on final weathering and finishing. Is there anything that anyone would like me to tackle? I am trying to see if I can get my head around one on air brushing, but I can't find a way of taking pics and spraying (my spray both aint big enough for 2). Is there a need for articles on the very basics, such as removing and cleaning up parts, Applying liquid cement and that sort of thing?
Mal
MAR 21, 2004 - 08:51 AM
Hi Mal,
there are a lot of beginners so the more simple tasks, would definitely be of great benefit.
And its just as nice for the more experienced to have a refresher course or two every now and again also. And doing them the way you've done the features so far would be excellent.
Cheers
Peter
:-)
MAR 21, 2004 - 06:10 PM

Simply very nice article helpful and nice written and presented . Thanks for sharing !!!
MAR 22, 2004 - 10:28 PM
Copyright ©2021 by Mal Mayfield. Images also by copyright holder unless otherwise noted. The views and opinions expressed herein are solely the views and opinions of the authors and/or contributors to this Web site and do not necessarily represent the views and/or opinions of AeroScale, KitMaker Network, or Silver Star Enterrpises. Images also by copyright holder unless otherwise noted. Opinions expressed are those of the author(s) and not necessarily those of AeroScale. All rights reserved. Originally published on: 2004-03-20 00:00:00. Unique Reads: 19862

WEB HOSTING BY


Copyright ©2021 AeroScale and Kitmaker Network, a subsidiary of Silver Star Enterprises
All Rights Reserved. Please read our Conditions of Use and Privacy Policy.
All Rights Reserved. Please read our Conditions of Use and Privacy Policy.