

1⁄35Storm Bringers - Painting & Detailing RAF 60lb RPs
3
Comments
Finishing.
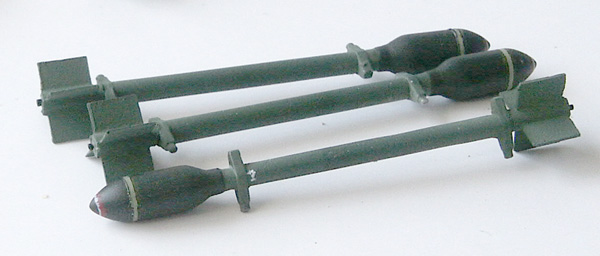
If you remember, earlier I had painted clear decal paper light green, to be applied to the warheads as the fill band around the widest part, no problems there then? Well yes, they didnt want to play, so I had to scrap that idea. I ended up hand painting a light green band around each body, masking with a strip of tape, then repainting with deep bronze green. On removing the masking I had some sort of light green band. They werent as neat as I wanted, but apart from starting from scratch they would have to do. As the rockets had taken almost as long to do, so far, as the main model and I had reference pictures showing shoddy painting, they were fine.Pigtails.
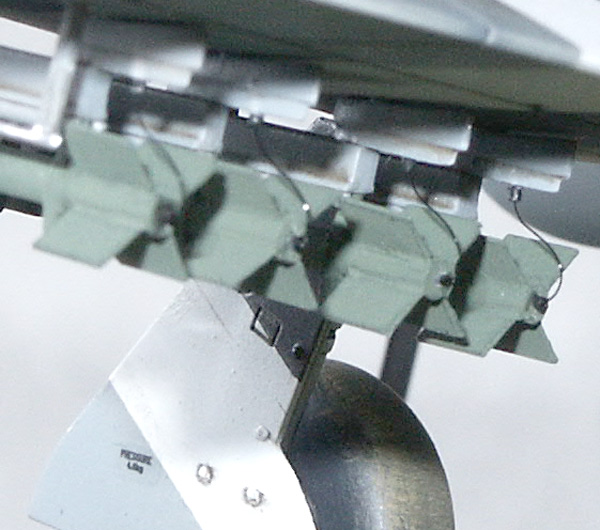
I have only ever seen one model with the pigtails (firing leads) connected at both ends and this turned out to have them connected in the wrong location. The real rockets arrive with the warhead and rocket body separate. From photographs it seems the method of joining the two is for one erk to hold the warhead on the ground, threads uppermost. A second erk screws the rocket motor onto the warhead. The pigtail is already fitted to the rocket motor, the other end is a 2 pin plug with a knurled threaded ring for fitting. This plug fits into a connection on the horizontal surface of the rear rail support. The assembled rockets are slid onto the rails, via a pair of clips, which are part of the rocket motor body.It would appear, again from looking at pictures, that once the rockets are attached to the rails the pigtails are left disconnected. This makes sense, as a safety precaution against accidental firing while the aircraft is being readied. The leads would be connected just before take off. This is how I wanted to depict my model, ready to go hunting targets (tanks).
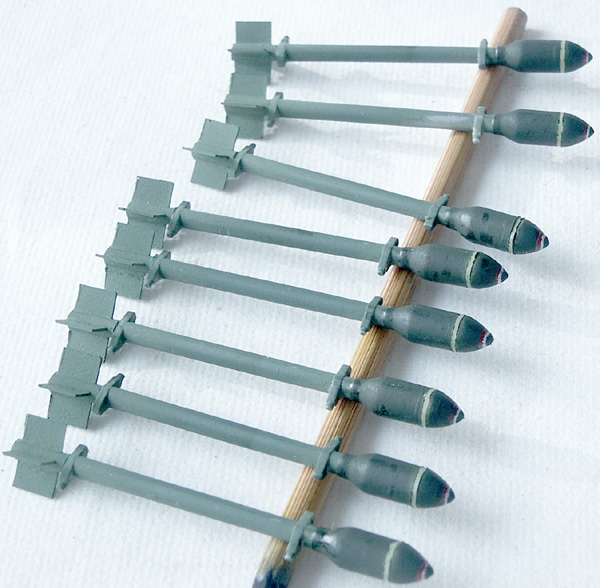
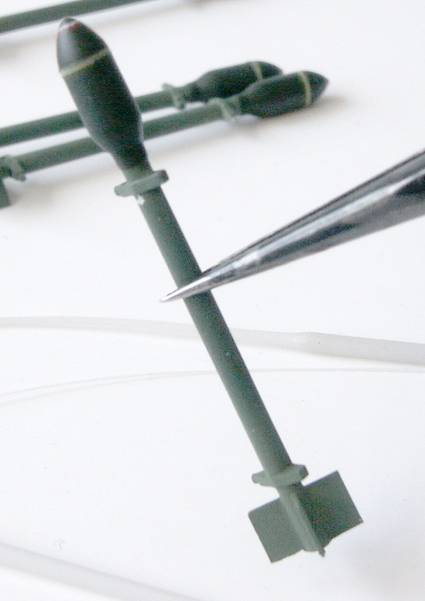
First of all, I had to find wire of a suitable diameter, to represent the pigtail leads. What I had was either too thick or too thin - here we go! It was while trying to solve the problem of what to use for the VHF antenna on the spine of the Typhoon that I cracked this. I wanted something that was thin, straight, flexible enough to bend when brushed against, but strong enough to return to its position. Nylon filament would be ideal and I found the perfect source in the bristles of the brush in a jar of Humbrol liquid cement.
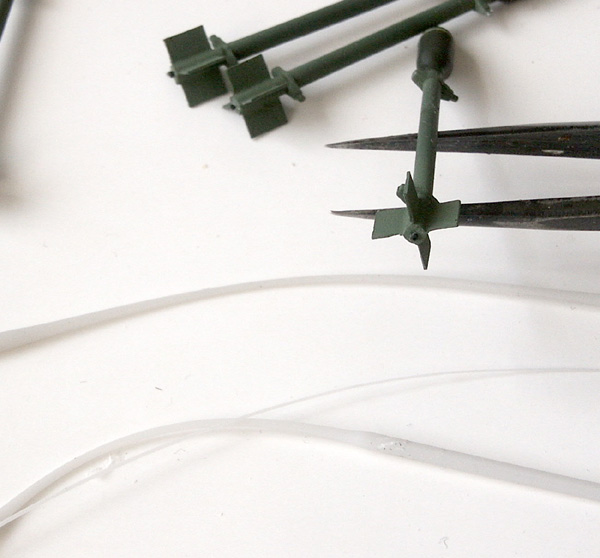
Ok, so now all I needed to do was make the knurled ring that would show at the connection at each end. For this I heat stretched some plastic tube then cut short sections. These were placed into the 0.3mm holes I had drilled into the rear of the rocket motors and in the rail supports, with just enough protruding and they were painted black. Each of the rockets received a length of bristle, from the cement brush, which incidentally is black. They were all then cut to the same size. The rockets were glued to the rails, using CA and, when this had cured the pigtails were glued into the piece of stretched tube, located in the rail support. The nylon filament gave me the double curved effect I was looking for. The rails, complete with rockets were then added to the model.
Conclusion
Was it worth it? Well, there was ample grief trying to get them right. At times it was very frustrating and can anyone tell the amount of work that has gone into them? Considering that the rockets took me about as long to build and paint as the rest of the Typhoon model, thereby doubling the modelling pleasure, then yes. Considering I now have jigs and the knowledge of how to make better rockets, then yes. Considering that I finally discovered the colours of fill bands on British ordnance, then yes. Considering that I know how much work went into them and that I persevered with them, even when everything seemed to be going wrong, then yes.As an addendum, I think that using clear acetate, rather than masking tape, might give a better finish. Ill try it when I next build some rockets and report back.
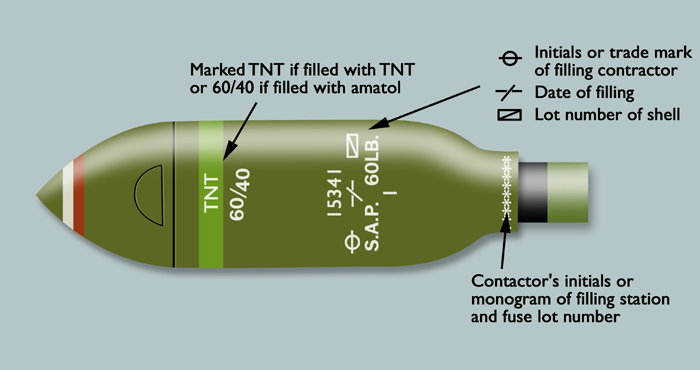
Fill bands
This is just a simple chart to show the location and colour of the fill bands used on British ordnance.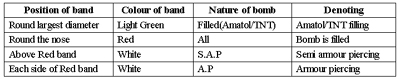
I have omitted the data on stencilling, as it would be to small to see, unless you are working in very large scales. This can be found on the last picture.


About the Author


FROM: ENGLAND - SOUTH WEST, UNITED KINGDOM
Hi, my name is Mal Mayfield and I have been modelling seriously for about 25 years. My main interest is 1/48 scale second world war. I build all types and all combatants. I have built 1/35 scale "targets" and 1/72 scale modern aircraft, plus a couple of cars. I have also dabbled with figure painting...
Comments

Thanks guys, I started this as part of the original Storm Warning article but as you can see it is a bit long to be part of that
Mal
MAR 07, 2005 - 07:42 AM
Copyright ©2021 by Mal Mayfield. Images also by copyright holder unless otherwise noted. The views and opinions expressed herein are solely the views and opinions of the authors and/or contributors to this Web site and do not necessarily represent the views and/or opinions of AeroScale, KitMaker Network, or Silver Star Enterrpises. Images also by copyright holder unless otherwise noted. Opinions expressed are those of the author(s) and not necessarily those of AeroScale. All rights reserved. Originally published on: 2005-03-06 00:00:00. Unique Reads: 16465

WEB HOSTING BY


Copyright ©2021 AeroScale and Kitmaker Network, a subsidiary of Silver Star Enterprises
All Rights Reserved. Please read our Conditions of Use and Privacy Policy.
All Rights Reserved. Please read our Conditions of Use and Privacy Policy.