

1⁄32U.S. Air Service S.E.5a
6
Comments
HISTORY
For any fan of WWI aviation, or military aircraft of any era for that matter, I would imagine an appreciation for an aircraft the likes of the British SE-5 series must rank as something of a sine qua non. And why not? By all accounts it was a great airplane (never flew one, so Ill take their word for it ). Indeed, superlatives abound in every account and description of it whether passed down to us by ally or opponent.All those accolades, however, like those for any other machine or tool, while doubtless well-deserved in its day must necessarily be appreciated within the narrow confines of the time for which the SE was intended. A sharp sword she may have been in 1917-18; but by the end of the decade and well into the next, use and advancing technology had blunted her point and dulled her edge. This is no reflection on a great machine; it is simply the way of such things. Every dog has its day.
Quickly benched by her native Service after the Armistice, the SE-5 soldiered on in second line service with some of the other Commonwealth air forces for a time, and then found increasing employment as an airshow attraction, mail plane and skywriting in the mix with other surplus types.
Second line and surplus well, maybe, except for this side of The Pond. Relic she may have been, but in the view of stodgy brass hats of the US Army Air Service, she was tip of the spearwell into the mid 1920s. As the type remained in service a good number of American SEs were the updated indigenous E-models: genuine monuments to the proverbial predilection of the US Government to fix things that arent broken until they are, in this case with plywood fuselages, down rated engines and other nominal improvements. But in the early years American pursuit pilots learned their trade, many paying the ultimate cost, in war weary ex-RFC/RAF surplusSE-5As modified only slightly to their adopted countrys continued use.
Indeed, it was in part the retention of these machines by a myopic and pinch-penny bureaucracy forcing young Army and Navy aviators to suffer injuries and die unnecessarily in old SEs among other outdated and/or ill-advised stopgaps and Rube Goldberg lash ups that caused General Billy Mitchell to rightfully accuse his superiors of criminal negligence, and the almost treasonable administration of our national defense by the Navy and War Departments In the event, of course, the administrators prevailed as they invariably do, and punctuated their victory by sentencing Old Billy to be metaphorically shot on his own quarterdeck for the unforgivable sin of being right. (or...as they say in in New Jersey Badda BYNG, badda BOOM!) * .sorry ..* couldnt resist that...
Be that as it may, I find the airplanes epilogue an intriguing subject, particularly since this particular machine also represents an interesting postscript to the 94th Aero Squadrons previous doings. Austin isa right fer piece from the skies of Touland Touquin, and nondescript days of dusty and dangerous training in the pizza oven heat of a West Texas summer hardly redolent with memories of the era that gave them Lufberry, Campbell and Rickenbacker.
THE MODEL
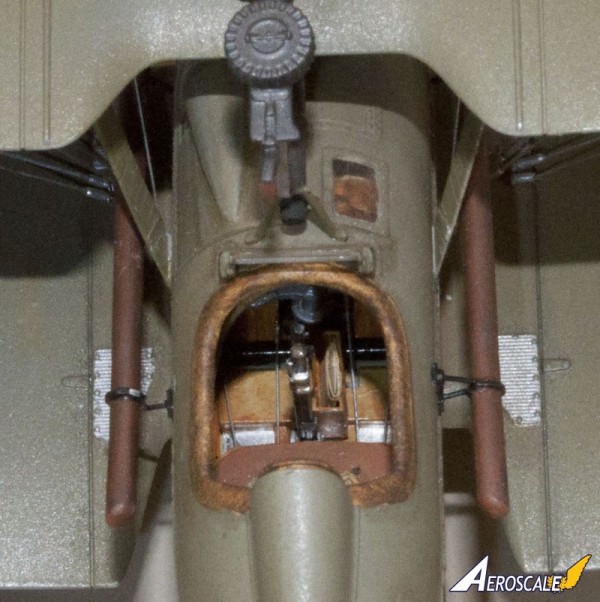
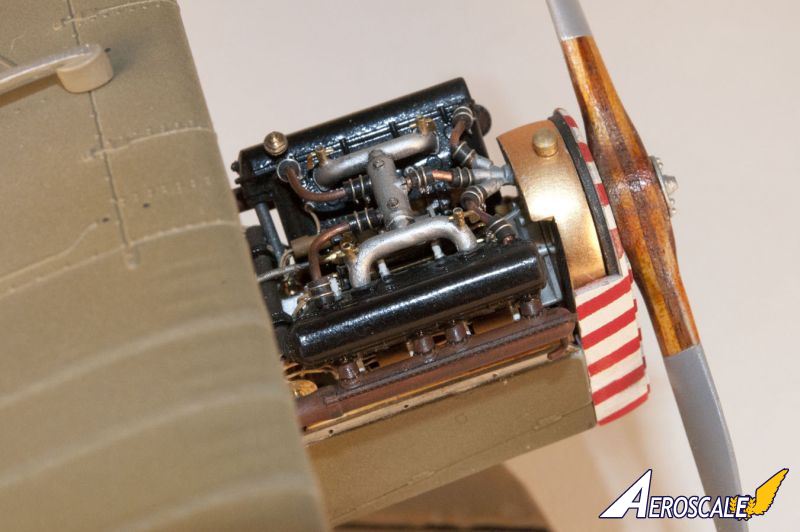
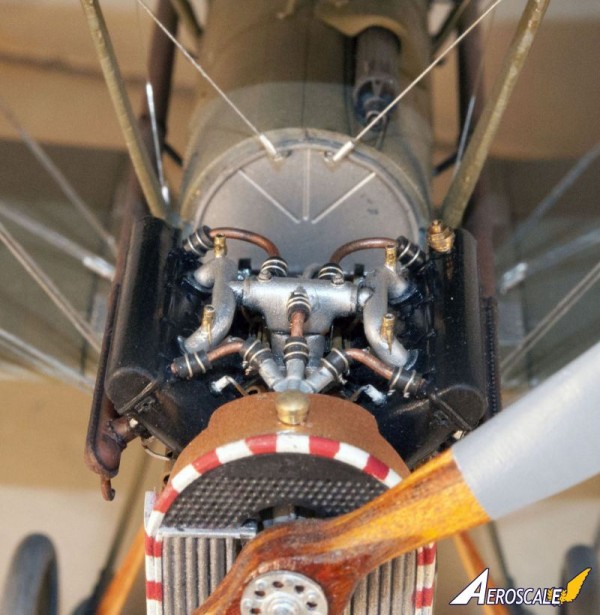
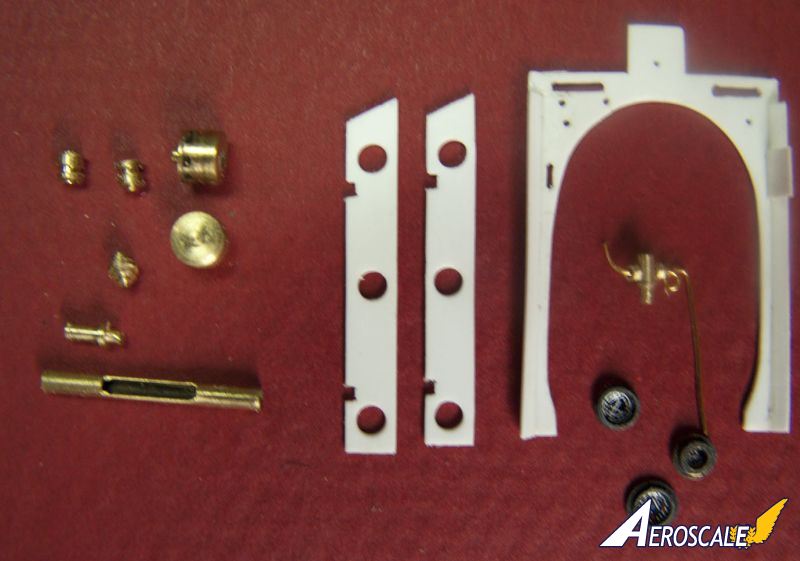
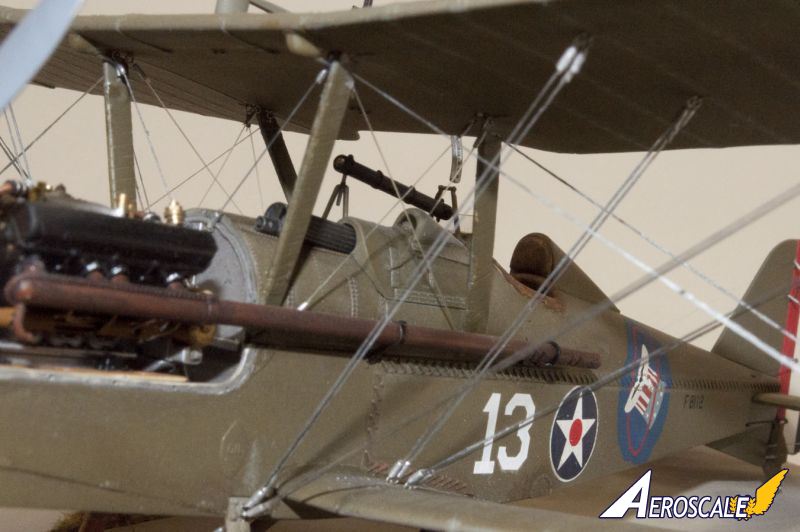
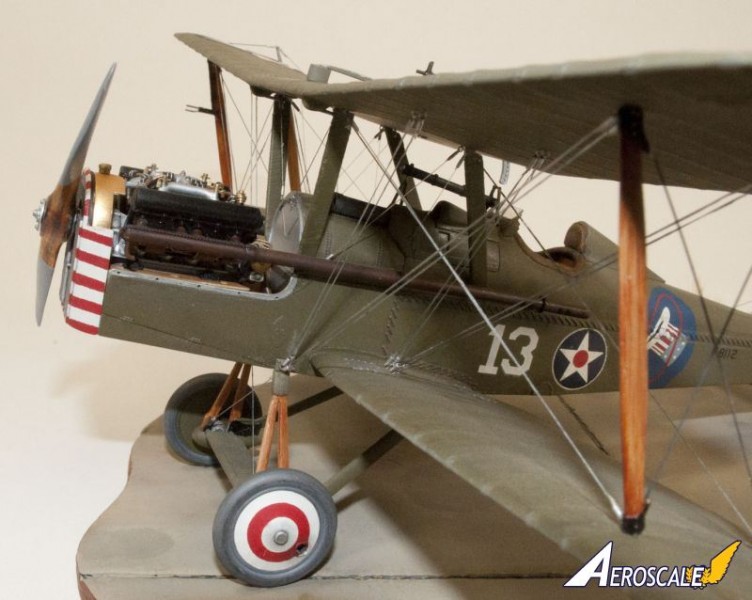
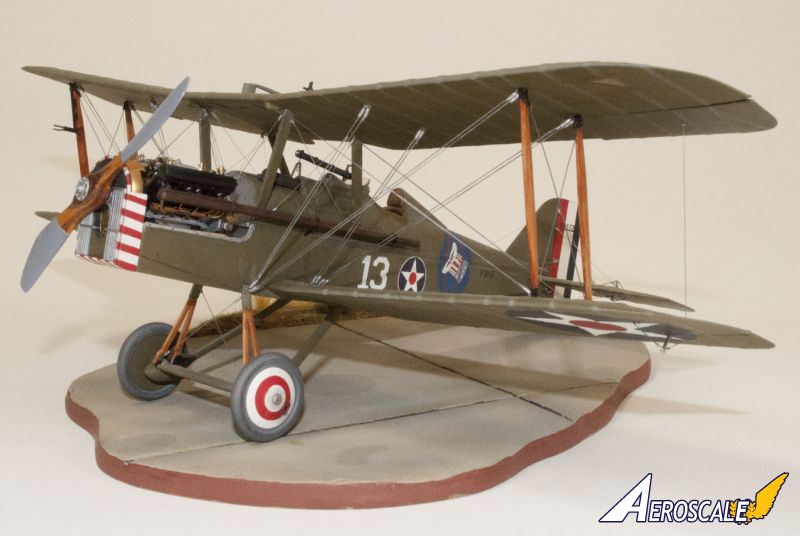
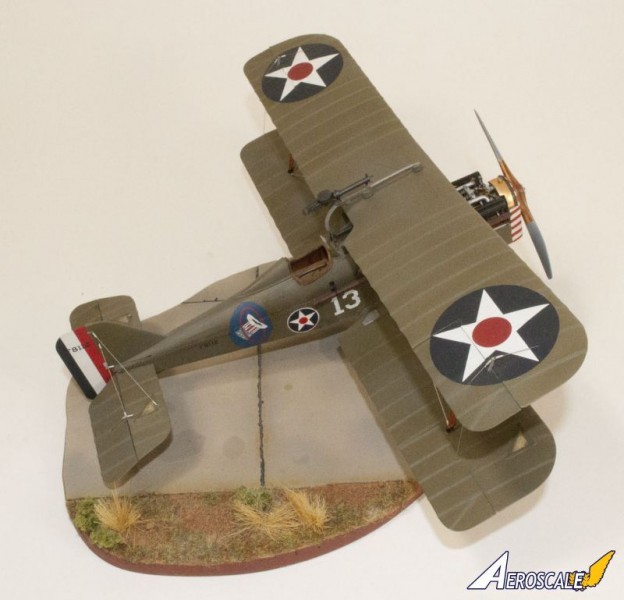
This then is my take on the excellent SE-5A Hisso from Wingnut Wings. What can I say? Its a great kit of a great airplane. Instead of rehashing everything that has been previously so well said, Ill dive right in to what I did to make it a little different. The bulk of the work went into the fuselage.The 94th Aero often flew their SEs without engine cowls in place during the summer months presumably to supplement overworked radiators with air cooling. This little truism gave me all excuse I needed to go all out detailing the power plant and engine bay area. I have no idea how many extra parts I put in there, but it was a bunch. The entire ignition system was scratch built including mags turned from brass rod and lead conduits from thin walled brass tube. Spark plugs were from RB Motion with leads from solder. All the coolant plumbing is from various sizes of soft copper wire with real rubber connector gaskets and clamps from thin beading wire. Other scratchbuilt items replaced or added were the tiny priming cups, coolant and oil fill caps, various connectors, exhaust manifold gaskets and the like.
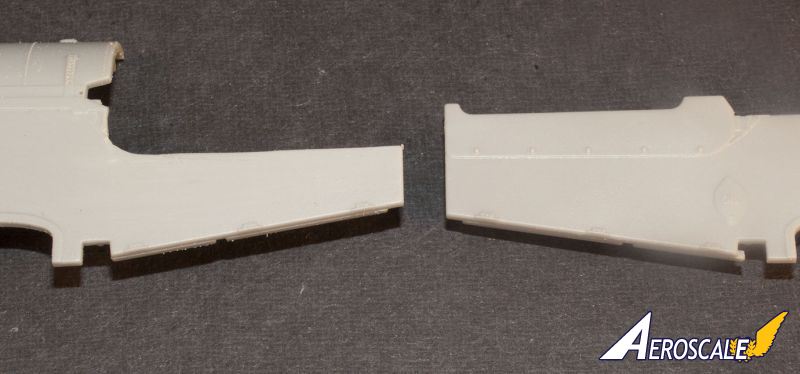
Because of the required configuration, just leaving off the kits upper cowls would not suffice. The molded on lower cover panels also had to go. Due to the engineering of the kit, removing that plastic required a rebuild of the engine bearer assembly, so this too was scratched from plastic sheet and a few railroad parts. Once the side panels were removed, and the underlying plastic thinned appropriately, attachment flanges were fabricated and installed to show where they would have been.
I also decided I needed to rebuild the entire cockpit from scratch; though to be perfectly candid, I have no earthy idea why. Some of the molded in detail looked to me as if it could have been done better for the scale I guess, and once I got started well its a sickness, I think. Anyway, all the cockpit instrument cases are turned from brass, the fuel distribution plumbing (?) cobbled from turned parts and brass wire. All bracing and control wires are present complete with springs and turnbuckles, all levers and controls are separate pieces with attachment rods and cables where appropriate and visible. The central Lewis magazine holder was converted into a map case, complete with charts and seat belts are scratch built from extremely fine silk ribbon cut to the proper width; painted and weathered, it produces astoundingly convincing miniature canvas. All wood effect was done with the tried and true oils over acrylic method.
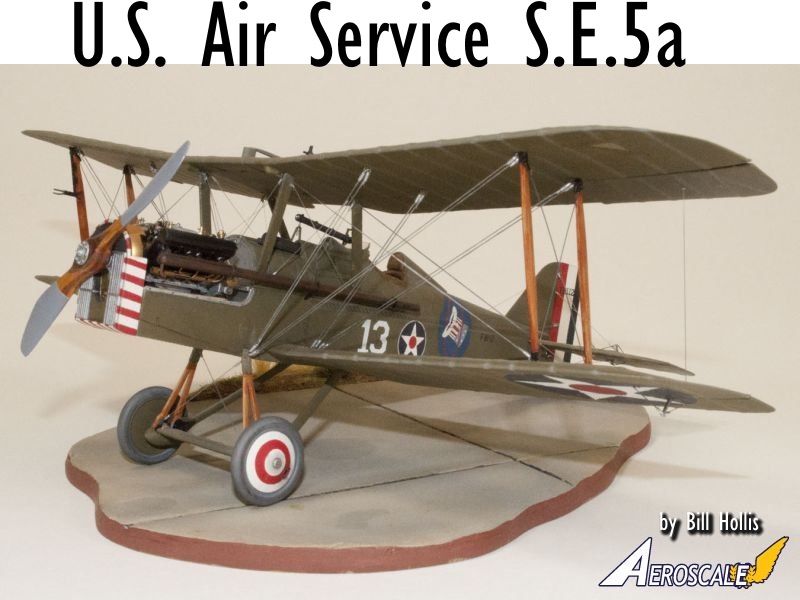
Otherwise, the tail control cable ports were carefully opened and a modified exhaust pipe brace system fabricated according to photographic evidence. Most notably, a large air scoop peculiar to American SEs was fabricated from plastic tubing and sheet and set in place on the panel covering the Vickers gun.
The landing gear came in for conversion as well. For reasons best known to themselves, the 94th operated at least some of their SE-5s sans forward LG strut fairings. They probably did it just so I would have to carefully carve and reshape the requisite parts to represent the underlying inverted V set up visible with the fairing removed.
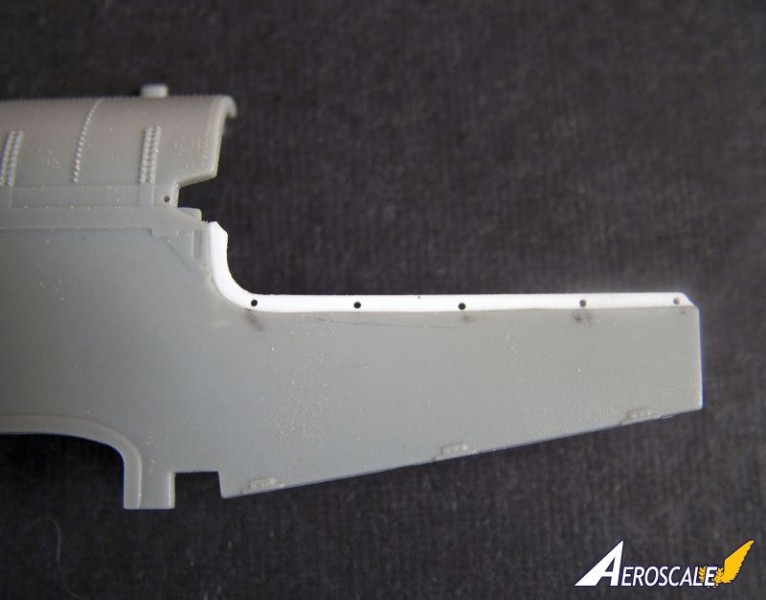
The wings and tail surfaces received less work. The wing trailing edges were very slightly scalloped as photos show this effect to be noticeable on these Texas based planes. The control pulley inspection panels were reworked to replace the unconvincing relief molded pulley assemblies with scratchbuilt items from punched sheet plastic disks, wire and photoetch car engine detailing parts. The thick kit clear parts were scrapped in favor of thin acetate and the edges covered with tape à la the prototype.
The gunsight was detailed with MV lenses to replicate the eye pupil and objective optic lenses. The VickersMG was detailed by hollowing out the cooling jacket and thinning it appropriately. A fulllength barrel was added with the kit muzzle device in place so that everything looked proper behind the Wingnut supplied jacket fore end. This was all a bit of artistic license on my part, seeing as any picture I could find of White 13 shows it with the Vickers unshipped; but I liked the look, so rationalization did its magic and in it went.
PAINT AND FINISH
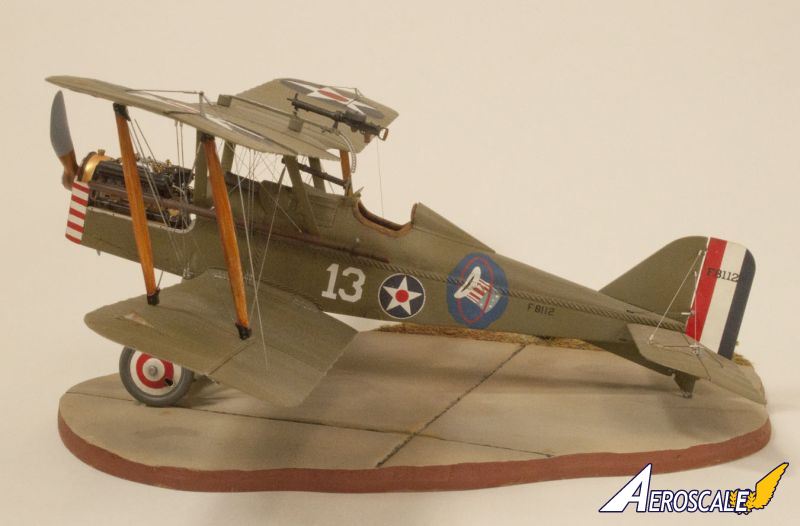
Conventional wisdom, and the profile painting in the Squadron SE-5 In Action book would have this plane in its wartime British PC-10 over natural linen colors. I respectfully disagree. A 1919 technical order unearthed by a buddy at the US Air Force Museum along with what photographic evidence exists indicates these planes, like everything else in the US Army at the time, were painted all over olive drab, top and bottom.Photos also show that at least some point in their lives the OD was pretty glossy. Well, maybe in 1919; but I imagine a few months in the good ol Texas sun put paid to that nonsense, and by the time my subject rolled up on the line the surfaces were dulled with exposure and showing a healthy bleaching. So, thats the way I did it. Lots of different shades of OD from dark glossy to dull bleached,a bucketload of masking, shading, airbrushing, oil filters and dry brushing interspersed with muttered blasphemies and polyglot vulgarities saw the thing done.
Otherwise weathering was kept to something of a minimum, a few light furl and oil streaks, a little mud splatter here and there. I reckon the ground crews would have been busy doing something given that the Cowboys didnt look good for the NFL playoffs that year.
All national insignia, again matched to the aforementioned borrowed tech order, were taken from a Yellow Wings decal sheet and the number 13s are sprayed on using homemade masks.
Cowl, wheel cover and rudder stripes are masked and sprayed. The original British serial number which was retained in the USAAS was pieced together from a couple of odd decal sheets.
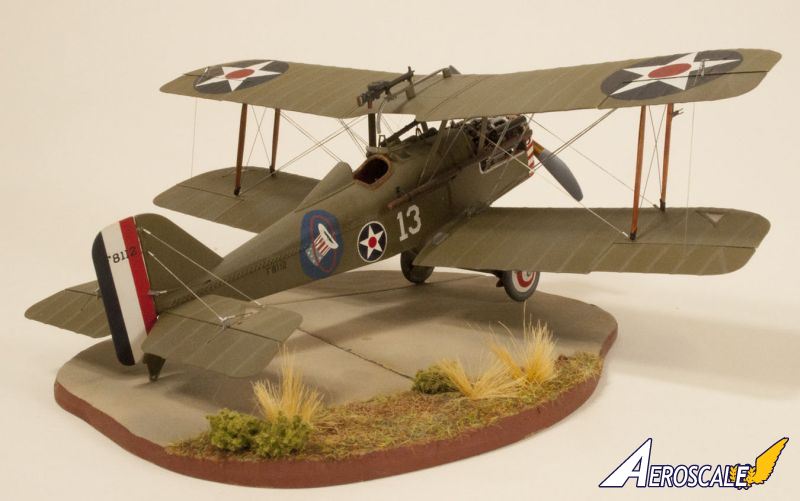
The 94ths Hat- In-The-Ring insignias are Vallejo acrylics, hand painted and made to look like they were with infinite care. In fact, those poorly drawn, out of proportion, nasty, amateurish little paintings are my favorite part of the whole model. (weird, huh?) Photos show that no two of the emblems on these airplanes looked alike; all were clearly hand drawn and painted and serve not only to commemorate the units proud heritage, but as mute tribute to a singular dearth of artistic prodigy within in its ranks while in Austin. ( so unlike Texass many other notable contributions to the fine arts who, for instance, can forget Ed, the finest ballerina in all of Amarillo?)
BASE AND FINAL DETAILS
The rigging is done with flat and round EZ Line secured with homemade eyelets and aluminum tube ends.The propeller is hand carved from laminated birch and black walnut, stained with colonial cherry and finished off with four coats of tung oil. The doped-on cloth binding is bare metal foil painted light gray after installation, and the boss plates were excised from the requisite Wingnut part and glued on over a brass tube prop shaft.
The little slice of heaven under the finished model is the percolated essence of my own fond memories of way too much time spent on tired, sunbaked, tumbleweedy beat up old West Texas airport ramps. It was put together from quarter inch Masonite, E-Poxy Sculpt concrete, latex-paint-thru-a-syringe tar calking, some railroad stuff dirt and rocks and other things I picked up here and there, some out of my own driveway. I forget what all, but, hey, it looks like Texas to me Pard, and I reckon that theres right about good nough
for government work, anyway....
Hope you like the final result. Thanks for looking.

About the Author


Comments


Hi Bill,
That is impressive beyonds words. A real jaw dropper. Bravo!
Gary
DEC 26, 2015 - 04:54 AM

Hey Bill
that is very well done and it is good to see you on the forum.
beautiful!
Doug
DEC 26, 2015 - 05:42 AM
Bill,
I'm speechless. And believe me that doesn't happen very often around these parts. Your build and detailing is just beyond comprehension. And your feature story is about the best I've ever read. Well detailed in the build process, and written in a style that is most entertaining. At some point as I was reading it, I started to hear your written words with a Texas accent.
Thanks so much for sharing your build with us.
Joel
DEC 29, 2015 - 01:59 AM
Thank you all for the very kind words. I'm happy you enjoyed the model.
DEC 30, 2015 - 04:31 PM

Goregeuos build Bill, and nice to see something "different" Congrats!
/Mikael
DEC 30, 2015 - 04:57 PM
Copyright ©2021 by Bill Hollis. Images also by copyright holder unless otherwise noted. The views and opinions expressed herein are solely the views and opinions of the authors and/or contributors to this Web site and do not necessarily represent the views and/or opinions of AeroScale, KitMaker Network, or Silver Star Enterrpises. Images also by copyright holder unless otherwise noted. Opinions expressed are those of the author(s) and not necessarily those of AeroScale. All rights reserved. Originally published on: 2015-12-26 13:39:17. Unique Reads: 4448

WEB HOSTING BY


Copyright ©2021 AeroScale and Kitmaker Network, a subsidiary of Silver Star Enterprises
All Rights Reserved. Please read our Conditions of Use and Privacy Policy.
All Rights Reserved. Please read our Conditions of Use and Privacy Policy.