

1⁄35First Jets
11
Comments
Construction
The cockpit
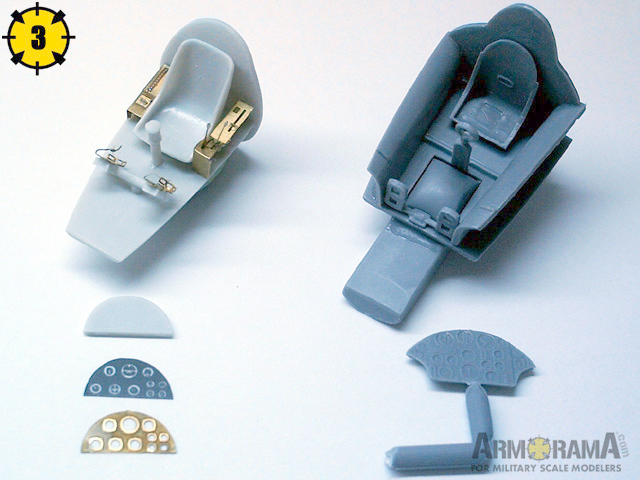
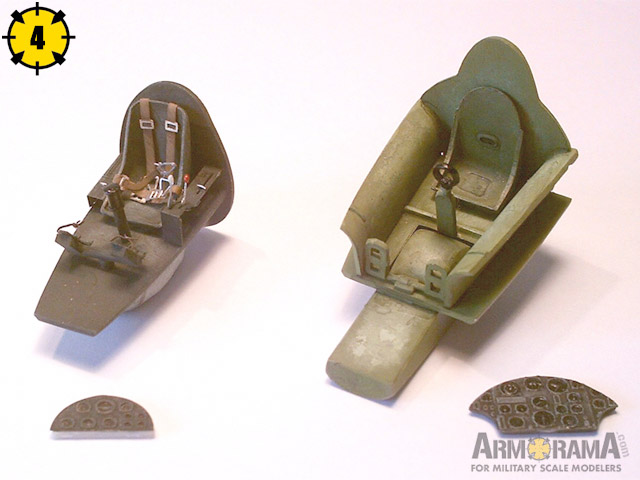
As usual, I first started with the cockpits (picture 3). And here, the Condor kit is definitely the best, being far more detailed (thanks to the PE parts) than the Special Hobby one. In fact, the Pioneer's cockpit looks like an empty bathtub, while the He 178 one looks more realistically busy. Even worse, the instrument panel of the British plane is a joke! Some instruments are literally cut on the borders and I guess the guys at Special Hobby simply made a dummy and trimmed it to fit in the cockpit, not very serious. Talking about fitting, the completed cockpit of the Heinkel does not fit in the two fuselage halves. So sanding and dry fitting is needed here to achieve a good result. On the contrary, the cockpit of the Pioneer goes in the two fuselage halves without much effort. But the complexity of its design will give you some problems! The front wheel bay is part of the cockpit assembly and achieving a good fit of the whole thing in the fuselage will be tricky! It would have been better to separate the cockpit and the wheel bay to have more "room" to work with! Special Hobby wanted to make a design "à la Tamigawa" and this will cause some troubles later.The Cockpit of the German plane was painted in dark grey (I used only Tamiya Acrylics unless otherwise noted) with some light grey drybrushing. A real plus is the PE levers, pedals and seatbelts. The levers received a drop of white glue on their heads and were painted dark grey with some white and red. The seatbelts where painted brown and silver and the pedals were glued in place after some dry fitting (remember the cockpit is narrow!) In all, the only minus of the Condor kit in that area is the joystick, which looks more like a club. Looking at the Special Hobby's Pioneer cockpit, I think it would have been perfect for a Tibetan monk but not for a test pilot. There is only a stick and a rudder pedal for the poor guy! I wonder what all the indicators on the instrument panel are for? The painting is therefore easy, with only a light green base and some drybrushing (picture 4).
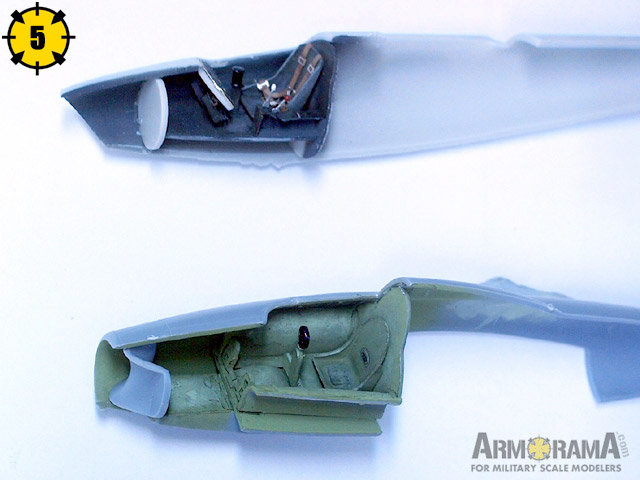
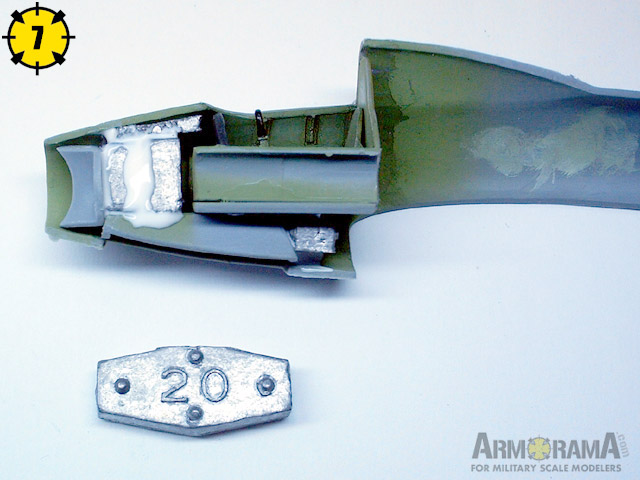
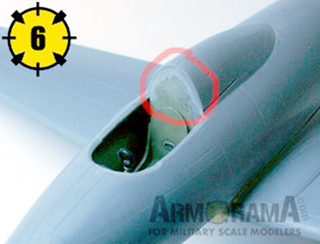
At this time of the build (picture 5), I must say the Condor kit made a better impression on me than the Special Hobby one. This was confirmed while gluing the two fuselage halves together. On the He 178 kit, once the cockpit floor and bulkhead are properly sanded, there is no problem. Gluing the two fuselage parts of the Pioneer is far more difficult due to the cockpit's design! Its very hard to achieve a good result here. If the gear door is in place, the cockpit is not and if the cockpit is in place, the gear door is offset. I decided the gear door would have priority and had to fill the resulting gap behind the pilot's seat (picture 6). Don't forget to add some weight in the nose of the Pioneer (picture 7). If you don't... well, you now what will happen. The instructions indicate that you will require 30g of weight in the nose. I only used 20g and it was more than enough! Anyway, there is not enough space for more.
About the Author


FROM: MOSELLE, FRANCE
I'm mainly interested in WW2 aircraft and I build them in 1/48 scale.
Comments

Jean-Luc no need to make it shorter next time, with that kind of information and work to be displayed it's the length it needs to be long or short. Good job, keep up the good work.
AUG 15, 2005 - 09:21 AM

Hi
what a great feature.
Excellent work Jean-Luc.
I thoroughly enjoyed reading it from first to last.
Thanks and cheers
Peter
:-)
AUG 15, 2005 - 05:54 PM

Bonjour Jean-Luc,
Excellent review of these early jets! don't worry about the lenght of your text, only your subject that counts!
Félicitations !
Francois
AUG 15, 2005 - 08:08 PM
Jean-Luc,
Yes sorry it took so long to get it published, the learning curve came down a little. The length is fine don't worry about that (just replace ! with . and all will great ) I enjoyed reading it and, More importantly I will probably buy these 2 models on the basis of your review/build, thanks.
Mal
AUG 16, 2005 - 06:59 AM

Hi all!
Thanks to all for your nice comments! I really do appreciate them as they are good motivation to do some more!
Peter, I have a project on the go that will probably interest you! Stay tuned!
Chuck and François... vous l'aurez voulu! I can even make longer........ ZZzz! ZZzz! Zzzzz!
Mal!!! What about my !!!s, I wondered if it was a Mac/PC compatibility problem!!! I like my !!!s! Doh! What!? It's to much!!! Ok I'll make an effort next time! Maybe I'm too enthusiastic!!! :-)
Jean-Luc
AUG 16, 2005 - 07:39 AM
I'm not! You should see the lousy car I'm driving! :-)
I said I can make longer... not I will make longer.
Jean-Luc
AUG 16, 2005 - 07:56 AM
Oh oh...
are we getting in to a "size matters" issue here...tut tut... :-)
Jean-Luc...you just make them as long as you want... :-)
Cheers
Peter
:-)
AUG 16, 2005 - 06:37 PM

Excellent article Jean-Luc!
Sorry - I've only just had a chance to read it!
Just for the record - re- the missing prototype "P" on the Pioneer; according to the only known photo, the prototype marking doesn't seem to have been applied at the time of the first flight.
For anyone interested in the story of the E.28 (and early jet developments), Tim Kershaw's "Jet Pioneers" is a must read, with plenty of previously unpublished photos and drawings.
All the best
Rowan
AUG 18, 2005 - 09:12 AM
Copyright ©2021 by Jean-Luc Formery. Images also by copyright holder unless otherwise noted. The views and opinions expressed herein are solely the views and opinions of the authors and/or contributors to this Web site and do not necessarily represent the views and/or opinions of AeroScale, KitMaker Network, or Silver Star Enterrpises. Images also by copyright holder unless otherwise noted. Opinions expressed are those of the author(s) and not necessarily those of AeroScale. All rights reserved. Originally published on: 2005-08-15 00:00:00. Unique Reads: 12687

WEB HOSTING BY


Copyright ©2021 AeroScale and Kitmaker Network, a subsidiary of Silver Star Enterprises
All Rights Reserved. Please read our Conditions of Use and Privacy Policy.
All Rights Reserved. Please read our Conditions of Use and Privacy Policy.