_GOTOBOTTOM
Early Aviation
Discuss World War I and the early years of aviation thru 1934.
Never Fear the Spoken Wheel
JackFlash
_VISITCOMMUNITY
Colorado, United States
Joined: January 25, 2004
KitMaker: 11,669 posts
AeroScale: 11,011 posts
Posted: Sunday, July 08, 2007 - 03:34 PM UTC


Welcome to the Premier Aeroscale Early Avaition Modeling Seminar.
At this time we will be focusing on open phototech spoked wheels. Comments and questions are welcome. I want to thank Eduard for a gift of their recent issue to Aeroscale for this seminar. Now on to the build

You don’t see them very often but they are there. Under the cloth, pressed sheet metal covers, or bare and exposed - every early aviation airframe had spoked wheels. Since the earliest appearance of Harry Woodman’s first brass photoetch items through Fotocut Labs (early 1970's) to Eduard’s most recent offering (2006) kit #48505, photoetch spoked wheels in various scales have been around. It takes a little forethought to do it right but essentially you must understand one thing to be successful. Your aircraft model won’t stand on unreinforced scale photoetch wire wheels without eventually buckling.

I remember putting photoetch wheels on an early Eduard 1/48 Albatros C.III back in 1997. I sent it to IPMS Nationals that same year attached to a base under a clear cover. It never got to compete. The fellow who took it for me noticed that the wire spoked wheels had buckled and ruined the display. I had built them according to the Detail Masters instructions of the time. Even nickel coated they were not strong enough to bear the weight of a two seat, two bay biplane with a white metal motor. When I got the Albatros C.III back on my hobby desk I set out to find the best method to build spoked wheels in scale. Here is the result of the repair.


The original method was to:
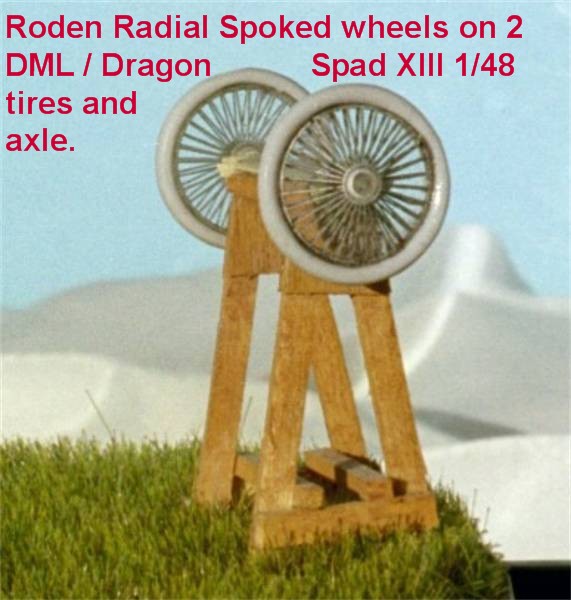
1. Cup or dish the center of two standard photoetch spoked rims.
2. Add a hollow tube spanning the area between the spoked wheels. This hollow tube would allow the axle end to pass through.
3. Glue the spacer between two tire halves at their hubs.
4. Glue the rims of the wheels together with the hollow tube / spacer

The problem comes from the fact that these predominantly two dimensional brass etched wire spokes cannot bear a load. Even if initially it stands freely for a time, eventually a shift of position or weight will buckle the wires and its done.
JackFlash
_VISITCOMMUNITY
Colorado, United States
Joined: January 25, 2004
KitMaker: 11,669 posts
AeroScale: 11,011 posts
Posted: Sunday, July 08, 2007 - 03:48 PM UTC
So here is what you had to do:
Purchase a sheet of polystyrene clear plastic. Evergreen, Plastruct or even the clear stand plastic that comes with Preiser figures. Cut a clear disk slightly larger that your wheel rim. This will be the basis for your wheel. For 1/72 try using .010 thou clear plastic sheet for the disk, for 1/48 use .020 thou clear sheet plastic. For 1/32 use .030 thou...

On some wheels if you look at the forward profile you will note that either both spoked wheel faces or only the outside face stick out beyond the tire. In any case always use a small hollow tube to pass through the clear disk center and through the center of the spoked rims. If the inside wheel face is vertical or flat with out any cupping / dishing outwards you can get away with attaching it directly to the clear disk But again you will need the hollow tube running through their centers through the center of the outside wheel face.

JackFlash
_VISITCOMMUNITY
Colorado, United States
Joined: January 25, 2004
KitMaker: 11,669 posts
AeroScale: 11,011 posts
Posted: Sunday, July 08, 2007 - 06:08 PM UTC
Are we clear so far?

Now for some definitions.
Kitboy
_VISITCOMMUNITY
Gelderland, Netherlands
Joined: July 20, 2006
KitMaker: 258 posts
AeroScale: 256 posts
Posted: Sunday, July 08, 2007 - 11:07 PM UTC
Hello Stephen,

So far I have never attempted to do spoked wheel, but this explanation may make me do an attempt somewhere in the future. Especially the use a clear disk is most inspiring.

Greetings, Nico
JackFlash
_VISITCOMMUNITY
Colorado, United States
Joined: January 25, 2004
KitMaker: 11,669 posts
AeroScale: 11,011 posts
Posted: Monday, July 09, 2007 - 02:45 PM UTC
Thanks for the vote of confidence Nico! I will try to help make it as painless as possible.!

Next the title should say Part of Poland made for Roden radial spoked wheel. . .


Using the above described method with the clear disk in the center gives the whole wheel a good rigid strength. The spoked photoetch becomes window dressing and not the main support structure.

Now when you have an all plastic kit you would think that it is not needed. But you would be wrong. As mentioned before it is most often the lateral shift of weight that would cause PE only wheels to collapse. The wings cause the most concern especially if they hang off the sides of your base. Easy to bump, catch on shirt sleeves, or get tipped off center. The thinner or more inscale spokes are the worst culprits.

Most aftermarket model companies went to using nickel plated PE in the early 1990's. While this did provide some added strength it was still not enough when it came to open spoked wheels. The main concern was that nickel coated brass PE was still a soft metal with a thin covering shell.
JackFlash
_VISITCOMMUNITY
Colorado, United States
Joined: January 25, 2004
KitMaker: 11,669 posts
AeroScale: 11,011 posts
Posted: Wednesday, July 11, 2007 - 04:15 AM UTC
To help with the assembly here is a centering template. Simply save image to your computer, resize to your needs with what ever imaging software you have and print out.

JackFlash
_VISITCOMMUNITY
Colorado, United States
Joined: January 25, 2004
KitMaker: 11,669 posts
AeroScale: 11,011 posts
Posted: Wednesday, July 11, 2007 - 04:53 AM UTC
As a bit of background, the first sets of photoetch for Early Aviation ( WWI ) were first designed bt Harry H. Woodman of the UK. Mr. Woodman took the idea from the first aftermarket PE sets developed for model rail-road kits. The brass sheets were attached black vinyl sections. A negative was laid over the brass and acid poured over the whole affair. The piece that were left, remained attached to the vinyl sections. To lift them off for use the brass piece and its vinyl were cut fom the whole section and immersed in lacquer thinner.


The white sections of this image (above) represent the brass pieces that were to be assembled. The multiple "small rings" included on this sheet were to be used to build up small axles for the wheel and to sandwich the wheel faces to. The outer rings of the wheel face were to be cut at regular intervals. This kept the spokes from getting kinked or bent. Usually a compass position of four cuts effectiively quartering the whole outer rim. North South East & West.
JackFlash
_VISITCOMMUNITY
Colorado, United States
Joined: January 25, 2004
KitMaker: 11,669 posts
AeroScale: 11,011 posts
Posted: Wednesday, July 11, 2007 - 05:24 AM UTC
As Eduard always seems to be on the cutting edge of photoetch sets it is not a surprise that they have tried to strengthen their new sets (#48505) to stand alone and not employ the clear disk method.
JackFlash
_VISITCOMMUNITY
Colorado, United States
Joined: January 25, 2004
KitMaker: 11,669 posts
AeroScale: 11,011 posts
Posted: Wednesday, July 18, 2007 - 04:32 AM UTC
Greetings all;

Sorry for the delay here. I have my wife in the hospital recovering from surgery and I am dad and mom to my children and mother-in-law. Busy, busy busy. Will be back at it soon.
JackFlash
_VISITCOMMUNITY
Colorado, United States
Joined: January 25, 2004
KitMaker: 11,669 posts
AeroScale: 11,011 posts
Posted: Saturday, July 21, 2007 - 09:08 AM UTC
If there are any questions on this subject, please feel free to speak up.
TedMamere
_VISITCOMMUNITY
Moselle, France
Joined: May 15, 2005
KitMaker: 5,653 posts
AeroScale: 4,347 posts
Posted: Saturday, July 21, 2007 - 10:15 AM UTC

Quoted Text

I have my wife in the hospital recovering from surgery


Hi Stephen!

I'm sorry to hear that. Do you have good news?

Take care...

Jean-Luc
JackFlash
_VISITCOMMUNITY
Colorado, United States
Joined: January 25, 2004
KitMaker: 11,669 posts
AeroScale: 11,011 posts
Posted: Saturday, July 21, 2007 - 02:41 PM UTC
Thanks for asking Jean-Luc!

I picked her up today. We do have some things to deal with in the coming months but with heaven's help we will get through it. Merci Mon Ami.
JackFlash
_VISITCOMMUNITY
Colorado, United States
Joined: January 25, 2004
KitMaker: 11,669 posts
AeroScale: 11,011 posts
Posted: Friday, August 03, 2007 - 08:05 AM UTC


As we continue with the new Eduard set I include a portion of their instructions with my own editorial comments.
JackFlash
_VISITCOMMUNITY
Colorado, United States
Joined: January 25, 2004
KitMaker: 11,669 posts
AeroScale: 11,011 posts
Posted: Thursday, August 23, 2007 - 05:51 AM UTC
To continue with this thread I will say the ball bearing idea is ok but it leaves your center hub of the wheel cupped and it should be more pronounced. I remind you of the images above where the hub and center line of the tire are parallel to each other. Also the Eduard method though simplified also makes the spokes appear curved. Where in the images they travel from hub to wheel rim in a straight line.
JackFlash
_VISITCOMMUNITY
Colorado, United States
Joined: January 25, 2004
KitMaker: 11,669 posts
AeroScale: 11,011 posts
Posted: Monday, June 23, 2008 - 03:45 PM UTC
Here is a query from one modeler.


Quoted Text

Hello, Stephen, "In for a penny, in for a pound!" I've read through the link, and it all sounds fine. I assume (bad thing to do, sometimes) that I would cut away the wheel centre, leaving only the actual "tire." Then comes the question: if this is so, then how are the PE spokes and the clear disc fitted into the inside of the tire circumference?


No worries Trackpad. When cutting a out the center of a solid wheel as I did with the DML Spad wheels. Then take it down as you mention til the tyre / tire is left. with the template provided (Thanks to Ray Rimell) and measure for the center clear disc and its center. Drill out the center to accept the axle. Then attach the rims to the outer edge of the tyre / tire noting the wheel profile. That is one side flat or both sides peaked beyond the tyre / tire profile. Some PE come with center reinforcement rings that would stack on each other to meet the center hub interior of the spoked wheel face.


Quoted Text

The diagrams seem to indicate that a groove is cut for these pieces. If so, what do you use to cut the groove, and how would the PE/clear disc assembly get slipped into place? The only idea I've had is that the "tire" gets cut into two pieces, the inside groove is delicately Dremelled in, the PE/clear disc is fitted (thus bringing the two tire pieces together), and the tire join is filled and sanded. Any clarification gratefully received! :magnify:


Now in the second case you have two wheel halves and cutting a groove is very easy with a dremel at low speed. You could actully only have to groove one inside tyre / tire half to fit a clear disk. But I usually go with both being grooved or notched. The idea is that the spokes in PE are not strong enough by themselves. to handle the weight of some aircraft. Especially if the motor is white metal.
thegirl
_VISITCOMMUNITY
Alberta, Canada
Joined: January 19, 2008
KitMaker: 6,743 posts
AeroScale: 6,151 posts
Posted: Monday, June 23, 2008 - 04:39 PM UTC
Hi Stephen , I found this to be very informative for the longest I had this fear on spoke wheels . Tired once in 1/72 and that turned out to be one big mess .
I'm sorry to here about your wife , I will pray for her for a speedy recovery .
Best Wishes Terri
JackFlash
_VISITCOMMUNITY
Colorado, United States
Joined: January 25, 2004
KitMaker: 11,669 posts
AeroScale: 11,011 posts
Posted: Saturday, July 12, 2008 - 03:33 PM UTC
Thank you Terri,

Now for a further bit of fun on types of spoked wheels and their geometry.
Click here.
JackFlash
_VISITCOMMUNITY
Colorado, United States
Joined: January 25, 2004
KitMaker: 11,669 posts
AeroScale: 11,011 posts
Posted: Tuesday, July 15, 2008 - 03:04 PM UTC
Here is a bit of fun on the Part of Poland PE wire wheels.
thegirl
_VISITCOMMUNITY
Alberta, Canada
Joined: January 19, 2008
KitMaker: 6,743 posts
AeroScale: 6,151 posts
Posted: Tuesday, July 15, 2008 - 03:10 PM UTC
Wow that looks realy great , I'll have to try this on the Speaicl Hobby kit of Sopwith Tabloid that I order . maybe this time I will have a better go at it then in 1/72 scale . Thanks for share Stephen . Cheers
JackFlash
_VISITCOMMUNITY
Colorado, United States
Joined: January 25, 2004
KitMaker: 11,669 posts
AeroScale: 11,011 posts
Posted: Tuesday, July 15, 2008 - 04:41 PM UTC
Always remember use the least amount of glue for the job.

In truth there are several spoke variations that fall into two main catagories.
Click here.

The two types we see in modeling (most often are the cross spoked and the radial spoked. (The French used both). I have a second set of the cross spoked that I will be alternatting the spokes on. I'll post them here later
Roxter
_VISITCOMMUNITY
Rigas, Latvia
Joined: July 04, 2007
KitMaker: 268 posts
AeroScale: 245 posts
Posted: Wednesday, July 16, 2008 - 05:27 AM UTC
Stephen, the link "Click here" doesn't work
JackFlash
_VISITCOMMUNITY
Colorado, United States
Joined: January 25, 2004
KitMaker: 11,669 posts
AeroScale: 11,011 posts
Posted: Wednesday, July 16, 2008 - 08:05 AM UTC
Thanks Arseny,

Should be ok now.
JackFlash
_VISITCOMMUNITY
Colorado, United States
Joined: January 25, 2004
KitMaker: 11,669 posts
AeroScale: 11,011 posts
Posted: Monday, July 21, 2008 - 03:40 PM UTC
Tonight I'll proceed on the other sets I have on my desk so we can wrap this thread up.
JackFlash
_VISITCOMMUNITY
Colorado, United States
Joined: January 25, 2004
KitMaker: 11,669 posts
AeroScale: 11,011 posts
Posted: Tuesday, August 05, 2008 - 11:39 PM UTC
Here we go folks.

The first image here is the attachment of the inner face spokes directly to the clear plastic. Do everything to can to work slowly out side the rim and not craze the center of the clear plastic between the spokes.


JackFlash
_VISITCOMMUNITY
Colorado, United States
Joined: January 25, 2004
KitMaker: 11,669 posts
AeroScale: 11,011 posts
Posted: Tuesday, August 05, 2008 - 11:41 PM UTC
The cut even breaks between the pairs of spokes for the outer half of the wheel. Attach the spacer hub to this and bend up the outer rim segments slightly.
 _GOTOTOP