_GOTOBOTTOM
Early Aviation
Discuss World War I and the early years of aviation thru 1934.
Roden Gotha GIV the build
CMOT70
_VISITCOMMUNITY
Victoria, Australia
Joined: August 23, 2007
KitMaker: 629 posts
AeroScale: 539 posts
Posted: Sunday, September 30, 2007 - 06:13 PM UTC
I've made a start today on my new project. I've been wanting to build one of these Roden Gothas for a while...but they look hard! I've read a few build reviews and know about some of the main things to look out for, so i'll see how i get along. Anyone on aeroscale built one?

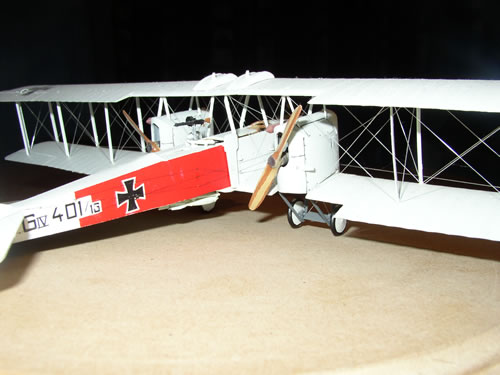
I love Roden kits, especially their Fokker DVII's. I believe they are leaders in being able to get closer to scale thickness WW1 trailing edges and other fine detail using just plastic only. I actually have 3 of these Gothas (i really like them!), i also have the G.V and G.Va kits, but have chosen the G.IV simply because i think it's tricky enough without having to deal with Rodens lozenge decals as well.

I made a start today by modifying the fuselage parts to represent G.IV Gotha built aircraft. Like most Roden kits the sprues are generic to a large extent with a bit of cutting, filing, sanding, filling and swearing needed to get the version called for in the instructions. The G.IV requires a section of left fuselage removed and an insert section put in its place. In the pic can be seen the filler used to blend in the insert- it's thickness differs from the fuselage and needs some work to blend in.

If this one doesn't end up thrown against the workshop wall before the end (even chance i'd say), then i may even enter it in the early bird contest

Andrew


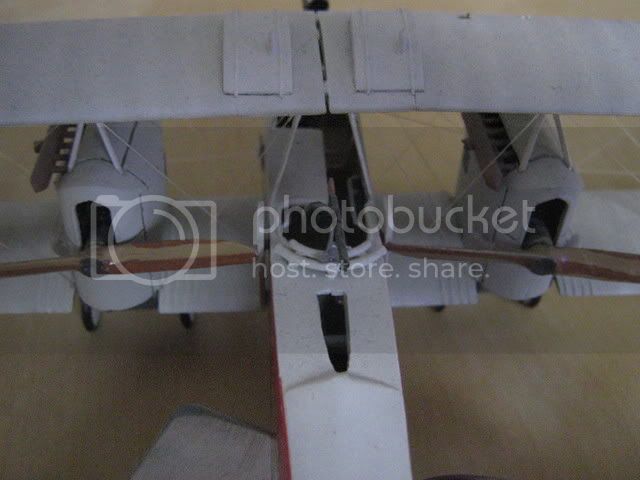
Here i'm partway through removing the covers in the center wing section for the interior bomb racks.
JackFlash
_VISITCOMMUNITY
Colorado, United States
Joined: January 25, 2004
KitMaker: 11,669 posts
AeroScale: 11,011 posts
Posted: Monday, October 01, 2007 - 12:55 PM UTC
Greetings Andrew;
It looks great so far. If you have ever seen the Datafiles on this subject? Good stuff.
CMOT70
_VISITCOMMUNITY
Victoria, Australia
Joined: August 23, 2007
KitMaker: 629 posts
AeroScale: 539 posts
Posted: Tuesday, October 02, 2007 - 01:06 PM UTC

Quoted Text

Greetings Andrew;
It looks great so far. If you have ever seen the Datafiles on this subject? Good stuff.


I haven't seen the Datafiles yet, but i've heard they're excellent on this subject. Anyway i may try to track one down, plus a Part etch set before i do (if i do) one of the G.V's. For the G.IV my main concern is just building it straight using what Roden supply.

I've already stumbled across the first critical alignment part of this one. As mentioned in the first post, the G.IV needs a section of left fuselage removed and replaced by an insert. See pic below.
Well i got it wrong the first try and had to cut it off and retry. The problem was the insert is too long or i didn't remove enough of the original fuselage...resulting in the fuselage being slightly too long. Test fitting with all the bulkheads fitted resulted in a nose bent off to the left! Also the insert is about twice as thick as the fuselage sides, in the second pic you can see the amount of thinning i did to blend it in. Anyway it all seems to match up ok now, with all the bulkheads in place.


So now it's time to paint the interior wood. Normally i use oils, but this time i'm going to try the water/poster colour method- i like the idea of the faster drying time. I can always wash it off and use oils if it doesn't work.


Andrew
CMOT70
_VISITCOMMUNITY
Victoria, Australia
Joined: August 23, 2007
KitMaker: 629 posts
AeroScale: 539 posts
Posted: Wednesday, October 03, 2007 - 02:05 PM UTC
The interior paint is on. I'm still not sure if i prefer the watercolour wood effect to the more usual oil paint option yet. I need more practice.

Anyway it's time to get the fuselage halves together. I'm leaving out the clear windows. I can use crystal clear for the smaller oval windows, and i'll try to fit the larger two after completion.


CaptainA
_VISITCOMMUNITY
Indiana, United States
Joined: May 14, 2007
KitMaker: 3,117 posts
AeroScale: 2,270 posts
Posted: Friday, October 05, 2007 - 09:39 AM UTC
I really love these WWI bombers. I guess they remind me of a tree house I tried to build as a child. Are you going to do the box scheme or go for one of the disruptive pattern schemes?
CMOT70
_VISITCOMMUNITY
Victoria, Australia
Joined: August 23, 2007
KitMaker: 629 posts
AeroScale: 539 posts
Posted: Friday, October 05, 2007 - 07:06 PM UTC

Quoted Text

Are you going to do the box scheme or go for one of the disruptive pattern schemes?


I considered doing one of the LVG aircraft with their purple/blue-grey camo. But i don't like the kit representation of those mesh side panels either side of the aft gunner. And the LVG aircraft use the mesh sides, whilst the Gotha built aircraft in the kit, use the wooden side panels. I think the Part etch set would be a good idea for doing an LVG aircraft because of those see-through screens.

Anyway i'm planning to do Rodens 3rd option c/h 604/16 of Kagohl 3. It's an overall pale light blue aircraft with areas of green trim.

The fuselage is together now. The only area that gave trouble was the underside of the nose. Somehow i ended up with a step there which has needed putty (which i'm waiting now for it to set). The rest of the fuselage seams have just needed some typing fluid or paint and light sanding.


The engine enclosures are a different matter. They don't fit so great and will need some work. I'm yet to start the filling and shaping process on them.
The engine themselves are not very important as you can't see much of
them when it's all done anyway.

The upper wings are together and are trouble free. I love Rodens very subtle wing rib detail- most companies over do that area on fabric covered aircraft. Matching the dihedral between top and bottom wings will be easy, as the top wing assembly is easy to adjust to match the lower wing dihedral- even after assenbly, due to the flexible centre attachment.

I think working rigging will be important for this model as opposed to "show" rigging (such as lycra thread which gives no structural strength), to prevent those long thin wings from drooping under their own weight.


Andrew

almonkey
_VISITCOMMUNITY
England - East Midlands, United Kingdom
Joined: March 23, 2003
KitMaker: 2,124 posts
AeroScale: 788 posts
Posted: Saturday, October 06, 2007 - 10:06 PM UTC
hi andrew, i built this same kit about three years ago, and just to say i have non working rigging and the wings seem to have held up ok-in fact i used aeroclub stretch thread for the rigging on the wings and fine fishing line for the tail control lines. i thought the stretch thread was a little overscale but i should really have stretched it a little more to thin it out! one final thing, on mine the props just hit the fusalage when they turn! don't know if this is a kit failing or if i've not quite got the wings on square
heres a pic-
CMOT70
_VISITCOMMUNITY
Victoria, Australia
Joined: August 23, 2007
KitMaker: 629 posts
AeroScale: 539 posts
Posted: Monday, October 08, 2007 - 09:49 PM UTC
Thanks for the useful info Phil. I've decided to still go with the nylon mending thread for the rigging...mainly because i don't have any lycra thread and don't know where to get any either.

I've been lucky regarding the props in that they do clear the fuselage- but only by millimetre htough I have one question though if you're reading this thread still: did you find the kit landing gear to be strong enough, or did you replace them or reinforce with brass?

Anyway it's all primered and ready for the paint scheme, as simple as it is. I'll be leaving the top and bottom of the wings unfinished until i've finished all the rigging, as i intend to fully drill through the rigging attachment holes.

Probably the most important part of this kit is to get the sweep of the lower wings matching that of the top wings. The top wing is easy. But the outer bottom wings, if built from the kit, will end up with no or little sweep. That would make installing the struts a nightmare and just wouldn't look right! So it's important to sand down the bottom wings where they attach to the nacelles until they match the sweep back of the upper wings.


Andrew
almonkey
_VISITCOMMUNITY
England - East Midlands, United Kingdom
Joined: March 23, 2003
KitMaker: 2,124 posts
AeroScale: 788 posts
Posted: Tuesday, October 09, 2007 - 05:20 AM UTC
hi again! i'm still following your build, its a bit of an eye opener because i don't even remember the sweep of the wings being an issue! however looking at mine from the top down, the upper wings do have more sweep than the lower ones, but the struts have gone on o.k.


the offending props! actually i've noticed they hit the side protection plates rather than the actual fusalage, which could easily be remedied by thinning down the plate and perhaps taking a little off the propellor tip, i did'nt notice this until after the model was finished, so i display it with the props pointing up and down. to answer your earlier question, i built this kit totally oob, only the rigging was aftermarket stuff, despite its size the kit undercarridge dosen't have any problems holding it, the finished model is quite light. the only problem i've had is that some of the bombs have vanished!
hth,phil
CMOT70
_VISITCOMMUNITY
Victoria, Australia
Joined: August 23, 2007
KitMaker: 629 posts
AeroScale: 539 posts
Posted: Sunday, October 14, 2007 - 12:10 AM UTC
Well, it still hasn't been thrown against the wall yet. But the scary bit is not too far away...putting the top wing on.

Just a few touch ups to do where overspray got onto the wooden interior. Then it's onto the struts and upper wing mounting. The top of the upper and underside of the lower wings are still unfinished until after rigging. All the holes are drilled in preparation for the nylon monofilament.

The Roden decals have been troublesome but at least they are printed well enough. I wasn't sure about the colour of the engine nacelles. But photos here www.angelfire.com/hi5/tgenth/gotha/GothaGIVe.htm#p2e definately show them to have been a darker colour on G'IV's. My assumption is that it would be the pale grey/green colour seen on many metal parts of German aircraft- eg cowlings of Albatros. I also believe it is the same colour that later became RLM 02, but that's just speculation.


Andrew

JackFlash
_VISITCOMMUNITY
Colorado, United States
Joined: January 25, 2004
KitMaker: 11,669 posts
AeroScale: 11,011 posts
Posted: Sunday, October 14, 2007 - 01:56 AM UTC
Excellent progress.
TheZOX
_VISITCOMMUNITY
Slovenia
Joined: August 23, 2007
KitMaker: 86 posts
AeroScale: 75 posts
Posted: Sunday, October 14, 2007 - 03:09 AM UTC
Superb weathering. Great job
almonkey
_VISITCOMMUNITY
England - East Midlands, United Kingdom
Joined: March 23, 2003
KitMaker: 2,124 posts
AeroScale: 788 posts
Posted: Tuesday, October 16, 2007 - 06:12 AM UTC
its looking sweet already!
how did you do the ribs? i pre shaded mine but it was in my early days of using this technique and its a bit fuzzy as opposed to the sharpness you've got on yours.
CaptainA
_VISITCOMMUNITY
Indiana, United States
Joined: May 14, 2007
KitMaker: 3,117 posts
AeroScale: 2,270 posts
Posted: Tuesday, October 16, 2007 - 10:28 AM UTC
Great build so far.
CMOT70
_VISITCOMMUNITY
Victoria, Australia
Joined: August 23, 2007
KitMaker: 629 posts
AeroScale: 539 posts
Posted: Tuesday, October 23, 2007 - 05:06 PM UTC

Quoted Text

its looking sweet already!
how did you do the ribs? i pre shaded mine but it was in my early days of using this technique and its a bit fuzzy as opposed to the sharpness you've got on yours.


I tried something new this time, i used thin strips of Tamiya tape and then oversprayed with X-19 Smoke. I think it's a bit overdone actually, and the ribs are a bit wide (though the real thing may have used rib caps- which would make them wider), but i plan to tone it all down after i've done the top wing wing.

And speaking of top wings it's on now. Haven't had much time in the last week, but i got the wing on and struts in place. The Gothas have no top wing stagger, it sits directly above the lower wing. So it's easier to assemble than at first i thought. And surprisingly, once all the struts are in place it's very rigid. It will survive an earthquake i think, once the actuall nylon rigging is done. Of course now that all the holes are drilled, i actually found a source for lycra rigging thread. So i could have used that method after all. Oh well, next time...


Andrew
CMOT70
_VISITCOMMUNITY
Victoria, Australia
Joined: August 23, 2007
KitMaker: 629 posts
AeroScale: 539 posts
Posted: Monday, October 29, 2007 - 10:18 PM UTC
Just a short progress update. I've finally built up the resolve needed to begin the rigging. I got about 1/3rd the way into it tonight, and that was about all i could handle for one sitting! Even what i've done so far is more rigging than any model i've done so far- i've only done single bay German and French biplanes up until this build.

I use the common method that most people already know. Threading nylon meanding thread or fishing line (depending on scale) through pre-drilled holes, superglue one end. Load the other end with a clamp as weight to hold tension and glue. Slice off the excess, fill and sand the holes and paint the top/bottom wings. Easy! But tedious.


Andrew

CaptainA
_VISITCOMMUNITY
Indiana, United States
Joined: May 14, 2007
KitMaker: 3,117 posts
AeroScale: 2,270 posts
Posted: Tuesday, October 30, 2007 - 08:57 AM UTC
As I watch you progress on your wonderful build, I can't help but wonder...how did these things stay up in the air?
JPTRR
Staff MemberManaging Editor
RAILROAD MODELING
#051
_VISITCOMMUNITY
Tennessee, United States
Joined: December 21, 2002
KitMaker: 7,772 posts
AeroScale: 3,175 posts
Posted: Tuesday, October 30, 2007 - 10:27 AM UTC

Quoted Text

I use the common method that most people already know. Threading nylon meanding thread or fishing line (depending on scale) through pre-drilled holes, superglue one end. Load the other end with a clamp as weight to hold tension and glue. Slice off the excess, fill and sand the holes and paint the top/bottom wings. Easy! But tedious.


Great Andrew!

Twenty-five +/- years ago I built the Life-Like 1/48 Gloster Gladiator. The wings were 2-piece, top and bottom, and I drilled out all the holes and rigged it with a single piece of thread (unfortunately, the fuzzy sewing thread). A couple of days after the masterpiece was complete, I proudly showed it to my girlfriend who promptly dropped it! Aside from a strut, the tail wheel and the exhaust pipe breaking loose, she held together!
CMOT70
_VISITCOMMUNITY
Victoria, Australia
Joined: August 23, 2007
KitMaker: 629 posts
AeroScale: 539 posts
Posted: Tuesday, October 30, 2007 - 07:40 PM UTC

Quoted Text

As I watch you progress on your wonderful build, I can't help but wonder...how did these things stay up in the air?


From reading a bit about Gothas the problems seems not to have been keeping them in the air, but more about how to get them safely back onto the ground. Most losses were from trying to do just that. Much like the Bf109 from the next war.

They were real pilots back in those days

Andrew
CMOT70
_VISITCOMMUNITY
Victoria, Australia
Joined: August 23, 2007
KitMaker: 629 posts
AeroScale: 539 posts
Posted: Tuesday, October 30, 2007 - 07:48 PM UTC

Quoted Text

[A couple of days after the masterpiece was complete, I proudly showed it to my girlfriend who promptly dropped it! Aside from a strut, the tail wheel and the exhaust pipe breaking loose, she held together!


Fred, it's good that the masterpiece held together. I just hope the girlfriend held together just as well?

As for myself, i'm more than capable of regularly doing such things without any help from the girlfriend. The dumbest i've managed so far was spraying a Porsche bright Jaegermeister Orange outside using laquer. Just after putting on the final wet glossy coat and admiring my work- it fell off the holder and into the fresh lawn cuttings. It looked like a bright orange Porcupine

Andrew
CaptainA
_VISITCOMMUNITY
Indiana, United States
Joined: May 14, 2007
KitMaker: 3,117 posts
AeroScale: 2,270 posts
Posted: Wednesday, October 31, 2007 - 05:58 AM UTC
It seems my major problem when building is trying to finish a model that is free of cat hair.
CMOT70
_VISITCOMMUNITY
Victoria, Australia
Joined: August 23, 2007
KitMaker: 629 posts
AeroScale: 539 posts
Posted: Tuesday, November 06, 2007 - 09:48 PM UTC
Now we're really cooking again. For the last week, every time i'd approach the Gotha to finish the rigging, i'd suddenly think of something else around the house that needed doing instead. Yesterday i even thought of doing my tax...before modelling. I knew it was time to just get on with it.

Rigging done then. Top and bottom wings sprayed. Decals should be on tomorrow i hope. On the home straight now.

Maybe i really should do the tax though...it was due last month.


Andrew
Dwaynewilly
_VISITCOMMUNITY
New York, United States
Joined: December 15, 2006
KitMaker: 365 posts
AeroScale: 344 posts
Posted: Wednesday, November 07, 2007 - 03:59 PM UTC
Andrew,
Really looking good, excellent work.
Dwayne
CMOT70
_VISITCOMMUNITY
Victoria, Australia
Joined: August 23, 2007
KitMaker: 629 posts
AeroScale: 539 posts
Posted: Monday, November 12, 2007 - 06:11 PM UTC
It's finished!! Well actually after looking at the pics i realise i forgot something (i usaully forget something that i don't notice until taking pics), but it's easy to add, i'll see how many notice my deliberate mistake...

This has been a great learning exercise. These are not the easiest kits to put together for sure, but no where near as hard as i was expecting either. If you can build and enjoy WW1 single seat aircraft, then there is nothing really harder with these bombers. There's just more of everything- both the good and bad bits.
I can also confirm what Phil said about the undercarriage, it is remarkably strong- as is the entire aircraft once all rigged up.

Someday i'll get the courage to do the G.Vb with all over lozenge and add an etch set, but not for at least 12 months. In the meantime i have one of those Roden Felixstowe flying boats lying around somewhere...

I took one pic for scale effect, with some old Fokkers that i did a while back.


Andrew
Maxidad
_VISITCOMMUNITY
England - South East, United Kingdom
Joined: August 18, 2006
KitMaker: 11 posts
AeroScale: 9 posts
Posted: Tuesday, November 13, 2007 - 02:50 AM UTC
Congratulations on your build. It's a lovely piece of work and I have enjoyed following your progress over the last few weeks. I have never attempted a WW1 plane yet, but I have a Revell Sopwith Camel in the stash which I might promote to my next project, thanks to your inspirational work.
 _GOTOTOP