_GOTOBOTTOM
Early Aviation
Discuss World War I and the early years of aviation thru 1934.
Wooden Propellers 101
JackFlash
_VISITCOMMUNITY
Colorado, United States
Joined: January 25, 2004
KitMaker: 11,669 posts
AeroScale: 11,011 posts
Posted: Saturday, October 06, 2007 - 08:52 AM UTC
Previously named "One good turn deserves . . .Another".

Though I have several going at one time here is another to sink your fangs into. This tutorial will be about doing wood laminate propellers. To start with here are the original diagrams that were my beginnings. Done by the great Bob Horton, who taught me how to do these. First familiarize yourself with these then we'll talk.
JackFlash
_VISITCOMMUNITY
Colorado, United States
Joined: January 25, 2004
KitMaker: 11,669 posts
AeroScale: 11,011 posts
Posted: Saturday, October 06, 2007 - 02:57 PM UTC
As I have mentioned before, some manufacturers did not clear varnish propellers but shellaced them. To do laminations on propellers you can either laminate woods with expoy or enamel paint kit items. I could post either method but painting is a bit quicker for most modelers to do. You almost have to have a separate setup to use woods.

A. For woods;

1. A box of rubber / latex gloves.

2. various thin woods from dollhouse marqueting sheets for floor planking and etc. The thickness is important here.

a. bass wood

b.mahogany woods

c. walnut

3.Clear varnish, semi gloss is best for small scale.

4. Homemade wire supports to hang them on while drying.

5. Beau coup Xacto blades (#11 are best.)

6. The lanimations should be an average of three of two kinds. 3 bass 3 walnut etc.

JackFlash
_VISITCOMMUNITY
Colorado, United States
Joined: January 25, 2004
KitMaker: 11,669 posts
AeroScale: 11,011 posts
Posted: Saturday, October 06, 2007 - 02:59 PM UTC
Here are some modern replica wooden props on full scale flying WWI types. These may give you an idea where we will go.


JackFlash
_VISITCOMMUNITY
Colorado, United States
Joined: January 25, 2004
KitMaker: 11,669 posts
AeroScale: 11,011 posts
Posted: Saturday, October 06, 2007 - 03:00 PM UTC
Here is my 1/48 build of MvR's Dr.I 425/17 with a three wood laminations variation instead of just the two.


JackFlash
_VISITCOMMUNITY
Colorado, United States
Joined: January 25, 2004
KitMaker: 11,669 posts
AeroScale: 11,011 posts
Posted: Saturday, October 06, 2007 - 03:01 PM UTC
Here is my 1/28 scale build of Oblt. Udet's early Schwerin Fokker D.VII labeled "Du doch Nicht!!" which means "certainly Not You!!" The prop is a wooden one that Martin Digmayer carved out from one piece of wood and he used varnish applied in layers to create the laminated look.


JackFlash
_VISITCOMMUNITY
Colorado, United States
Joined: January 25, 2004
KitMaker: 11,669 posts
AeroScale: 11,011 posts
Posted: Saturday, October 06, 2007 - 03:02 PM UTC
Here is a laminated prop with walnut and bass wood on a 1/48 build of an Albatros D.Va.


JackFlash
_VISITCOMMUNITY
Colorado, United States
Joined: January 25, 2004
KitMaker: 11,669 posts
AeroScale: 11,011 posts
Posted: Saturday, October 06, 2007 - 03:05 PM UTC
Here for MerlinV is a four bladed prop with three woods in the laminations on my 1/48 Fokker V.7. I made two identical layered blanks (see step 4 above) and cut them down on the same pattern. Then I Lincoln log cut the hubs to fit. Viola.


JackFlash
_VISITCOMMUNITY
Colorado, United States
Joined: January 25, 2004
KitMaker: 11,669 posts
AeroScale: 11,011 posts
Posted: Saturday, October 06, 2007 - 03:08 PM UTC
The dollhouse woods I mentioned earlier often come with a gummed backing that needs to be scraped off. Soaking with solvent and scraping is the best way to remove it.


JackFlash
_VISITCOMMUNITY
Colorado, United States
Joined: January 25, 2004
KitMaker: 11,669 posts
AeroScale: 11,011 posts
Posted: Saturday, October 06, 2007 - 03:10 PM UTC


Greetings all

The diorama "Home from the Front" is one of my older 1/48 builds. Done before the Eduard Albatros D.III was released it incorporates resin copies of the Eduard Alb. D. Va wings and the Glencoe fuselage. The wood veneer is the marqueting wood I spoke of earlier. The prop is laminated wood as well. The pilot is an OOP item from Van's Scale Modeles. The mechanic is a modified CMK item.


The build depicts a late built Albatros D.III that has a replacement lower wing. The red brown had been deleted from use by the time this machine was assembled on the factory floor at Johannistahl. It was one of the few D. III types still with Jasta 5 during the late winter of 1917-1918. It is believed to have been used by a Ltn. Stroebel and is shown here having returned from an uneventful but cold patrol on 24 Dec. 1917.

JackFlash
_VISITCOMMUNITY
Colorado, United States
Joined: January 25, 2004
KitMaker: 11,669 posts
AeroScale: 11,011 posts
Posted: Saturday, October 06, 2007 - 03:11 PM UTC

The Albatros D.V 1119/17 has a painted kit propeller and represents the machine assigned to Oblt. E. von Althaus Commander Of Jasta 10 during July 1917. When MvR returned from his head wound treatments reports came to him that caused him to transfer von Althaus out of JG.I. The insignia is from the international Morse code and displays the letters "HA". This goes back to the days when he was refered to as "Hussar Althaus". Cavalry in the field began Morse code tranmissions with such identifyers.


This is Alb. D.V 4594/17 as flown in Oct 1917 by Ltn. Paul Straehle of Jasta 18. He took this machine with him to Jasta 57 when he was named commander.
JackFlash
_VISITCOMMUNITY
Colorado, United States
Joined: January 25, 2004
KitMaker: 11,669 posts
AeroScale: 11,011 posts
Posted: Saturday, October 06, 2007 - 03:12 PM UTC
Here is a recent painted kit propeller from the new Roden 1/32 scale Pfalz D.III kit review. I have done here at Aeroscale.


JackFlash
_VISITCOMMUNITY
Colorado, United States
Joined: January 25, 2004
KitMaker: 11,669 posts
AeroScale: 11,011 posts
Posted: Saturday, October 06, 2007 - 04:12 PM UTC
Now finally here is the most recent effort. This kit prop was painted to represent the laminations. (Done for the VVS air campaign.)


MerlinV
_VISITCOMMUNITY
Victoria, Australia
Joined: November 26, 2006
KitMaker: 608 posts
AeroScale: 602 posts
Posted: Saturday, October 06, 2007 - 09:17 PM UTC
Aaah, that would be a Pune, or Play on Words...

Stephen, you have obviously spent many hours perfecting this technique!
I have to say your examples whether laminated or painted are exemplerary!.

Thanks heaps for posting this tute.

Cheers,

Hugh
CaptainA
_VISITCOMMUNITY
Indiana, United States
Joined: May 14, 2007
KitMaker: 3,117 posts
AeroScale: 2,270 posts
Posted: Sunday, October 07, 2007 - 07:32 AM UTC

Quoted Text

The Albatros D.V 1119/17 has a painted kit propeller and represents the machine assigned to Oblt. E. von Althaus Commander Of Jasta 10 during July 1917. When MvR returned from his head wound treatments reports came to him that caused him to transfer von Althaus out of JG.I. The insignia is from the international Morse code and displays the letters "HA". This goes back to the days when he was refered to as "Hussar Althaus". Cavalry in the field began Morse code tranmissions with such identifyers.


What were those reports? Was it a personality clash, or reports if von Althaus losing his eyesight?
JackFlash
_VISITCOMMUNITY
Colorado, United States
Joined: January 25, 2004
KitMaker: 11,669 posts
AeroScale: 11,011 posts
Posted: Sunday, October 07, 2007 - 01:22 PM UTC
There was supposedly some blackmarket activity. MvR had to treat him with kid gloves because not only was he nobility but he was a holder of the Blue Max as MvR was. There is more to the story but its not for publication here.
JackFlash
_VISITCOMMUNITY
Colorado, United States
Joined: January 25, 2004
KitMaker: 11,669 posts
AeroScale: 11,011 posts
Posted: Wednesday, October 17, 2007 - 07:10 PM UTC
Is anyone interested in the secret of painting the look of simulated wood laminated propellers?
Dwaynewilly
_VISITCOMMUNITY
New York, United States
Joined: December 15, 2006
KitMaker: 365 posts
AeroScale: 344 posts
Posted: Wednesday, October 17, 2007 - 09:20 PM UTC
Stephen,
Please, by all means, do continue. Since my time and space prevent me from starting even a modest wood shop, painting these laminations is my only real option.
Dwayne
slodder
_VISITCOMMUNITY
North Carolina, United States
Joined: February 22, 2002
KitMaker: 11,718 posts
AeroScale: 305 posts
Posted: Wednesday, October 17, 2007 - 10:34 PM UTC
That should be a full feature like the Digital Diamonds
MerlinV
_VISITCOMMUNITY
Victoria, Australia
Joined: November 26, 2006
KitMaker: 608 posts
AeroScale: 602 posts
Posted: Wednesday, October 17, 2007 - 11:09 PM UTC
Damn! Yes please.

Cheers,

Hugh
Murdo
_VISITCOMMUNITY
Scotland, United Kingdom
Joined: May 25, 2005
KitMaker: 2,218 posts
AeroScale: 211 posts
Posted: Thursday, October 18, 2007 - 07:37 AM UTC
These really look superb. Absolute class!
JackFlash
_VISITCOMMUNITY
Colorado, United States
Joined: January 25, 2004
KitMaker: 11,669 posts
AeroScale: 11,011 posts
Posted: Thursday, October 18, 2007 - 08:06 AM UTC
Ok first a bit of text.

1. white sheet of paper or 3X5" card one or the other it won't matter.

2. draw a line veritcally (north to south).

3. Lay your prop down, center it on the line with blades at horizontal. (East to west).

4. Mark on the paper the end points of each lamination.

5. in #2 pencil mark on the edge blade / paddle the same as #4.

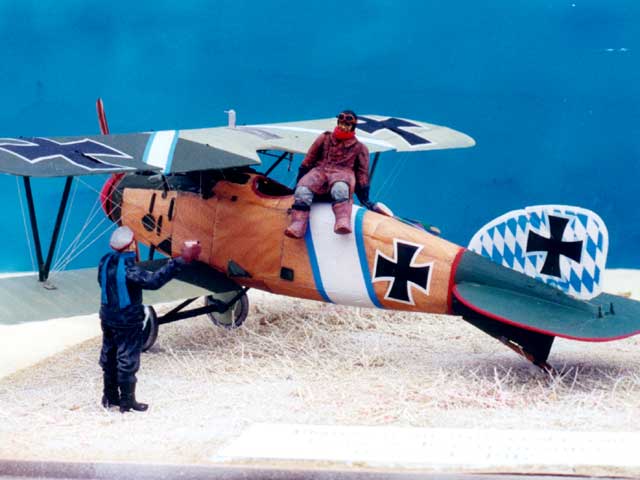
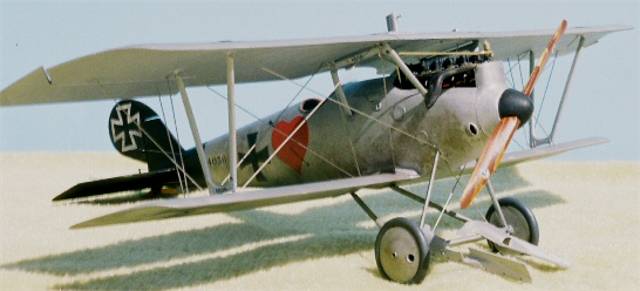
6. Your propeller should be a base colour of varnished wood.


7. On the front face of the paddle apply your darker lamination colour like a narrow Nike swoosh icon.


8. From the paddle edge the lamination narrows down to the prop hub in a narrow stripe.

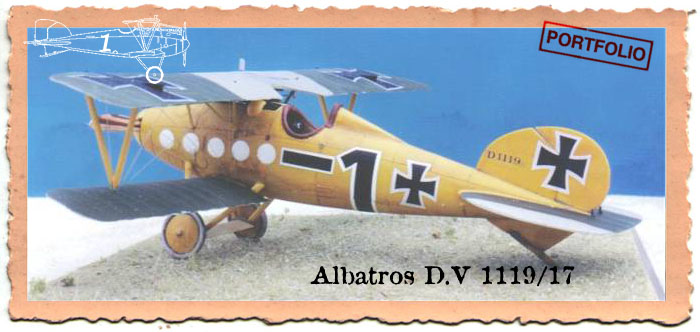
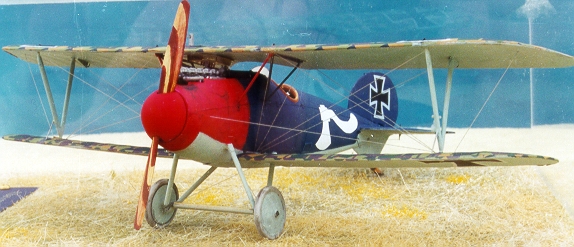
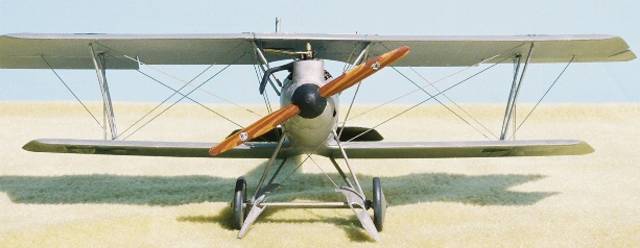
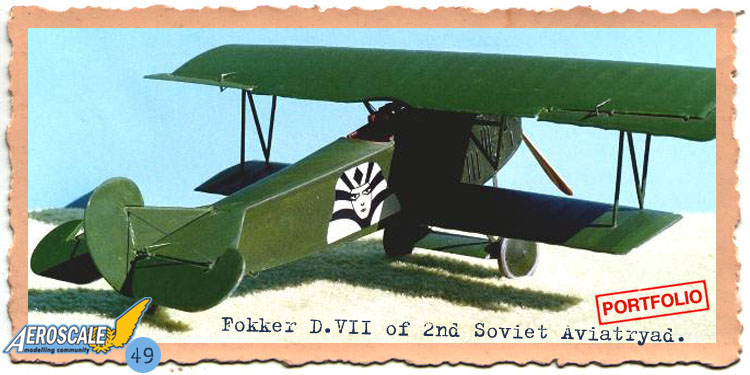
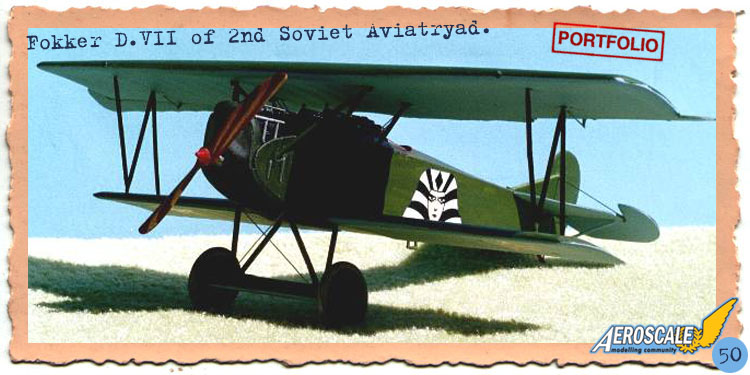
9. Photo references that I have posted earlier should be reviewed.

10. After dry use clean thinner in a brush to straighten the dark lamination edges. This also adds wood grain to the base colour.

11. Once done rotate the other blade / paddle to the same loction and duplicate 4-10.

12. Once dry flip over to the back paddle faces and use the dark lamination edge on the paddle to bring more dark paint down to the propeller hub.

13. After dry use clean thinner in a brush to straighten the dark lamination edges. This also adds wood grain to the base colour.

14. Rotate to the other paddle / blade rear face and repeat.
JackFlash
_VISITCOMMUNITY
Colorado, United States
Joined: January 25, 2004
KitMaker: 11,669 posts
AeroScale: 11,011 posts
Posted: Tuesday, December 04, 2007 - 09:14 PM UTC
Greetings all; Here are two half completed propellers from the Roden Bristol F.2b kit. Note the laminations are opposite in locations. Note the colour at the hub and then how they go out to the tips.
JackFlash
_VISITCOMMUNITY
Colorado, United States
Joined: January 25, 2004
KitMaker: 11,669 posts
AeroScale: 11,011 posts
Posted: Wednesday, December 05, 2007 - 08:48 AM UTC
NOTE! the curve of the laminations ALWAYS are on the front leading edge of the propeller.
JackFlash
_VISITCOMMUNITY
Colorado, United States
Joined: January 25, 2004
KitMaker: 11,669 posts
AeroScale: 11,011 posts
Posted: Sunday, December 30, 2007 - 07:17 PM UTC
Any questions?
JimMrr
_VISITCOMMUNITY
Ontario, Canada
Joined: January 03, 2007
KitMaker: 1,505 posts
AeroScale: 595 posts
Posted: Sunday, January 06, 2008 - 06:21 AM UTC
A very simple and useful tecnique..thank you for sharing. I have just used this on the prop for my albatros Im working on and it looks good.TY
 _GOTOTOP