_GOTOBOTTOM
Pre-Flight Check
Constructive critique of your finished or in-progress photos.
Hawker Hurricane mk.I (1:72)
lampie
#029
_VISITCOMMUNITY
England - East Midlands, United Kingdom
Joined: December 23, 2005
KitMaker: 6,249 posts
AeroScale: 3,270 posts
Posted: Thursday, November 08, 2007 - 08:39 AM UTC
Hi Eetu
Very nice job.
Hurricanes look really nice in Finnish markings I think. The one I built for FUMS is my favourite of the Hurricanes in my display cabinet.
Ive enjoyed watching this one come together.
Nige
Emeritus
_VISITCOMMUNITY
Uusimaa, Finland
Joined: March 30, 2004
KitMaker: 2,845 posts
AeroScale: 1,564 posts
Posted: Saturday, November 10, 2007 - 01:51 AM UTC
Thanks.
I agree on the good looks of Finnish Hurricanes, in fact I think that there aren't many planes that don't look good in FAF markings.
It's strange how you get used to seeing some types in certain colors. Take brewsters for example, I feel they look almost downright weird in any other than FAF warpaint. (well, not so much for US. camo, but the others look odd)
csch
_VISITCOMMUNITY
Buenos Aires, Argentina
Joined: December 27, 2002
KitMaker: 1,941 posts
AeroScale: 1,040 posts
Posted: Monday, November 12, 2007 - 03:15 AM UTC
Absolutely great job. All the buid and paint job are very good, a profesional work.
Congratulations.

SGTJKJ
#041
_VISITCOMMUNITY
Kobenhavn, Denmark
Joined: July 20, 2006
KitMaker: 10,069 posts
AeroScale: 3,788 posts
Posted: Monday, November 12, 2007 - 10:50 PM UTC
Great job, Eetu. Another winner from you. It has been interesting to follow your blog.

Thanks for sharing
propwash
_VISITCOMMUNITY
Charente, France
Joined: July 06, 2007
KitMaker: 289 posts
AeroScale: 231 posts
Posted: Sunday, January 13, 2008 - 12:36 PM UTC
A very nice model and great paint work. As I'm new, I have a question:

How did you get the panel lines to stand out like that on the underside? Maybe you've already explained and I've missed it..

Cheers
Emeritus
_VISITCOMMUNITY
Uusimaa, Finland
Joined: March 30, 2004
KitMaker: 2,845 posts
AeroScale: 1,564 posts
Posted: Sunday, January 13, 2008 - 08:03 PM UTC
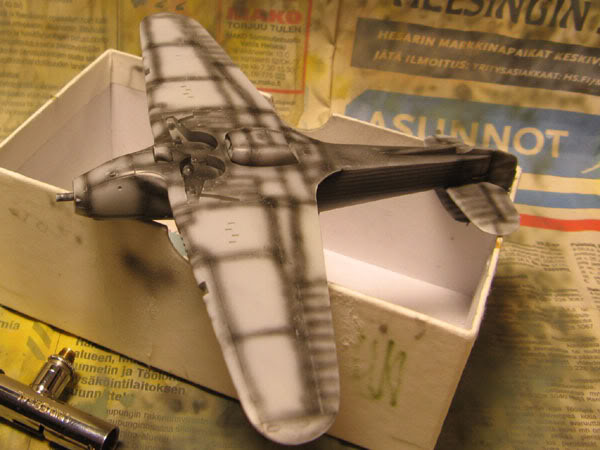
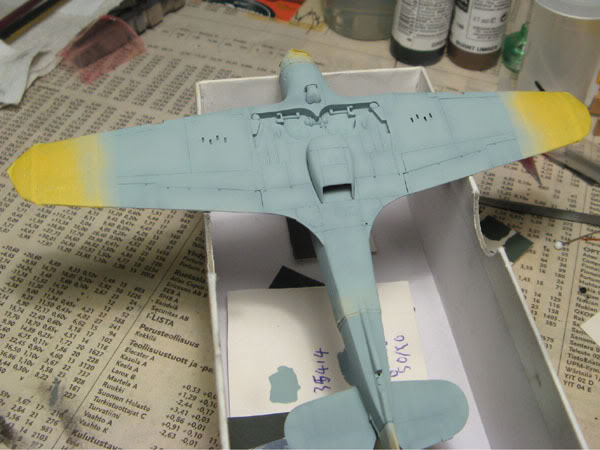
The panel lines on the underside are a result from two techniques, the preshading applied prior to painting the light blue, and an application of pastel dust.
Step by step.
1. Preshade over primer:

2. Light blue (and yellow of course, which is masked at this stage)

3. Pastel dust applied with a brush.
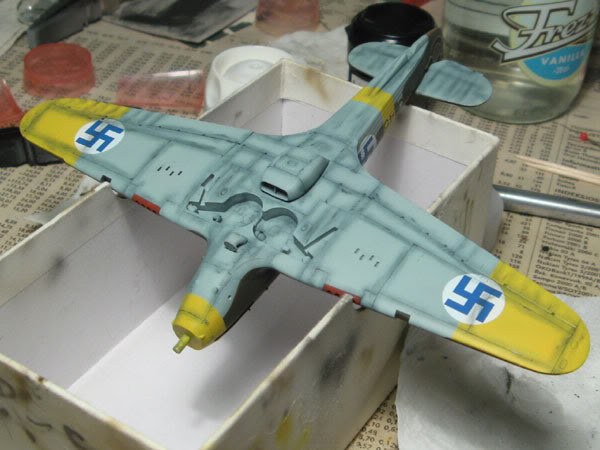

4. And finally, the excess pastel dust is worked around and removed with moistened q-tips.
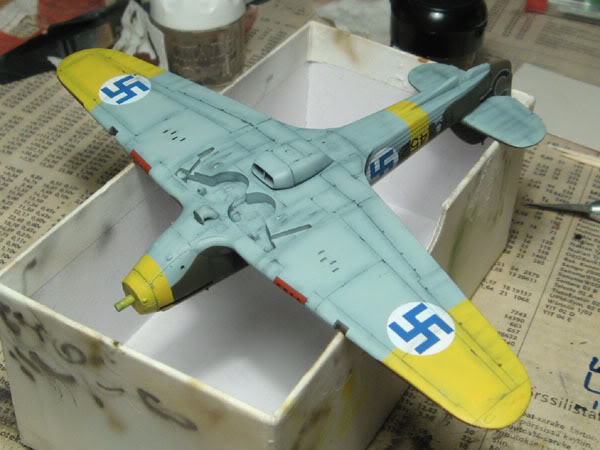
As you might notice, the same was also done on the uppersides, but due to the darker colors and the unexpected need for heavier coats, the preshade effect was all but lost, leaving the most of the panel line accenting to the pastel treatment.

In the end, this is like applying a wash, but I prefer this method because it's much more forgiving, the pastel dust doesn't dry like paint washes, it can be applied dry (for exhaust & gun opening stains), or brushed on and worked with water. On the latter, you can go from just removing excess dust to using more water, making it more like a wash.
This is best applied to a flat(tish) finish, pastels don't stick to gloss surfaces. Also, apply the final flat (or whataver you like) coat carefully, preferably misting on several coats, to keep the pastels intact.
propwash
_VISITCOMMUNITY
Charente, France
Joined: July 06, 2007
KitMaker: 289 posts
AeroScale: 231 posts
Posted: Sunday, January 13, 2008 - 11:22 PM UTC
Hey, thanks for these tips. They sound beyond my skill level at the moment, but I'll keep the knowledge for future builds.
 _GOTOTOP