_GOTOBOTTOM
World War II: USA
Aircraft of the United States in WWII.
Hosted by Rowan Baylis
P-47 Razorback WIP
glamdring
Joined: May 21, 2007
KitMaker: 77 posts
AeroScale: 76 posts
Posted: Saturday, October 20, 2007 - 02:03 PM UTC
Hello All,

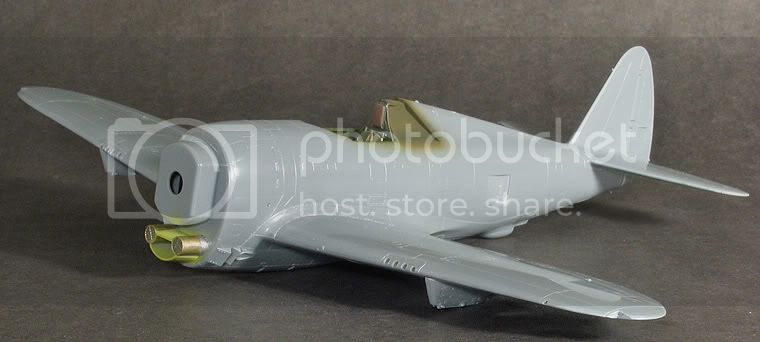
The P-47 Sig has inspired me to pull out Tamiya's 1/48 P-47 Razorback that I started maybe a year or two ago and lost steam on. Anyway, I figured a WIP thread might help keep me motivated and allow me to post questions from what I have done so far and questions for what is upcoming. I have a good start, but will post in steps because I am an incredibly slow builder so doing that might help me keep ahead of the thread.

First up the cockpit.

It was painted flat black followed by a downward angled spray of green. This allows some areas to remain black or a little darker to appear shadowy. This is a technique I read about online and am still working to master, but I like the idea and will continue to try it. After the green, random streaks were painted with a very diluted tan to break up the monotone look.

Then various details (consoles, etc) where painted with Tamiya acrylics. Chipping and highlighting of most of the switches on the consoles were done using a prismacolor silver colored pencil.

Various parts of the eduard 'zoom' colored pe set and placards set where added. One of the really nice parts of the colored PE set is the instrument panel; it has a lot of nice details. One question I have here is: How do you bend the pre-painted seatbelts without the pre-paint chipping off. It isn't terribly noticeable at first glance, but definitely not what I would really like it to be.

The cockpit didn't photograph as well as I would have liked, but it looks pretty good in person. Anyway, some pictures:


Hope all is well with everyone.
Allen
f1matt
_VISITCOMMUNITY
Manitoba, Canada
Joined: August 13, 2006
KitMaker: 1,021 posts
AeroScale: 184 posts
Posted: Saturday, October 20, 2007 - 06:10 PM UTC
Can't say I ever had a problem with the seat harness myself. Your right about that instrument panel. Looks great. Along with the rest of the cockpit. And I actually prefer the lines of the razorback to the bubbletop.

So will it be a natural metal finish or OD?
Repainted
_VISITCOMMUNITY
Östergötland, Sweden
Joined: April 04, 2006
KitMaker: 1,058 posts
AeroScale: 1,004 posts
Posted: Saturday, October 20, 2007 - 07:05 PM UTC
neat office. Thoose prepainted seatbelts yes I don´t like them at all. so often I´ll just have to repaint them all over.prepaint Where di the real model building go? Whats next preglued kits?

Larsa
Emeritus
_VISITCOMMUNITY
Uusimaa, Finland
Joined: March 30, 2004
KitMaker: 2,845 posts
AeroScale: 1,564 posts
Posted: Saturday, October 20, 2007 - 08:47 PM UTC
This is the kit-supplied cockpit, with Zoom PE added? Looks very nice so far. It maybe the photos, as you pointed out, but those streaks look like rust to me, something I'd doubt to have appeared in planes while being in servive.

Eduard apparenty doesn't prime the pre-painted parts, resulting in quite a fragile finish.
While dealing with such PE, I usually give all the painted parts a coat of clear flat to protect the finish. That, and being carefully handling them is usually enough to keep them intact for me. Since starting to do that, even seatbelts have behaved.
glamdring
Joined: May 21, 2007
KitMaker: 77 posts
AeroScale: 76 posts
Posted: Sunday, October 21, 2007 - 03:51 AM UTC
Thanks for the comments guys. I really appreciate it. Maybe if I try the pre-painted belts again, I'll give the flat coat first idea a go. For the most part it held up but on the major bends (lap belt going over seat side) they chipped. Sad because the painting detail is really nice and something I could never achieve by hand. Maybe the decal belts on foil would be a better way to go??

Matthew, I actually prefer the razorback too and will be doing this one in OD with more George Rarey Nose Art (A previous build with his nose are in the SIG thread) I'm not sure which I will do, but I really love the cartoony look of the nose art he did.

Thanks again for your comment and suggestions.
Allen

CaptainA
_VISITCOMMUNITY
Indiana, United States
Joined: May 14, 2007
KitMaker: 3,117 posts
AeroScale: 2,270 posts
Posted: Sunday, October 21, 2007 - 11:43 AM UTC
It does look good. Using prepainted PE is a trade off... You do away with the aggravation of trying to paint small details, but gain the aggravation of working with PE.
lampie
#029
_VISITCOMMUNITY
England - East Midlands, United Kingdom
Joined: December 23, 2005
KitMaker: 6,249 posts
AeroScale: 3,270 posts
Posted: Monday, October 22, 2007 - 01:25 AM UTC
It about time you got this one done!!
George Rarey nose art too,,I cant wait
What decal sheet are you using?
Nige
glamdring
Joined: May 21, 2007
KitMaker: 77 posts
AeroScale: 76 posts
Posted: Tuesday, October 23, 2007 - 03:32 PM UTC

Quoted Text


What decal sheet are you using?
Nige


Nige,
I am using a decal sheet that was part of the IPMS US national convention sometime in the 90s (don't remember off the top of my head). That was of course long before I got into modeling, but I have found a few for sell at various modeling meetings / contests. It has some pretty nice Rarey nose art.
Allen
glamdring
Joined: May 21, 2007
KitMaker: 77 posts
AeroScale: 76 posts
Posted: Sunday, October 28, 2007 - 12:03 PM UTC
Second step of progress: The engine...

The engine looks really nice out of the box, but I decided to wire it up. To do this, I drilled the necessary holes into the ring and glued a length of wire with a small amount of insulation left on into each of the holes. I then sprayed on some primer to give the following paint something to 'bite' in to. After that the wires were painted, and I used a little bit of bare metal foil to replicate the wire ties. The actual engine cylinders were painted with Testors silver followed by a wash of PollyScale Grimy Black. After taking pictures and thinking the cylinders were too silver, I went back again with a darker black and tried to dirty them up some more.

Pictures:

Wiring set up:


Finished engine:


Any comments / criticisms welcome.
Allen
wingman
_VISITCOMMUNITY
Pennsylvania, United States
Joined: December 09, 2003
KitMaker: 880 posts
AeroScale: 654 posts
Posted: Sunday, October 28, 2007 - 12:09 PM UTC
Nice build Glamdring. The engine is OUTSTANDING, I really like the contrast between the natural metal and the painted parts. The weathering is just right. Great job, Wingman out.
glamdring
Joined: May 21, 2007
KitMaker: 77 posts
AeroScale: 76 posts
Posted: Tuesday, October 30, 2007 - 12:50 AM UTC
Thanks Wingman. I appreciate your comment.
Allen
glamdring
Joined: May 21, 2007
KitMaker: 77 posts
AeroScale: 76 posts
Posted: Tuesday, October 30, 2007 - 12:54 AM UTC
Next update. I'm almost caught up with where I actually am on the build (closed off the fuselage, working on seams). Anyway...

The opening on the side of the fuselage opens into nothing. For awhile there was a scalequest resin set available that addressed that problem, but it is now out of production. I wanted to do something, so I found a picture of the scalequest set on line and did my best attempt at making my own piece. It will be barely noticeable in the final plane, but if anyone does happen to look in the opening they will at least not see the giant void...


Hope all is well.
Allen
lampie
#029
_VISITCOMMUNITY
England - East Midlands, United Kingdom
Joined: December 23, 2005
KitMaker: 6,249 posts
AeroScale: 3,270 posts
Posted: Tuesday, October 30, 2007 - 01:51 AM UTC
Stunning work Allen,,especially that engine!
Puts my efforts to shame.
Looking forward to seeing the very latest photos!!
Nige
CaptainA
_VISITCOMMUNITY
Indiana, United States
Joined: May 14, 2007
KitMaker: 3,117 posts
AeroScale: 2,270 posts
Posted: Tuesday, October 30, 2007 - 09:08 AM UTC
You are doing a fine job. Keep the pictures coming.
glamdring
Joined: May 21, 2007
KitMaker: 77 posts
AeroScale: 76 posts
Posted: Wednesday, October 31, 2007 - 01:05 PM UTC
Thanks guys. I am really glad that the SIG inspired me to pull this out; it has helped spark an enjoyment I haven't had for awhile. This Tamiya kit is really great. I hope to set up the camera area soon and be able to take more photos.
Allen
glamdring
Joined: May 21, 2007
KitMaker: 77 posts
AeroScale: 76 posts
Posted: Saturday, November 10, 2007 - 02:27 PM UTC
Well, I'm slowly progressing. The fuselage is closed up. Most major parts (except gears) are off the sprues and cleaned up. The wings will hopefully be joined soon and maybe a primer coat to find trouble spots within the week (I hope).

Here is a picture of the wheel wells. They were painted with Tamiya acrylics and then chipped with prismacolor silver pencils. Tubing is very small wire from Radio Shack (the same used on the engine) some with insulation left on and some with it stripped off. It was primed before painting so that the tamiya paint would stick a little better. Everything was given the pollyscale grimy black wash and followed up with a flat coat.


Hope all is well.
Allen
TedMamere
_VISITCOMMUNITY
Moselle, France
Joined: May 15, 2005
KitMaker: 5,653 posts
AeroScale: 4,347 posts
Posted: Sunday, November 11, 2007 - 01:06 AM UTC
Hi Allen!

Looks very nice and I like the additional details. I see you've painted the wheel bays in green rather than yellow green, was it like that on your plane?

I'm also interested in the cable you use. "Wire from Radio Shack", what it is exactely? It seems indeed to be the perfect size for engine wires.

Anyway, it looks very good so far and I can't wait to see more...

Jean-Luc
glamdring
Joined: May 21, 2007
KitMaker: 77 posts
AeroScale: 76 posts
Posted: Monday, November 12, 2007 - 04:49 PM UTC
Jean-Luc,

I am pretty sure the wire is 30-gauge wrapping wire. Seen at this Link
It is really good stuff and I have been using it for wheel wells and engine detailing. Here's a corsair engine done using it:


As for the color. I don't know. I did use tamiya yellow-green. I can see though that the weathering makes it definitely look darker than in the bottle. I'm not very good with colors (color blind) so I can't say if the actual color is ok and the picture just makes it look more green or if it mostly green on the real thing. Oh well - it's probably green - that's the way my luck would have it go...

Thanks for your comment / question.
Allen
gcn123
Joined: September 13, 2007
KitMaker: 69 posts
AeroScale: 60 posts
Posted: Thursday, January 03, 2008 - 09:24 PM UTC
It's a shame this one seems to have dried up as it was turning out to be something special.

The engine detail was looking especially impressive
lampie
#029
_VISITCOMMUNITY
England - East Midlands, United Kingdom
Joined: December 23, 2005
KitMaker: 6,249 posts
AeroScale: 3,270 posts
Posted: Friday, January 04, 2008 - 12:55 AM UTC
It'll be back.
Allen isnt exactly know for his speed builds!
Its touch and go as to which one of us finishes his razorback first,,lol
Nige
glamdring
Joined: May 21, 2007
KitMaker: 77 posts
AeroScale: 76 posts
Posted: Monday, January 14, 2008 - 03:17 PM UTC

Quoted Text

It's a shame this one seems to have dried up as it was turning out to be something special.

The engine detail was looking especially impressive


Thanks Gary, That is really nice of you to say.

And thanks Nige for the encouragement.

It is coming along VERY SLOWLY but is coming along. I do all my painting out in the garage and right now it is just too cold to want to go out there and work for any length of time, so I am trying to focus on little things I can do in the house which has slowed my already very slow pace down even more.

Anyway, right now I have it pretty much together just waiting for some warmth so I can go put on some primer and see many places I need to fix. Picture...


I added some wiring and eduard pe to the gear legs. I really love the decals tamiya includes for the legs; they give a nice bit of something extra. Also the eduard pe scissors (I think they are called??) are quite nice. Picture... (The White Balance is off - they are silver)


Finally for the gun sight I replaced the 'glass' with clear plastic and drilled out the center. I wasn't sure how to replace that with something that looked clear so I just put in some future. I don't know if it is any good, but at least I know I tried something. Picture...


That's pretty much it right now. I decided that I am going to try to use the standing pilot figure from the Tamiya P-51 kid and put my T-Bolt on a base with the figure, so I will probably try to clean him up and maybe even be able to paint him by hand inside while I wait for nicer weather.

Hope all is well.
Allen
lampie
#029
_VISITCOMMUNITY
England - East Midlands, United Kingdom
Joined: December 23, 2005
KitMaker: 6,249 posts
AeroScale: 3,270 posts
Posted: Monday, January 14, 2008 - 06:56 PM UTC
Inspiring work as always Allen.
Keep at it!
Im watching
Nige
gcn123
Joined: September 13, 2007
KitMaker: 69 posts
AeroScale: 60 posts
Posted: Tuesday, January 15, 2008 - 03:02 AM UTC
Nice to see the updates, as impressive as whats gone before.

While you're twiddling your thumbs waiting for Summer perhaps you could explain how you did the engine.

I tried to copy your photos but made a right fist of it ruining half my engine which Wingman is coming to my rescue on.

I have the wires and the wire cutter but no amount of CA and accelerator could keep the buggers in place.
glamdring
Joined: May 21, 2007
KitMaker: 77 posts
AeroScale: 76 posts
Posted: Tuesday, January 15, 2008 - 03:47 PM UTC

Quoted Text

Nice to see the updates, as impressive as whats gone before.

While you're twiddling your thumbs waiting for Summer perhaps you could explain how you did the engine.

I tried to copy your photos but made a right fist of it ruining half my engine which Wingman is coming to my rescue on.

I have the wires and the wire cutter but no amount of CA and accelerator could keep the buggers in place.


Thanks Nige and Gary. I hope to slowly keep at this. It is an enjoyable build.

Gary,
They key to getting the wires to stay put is to drill tiny little holes to put the wires in to. I have a little drill and some small bits that I bought in the local hobby shop. I think the smallest bit might be something like #80, but I'm taking a stab in the dark at that. Anyway, I found that just attacking it with the drill and bit weren't giving me very good results, so before drilling, I use a sewing needle / push pin and make a little starter hole. This followed by the drill bit gave me a nice little hole to put the CAed wire into. Hopefully this is able to help you out. Let me know if there is anything more I can do for you.
Allen
gcn123
Joined: September 13, 2007
KitMaker: 69 posts
AeroScale: 60 posts
Posted: Wednesday, January 16, 2008 - 11:45 PM UTC
Hi Allen

I'm conscious that I want to avoid hijacking this thread but on the engines I found that my smallest drill bit at .5mm was too big so I tried to CA the wires on the flush surface. This was ok until I tried to fix the wires to the cyclinders at which point they all starting to detach themselves.

I have since got hold of a .3 mm drill bit that seems more suitable to the task and I have drilled all the way through the cyclinders so when attaching I can use longer wires to relieve the stress on the fixed part.

I'm hoping this strategy will work better than the few attempts I've had so far. I have the cable and a good set of cable strippers so fingers crossed.
 _GOTOTOP