_GOTOBOTTOM
World War II: Germany
Aircraft of Germany in WWII.
Hosted by Rowan Baylis
"Double Trouble" Bf 109 K-4 build
Rattler
_VISITCOMMUNITY
Texas, United States
Joined: November 23, 2002
KitMaker: 512 posts
AeroScale: 104 posts
Posted: Sunday, February 03, 2008 - 10:51 PM UTC
Overview:
Historical Applications in Aircraft Design exposes the student to concepts that have evolved from design aspects utilized in aircraftdevelopment.
Historically, aircraft designs have followed a comprehensive evolution in the development of aerodynamic efficiency. These designs and improvements for aircraft manufacture and implementation will be explored and analyzed during the course. Lab activities will include the study and construction of scale model from the period of aircraft presented in this course.

Alright so that is where it all began for me last year. A fellow modeler, club member is a teacher out at our local college... this is the 2nd year for his class. *** last year we had 32 students***
Last year the class built Hasegawa’s 23nd scale Messerschmitt Bf 109 G-6... so for this year we will be building the Bf 109 K-4 ‘ Hartmann’ #8173 *** this year we have 25 students***
So lets get into it.
Here are the birds that I am building for this blog/class work
For Class as stated above is the K-4 Hartmann( 8713 ) kit by hasegawa, on a personal level I’m building the original release from hasegawa. The Bf 109 K-4 ( St 20 )... Now I know there are some issues with both kits, but I have never been a rivet counter and never will be. I build pure and simple for the enjoyment of the hobby. Now ofcourse I get a giggle if someone gives a compliment or a pat on the back. It’s great to hear that people like your work.
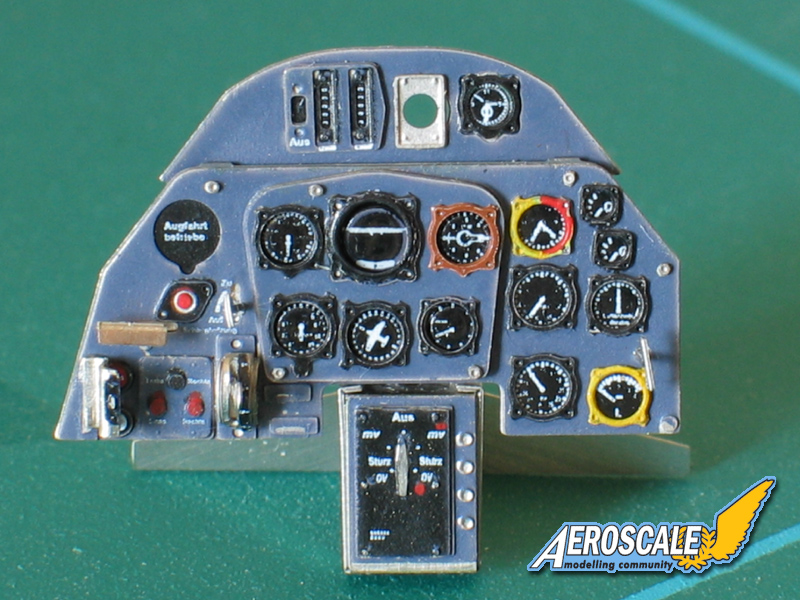
SO ... the class kit will be STOCK from the box, but it is getting a corrected spinner from http://www.eagle-editions.com ) aside from this the decals supplied with the kit will not be used, but replaced with a set of decals from http://www.eaglestrikeproductions.com Too Little ,Too Late Part 1 # 32057. As to which aircraft I will be doing from this sheet, I am not sure yet. Now we come to the other K-4 . Kit # St20, this ole bird I have gone and given a shot at doing some scratch building... now I am by no means an expert or anything of that nature... but I gave it a good crack.. the cockpit is what I focused a couple days on, products from http://www.evergreenscalemodels.com were used. Round and Hex punchs were also used for finer details, can’t forget the plumbing... * lemme tell ya that was nuts.. for me anyways*.. Various photos were used as ref. From manuals for the K-4, as well as other dedicated Luftwaffe web sites.

Ok so lets post some photos.. ( keep in mind that I’m no expert when it comes to scratch building or to the aircraft ) I got as close as I possible could with the ref. Photos I have been using. Enjoy. Cockpit photos to follow.. any comments or advise greatly welcomed
Chris


This is the Class kit as I stated above.

This is the personal kit for myself.

Now the photos of the cockpit I will be showing are for the above aircraft # 2, the personal bird..class cockpit has not been build yet. that happens tonight in class.


Ok so there it is for now.. will post again soon.

Chris
Merlin
Staff MemberSenior Editor
AEROSCALE
#017
_VISITCOMMUNITY
United Kingdom
Joined: June 11, 2003
KitMaker: 17,582 posts
AeroScale: 12,795 posts
Posted: Monday, February 04, 2008 - 10:17 PM UTC
Hi Chris

Very neat! The extra wiring and consoles look great and should really make a huge difference to the standard kit cockpit. I popped the spare instrument panel into the post at lunchtime, so hopefully it should be with you soon. I'm really looking forward to seeing how your build progresses.

All the best

Rowan
Rattler
_VISITCOMMUNITY
Texas, United States
Joined: November 23, 2002
KitMaker: 512 posts
AeroScale: 104 posts
Posted: Tuesday, February 05, 2008 - 06:23 AM UTC
hiya Rowan,

thanks a bunch man.. I really appreciate that alot... I'm still sore that it was not even in the kit.. wonder if I was just lucky.. did the base coat of RLM66 last night and all the pre shading but it didn't come out like I would have liked, but oh well it happens, will post photos later this evening, right now Mac&Cheese is calling..

again my thanks for saving my rump with the panel


Chris
Rattler
_VISITCOMMUNITY
Texas, United States
Joined: November 23, 2002
KitMaker: 512 posts
AeroScale: 104 posts
Posted: Wednesday, February 06, 2008 - 08:26 AM UTC
***Progress Update***


Hi again folks,

Ok so another Monday has passed and progress is moving right along. At class one of the kid’s happened to make a mistake and grinded off the detail on the Left Sidewall of the plane. Being I’m there to help out Jim * the teacher* and his students best as possible, I just pulled the left side of the aircraft out of the St 20 kit box and said “ here I’ll trade you” the look on this guys face was cool… I think he was still in shock at the end of class. But hey that’s why I’m there to help out and help support the hobby and have fun. When I got home I grinded off all the molded on detial. So now begins the attempt to scratch build the left wall in the cockpit.

Oook so we come to the Left side of the cockpit this go around… now the kit detail is pretty fair, though not totally correct for a K series aircraft, least from all the ref. photos I’ve seen thus far.

Well the post man delivered good news today to me. The order I placed with Company I used to buy AfterMarket Stuff came in today…WoooooHoooo... Ok so here is a list of what I got from these fine folks, man talk about fast service. I ordered them on Monday evening; they got here today on Wed. Alright so here is what I ordered, from Quick boost resin mufflers to replace the kits, as well as the MG barrels. Guys, I’m telling you these things are beautiful!! Just like Adler’s Nest barrels as well… On ward we have from Scale Aircraft Conversations 109 Series landing gear out of white metal, nice job done by theses guys... I look forward to seeing and using their stuff. Last but not least Eduard’s fine PE stuff for the St20 kit I will be using ED 33015 which is the 109 K dashboard and I’m also adding the set 32 592 109 K seatbelts.* think I’ll have to order another one just for the class kit, these things look really sharp, I mean more so than the normal 48th scale belts I’m used to messing with from ED. And Last I will be getting the corrected spinners for both kits and 1 oil cooler from Corrected Spinner and Oil Cooler

Ok, so there are the aftermarket items I’ll be using for this build. Photos below… * first part is the reworked cockpit... then all the aftermarket goodies.*

Enjoy!!!

Again any questions comments or anything by all means please speak up, please. I welcome all.

Cheers

Rattler


the red arrows are pointing to the area's where I did alittle hollowing out so the Throttle Contorls would sit in.

A closer look at the After Market Items.


Rattler
_VISITCOMMUNITY
Texas, United States
Joined: November 23, 2002
KitMaker: 512 posts
AeroScale: 104 posts
Posted: Wednesday, February 06, 2008 - 01:32 PM UTC
Ok so here's a quick update on the Left sidewall of the birds..

First up is the class kit, with stock TC
Next up will be the same but alil closer.


So now we come to the personal biuld.. St 20
Oh but before that.. I had a rather big OPPS with the placement of an item so I had to snap it off an reglue in the correct position, not too much damange though * which I'm thankful for*

now on with the newly added part to the left sidewall


an yes the lil ball does move up or down, lol not like it would matter though..

Chris
Merlin
Staff MemberSenior Editor
AEROSCALE
#017
_VISITCOMMUNITY
United Kingdom
Joined: June 11, 2003
KitMaker: 17,582 posts
AeroScale: 12,795 posts
Posted: Wednesday, February 06, 2008 - 03:12 PM UTC
Hi Chris

It's all looking great! I took a look at Eduard's Bf 109K dashboard last year - the detail is eye-popping!


All the best

Rowan
Rattler
_VISITCOMMUNITY
Texas, United States
Joined: November 23, 2002
KitMaker: 512 posts
AeroScale: 104 posts
Posted: Wednesday, February 13, 2008 - 08:59 AM UTC
Hi again folks...

I'm back to update everyone with photos, no real write up this go around. So basicaly the only thing new to add is I'll be scratch building* to the best of my abilities are the pilots interior lights
as you can see I have only got the outter tubes cut, waiting on supplies to hit the LHS* crossing fingers*

ok so here are the cockpit detail painting for the St20 kit that I've been scratch building the interior on.


Ok now I just taped up the halfs together to get an idea of what it would look like so here goes..


On to the insturment panel, NOW originaly St20 was going to get the Eduard bf109 k PE dashboard set, but umm well 2 parts went flying into never never land.. sooo I put on the super eyes and am now crossed eyes after painting this.. base was airbrushed ofcourse..

the yellow/red dial was taken from the Eduard PE
A closer look at her


now we come to the tub,


and last we have the class kit


Alright, that is it for the time being..

I'll see yall next time.

Chris

Again any comments gladly welcomed. B)
chris1
_VISITCOMMUNITY
Auckland, New Zealand
Joined: October 25, 2005
KitMaker: 949 posts
AeroScale: 493 posts
Posted: Wednesday, February 13, 2008 - 11:38 AM UTC
Hi Chris
Absolutely brilliant so far BUT
Please god shoot me now!!!!!!!!!!!!!!!!!!!!!!!!!!!!!!!!!!!!!!!!!!!!!!!!!!!!!!!!!!!
It's just not fair I need to spend more time on my kits

Chris

Rattler
_VISITCOMMUNITY
Texas, United States
Joined: November 23, 2002
KitMaker: 512 posts
AeroScale: 104 posts
Posted: Thursday, March 06, 2008 - 08:22 AM UTC
ok so I know I'm long over due in posting.. been busy. not only with class, but here we go

only 2 this go around.

pre-shading on the class bird


St20 is primed an ready to be pre-shaded at class monday night.
Rattler
_VISITCOMMUNITY
Texas, United States
Joined: November 23, 2002
KitMaker: 512 posts
AeroScale: 104 posts
Posted: Wednesday, March 12, 2008 - 12:31 PM UTC
HI gang, I’m back

Ok so Monday night and yesterday and the day after I’ve been putting paint onto the St 20 kit for school.

Sadly though I did not get any photos of the first coat of paint laid down, which was Dark Green(UA 411) * from Life Color * it turned out to be alil too dark for what I was using as a ref. photo. So later on that same night*Monday, after I got home* I shot a few light coats of the Light Green (UA 410). This turned out much better to my liking.
Ok so on we go with the next step.
Under coat for St20 were done with RLM 76 (UA 509) as the base. With highlights done using RLM 65 (UA 65) Class bird got a straight coat of RLM 65 (UA 503)
Applying camouflage: I’ve always liked the splinter style due to the fact the shapes used were way off in left field and gave the bird more character. So I went with that style. Using the direction from the kit Dr. Jimbo* as some of us lovingly call him* enlarged the color lay out from the directions. I made several copies and twiddled around with different designs until I came up with one I liked, all in all I think I have about 20 different designs now… lol I know over kill huh, but hey wait I can use them for later kits. LOL so it’s all good.

Using the Life Color paints… which take some getting used to, came out nice an smooth and very flat which I love. * I have been using Windex to thin the paints with and it does an amazing job, also shoot at a higher psi then you normally would with enamels or other acrylics (my personal exp.) *** I did some testing with tamiya thinner, 70% alcohol and 91% and distilled water. Windex has proven so far to be the better choice. ***
I have not used the LC thinner yet, that is on the way from Sprue Brothers.

I used RLM 82(UA 511) from the Luftwaffe set #2, Dark Brown (UA 409) from the Figure set # 2.
Ok so I’ll shut up now and let you see what I’ve done so far.

Again any comments, questions

Chris


Well there it is.. Will be starting the class bird tonight...
SGTJKJ
#041
_VISITCOMMUNITY
Kobenhavn, Denmark
Joined: July 20, 2006
KitMaker: 10,069 posts
AeroScale: 3,788 posts
Posted: Thursday, March 13, 2008 - 12:00 AM UTC
Excellent progress, Chris. This will end up with some great "Karls". The cockpit is surely very detailed.
The colour schemes are very attractive. I am looking forward to see you pull those of. Especially because I have the Revell K-4 in my stash, which is basically the same kit with different decals.

Looking forward to see more
Yeti123
_VISITCOMMUNITY
Michigan, United States
Joined: February 11, 2008
KitMaker: 311 posts
AeroScale: 278 posts
Posted: Thursday, March 13, 2008 - 09:30 AM UTC
Thank you for posting. They both look great. Very interesting scheme. I am looking forward to more photos.
mpatman
_VISITCOMMUNITY
New South Wales, Australia
Joined: March 09, 2006
KitMaker: 248 posts
AeroScale: 160 posts
Posted: Sunday, March 16, 2008 - 09:17 AM UTC
Nice job on both birds so far-
Rattler
_VISITCOMMUNITY
Texas, United States
Joined: November 23, 2002
KitMaker: 512 posts
AeroScale: 104 posts
Posted: Friday, March 21, 2008 - 06:50 PM UTC
~plays taps~

just an update... St20 kit has died .... bottle of laquor thinner got spilled on the kit.. from rear of cockpit to tail section was completely eatn by the laquor.... the class bird is still alive, only due to the fact it wasn't on the table...

so now I'm down to 1 bird...

anyways..

Chris
Holdfast
Staff MemberPresident
IPMS-UK KITMAKER BRANCH
#056
_VISITCOMMUNITY
England - South West, United Kingdom
Joined: September 30, 2002
KitMaker: 8,581 posts
AeroScale: 4,913 posts
Posted: Friday, March 21, 2008 - 11:57 PM UTC
Chris, what a bummer, and it was looking great too Thank your lucky stars that both didn't get the bath.

Mal
Rattler
_VISITCOMMUNITY
Texas, United States
Joined: November 23, 2002
KitMaker: 512 posts
AeroScale: 104 posts
Posted: Saturday, March 22, 2008 - 01:19 AM UTC
yeah I damn near cried.... I've tried to clean it up with enamal thinner and oddly enough it's helpd to smooth out alot of the maring, did some sanding as well.. didn't loose too much of the detail.. will snap a photo later today.. before I reapply the tamiya primer coat an then re-shade the panel lines.

keep fingers crossed, but I'm afraid she wont ever look the same though ... the St20 kit was the bird with the green an brown camo pattern with light green siding..

Chris
P.S. I'm still about it all... an then I just laugh at how careless I was..
Yeti123
_VISITCOMMUNITY
Michigan, United States
Joined: February 11, 2008
KitMaker: 311 posts
AeroScale: 278 posts
Posted: Saturday, March 22, 2008 - 02:29 AM UTC
Chris:
Sorry to here about the accident. I hope you can reserect it from the the ashes(or L thinner). I am pulling for you.
Rattler
_VISITCOMMUNITY
Texas, United States
Joined: November 23, 2002
KitMaker: 512 posts
AeroScale: 104 posts
Posted: Saturday, March 22, 2008 - 07:56 PM UTC
Well god was smiling on me this morning… lil sanding and using enamel thinner I was able to save most of the plane… here are some photos of the after clean up.. red an green areas show where the damage was before clean up.. There is still some left over damage but I don’t think it’ll be that noticeable once a primer coat is re-sprayed down.

We’ll see if it makes it thru surgery LOL


Chris

here's some photos...


I'll be shooting a primer coat on it in alil bit.. so wish Me luck as well as doing some touch up work on the wing root.
Chris
Rattler
_VISITCOMMUNITY
Texas, United States
Joined: November 23, 2002
KitMaker: 512 posts
AeroScale: 104 posts
Posted: Monday, March 24, 2008 - 10:22 PM UTC
Hi gang...

well monday night's class was great... St 20 is alive and somewhat well.. sprayd side coat of paint will be doing the brown an green today in about an hour... should have those photos on tonight.. Splinter pattern will be changed up as you can see from the tamiya tape laid down.

enjoy


TankTrap
_VISITCOMMUNITY
Invercargill, New Zealand
Joined: December 08, 2006
KitMaker: 456 posts
AeroScale: 16 posts
Posted: Monday, March 24, 2008 - 10:55 PM UTC
Nice work on the save there man.
Rattler
_VISITCOMMUNITY
Texas, United States
Joined: November 23, 2002
KitMaker: 512 posts
AeroScale: 104 posts
Posted: Wednesday, March 26, 2008 - 10:07 AM UTC
Here she is.

Green camo pattern is done.. only have to add the brown, which will get done tonight.. should have all painting finished tonight *fingers crossed* on the St 20 kit.. still have some work to do on the Hartmann kit though..painting that is.

so here we go with the new look


I think she looks better than the first, but well lol


Chris
chris1
_VISITCOMMUNITY
Auckland, New Zealand
Joined: October 25, 2005
KitMaker: 949 posts
AeroScale: 493 posts
Posted: Wednesday, March 26, 2008 - 07:15 PM UTC
Chris
GOD never smiles....... He remembers the old KLINGON proverb"to expect it when you lest expect it "
PS he was a klingon modeller

Chris
Rattler
_VISITCOMMUNITY
Texas, United States
Joined: November 23, 2002
KitMaker: 512 posts
AeroScale: 104 posts
Posted: Wednesday, March 26, 2008 - 07:57 PM UTC
ok, when it rains it pours....


was hopen to have the Hartmann kit finished tonight paint wise.. umm but well.. now the airbrush is down... freaking nozzle shreaded off in the thread... don't ask...


at any rate orderd replacement parts.. should be here by Fri I hope..

I think I need a keg now.. lol..

Chris
SGTJKJ
#041
_VISITCOMMUNITY
Kobenhavn, Denmark
Joined: July 20, 2006
KitMaker: 10,069 posts
AeroScale: 3,788 posts
Posted: Thursday, March 27, 2008 - 02:32 AM UTC
Nice job on the splinter camouflage for the wings. Good to hear that you managed to save the kit.

Hope you fix the airbrush - looking forward to see more
Rattler
_VISITCOMMUNITY
Texas, United States
Joined: November 23, 2002
KitMaker: 512 posts
AeroScale: 104 posts
Posted: Saturday, April 19, 2008 - 12:49 AM UTC
Well after a long pause, I’m back with update shots of where I am so far.

St20 bird is looking just right as rain, still have to add its wash, flat it an then some more weathering.

Class Bird got its wash today, will get its flat coat tonight and then on to the weathering.

Enjoy

Chris


 _GOTOTOP