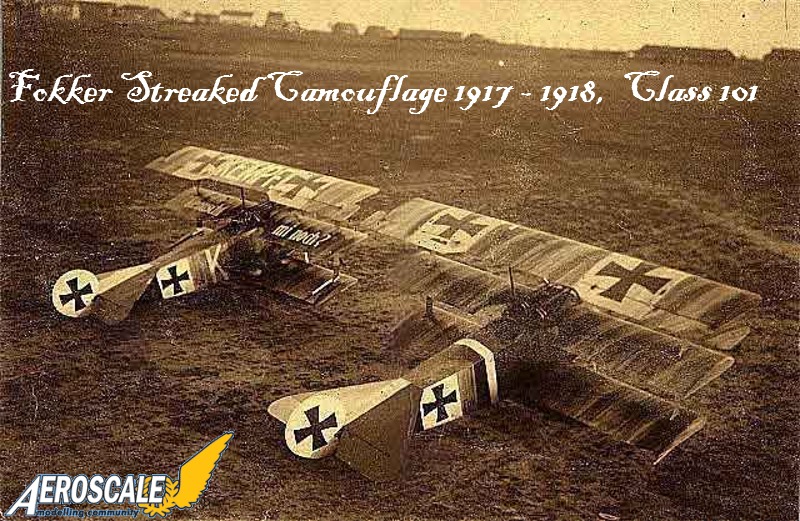
Fok. Streaked Camouflage 101
Colorado, United States
Joined: January 25, 2004
KitMaker: 11,669 posts
AeroScale: 11,011 posts
Posted: Sunday, April 13, 2008 - 06:21 PM UTC
Greetings fellow wingnuts!
Late entry April 11,2009. From a couple of PM messages it looks like there is a need for one. So I will turn this thread into a detailed "how to" on the applications of this camouflage scheme.
In a recent PM I was asked for a bit of help.
Quoted Text
on 2008-04-14 02:22, thegirl wrote:
Good day Stephen , I need your assistance on a few things . I hit another road block on painting . I'm working on a Fokker Dr.I and I'm doing a streaked camo on it . I have a base coat , or had one for my attempt was a real mess . What will be the best way on doing this ? all the paint has been removed for to try another go at this . Originally I had a olive green for my base coat then using olive green and brown I would brush on the one colour following by the other . Didn't work . Your feed back will be great on this . . .Terri
Greetings Terri,
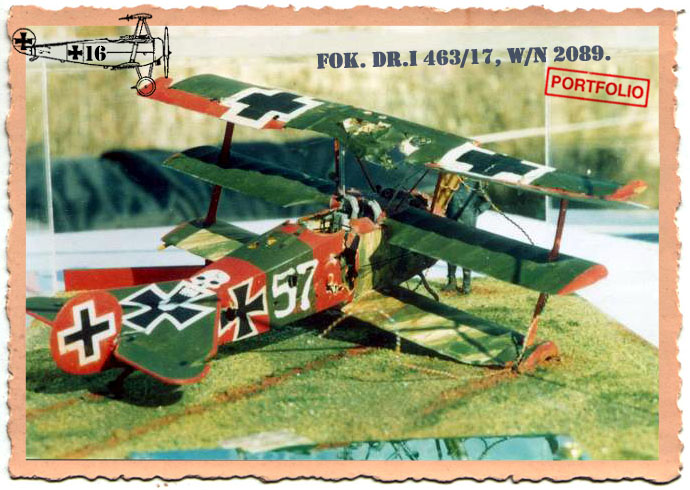
I will be glad to help you First I need to know what paints your working with. You see I have had a go at several methods. As you can see in my Portfolio #2 on some of the Fokker Dr.I kits I have built. I even have the makings of a How to for the forum on the subject. First the base coat. Is it enamel or acrylic? Next what will you use for the streaking enamels or acrylics? If you don't mind I may share some of this with the membership to help them as well. Thine Stephen
With the announcement of the Fokker Dr.I from Eduard. We all will practicing our streaking technique.
Click here.". . .The most important thing is to know why you build and then get the most that you can out of building." via D.D.
Colorado, United States
Joined: January 25, 2004
KitMaker: 11,669 posts
AeroScale: 11,011 posts
Posted: Sunday, April 13, 2008 - 08:36 PM UTC
Quoted Text
Hi Stephen , First of all let me say thank-you for responding ! I mostly work with acrylics either pollyscale when I can get them or any of the testors and some times with tamiya . I really don't use enamels . . . Using acrylics is easier to clean up for me . You are more then welcome to share this with other modelers . So far I find WWI aircraft more challenging . . ., the colour choices are endless . Thanks for help with this once more as always all of you are so helpful at this site .
I use a two colour type method. First I start with an acrylic. Usually Polly S Dirty White or Antique White. The Polly S Doped Linen is similar and has a green tint to it so it can be used as well.
Next after the base coat is thoroughly dry I spray on a coat of clear flat enamel. This must thoroughly dry as well.
Then, I begin with a paintbrush partially loaded with awash of Testors Model Master Field Drab. This wash is applied in sections, leaving blank spaces of the base color untouched by the wash (check Dr.I references.) Let this dry.
Finally, I used an almost dry brush effect but drag the brush in one direction only of the Field Drab. The clear coat acts as a buffer between the acrylic and the fresh enamel. Don't scrub or rub back and forth use light delibrate strokes of the brush.
On the wings the angle should cover the distance between 2 rib stations only. The horizontal surfaces are also to be done separately from the fuselage like the originals. Check your references for the angles. Practice on some scrap.
On this machine I used a greener olive than usual for the streaks. I probably should have stuck with the colour used in overpainting the cross fields.

". . .The most important thing is to know why you build and then get the most that you can out of building." via D.D.
Colorado, United States
Joined: January 25, 2004
KitMaker: 11,669 posts
AeroScale: 11,011 posts
Posted: Sunday, April 13, 2008 - 08:40 PM UTC
My own critique of the previous piece is I went too deep with the angle of the streaking. *I should have *kept it closer to just the distance between 2 rib bays. This next one is a better rendition of the angle, again in my opinion.
Here is a Jasta 19 Triplane of mine from the 1/48 DML /Dragon kit. Note the streaking here was done over a standard factory scheme. Try some scrap plastic to experiment with. Since I usually work in 1/48 scale for this Dr.I, I just painted the base color (acrylic dirty white like the wings) , then I shot a translucent dark blue over all. Then I waited until dry and hit it with a generous covering of dullcoat overall. Finally I went over it with a a dry brush streaking of the same dark blue. As a benchmark I will keep most fabric areas a little translucent and all metal areas opaque with some chipping or flaking.
". . .The most important thing is to know why you build and then get the most that you can out of building." via D.D.
Colorado, United States
Joined: January 25, 2004
KitMaker: 11,669 posts
AeroScale: 11,011 posts
Posted: Sunday, April 13, 2008 - 08:42 PM UTC
This shot is a little busy with all the colors. But it was the very first DML 1/48 Dr.I that I did.
". . .The most important thing is to know why you build and then get the most that you can out of building." via D.D.
Colorado, United States
Joined: January 25, 2004
KitMaker: 11,669 posts
AeroScale: 11,011 posts
Posted: Sunday, April 13, 2008 - 08:44 PM UTC
Heres the fun side of the same piece.

". . .The most important thing is to know why you build and then get the most that you can out of building." via D.D.
Colorado, United States
Joined: January 25, 2004
KitMaker: 11,669 posts
AeroScale: 11,011 posts
Posted: Sunday, April 13, 2008 - 08:46 PM UTC
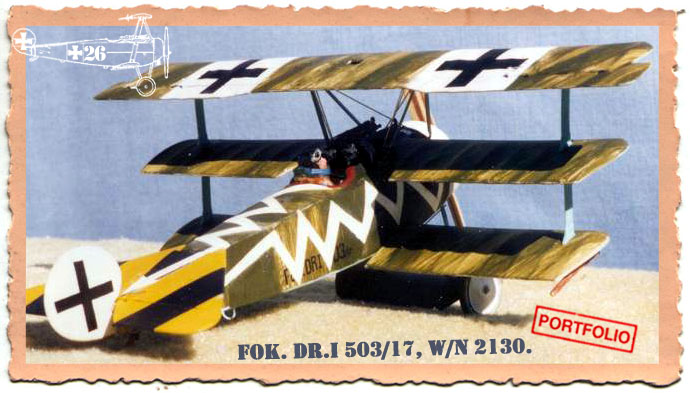
Jasta 19, Dr.I 503/17. My first exercise in making my own decals.

". . .The most important thing is to know why you build and then get the most that you can out of building." via D.D.
Colorado, United States
Joined: January 25, 2004
KitMaker: 11,669 posts
AeroScale: 11,011 posts
Posted: Sunday, April 13, 2008 - 08:48 PM UTC
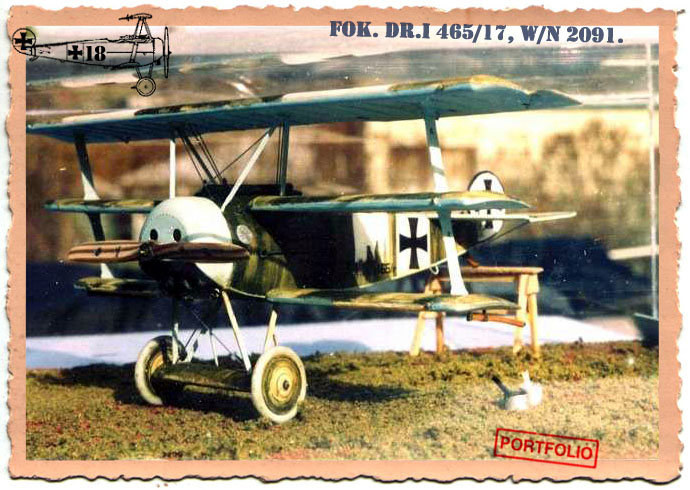
Greetings all: Here is my version of a Dr.I thats had several owners and wound up in a training school.
". . .The most important thing is to know why you build and then get the most that you can out of building." via D.D.
Colorado, United States
Joined: January 25, 2004
KitMaker: 11,669 posts
AeroScale: 11,011 posts
Posted: Sunday, April 13, 2008 - 08:51 PM UTC
Here's one from the 1/72 scale master Steve Hustad.

". . .The most important thing is to know why you build and then get the most that you can out of building." via D.D.
Colorado, United States
Joined: January 25, 2004
KitMaker: 11,669 posts
AeroScale: 11,011 posts
Posted: Sunday, April 13, 2008 - 08:55 PM UTC
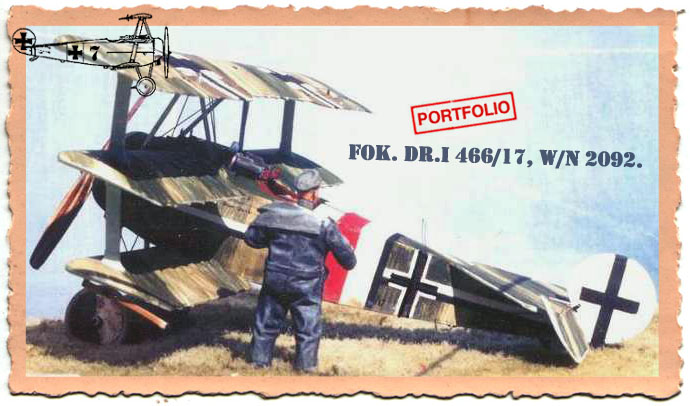
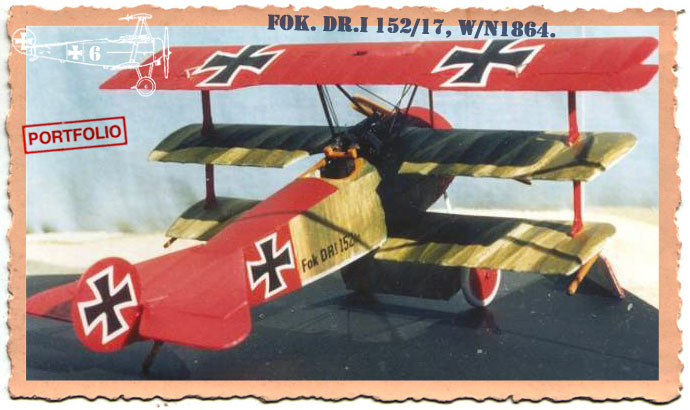
Another one of mine depicting MvR's Fok. Dr.I 152/17 in Feb. - March 1918.
". . .The most important thing is to know why you build and then get the most that you can out of building." via D.D.
Colorado, United States
Joined: January 25, 2004
KitMaker: 11,669 posts
AeroScale: 11,011 posts
Posted: Sunday, April 13, 2008 - 09:06 PM UTC
Here are two schools of thought on the same airframe.


Interpretation of colours from orthocromatic film can vary BUT the camouflage colours are recorded in the Public Records Office in Britain.
". . .The most important thing is to know why you build and then get the most that you can out of building." via D.D.
Colorado, United States
Joined: January 25, 2004
KitMaker: 11,669 posts
AeroScale: 11,011 posts
Posted: Sunday, April 13, 2008 - 09:46 PM UTC
As for the early production F.100-103/17 Triplanes modern research say bleached linen instead of unbleached was used. More on those later. Any questions so far?
". . .The most important thing is to know why you build and then get the most that you can out of building." via D.D.
Alberta, Canada
Joined: January 19, 2008
KitMaker: 6,743 posts
AeroScale: 6,151 posts
Posted: Monday, April 14, 2008 - 02:55 AM UTC
Thanks Stephen . Now that I'm armed with better knowledge on doing this . I'm ready to make another go at it . One more question . Would that also be the under side of the wings as well ?

Colorado, United States
Joined: January 25, 2004
KitMaker: 11,669 posts
AeroScale: 11,011 posts
Posted: Monday, April 14, 2008 - 10:07 AM UTC
From the factory all under surfaces are lt. blue. Even struts in most cases. The only exception is the cross fields on the lower surfaces are clear doped linen.
". . .The most important thing is to know why you build and then get the most that you can out of building." via D.D.
Ontario, Canada
Joined: January 03, 2007
KitMaker: 1,505 posts
AeroScale: 595 posts
Posted: Monday, April 14, 2008 - 01:31 PM UTC
good to know about the clear doped sections on underside of airframe ,,thanks
Projects:
K44 Anti Tank gun
Diana
Albatros DIII
Alberta, Canada
Joined: January 19, 2008
KitMaker: 6,743 posts
AeroScale: 6,151 posts
Posted: Monday, April 14, 2008 - 01:53 PM UTC
My head is going to explode from all the endless info from this site , thanks guys . I did spray my first coat of white mixed with just a little bit of dope linen , end results are just super. I let this dry for a few days and then clear coat it . cheers

Colorado, United States
Joined: January 25, 2004
KitMaker: 11,669 posts
AeroScale: 11,011 posts
Posted: Wednesday, April 16, 2008 - 04:34 AM UTC
The entire skeletal airframe was covered with the same fabric. The undersurfaces were painted the blue color that slightly varied (Methuen codes 22 B 3.5 to 24 A 5). The undersurfaces were painted with one coat sky blue. After varnishing (to waterproof the fabric) the color shifted to turquoise 25 B/C 5. On the bottom edge of the fuselage and top edge of the tailplane, the turquoise wrapped around the edged 20mm.
The sides of the fuselage and the top surfaces had the Fokker camouflage (greenish color streaks) applied then the bottom surfaces were painted the blue color. There was no over-paint in the top surfaces from the factory just the green streaked camouflage.
The upper surface color was olive-brown and varied from very dark to very light. The fabric on the wings, tailplane and rudder were given two coats of clear dope, one cocoat of the olive -brown streaking, the fuselage was given one coat of clear dope and one color coat of olive streaking. All fabric surfaces were given a final coat of varnish to waterproof the fabric. The Metheun colors codes are: dark, 4F8; medium, 4E5; and light 4D8.
These colors were coded by Paul S. Leaman from fabric samples taken from Fok.DR.I 144/17.
". . .The most important thing is to know why you build and then get the most that you can out of building." via D.D.
Indiana, United States
Joined: May 14, 2007
KitMaker: 3,117 posts
AeroScale: 2,270 posts
Posted: Friday, April 18, 2008 - 09:53 AM UTC
I am anxiously awaiting the Eduard Dr.I kits. Then I can try out these new techniques and colors.. I never realized my older builds were so far off the mark.
"Treat 'em Rough", Current Builds--Wingnut Rumpler
I am frequently seen with blood shot eyes from staying up past my nap time to get the right colour scheme on my latest WWI model?
Removed by original poster on 04/19/08 - 01:19:58 (GMT).
Alberta, Canada
Joined: January 19, 2008
KitMaker: 6,743 posts
AeroScale: 6,151 posts
Posted: Friday, April 18, 2008 - 02:30 PM UTC
Colorado, United States
Joined: January 25, 2004
KitMaker: 11,669 posts
AeroScale: 11,011 posts
Posted: Friday, April 18, 2008 - 04:04 PM UTC
Greetings Terri;
After building 33 of the 1/48 DML Dragon Triplanes I can safely recommend.
1. trimming the all the ends of the plastic interplane struts down 1/64 of an inch and don't be afraid to deepen their corresponding wing sockets.
2. The middle wing might need a bit of flexing to keep it from bowing up at the tips.
3. The area by the chin panel will need you to drill two locator holes for the front legs of the landing gear.
4. The panel itself will need to be scribed.
5. Use good three view plans to track the forward stagger of the interplane struts.
6. Use only a SHARP razor knife to cut the seat framing from the sprue. Very fragile.
7. The horizontal tail surfaces are a little large. To fix separate the elevators and reduce from the separation edges. (Again use good three views.)
8. Cut off the wheel axle studs from the landing gear wing and rerplace with brass rod by drilling holes.
9. Check your lay of the wings from above the model. Looking down on it leading and trailing edges should always be parallel.
10. Put the guns on before the top wing is attached.
11. Do not put a weight in the tail as most instructions recommend. (Tail skid is plastic.)
". . .The most important thing is to know why you build and then get the most that you can out of building." via D.D.
Alberta, Canada
Joined: January 19, 2008
KitMaker: 6,743 posts
AeroScale: 6,151 posts
Posted: Sunday, April 20, 2008 - 06:18 AM UTC
Thank-you for the tips on building dragons kit , only wish I had this 11 days ago . However it will come in handy for the next one I have . Cheers Stephen !
Colorado, United States
Joined: January 25, 2004
KitMaker: 11,669 posts
AeroScale: 11,011 posts
Posted: Monday, April 21, 2008 - 02:56 PM UTC
Greetings all;
One fellow has asked me ;
Quoted Text
". . .I really like the look of the dark green streaked camo on your E.V wing (like that commonly seen on the Dr.I). Would that be reasonably accurate, and what is a good way to represent that look? I have never tried anything like that, so I don't really know how to go about it. Any help would be greatly appreciated! "
For a referesher see;
Fokker E.V and new research on the wing camoflage. 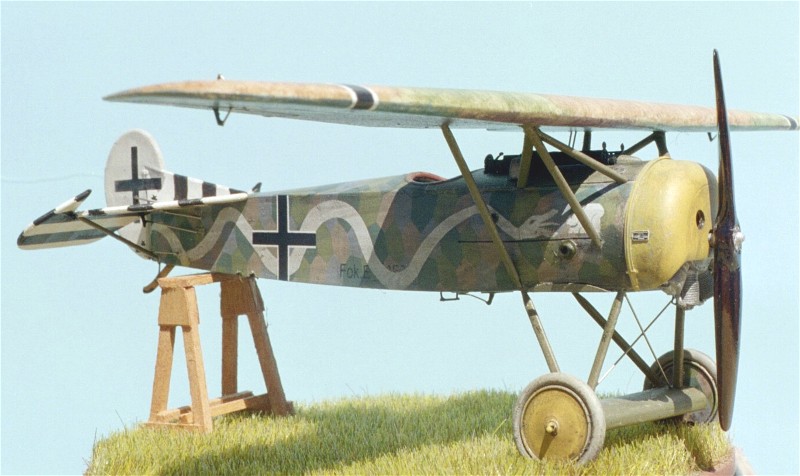

". . .The most important thing is to know why you build and then get the most that you can out of building." via D.D.
Colorado, United States
Joined: January 25, 2004
KitMaker: 11,669 posts
AeroScale: 11,011 posts
Posted: Monday, April 21, 2008 - 09:18 PM UTC
Years ago this was considered the normal application for the preproduction Fokker triplanes. You know F.I 102/17 (that went to MvR) & 103/17 (that went to Voss.) Incoherent salvage reports and colour blind personnel and heat of the moment combat reports all contributed to the bad information that was regurged for years from one would-be author to another.
Modern research of higher quality images (from private archives) tells us more likely that they were covered in bleached linen (almost white in appearance) then streaked on their upper surfaces and painted light blue on their undersurfaces. Production triplanes were covered in unbleached linen with the same process. For so long we knew so little. Then Came Cross & Cockade USA, Great Britain then Over the Front and then the internet. It takes awhile to get to the real story but if you know where to look it all makes sense.
". . .The most important thing is to know why you build and then get the most that you can out of building." via D.D.
Colorado, United States
Joined: January 25, 2004
KitMaker: 11,669 posts
AeroScale: 11,011 posts
Posted: Friday, January 16, 2009 - 06:46 PM UTC
Bringing this up for a fellow modeler.
". . .The most important thing is to know why you build and then get the most that you can out of building." via D.D.
Colorado, United States
Joined: January 25, 2004
KitMaker: 11,669 posts
AeroScale: 11,011 posts
Posted: Tuesday, March 24, 2009 - 04:50 PM UTC
Here is a bit of fun concerning 1/48 scale streaking and a further note of how to do it.
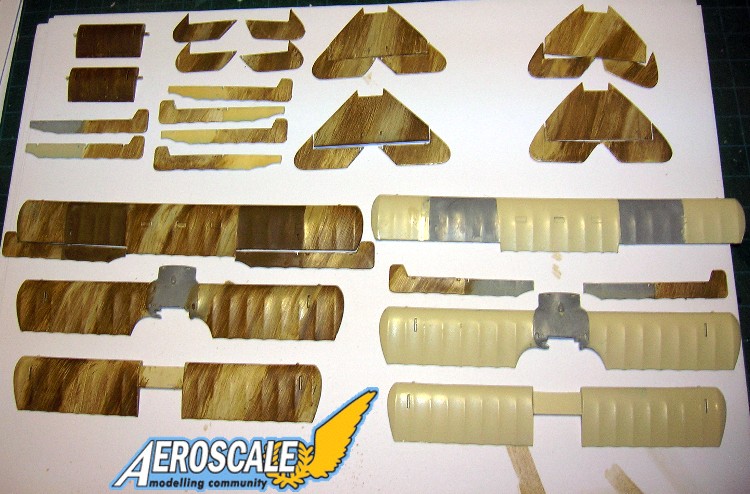
Fokker Streaked camouflage 1/48 - painted. At right the base coat is a light almond colour representing unbleached linen. At left the finished Fokker type streaked camouflage. The dark solid fields were for the crosses. It was ordered to bring the factory white fields of the pattee or iron crosses down to a narrow border. With the balkan crosses the border was at first widened then narrowed down in specific ratio later in the war.

Fokker Streaked camouflage 1/48 - painted. Here the finished Fokker type streaked camouflage. The wings were hand painted at the factory and the streaked fields varied from airframe to airframe.
". . .The most important thing is to know why you build and then get the most that you can out of building." via D.D.


