World War II: USA
Aircraft of the United States in WWII.
Hosted by Rowan Baylis
P-47M "Ugly Ducking" ?
FalkeEins
_VISITCOMMUNITY
England - South East, United Kingdom
Joined: March 07, 2005
KitMaker: 868 posts
AeroScale: 690 posts
Posted: Monday, June 09, 2008 - 02:07 AM UTC

Quoted Text

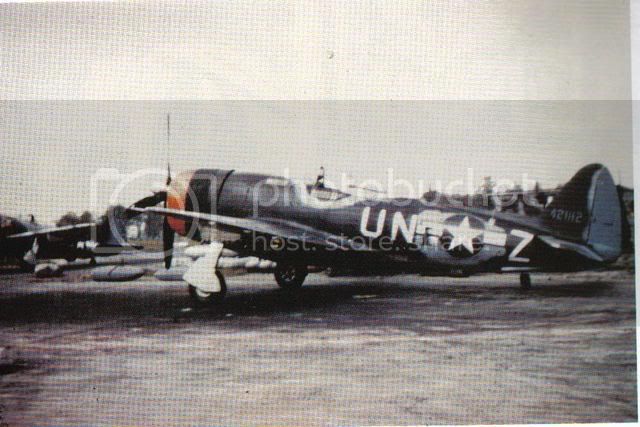
Cpt George Bostwicks P47M 44-21112. Last CO of the 63rd FS 56th FG.

Bostwick christened each of his allocated Thunderbolts "Ugly Duckling" but theres no evidence to suggest the name appears on any of them.
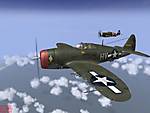
The 63rd FS P-47M's carried some beautiful paint schemes and Bostwicks was no exception.
NMF undersides,3 different shades of blue, red and black cowling and bare metal squadron codes!,,,,what a beauty! Hopefully I'll be able to do this stunning paint scheme justice.


..great pic, scheme and finish Nige - the two blues look spot on..

have posted a pic of this machine from 'Aces & Wingmen II' by Danny Morris. According to the caption " a painting of a duckling was later added to the cowling along with the name 'Ugly Duckling' ..". Since Bostwick is one of the featured aces in this book I wouldn't mind betting that this info came from the pilot himself - doesn't necessarily mean its reliable of course..easy enough to find out as I'm in touch with Danny..
sorry about the pic quality - I don't have a scanner (....I trod on it..) - good view on the original of the K-14 sight

lampie
#029
_VISITCOMMUNITY
England - East Midlands, United Kingdom
Joined: December 23, 2005
KitMaker: 6,249 posts
AeroScale: 3,270 posts
Posted: Monday, June 09, 2008 - 02:47 AM UTC
Hi Neil.
Thanks, I dont think the blues were a bad guess actually
Thanks also for posting the other colour photo of George Bostwick with his P-47 M.I was going to post that in the Aces gallery when Ive finished
Id be interested to know if he ever had any duck artwork added at any point. George flew 3 P47's all nicknamed Ugly Duckling but as far as Im aware none of them carried any artwork. I have about 6 photos of his P-47 M, all carrying 15 kill markings which dates them as post April 7th 1945.
Ive seen one where the squadron codes appear to be thinly outlined in red, no signs of any ducks though
Have you seen the photo of George holding the remains of the tree he flew through taking off from Boxted one day?
Nige
FalkeEins
_VISITCOMMUNITY
England - South East, United Kingdom
Joined: March 07, 2005
KitMaker: 868 posts
AeroScale: 690 posts
Posted: Monday, June 09, 2008 - 08:00 AM UTC

Quoted Text

.
Thanks, I dont think the blues were a bad guess actually


..the light Blue looks very Luftwaffe RLM 65 ..is that likely ..? it doesn't look like an RAF or USAAF colour ? ..when did the 56th move to the Continent...?
lampie
#029
_VISITCOMMUNITY
England - East Midlands, United Kingdom
Joined: December 23, 2005
KitMaker: 6,249 posts
AeroScale: 3,270 posts
Posted: Monday, June 09, 2008 - 08:10 AM UTC

Quoted Text


Quoted Text

.
Thanks, I dont think the blues were a bad guess actually


..the light Blue looks very Luftwaffe RLM 65 ..is that likely ..? it doesn't look like an RAF or USAAF colour ? ..when did the 56th move to the Continent...?


Hi Neil.
I have no idea of the origin of the colours Im afraid. They tend to look different in every photograph due to the light and standard of the photographs exposure etc.
I have some great colour movie film from Boxted but its pre P-47M......dammit!!!
The 56th never moved over the channel, although they expected to be posted abroad at anytime they remained based at Boxted.
Nige
f1matt
_VISITCOMMUNITY
Manitoba, Canada
Joined: August 13, 2006
KitMaker: 1,021 posts
AeroScale: 184 posts
Posted: Monday, June 09, 2008 - 06:11 PM UTC
Great to see so much progress on Ugly Duckling. That Alclad looks fantastic. I see what you mean with the preshading being rather obvious sometimes and looking very subtle at other angles. Now that I'm back from Montreal I have to get some work done on my own bird.

-Matt
propwash
_VISITCOMMUNITY
Charente, France
Joined: July 06, 2007
KitMaker: 289 posts
AeroScale: 231 posts
Posted: Tuesday, June 10, 2008 - 01:51 AM UTC
Looking really good, Nige. That's certainly and eye-catching paint scheme.
Holdfast
Staff MemberPresident
IPMS-UK KITMAKER BRANCH
#056
_VISITCOMMUNITY
England - South West, United Kingdom
Joined: September 30, 2002
KitMaker: 8,581 posts
AeroScale: 4,913 posts
Posted: Tuesday, June 10, 2008 - 07:40 AM UTC
Looking damn good Nige, a wonderful scheme

lampie
#029
_VISITCOMMUNITY
England - East Midlands, United Kingdom
Joined: December 23, 2005
KitMaker: 6,249 posts
AeroScale: 3,270 posts
Posted: Tuesday, June 10, 2008 - 07:47 AM UTC
Thanks Mal.
Its very distinctive and indeed unique to this aircraft, as were all 63rd FS schemes.
Ive been playing with your masks today


Nige
Holdfast
Staff MemberPresident
IPMS-UK KITMAKER BRANCH
#056
_VISITCOMMUNITY
England - South West, United Kingdom
Joined: September 30, 2002
KitMaker: 8,581 posts
AeroScale: 4,913 posts
Posted: Tuesday, June 10, 2008 - 08:01 AM UTC
Nicely done Nige, what blue have you used for the S&B, it looks to be spot on.

Are you still requiring spare fuselage S&B?

I must get on and build my 1/32 P-47, this is inspiring stuff
lampie
#029
_VISITCOMMUNITY
England - East Midlands, United Kingdom
Joined: December 23, 2005
KitMaker: 6,249 posts
AeroScale: 3,270 posts
Posted: Tuesday, June 10, 2008 - 08:09 AM UTC

Quoted Text

Nicely done Nige, what blue have you used for the S&B, it looks to be spot on.

Are you still requiring spare fuselage S&B?

I must get on and build my 1/32 P-47, this is inspiring stuff


Thanks Mal.
The wing star and bar was easy, but Im still experimenting with the best way to get around the intercooler doors on the fusalage so if you could send some fusalage sized s&b's over it would be much appreciated.
The blue is bog standard Tamiya XF-8. With a coat of Klear is darkens just a little bit and looks just right IMHO. ( The "cow" was done with the same colour.)
I must get on and build one of my 1:32 P-47's as well, but the way its going I'll be doing one for the Cave Tonitrum campaign, as works getting busy again!
Nige
lampie
#029
_VISITCOMMUNITY
England - East Midlands, United Kingdom
Joined: December 23, 2005
KitMaker: 6,249 posts
AeroScale: 3,270 posts
Posted: Wednesday, June 11, 2008 - 04:56 AM UTC
Got the codes on today.
Mal, can you believe I got the starboard S&B on first time!,so if you havent already sent the masks then hold fire. ( if youve already sent them dont worry, Im sure I'll be building another P-47 at some point in the future )
The code letters worked very well. I just had to trim some of the "Z" masks where the horizontal stabilisers were intruding, but it didnt effect the Z itself.
Going to get some Klear brushed on to protect the painted markings. Soon be time to tackle those intercooler doors, Im dreading that!


If anyones looking at the pictures and thinking that the Z is crooked, dont worry, it was like that on the real P-47
Nige
Holdfast
Staff MemberPresident
IPMS-UK KITMAKER BRANCH
#056
_VISITCOMMUNITY
England - South West, United Kingdom
Joined: September 30, 2002
KitMaker: 8,581 posts
AeroScale: 4,913 posts
Posted: Wednesday, June 11, 2008 - 06:53 AM UTC

Quoted Text

Mal, can you believe I got the starboard S&B on first time!,so if you havent already sent the masks then hold fire.


I was just checking before cutting them, so that's worked out great. Is there anything that I could do to make applying the fuselage S&B easier? Or is it just a case of the difficulty in lining up the cut out? If that's the case then using a piece of the backing sheet and having the cut out bar overhanging off it should make it easier.

Anyway, she is really looking good now, I bet this takes a prize at a few contests

lampie
#029
_VISITCOMMUNITY
England - East Midlands, United Kingdom
Joined: December 23, 2005
KitMaker: 6,249 posts
AeroScale: 3,270 posts
Posted: Wednesday, June 11, 2008 - 07:23 AM UTC
Hi Mal.
I couldnt successfully find a way of working out how to use the masks by cutting out the gap over the intercooler door either before or after applyling the mask.
The way I did it in the end was to dry fit the part you would normally use if you were to depict the P-47 with the intercooler door closed.
This made lining up the mask easier as well.
The problem you get with this is that to remove the part once the insignia is painted you have to poke a small drill, or something similar, through from the opposite side, so you can only do one side at once.
Once its been Klear'ed I'll mask off the intercooler door area and paint the inside. The outer doors have been painted in the lighter blue earlier and I'll paint them when I can match up the demarcation line.
All clear?,,,
To sum up.
If you intend to depict the intercooler doors open then theres a good deal of forward planning involved!
The masks work very well over the closed doors, maybe thats telling me something?
As for when its finished?
Its certainly starting to look nice but theres still a long way to go, and so plenty of opportunity to muck it up!
Nige
lampie
#029
_VISITCOMMUNITY
England - East Midlands, United Kingdom
Joined: December 23, 2005
KitMaker: 6,249 posts
AeroScale: 3,270 posts
Posted: Friday, June 13, 2008 - 05:26 AM UTC
Right now Im officially feeling very pleased with myself as Ive managed to mask and paint the rest of the insignia in and around the intercooler doors.

Oh yeah!
Decals next and I'll carry on with the fiddly bits that will be attached last thing.
The Ugly Duckings sitting on its (dry fitted)undercarriage now as well.
The finishing line is slowly coming into sight.
Nige
f1matt
_VISITCOMMUNITY
Manitoba, Canada
Joined: August 13, 2006
KitMaker: 1,021 posts
AeroScale: 184 posts
Posted: Friday, June 13, 2008 - 08:16 AM UTC
Slowly Nige? You're absolutely flying. Glad to see the masks have worked well for you.

-Matt
lampie
#029
_VISITCOMMUNITY
England - East Midlands, United Kingdom
Joined: December 23, 2005
KitMaker: 6,249 posts
AeroScale: 3,270 posts
Posted: Friday, June 13, 2008 - 09:57 AM UTC
Thanks Matt.
The masks worked very well. Unfortunately the "stencil style" serial number on the rudder has defeated myself and Mal up to now so Im going to have to use the kit decals.
Dont worry, I wont be "flying" for long, Im off on tour again in a few days and wont be seeing the workbench until mid-late July.
You'll have to fly the P-47 flag for me while Im gone
Nige
lampie
#029
_VISITCOMMUNITY
England - East Midlands, United Kingdom
Joined: December 23, 2005
KitMaker: 6,249 posts
AeroScale: 3,270 posts
Posted: Thursday, July 17, 2008 - 12:45 AM UTC
A month down the road and back home.
Time to hit the bench and finish this!
What few decals that remain after using Miracle Masks to paint the majority of markings on have been applied.
Undercarriage has been wired up.

"Promodeller Wash" applied. Its the second time Ive used this stuff and Im very impressed. What you dont get though, is the streaky effect thats achieved by wiping an oil wash away in the direction of the airflow. This wash, at least when applied over Klear, is a bit more clinical. Im probably going to mist over some extremely thinned Tamiya Smoke to blend everything a bit more.
Looks ok though.

So,after a month away from the bench the finishing line is rapidly approaching, and I hope to have the Ugly Duckling finally done within the next week.
At last, the Jug has found its feet!

Last few bits and pieces ready for finishing off. Some weathering and varnish to come and that'll do it.

Nige
rdriscoll
_VISITCOMMUNITY
Florida, United States
Joined: November 24, 2007
KitMaker: 180 posts
AeroScale: 50 posts
Posted: Thursday, July 17, 2008 - 02:47 AM UTC
Nighe,

Beautiful work! I really like how you followed the panel lines on the leading edge with the Alclad. What color did you use for the rudder?

lampie
#029
_VISITCOMMUNITY
England - East Midlands, United Kingdom
Joined: December 23, 2005
KitMaker: 6,249 posts
AeroScale: 3,270 posts
Posted: Thursday, July 17, 2008 - 11:38 AM UTC

Quoted Text

Nige,

Beautiful work! I really like how you followed the panel lines on the leading edge with the Alclad. What color did you use for the rudder?


Thanks Rex.
The rudder was painted using the mix recommended by Tamiya..2 parts X16purple, 2 parts XF8flat blue and 1 part XF-2 white.
The other blues I mixed up myself. The lighter blue was 3 parts Vellejo white(001)/1 part Dark Blue(053). The darker blue was 3 parts Tamiya X3 (royal blue)/ 1 part XF17(sea blue)
Nige
CaptainA
_VISITCOMMUNITY
Indiana, United States
Joined: May 14, 2007
KitMaker: 3,117 posts
AeroScale: 2,270 posts
Posted: Thursday, July 17, 2008 - 12:38 PM UTC
Wow.
lampie
#029
_VISITCOMMUNITY
England - East Midlands, United Kingdom
Joined: December 23, 2005
KitMaker: 6,249 posts
AeroScale: 3,270 posts
Posted: Tuesday, July 22, 2008 - 07:37 AM UTC
Finished at last!


Thanks for supplying the masks for this project Mal

I quite like this larger scale

Nige
Holdfast
Staff MemberPresident
IPMS-UK KITMAKER BRANCH
#056
_VISITCOMMUNITY
England - South West, United Kingdom
Joined: September 30, 2002
KitMaker: 8,581 posts
AeroScale: 4,913 posts
Posted: Tuesday, July 22, 2008 - 08:17 AM UTC
Looks great Nige, thank you for trying out the masks, they look to be pretty succesful
With you permission I'll capture some pics for my web sight
betheyn
Staff MemberSenior Editor
AEROSCALE
#019
_VISITCOMMUNITY
England - South East, United Kingdom
Joined: October 14, 2004
KitMaker: 4,560 posts
AeroScale: 2,225 posts
Posted: Tuesday, July 22, 2008 - 10:24 AM UTC
Fantastic mate.
That build is definitely worth the extra wait while you finished a tour.
Did you give it a satin coat ?
Andy
TedMamere
_VISITCOMMUNITY
Moselle, France
Joined: May 15, 2005
KitMaker: 5,653 posts
AeroScale: 4,347 posts
Posted: Tuesday, July 22, 2008 - 11:00 AM UTC
Hi Nigel!

Looks fantastic!

Will you submit it as a feature?

Jean-Luc
lampie
#029
_VISITCOMMUNITY
England - East Midlands, United Kingdom
Joined: December 23, 2005
KitMaker: 6,249 posts
AeroScale: 3,270 posts
Posted: Tuesday, July 22, 2008 - 10:54 PM UTC
Thanks guys.
Mal,,
Of course you can use photos for your site. I'll be taking some on a mirrored base soon. Do you want to wait until Ive taken them? The lighting should be better as well.
Andy.
There are a couple of coats of Humbrol satin varnish applied.It give a nice sheen to the surface.
Jean Luc.
I'll be taking some better photos soon. I'll submit them if you like,but it would be nice to see photo features from new members dont you think?
All the best
Nige