Hi All
at the moment I am again in a phase with several parallel projects (that I am actually working on). A nicely build Shawnee by a clubmate motivated me to start this beast (it is really large compared to other 1/48 models I have).
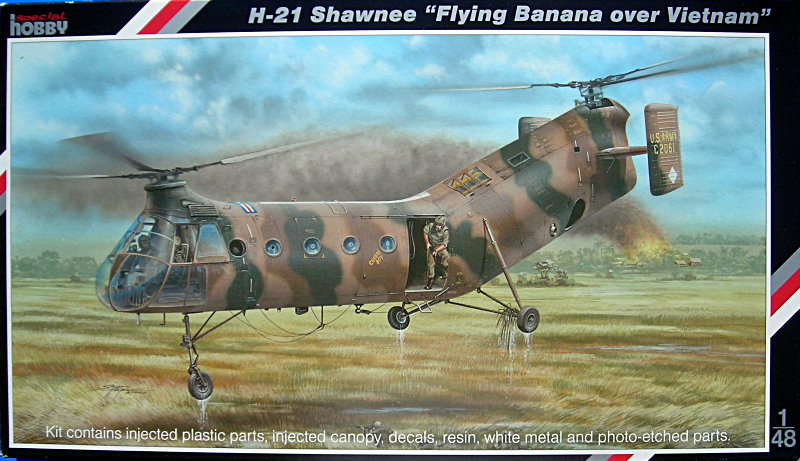
I have made a short review with pix in German on my site. I am not sure if there is one at Aeroscale?
As you see in the picture I have asemble pretty much all of the interior stuff. I want to keep this oob to keep it fun (there also is no AM stuff except for masks). I hope the lead below the pit is enough. If not I will add some ledd filled barrels as my clubmate. Unfortunately the instructions are pretty bad, so I cannot determine the colour for the interior. I cannot believe Gunze H1 (white) is right, esp, as it is called light grey in the instructions. Any help welcome!
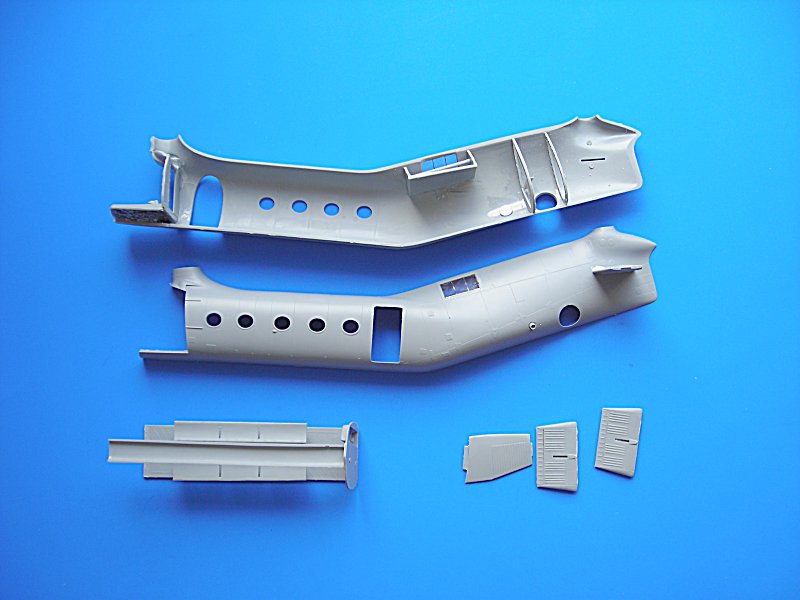
Any things to watch out for??
best wishes
Steffen
Rotary Wing
Discuss helicopters and other rotary wing aircraft from any era.
Hosted by Gino P. Quintiliani
SH Piasecki H-21 Shawnee 1/48
Posted: Sunday, July 13, 2008 - 12:03 AM UTC
Phantom2
Östergötland, Sweden
Joined: April 18, 2006
KitMaker: 708 posts
AeroScale: 678 posts
Joined: April 18, 2006
KitMaker: 708 posts
AeroScale: 678 posts
Posted: Sunday, July 13, 2008 - 04:51 AM UTC
Hi Steffen!
I also bought this kit last week!
Great minds think alike, eh?
This type of helicopter served in the Swedish Airforce as the HKP1 during the 50´s, before the delivery of the big Vertol HKP4.
From what I can remember the interior is in a grey/light grey colors (H140-128?), with a darker grey or black floor.
Yes, we have one Vertol 44B chopper in the Airforce Museum Here in Linkoping, and better still, you are allowed to walk trough it!
The 44B was the civil version of the H-21, can´t say how common the colors are, but It´s the best shot I have!
Grey (Grey or green for the cargo section) is a better guess then white for the interior anyway!
I´m planning to do a Walk-around and a actual walk-TROUGH of this helicopter next time we have our IPMS-meeting (27/7) as the Museum actually are our club-locale!
Of course I´ll bring my camera with lots of memory!
Please show your work, I´ll follow closley!
Cheers!
Stefan E
Posted: Sunday, July 13, 2008 - 05:03 AM UTC
Hello Stefan
many thanks for your help ... what colour range are we talking about? I forgot to add that the instructions show Gunze (my post is updated). Are yours Gunze or Humbrol?
I just posted the question on HS .. maybe some chopper guys there who remember the colour (I am doing a Vietnam bird dio with a M151 and some crew).
cheers
Steffen
HeavyArty
Florida, United States
Joined: May 16, 2002
KitMaker: 17,694 posts
AeroScale: 1,728 posts
Joined: May 16, 2002
KitMaker: 17,694 posts
AeroScale: 1,728 posts
Posted: Sunday, July 13, 2008 - 07:12 AM UTC
As with most, if not all, military helos from the '50s and '60s (and still today), the interior is in shades of grey. Medium grey for metal areas, a slightly darker grey for fabric soundproofing. The troop seats can be either red or green. Floor usually has black non-slip tape strips or a black sand paint on it in high traffic areas. Cockpit is same grey with grey instrument panel and black gauges. Upper surface of instrument panel hood (glare shield) is flat black.
Not the best pics, being B&W, but you get the idea.
A full walk-around at ARC.
Hope that points you in the right direction.
Not the best pics, being B&W, but you get the idea.
A full walk-around at ARC.
Hope that points you in the right direction.
Posted: Sunday, July 13, 2008 - 07:23 AM UTC
Hello Gino
many thanks! Chukw posted some OD /black interior pix over at Hyperscale, but I rather go with the grey colour. Your pix in the CH-47 thread give me a good idea about the colour.
off to the work bench
cheers
Steffen
many thanks! Chukw posted some OD /black interior pix over at Hyperscale, but I rather go with the grey colour. Your pix in the CH-47 thread give me a good idea about the colour.
off to the work bench
cheers
Steffen
Phantom2
Östergötland, Sweden
Joined: April 18, 2006
KitMaker: 708 posts
AeroScale: 678 posts
Joined: April 18, 2006
KitMaker: 708 posts
AeroScale: 678 posts
Posted: Sunday, July 13, 2008 - 08:55 AM UTC
Quoted Text
what colour range are we talking about? I forgot to add that the instructions show Gunze (my post is updated). Are yours Gunze or Humbrol?
Hi Steffen!
I´m talking Humbrol colors!
Sorry, forgot that not everybody uses them!
Btw. That interior pic looks exactly as I remember the interior, so I´ll go for grey!
Cheers!
Stefan E
Posted: Monday, July 14, 2008 - 06:16 AM UTC
Hi All
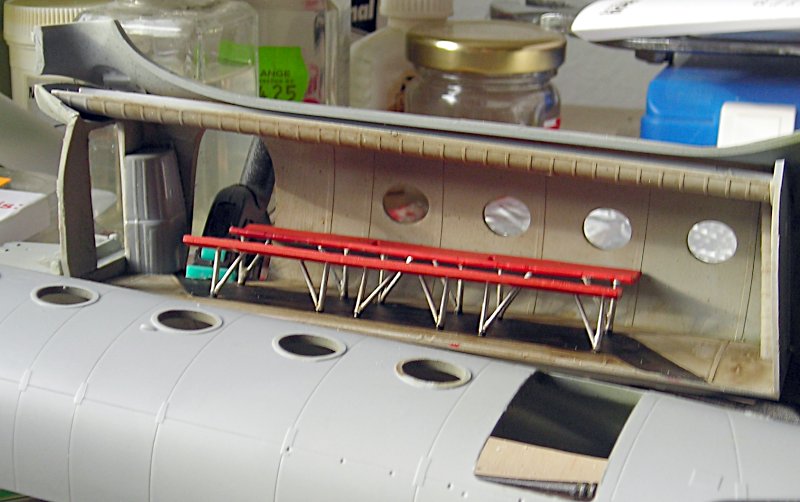
here is a small update. There were quite a lot answers on HS .. still with so much confusing info I used Ginos answer (plus pix in the CH-47 thread) and painted it Light grey /red/ black. There is already an umbra oil wash on. I will do another one with pigments for all the dirt in the corners ...
The construction is a bit tricky, because there is no real evidence where which part has to go (there are several mm if not cm variance).
Better do the decal job on my 110 next .. or I won't finish that one in time
best wishes
Steffen
Posted: Thursday, July 24, 2008 - 06:02 AM UTC
Hi a small update
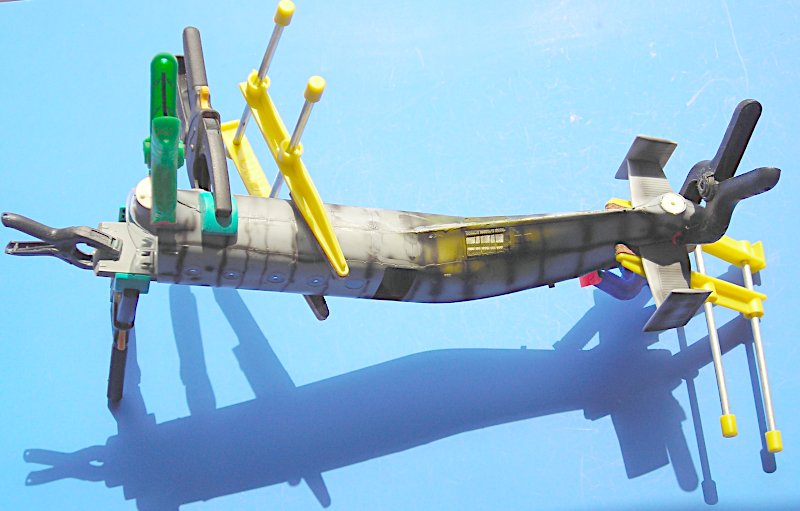
I glued in the windows ... breaking two as the "holes" are too small. Today I glued it all together .. what a task. I almost had not enough clamps (I already removed some for the pic)
cheers
Steffen
I glued in the windows ... breaking two as the "holes" are too small. Today I glued it all together .. what a task. I almost had not enough clamps (I already removed some for the pic)
cheers
Steffen
Greenhornet2
California, United States
Joined: July 21, 2008
KitMaker: 51 posts
AeroScale: 37 posts
Joined: July 21, 2008
KitMaker: 51 posts
AeroScale: 37 posts
Posted: Thursday, July 24, 2008 - 11:16 AM UTC
wow that looks geat! wish my hueys looked that good during assembly.
Posted: Thursday, July 24, 2008 - 11:59 AM UTC
Well Seth,
thank you but actually there are huge gaps, e.g. at the front rotor and the area above the screens needed CA to stay in place. I tried to avoid CA but it was not possible as I needed at least some areas "fitting" immediately.
Now I have used quite a lot of filler all around .. will have to rebuild a few details. All in all it does not look that good ( OTOH not bad considering it's a Special Hobby kit)
cheers
Steffen
Grumpyoldman
_ADVISOR
Florida, United States
Joined: October 17, 2003
KitMaker: 15,338 posts
AeroScale: 836 posts
Joined: October 17, 2003
KitMaker: 15,338 posts
AeroScale: 836 posts
Posted: Thursday, July 24, 2008 - 02:22 PM UTC
Looks good so far Steffen,
My first though when I saw the clamping photos was
"Damn that's a lot of clamps!"
My first though when I saw the clamping photos was
"Damn that's a lot of clamps!"
Greenhornet2
California, United States
Joined: July 21, 2008
KitMaker: 51 posts
AeroScale: 37 posts
Joined: July 21, 2008
KitMaker: 51 posts
AeroScale: 37 posts
Posted: Thursday, July 24, 2008 - 03:02 PM UTC
Quoted Text
haha you think you hade gaps! i am building 2 1/48 Revell hueys. screw CA i had to go out to my dads shop and get automotive body filler and they still dont look perfect. Well Seth,
thank you but actually there are huge gaps, e.g. at the front rotor and the area above the screens needed CA to stay in place. I tried to avoid CA but it was not possible as I needed at least some areas "fitting" immediately.
Now I have used quite a lot of filler all around .. will have to rebuild a few details. All in all it does not look that good ( OTOH not bad considering it's a Special Hobby kit)
cheers
Steffen
Posted: Sunday, July 27, 2008 - 09:56 PM UTC
Looks good, Steffen. It will be an interesting build with a very nice camouflage scheme.
Looking forward to see more
Posted: Sunday, July 27, 2008 - 10:44 PM UTC
Hi Jesper
Thanks for your kind comment! Well, I think I will go for a OD scheme .. so it is not very interesting
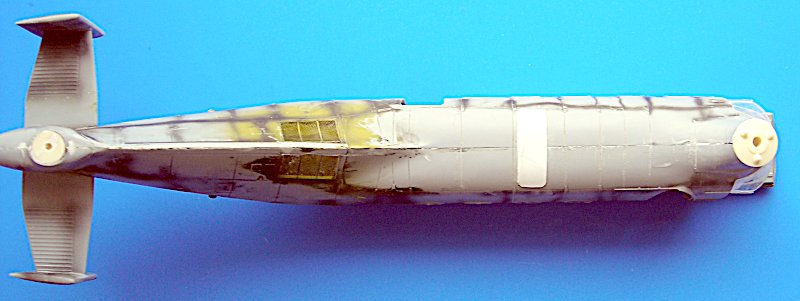
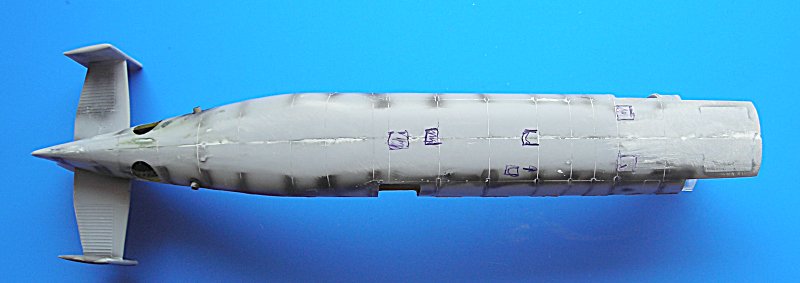
I tokk two more pix. The upperside was filled (squadron white putty) and sanded. Sadly after sanding, polishing and rescribing the damn gap reappeared .. maybe I'll leave it or give the model a primer leayer to see how it really looks. the lower side is rough sanded. I have to fine sand it and rebuild the lost details.
all the best
Steffen
Posted: Wednesday, July 30, 2008 - 12:43 AM UTC
Hi all
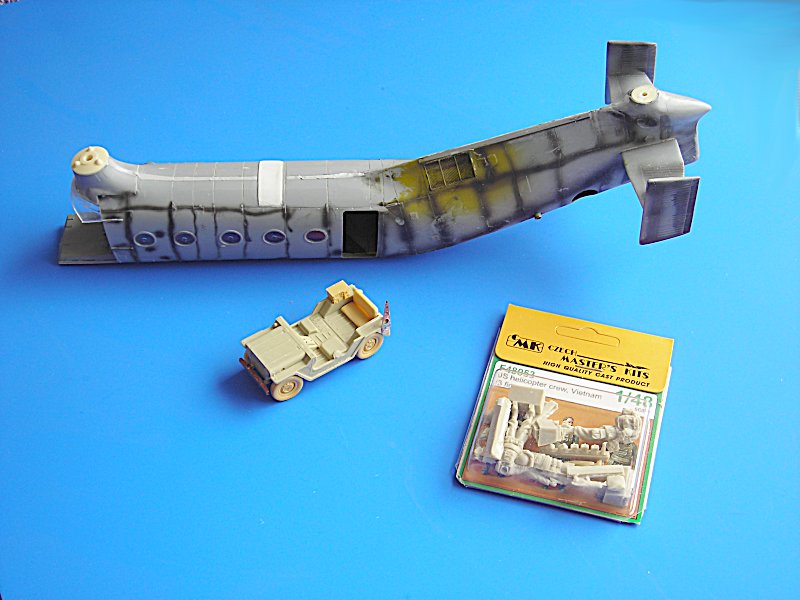
as Andrzej posted a link from the Airborne campaign I want to show what I have in mind as a small scene. It will be some kind of pre flight chatter between some pilots and if I get some soldiers too..
I have Verlindens Ford Mutt and some CMK figures. I could not get the 2nd set with seated pilots yet.
I am filling and sanding a lot on the model, so the missing figures do not slow my progress now. Ah, and I broke all three of the front rotor "nubs" in an accident. If anybody has the model could you please measure how long those posts on the resin parts are, so that I can replace them with rods or tubes. Thank you!
cheers
Steffen
HeavyArty
Florida, United States
Joined: May 16, 2002
KitMaker: 17,694 posts
AeroScale: 1,728 posts
Joined: May 16, 2002
KitMaker: 17,694 posts
AeroScale: 1,728 posts
Posted: Wednesday, July 30, 2008 - 03:28 AM UTC
Looking good so far. I'm sure it will come out great when done.
One comment on the scene though, the M151A1 wasn't fielded until late '64. The H-21 was mainly used in the advisor years before that. 1 CAV deployed with UH-1B and D model Hueys in mid-'64. I think a WWII Willys MB or an M38A1 would be more appropriate. I know there is a 1/48 Willis, there was/is a basic M38A1 in 1/48 in the old Revell CH-53 kit, along w/a 105mm howitzer.
Posted: Wednesday, July 30, 2008 - 03:33 AM UTC
Hi Gino
thank for the hint!!! I did not know that the M151 was introduced that late.
The H-21 c&m instructions all say 1963 so I will get myself another Tamiya Jeep ... will be a lot easier to build.
Steffen
thank for the hint!!! I did not know that the M151 was introduced that late.
The H-21 c&m instructions all say 1963 so I will get myself another Tamiya Jeep ... will be a lot easier to build.
Steffen
HeavyArty
Florida, United States
Joined: May 16, 2002
KitMaker: 17,694 posts
AeroScale: 1,728 posts
Joined: May 16, 2002
KitMaker: 17,694 posts
AeroScale: 1,728 posts
Posted: Wednesday, July 30, 2008 - 06:44 PM UTC
Sounds good. Good luck on it.
Posted: Thursday, July 31, 2008 - 09:44 PM UTC
Looks good, Steffen.
Will you need to rescribe the fuselage after all that sanding? Rescribing is my worst nightmare - probably combined with rigging
Any special reason to go for the overall OD scheme? I think the 3 colour camouflaged scheme looks much better
Will you need to rescribe the fuselage after all that sanding? Rescribing is my worst nightmare - probably combined with rigging
Any special reason to go for the overall OD scheme? I think the 3 colour camouflaged scheme looks much better
Posted: Thursday, July 31, 2008 - 11:09 PM UTC
Quoted Text
Looks good, Steffen.
Will you need to rescribe the fuselage after all that sanding? Rescribing is my worst nightmare - probably combined with rigging
Any special reason to go for the overall OD scheme? I think the 3 colour camouflaged scheme looks much better
Many thanks Jesper!
I do not master the rescribing stuff (yet?). Luckily there are only the vertical panel lines, so I can do it with the Tritool scriber saws.
I choose the OD scheme because I already have a 3 colour Shawnee for my site.
cheers
Steffen
Posted: Friday, August 01, 2008 - 07:43 AM UTC
Hi Steffen!
I see you also like to work with lots of filler... so you are a masochist as well?
Jokes aside, I can't wait to see the finished diorama.
Jean-Luc
I see you also like to work with lots of filler... so you are a masochist as well?
Jokes aside, I can't wait to see the finished diorama.
Jean-Luc
Posted: Saturday, August 02, 2008 - 07:17 AM UTC
Hi Jean-Luc
well, I do not like it so I am maybe stupid but not masochistic.
here is the model that inspired me to start this kit:
Banana over Vietnam
cheers
Steffen
well, I do not like it so I am maybe stupid but not masochistic.
here is the model that inspired me to start this kit:
Banana over Vietnam
cheers
Steffen
Posted: Saturday, August 02, 2008 - 08:30 AM UTC
Quoted Text
I do not master the rescribing stuff (yet?). Luckily there are only the vertical panel lines, so I can do it with the Tritool scriber saws.
I choose the OD scheme because I already have a 3 colour Shawnee for my site.
cheers
Steffen
I also do not master rescribing. I mess up almost everytime
Nice looking banana on your site. Now I understand that an all overall OD will supplement the other H-21 nicely.
chukw1
California, United States
Joined: November 28, 2007
KitMaker: 817 posts
AeroScale: 729 posts
Joined: November 28, 2007
KitMaker: 817 posts
AeroScale: 729 posts
Posted: Friday, January 08, 2010 - 03:45 AM UTC
Well, Steffen? Any progress?
Cheers!
chuk
Cheers!
chuk
Posted: Friday, January 08, 2010 - 03:57 AM UTC
Wow Chuck you are digging out the very old stuff
No, there is no progress, but I have the CMK pilots now, so I could proceed. it is still on my bench, but i have sooooo many projects, that this one will stay a bit longer on hold ....
thanks for looking
all the best
Steffen
No, there is no progress, but I have the CMK pilots now, so I could proceed. it is still on my bench, but i have sooooo many projects, that this one will stay a bit longer on hold ....
thanks for looking
all the best
Steffen