Avia B.534 (IV. serie) Eduard 1/48
Germany
Joined: September 07, 2005
KitMaker: 5,609 posts
AeroScale: 5,231 posts
Posted: Saturday, September 13, 2008 - 08:11 AM UTC
Hi all
First a question: I seem to remember that a board member already did a Blog thread on this kit, though I cannot find it. Rowan, Jean-Luc ... anyone .. did you build it??
While sitting at the bench I looked a bit around and "found" my Avia B.534. ... as I waited for the base coat to dry (Eduard Hellcat) I played a bit with the parts (I started the kit already in the past .. but only a few parts test fit) .. well the inside of the crate has to be silver and thus I tried out the metallic colours from JPS (dark aluminium in this case) and it turned out really nice .. BTW those are acrylics!!! .. the paint has to be built up thin & slowly but the result is Alclad-like (it is much better than I can photograph it)
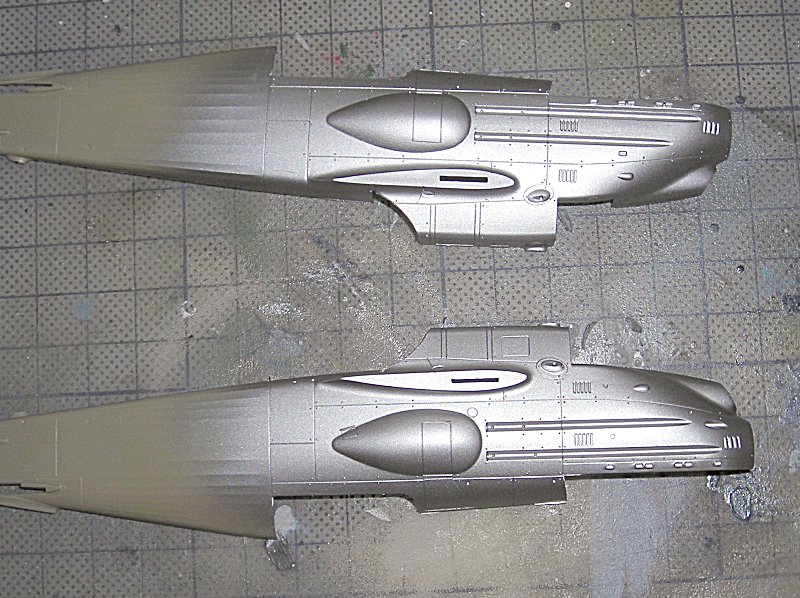
I played a bit with the cockpit .. but nothing that worth showing yet.
cheers
Steffen
DULCE ET DECORUM EST PRO HOBBY MORI
Moselle, France
Joined: May 15, 2005
KitMaker: 5,653 posts
AeroScale: 4,347 posts
Posted: Saturday, September 13, 2008 - 09:15 AM UTC
Quoted Text
Rowan, Jean-Luc ... anyone .. did you build it??
Hi Steffen,
Nope, I didn't started this kit. It must be Rowan then...

I will follow your build with great interest!

Jean-Luc

Better think one hour and build five minutes...
Than think five minutes and build an hour!
Germany
Joined: September 07, 2005
KitMaker: 5,609 posts
AeroScale: 5,231 posts
Posted: Saturday, September 13, 2008 - 08:40 PM UTC
Thank you Jean-Luc
here is the cockpit so far .. I will do a washing to bring out the details as the alu color absorbs much of it.
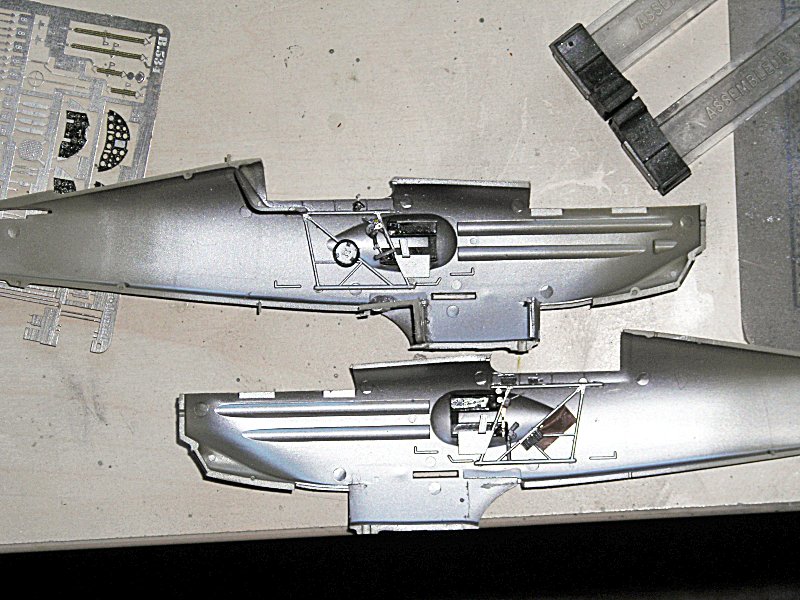
I hate doing cockpits ...


all the best
Steffen
DULCE ET DECORUM EST PRO HOBBY MORI

#042
England - North East, United Kingdom
Joined: November 18, 2006
KitMaker: 2,828 posts
AeroScale: 1,720 posts
Posted: Saturday, September 13, 2008 - 10:15 PM UTC
Hi Steffen,
You may want to check out Scale Aviation Modeller International this month as the Modellers profile is on this Plane and the is a kit build of the Eduard kit.
Cheers
Allen
Modellers Creed: This is my toolbox. There are many like it, but this one is mine. My toolbox is my best friend. It is my life. I must master it as I must master my life. My toolbox, without me, is useless. Without my toolbox, I am useless.
Germany
Joined: September 07, 2005
KitMaker: 5,609 posts
AeroScale: 5,231 posts
Posted: Saturday, September 13, 2008 - 10:21 PM UTC
Many thanks Allen
sadly I cannot get SAMI here. And with my actual situation I cannot justify a subscription.
cheers
Steffen
DULCE ET DECORUM EST PRO HOBBY MORI
Germany
Joined: September 07, 2005
KitMaker: 5,609 posts
AeroScale: 5,231 posts
Posted: Sunday, September 14, 2008 - 03:12 AM UTC
Another small update.
The sidewall details got a black wash and i build up the center section: instrument panel, seat with belts and stuff. I weathered the floor with some dark gray scratches (Faber cold grey IV pencil) and a brown filter/wash... sounds not much but is more than 1 hour work. (I tried to avoid the flash this time but thus its slightly blurry

)
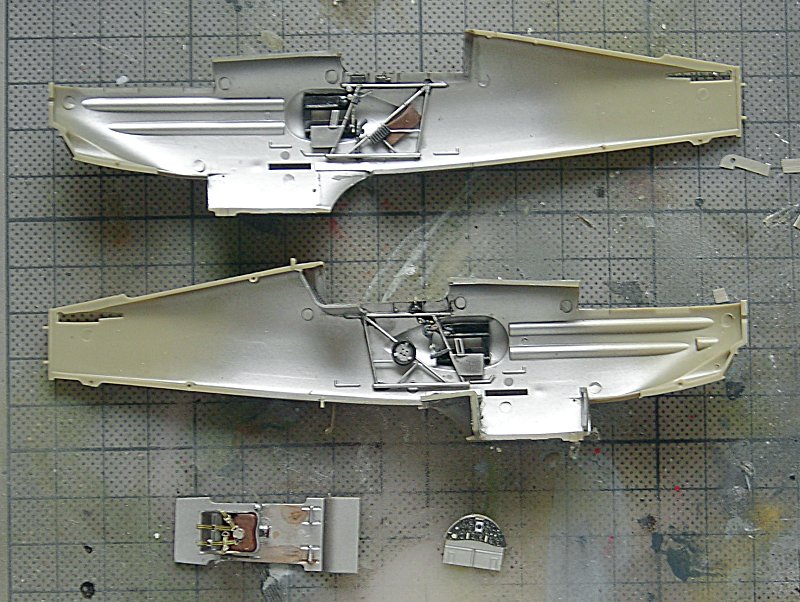
happy modelling
Steffen
DULCE ET DECORUM EST PRO HOBBY MORI

#042
England - North East, United Kingdom
Joined: November 18, 2006
KitMaker: 2,828 posts
AeroScale: 1,720 posts
Posted: Sunday, September 14, 2008 - 10:44 AM UTC
Quoted Text
Many thanks Allen
sadly I cannot get SAMI here. And with my actual situation I cannot justify a subscription.
cheers
Steffen
Hi Steffen,
I would volunteer to scan the article for you but unfortunately my scanner has packed up, I can't find the driver disk and the ones of the Web don't work. If i do get it back up and running I'll see what I can do.
Cheers
Allen
Modellers Creed: This is my toolbox. There are many like it, but this one is mine. My toolbox is my best friend. It is my life. I must master it as I must master my life. My toolbox, without me, is useless. Without my toolbox, I am useless.
Merlin
 Senior Editor
#017
United Kingdom
Joined: June 11, 2003
KitMaker: 17,582 posts
AeroScale: 12,795 posts
Posted: Monday, September 15, 2008 - 11:04 PM UTC
Quoted Text
Hi all
First a question: I seem to remember that a board member already did a Blog thread on this kit, though I cannot find it. Rowan, Jean-Luc ... anyone .. did you build it??...
cheers
Steffen
Hi Steffen
Nice job so far.

I tackled the III Serie
https://aeroscale.kitmaker.net/forums/99215#819580.
I messed up at the decal stage when the softener I was using (sorry - I can't remember what brand) reacted badly with the Klear gloss-coat, leaving a white residue that won't seem to come off. I really need to strip a few areas and repaint them - that's why I so admired your determination over the Wildcat!
I think I remember Stephen showing a pic of a finished IV Serie by a modeller on another forum - maybe that's what you're thinking of?
All the best
Rowan

BEWARE OF THE FEW...
As I grow older, I regret to say that a detestable habit of thinking seems to be getting a hold of me. - H. Rider Haggard
Germany
Joined: September 07, 2005
KitMaker: 5,609 posts
AeroScale: 5,231 posts
Posted: Monday, September 15, 2008 - 11:34 PM UTC
hello Rowan
many thanks! probably I was thinking of the serie III .. your pit is much cleaner built than mine and the silver grey looks nice (the strong reflections in my pix come from the flash of my camera, but still ....).
I had some problems fitting the fuselage together either I had a step on top or on the oil cooler .. I decided to make the top flush and handle the cooler after all was dry. I then put in some raw force to break the internal cooler part then glued the fuselage halfs in this area again and finally inserted the cooler (the nose top was still off in this phase) ..
Llooks good now .. maybe I just had an edge or a wrong angle the prevented the parts to fit. The upper nose was then fitted and glued. Some minutes ago I glued on the lower wings and put the model on a make shift helling ... Yeah, Brian and Captain Mal (see CD covers) will not be happy
I measured beforehand to find a suitable solution! ... as per instructions 12.9 mm hope that works out.
I still have no idea how to fit the bracing to that darn etched parts .. this assembly will never hotd the forces when I tighten the thread ...
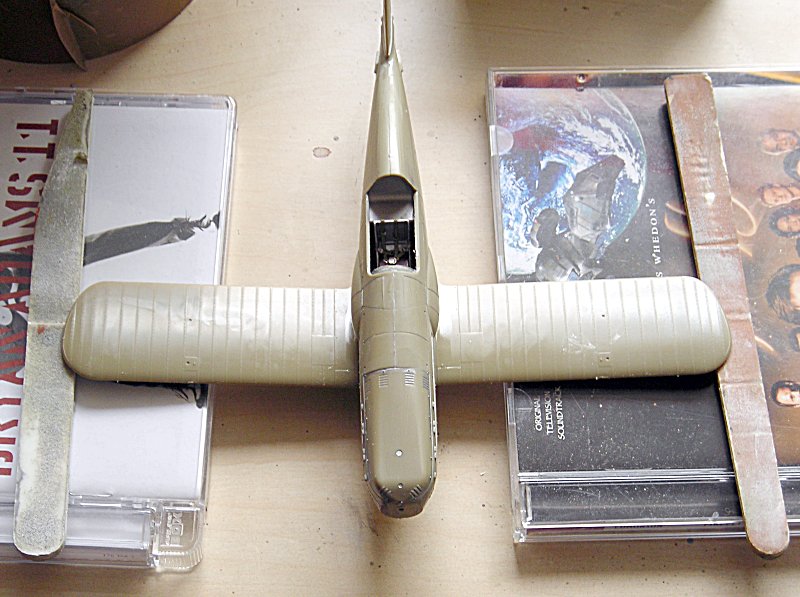
In case you wonder .. the outside alu color suffered a bit form sanding, tear and wear so I stripped it .. it was a test anyway ... it will be reapplied later.
happy modelling
Steffen
Edit ... I corrected some errors and added a paragraph .. there must be something in the tea ....
DULCE ET DECORUM EST PRO HOBBY MORI
Alberta, Canada
Joined: January 19, 2008
KitMaker: 6,743 posts
AeroScale: 6,151 posts
Posted: Tuesday, September 16, 2008 - 02:50 AM UTC
WOW Steffen fantastic job ! very interesting aircraft . Just love the deatil in the office !
Germany
Joined: September 07, 2005
KitMaker: 5,609 posts
AeroScale: 5,231 posts
Posted: Tuesday, September 16, 2008 - 05:15 AM UTC
Many thanks Terri
but when you compare my meager try with Rowans "office" it is just a caricature .. OTOH you cannot see much of it once it is closed ...
cheers
Steffen
DULCE ET DECORUM EST PRO HOBBY MORI
Merlin
 Senior Editor
#017
United Kingdom
Joined: June 11, 2003
KitMaker: 17,582 posts
AeroScale: 12,795 posts
Posted: Tuesday, September 16, 2008 - 09:21 AM UTC
Hi Steffen
That's very kind of you - even if it is totally untrue! The
real difference between our models is that you are far, far better than me at actually finishing them!

All the best
Rowan

BEWARE OF THE FEW...
As I grow older, I regret to say that a detestable habit of thinking seems to be getting a hold of me. - H. Rider Haggard
Germany
Joined: September 07, 2005
KitMaker: 5,609 posts
AeroScale: 5,231 posts
Posted: Tuesday, September 16, 2008 - 09:47 AM UTC
Well, Rowan
I stand to my statement above ... I would never (again) try such close ups of my models ...
This is Rowans cockpit from his build thread (link posted above)
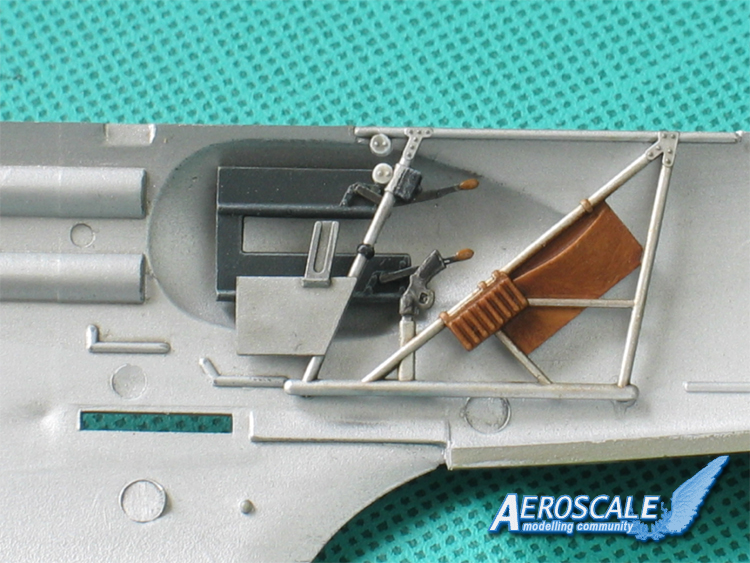
I ordered some cheap photo lights so that my pictures will be at least sharp in the future .. but still there are ages between the two builds.
As for finishing models ... I bet that we are pretty much on par on started models .. it is just my current situation (in wich modelling helps me as a kind of meditation to cope with it) that makes me finish something, but I digress.
I hope I get this done for Battle over Europe.
May I remind you to look for the type of bracing?! thanks!
all the best
Steffen
DULCE ET DECORUM EST PRO HOBBY MORI
Merlin
 Senior Editor
#017
United Kingdom
Joined: June 11, 2003
KitMaker: 17,582 posts
AeroScale: 12,795 posts
Posted: Tuesday, September 16, 2008 - 10:20 AM UTC
Thanks Steffen!
I'm starting to suspect a conspiracy to get me to finish my kit!


Quoted Text
May I remind you to look for the type of bracing?! thanks!
I'll go and dig out that reference book now.

All the best
Rowan

BEWARE OF THE FEW...
As I grow older, I regret to say that a detestable habit of thinking seems to be getting a hold of me. - H. Rider Haggard
Merlin
 Senior Editor
#017
United Kingdom
Joined: June 11, 2003
KitMaker: 17,582 posts
AeroScale: 12,795 posts
Posted: Tuesday, September 16, 2008 - 10:27 AM UTC
Hi again
Looking at the photos in the HT Model Special of original machines and the Czech museum replica, I'm certain the rigging was done with streamlined wire.
All the best
Rowan

BEWARE OF THE FEW...
As I grow older, I regret to say that a detestable habit of thinking seems to be getting a hold of me. - H. Rider Haggard
Germany
Joined: September 07, 2005
KitMaker: 5,609 posts
AeroScale: 5,231 posts
Posted: Tuesday, September 16, 2008 - 10:36 AM UTC
Rats! ...
Many thanks for looking!!!!!! Are you aware of a professional product for those (eduard, part, ....??)
I know the guys from PMCL in Lübeck did/do such stuff but it is not regularily available .. should have bought some at the last show ...
greets
Steffen
P.S. as for conspiracy .. I only say Bf 110
DULCE ET DECORUM EST PRO HOBBY MORI
Merlin
 Senior Editor
#017
United Kingdom
Joined: June 11, 2003
KitMaker: 17,582 posts
AeroScale: 12,795 posts
Posted: Tuesday, September 16, 2008 - 08:07 PM UTC
Hi Steffen
I've never come across anything (I know some kits occasionally include etched streamlined wires). I've heard of people flattening soft wire, and I've stretched sprue that I'd sanded to shape.
Maybe our WW1 brigade know of an easy source?
All the best
Rowan

BEWARE OF THE FEW...
As I grow older, I regret to say that a detestable habit of thinking seems to be getting a hold of me. - H. Rider Haggard
Germany
Joined: September 07, 2005
KitMaker: 5,609 posts
AeroScale: 5,231 posts
Posted: Tuesday, September 16, 2008 - 09:52 PM UTC
Hello Rowan
Many thanks ... I hoped there was an AM set easily available... i contacted the PMCL tonight and I hope I get an answer soon ... hopefully I can get such a set ... (it is not perfect, but better than most other stuff
Until then my build is pretty much on hold. I added the elevators yesterday and can do some bits and pieces .. I do not know if it is clever to add the u/c gear at this stage or leave it off until after painting. ... luckily I have enough other stuff the Wildcat needs some Klear and the weathering and flat .. the Hellcat has some decals on .. when thats finished it will get a similar treatment as the Wildcat.
cheers
Steffen
Edit: .. post cleaned up .. it went a bit off theme  (see Terri's answer below for the pic)
DULCE ET DECORUM EST PRO HOBBY MORI
Germany
Joined: September 07, 2005
KitMaker: 5,609 posts
AeroScale: 5,231 posts
Posted: Wednesday, September 17, 2008 - 12:22 AM UTC
hello world
I just got my photo lamps ..
Well, you get what you pay for. The light is focussed on a small area and the light is a bit on the yellow side. Still it works.
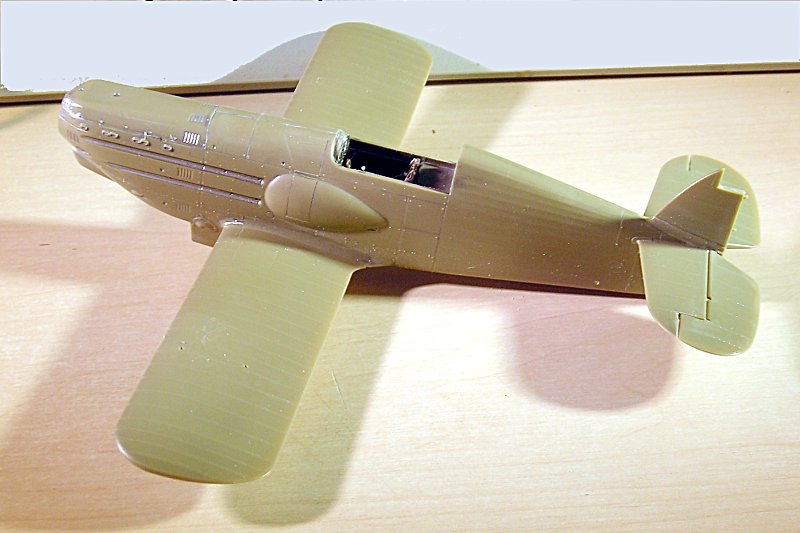
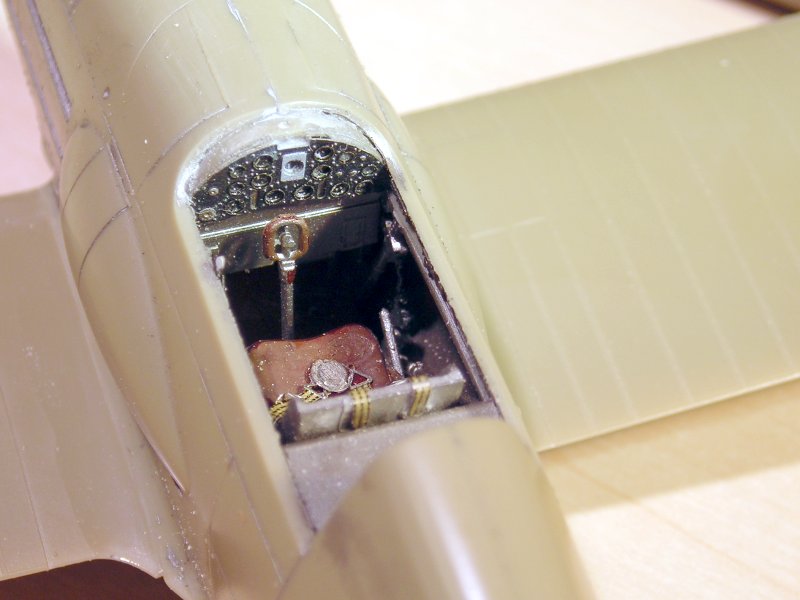
(just to prove what I wrote above I took a close up of the pit)
cheers
Steffen
DULCE ET DECORUM EST PRO HOBBY MORI
England - North, United Kingdom
Joined: April 10, 2005
KitMaker: 78 posts
AeroScale: 43 posts
Posted: Wednesday, September 17, 2008 - 07:52 PM UTC
Steffen
Here's the linkys to my build of the kit.. This maybe the thread Rowan was thinking of.
http://www.britmodeller.com/forums/index.php?showtopic=12292&hl=Avia+B534http://www.britmodeller.com/forums/index.php?showtopic=12664&hl=Avia+B534Keep up the good work, she's a looker at the end.
IAN

Germany
Joined: September 07, 2005
KitMaker: 5,609 posts
AeroScale: 5,231 posts
Posted: Wednesday, September 17, 2008 - 08:30 PM UTC
Hello Ian
many thanks!!!
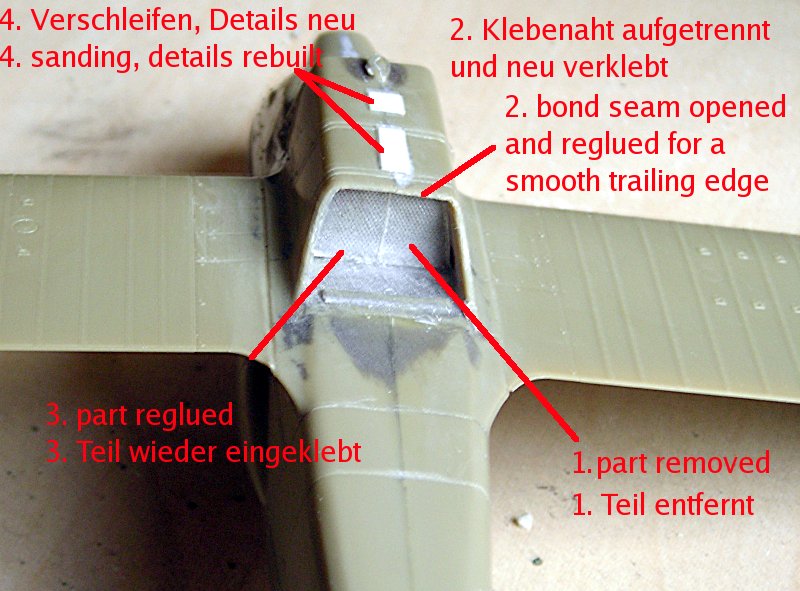
This looks familiar, though I could manage to get the fuselage pretty nice i still had the radiator step. Also the angled inside part .. so it seems that was not just my fault


.
Here is Ian's picture. And life links:
http://www.britmodeller.com/forums/index.php?showtopic=12292&hl=Avia+B534" target="_blank">
http://www.britmodeller.com/forums/index.php?showtopic=12292&hl=Avia+B534http://www.britmodeller.com/forums/index.php?showtopic=12664&hl=Avia+B534" target="_blank">
http://www.britmodeller.com/forums/index.php?showtopic=12664&hl=Avia+B534
hope my pic explains good enough what I did:
cheers
Steffen
DULCE ET DECORUM EST PRO HOBBY MORI
Alberta, Canada
Joined: January 19, 2008
KitMaker: 6,743 posts
AeroScale: 6,151 posts
Posted: Friday, September 19, 2008 - 03:22 AM UTC
Hey it's me in my night gear !
Germany
Joined: September 07, 2005
KitMaker: 5,609 posts
AeroScale: 5,231 posts
Posted: Friday, September 19, 2008 - 03:37 AM UTC
Hi Terri
I won't comment on that .. it's a minefield ... impossible to pass safely


but I am glad you like the model.
cheers
Steffen
DULCE ET DECORUM EST PRO HOBBY MORI
Alberta, Canada
Joined: January 19, 2008
KitMaker: 6,743 posts
AeroScale: 6,151 posts
Posted: Friday, September 19, 2008 - 03:47 AM UTC
I always enjoy your builds Steffen !
Germany
Joined: September 07, 2005
KitMaker: 5,609 posts
AeroScale: 5,231 posts
Posted: Friday, September 19, 2008 - 04:10 AM UTC
Quoted Text
I always enjoy your builds Steffen !
Well I wish I could paint figures like that. It is from a friend of mine.
cheers
Steffen
Edit .. I cleaned this post up as I got a bit off themeDULCE ET DECORUM EST PRO HOBBY MORI


