REVIEW
Eduard 1:48 Spad XIII
Colorado, United States
Joined: January 25, 2004
KitMaker: 11,669 posts
AeroScale: 11,011 posts
Posted: Saturday, September 05, 2009 - 08:33 AM UTC
Quoted Text
Hi Stephen I had not seen that you had begun and ended your spad (almost ended). However I waited for it. It is splendid. Colours are very nice and go to him very well.
Louis
Thank Louis for the kind words. Your build of this kit inspired me. I am working on a solution for the rigging of the middle bay struts.
". . .The most important thing is to know why you build and then get the most that you can out of building." via D.D.
New York, United States
Joined: December 15, 2006
KitMaker: 365 posts
AeroScale: 344 posts
Posted: Sunday, September 06, 2009 - 12:54 PM UTC
Stephen,
Most excellent, model dude!
Two things:
First, in your opinion, would the Misterkit paints be good for hand brushing? The colors look outstanding and that is my preferred method.
Second, I eagerly await your solution to the rigging of the middle bay struts. To me, this is a major stumbling block for this kit and the SPAD VII from special hobby.
I kinda liked the way Dragon solved the problem with their SPAD XIII.
Model on, model dude!
Dwayne
Colorado, United States
Joined: January 25, 2004
KitMaker: 11,669 posts
AeroScale: 11,011 posts
Posted: Sunday, September 06, 2009 - 03:41 PM UTC
I think I have it figured out.
". . .The most important thing is to know why you build and then get the most that you can out of building." via D.D.
Michigan, United States
Joined: February 19, 2009
KitMaker: 30 posts
AeroScale: 13 posts
Posted: Monday, September 07, 2009 - 08:00 PM UTC
Quoted Text
Coming along very nicely Stephen !
Did you break a wing strut by the way ? 
May I add my own "WOW!"? Beautiful job!
Colorado, United States
Joined: January 25, 2004
KitMaker: 11,669 posts
AeroScale: 11,011 posts
Posted: Tuesday, September 08, 2009 - 11:24 PM UTC
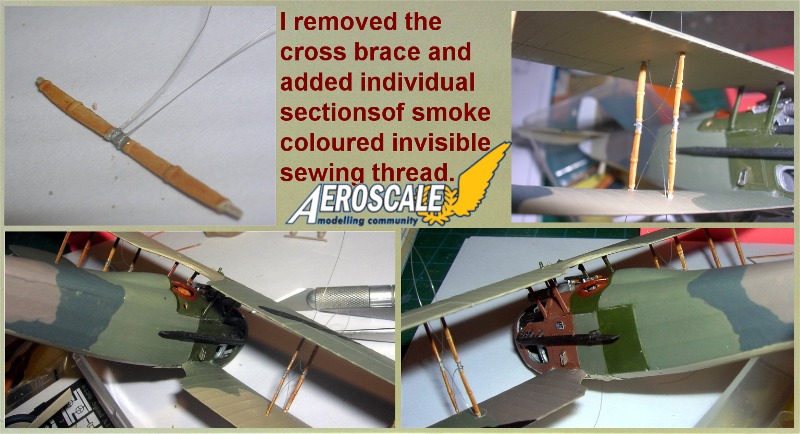
Thank you bizarro1. Here is where I begin to rig the main planes.
". . .The most important thing is to know why you build and then get the most that you can out of building." via D.D.
Alberta, Canada
Joined: January 19, 2008
KitMaker: 6,743 posts
AeroScale: 6,151 posts
Posted: Wednesday, September 09, 2009 - 01:44 AM UTC
Through the wing method I see , was wondering what you were going to come up with ever since Dwanye asked . Great idea on doing it . Did you use a # 80 drill bit for the holes in the struts ? Just seems to be a very small surface area for the bit to grab with out slipping and japping into a waiting finger !
How is the fit of the attachment points for the struts ?
Very impressive so far Stephen , makes me want to break out my kit and start building her .
Colorado, United States
Joined: January 25, 2004
KitMaker: 11,669 posts
AeroScale: 11,011 posts
Posted: Wednesday, September 09, 2009 - 09:23 AM UTC
Quoted Text
Stephen,
Most excellent, model dude!
Two things:
First, in your opinion, would the Misterkit paints be good for hand brushing? The colors look outstanding and that is my preferred method.
Second, I eagerly await your solution to the rigging of the middle bay struts. To me, this is a major stumbling block for this kit and the SPAD VII from special hobby.
I kinda liked the way Dragon solved the problem with their SPAD XIII.
Model on, model dude!
Dwayne
Greetings Dwayne I wanted to get that rigging thing out of the way before I responded.
A. Misterkit paints brush and air brush on great. Any bubbles disappear into a smooth uniform surface.
B. I have posted images showing the remedy. I used the same method on a DH 2 once.
All the best!
". . .The most important thing is to know why you build and then get the most that you can out of building." via D.D.
Colorado, United States
Joined: January 25, 2004
KitMaker: 11,669 posts
AeroScale: 11,011 posts
Posted: Wednesday, September 09, 2009 - 09:29 AM UTC
Quoted Text
". . . Did you use a # 80 drill bit for the holes in the struts ? Just seems to be a very small surface area for the bit to grab with out slipping and japping into a waiting finger !
How is the fit of the attachment points for the struts ? Very impressive so far Stephen , makes me want to break out my kit and start building her .
Greetings Terri, No drilling just laid the thread sections in a small pool of thick gel cyano. let it dry and trimmed the ends. I did use a minute drop of accelerator to make short work of the job. The resulting ridges work together in holding the new horizontal brace.
". . .The most important thing is to know why you build and then get the most that you can out of building." via D.D.
Colorado, United States
Joined: January 25, 2004
KitMaker: 11,669 posts
AeroScale: 11,011 posts
Posted: Wednesday, September 09, 2009 - 11:01 PM UTC
Well here is the build halfway through Wednesday evening.
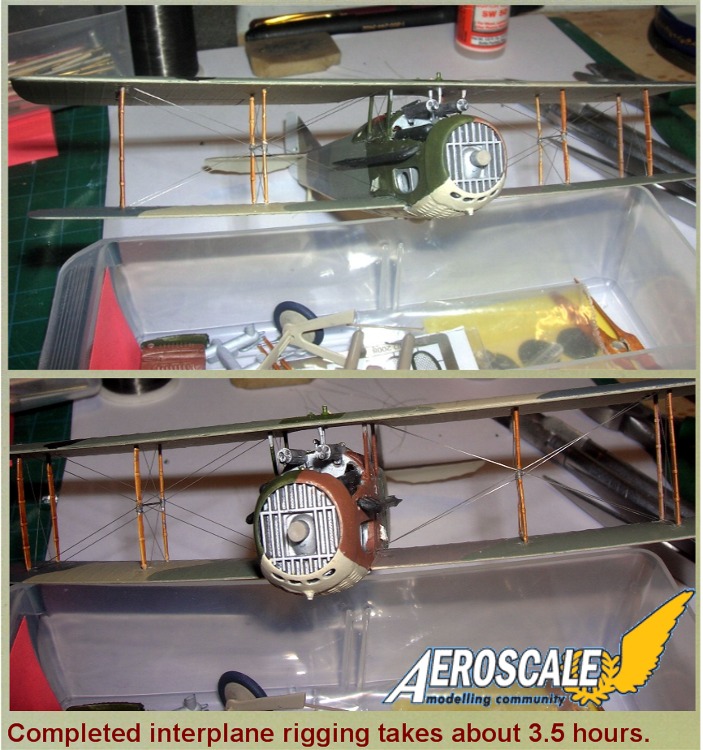
". . .The most important thing is to know why you build and then get the most that you can out of building." via D.D.
Colorado, United States
Joined: January 25, 2004
KitMaker: 11,669 posts
AeroScale: 11,011 posts
Posted: Wednesday, September 09, 2009 - 11:02 PM UTC
Then at the evening's end.
". . .The most important thing is to know why you build and then get the most that you can out of building." via D.D.
Alberta, Canada
Joined: January 19, 2008
KitMaker: 6,743 posts
AeroScale: 6,151 posts
Posted: Thursday, September 10, 2009 - 01:29 AM UTC
Excellent job done on the rigging Stephen

Looking forward to seeing her done !
Colorado, United States
Joined: January 25, 2004
KitMaker: 11,669 posts
AeroScale: 11,011 posts
Posted: Friday, September 11, 2009 - 04:24 PM UTC
Final touch-ups later this evening.
". . .The most important thing is to know why you build and then get the most that you can out of building." via D.D.
Colorado, United States
Joined: January 25, 2004
KitMaker: 11,669 posts
AeroScale: 11,011 posts
Posted: Saturday, September 12, 2009 - 12:45 AM UTC
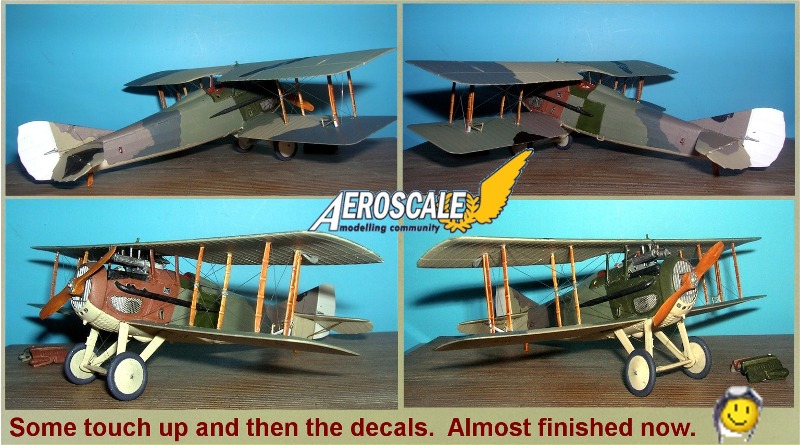
As promised the end is here. Finished I say finished! With this build anyway.
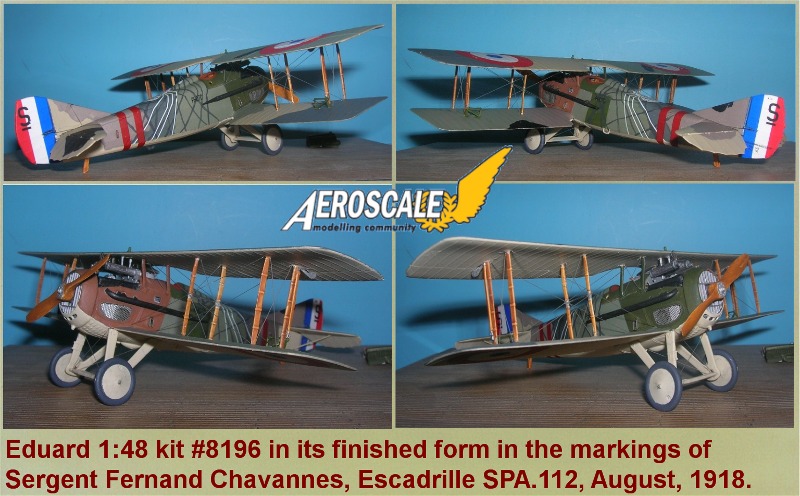
Here is the end of this tail uh er tale! STL
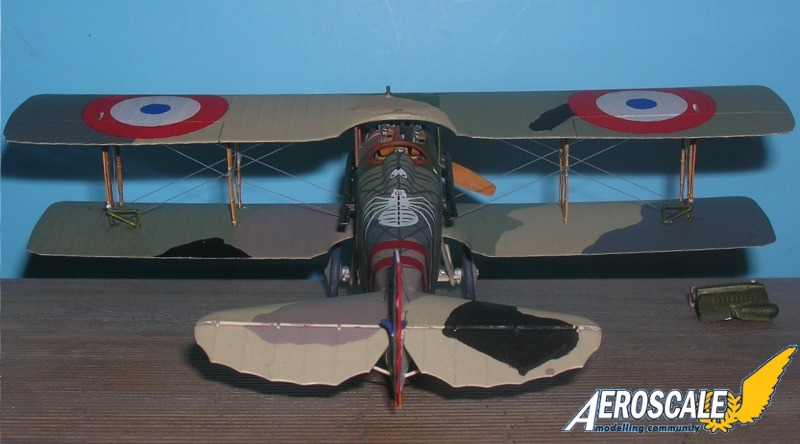
". . .The most important thing is to know why you build and then get the most that you can out of building." via D.D.
Michigan, United States
Joined: February 19, 2009
KitMaker: 30 posts
AeroScale: 13 posts
Posted: Saturday, September 12, 2009 - 01:05 AM UTC
That's absitively beautiful! The SPAD has always been one of my very favorites and that is a well-executed example! I doff my flight helmet in awed respect!

Alberta, Canada
Joined: January 19, 2008
KitMaker: 6,743 posts
AeroScale: 6,151 posts
Posted: Saturday, September 12, 2009 - 04:02 AM UTC
Stephen , I must say this is one of your best builds so far !! Wow what a fantastic job done on her . Your solution to the rigging will be most helpful for others

Very well played !
Since I joined the site I have notice that your finishing has also improved as well , thanks for being a visual teacher

Colorado, United States
Joined: January 25, 2004
KitMaker: 11,669 posts
AeroScale: 11,011 posts
Posted: Sunday, September 13, 2009 - 02:48 PM UTC
Thank you Michael and Terri. Its easy to do your best when it is appreciated. Model On!
For me adding a relevant figure helps bring a visual proportion to the display. Here with Eduard's 1:48 #8196 Spad XIII build I use the Model Cellar French officer.


". . .The most important thing is to know why you build and then get the most that you can out of building." via D.D.
Michigan, United States
Joined: February 19, 2009
KitMaker: 30 posts
AeroScale: 13 posts
Posted: Tuesday, September 15, 2009 - 08:44 AM UTC
Truly a beautiful job, Stephen!


