_GOTOBOTTOM
Early Aviation
Discuss World War I and the early years of aviation thru 1934.
1/48 Blue Max Sopwith 7.F-1 "Snipe"
BradCancian
_VISITCOMMUNITY
Queensland, Australia
Joined: August 30, 2006
KitMaker: 285 posts
AeroScale: 281 posts
Posted: Friday, October 17, 2008 - 10:11 PM UTC
Hi everyone,

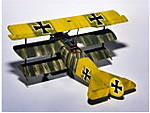
Just thought I would share some progress pics of the project I have just started - the 1/48 scale Blue Max Sopwith 7F-1 Snipe (there is plenty of history around on this aircraft so I won't go into it here). I plan to build this as a 4SQN Australian Flying Corps aircraft (yes I am feeling a little patriotic after building all that German stuff!) The kit is limited run, and is one of three Snipe kits in this scale (the others being the CSM resin offering and the Hi-Tech kit, also limited run). Being a Blue Max kit (ie nice fine details but nothing really fits), I am in for a fun time.

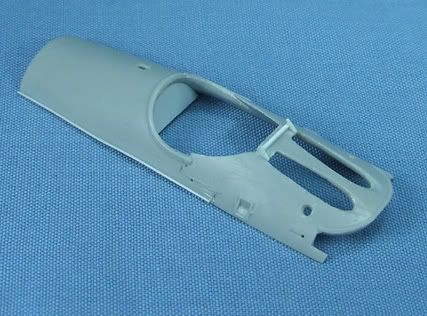
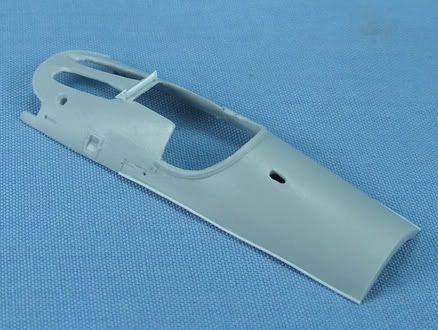
I have not done too much to date, however, I started with the upper fuselage decking. Dry-fitting revealed that it sat too high and was too wide, so I sanded the deck until it sat properly at the right height. Looking at photos and drawings in the datafile, it quickly became ovious to me that Blue Max got the shape of the cockpit opening rather wrong. The opening needed to be extended forward, noting the assymetry between sides (the required adjustments are marked in blue - of note, taking a look at sprue shots, Hi-Tech got the cockpit opening wrong as well, and I am not so sure on the CSM shape).


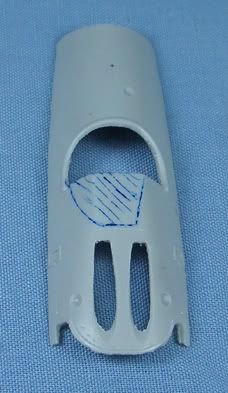
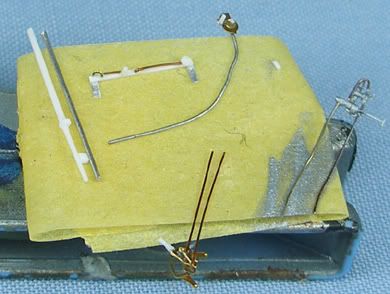
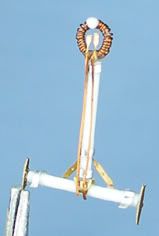
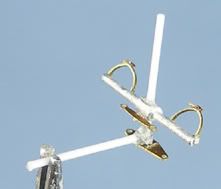
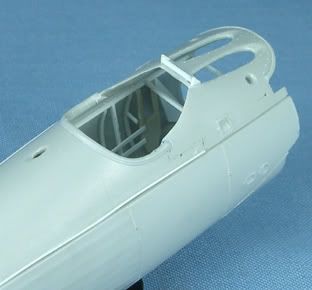
I thusly modified the kit cockpit opening and thinned the thick plastic to a more realistic thickness. Whilst I was on the decking, I made a few more corrections. The hand hold behind the cockpit is moulded as a round dimple, where photos clearly show a smaller rectangular opening with rounded ends. I filled the dimple then cut a new handhold. I also added the panel lines where the plywood section of the decking finishes and the metal part starts. Other additions included the windshield stand, bulkhead behind the cockpit opening, and the raised lip around the bottom sides of the decking (a feature prominent in photos).


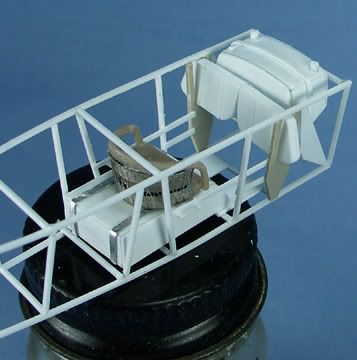
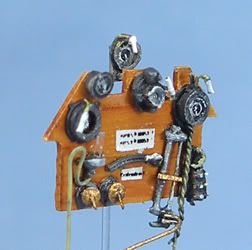
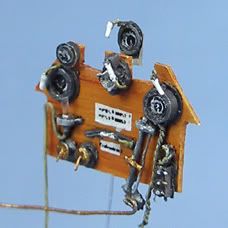
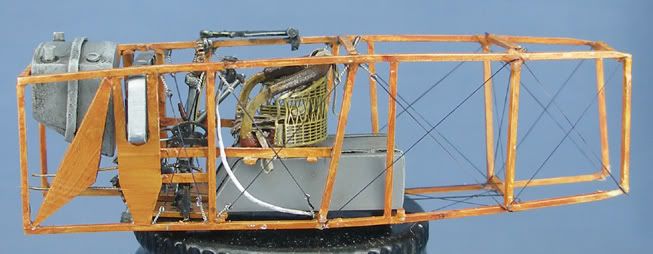
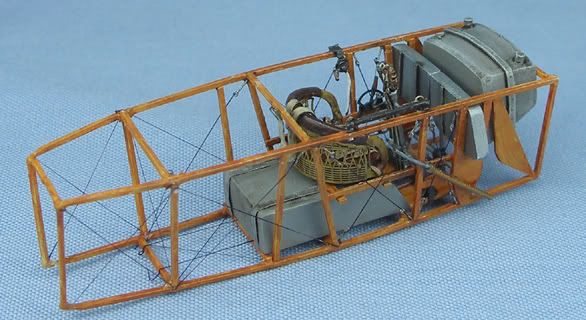
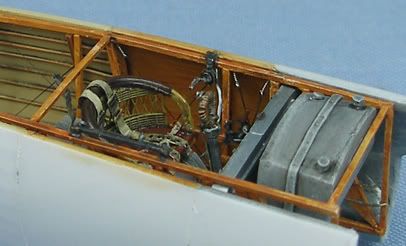
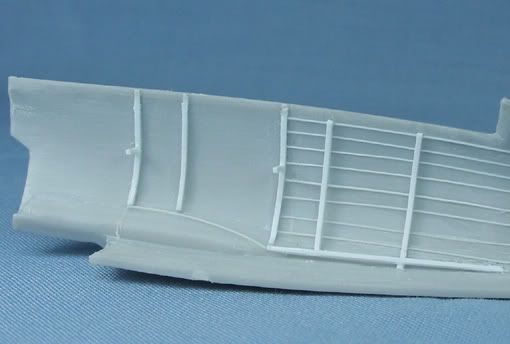
Next I moved to the cockpit itself. The enlarged cockpit opening, plus the "open" centre wing section, meant that I couldn't get away with anything too simple. The kit cockpit is simple and predominantly white metal, and it quickly became apparent to me that it wouldn't fit. A such, I decided to largely scratch build the cockpit. After thinning out the sides a little, I built up the cockpit framing from strip and sheet styrene (plus some heat stretched styrene for the stringers), making sure to check that it fit. I did have to taper the frame towards the lower part of the cockpit due to the indents for the wing attachments, however, when in place with the decking on it is surprisingly difficult to tell that it is tapered.


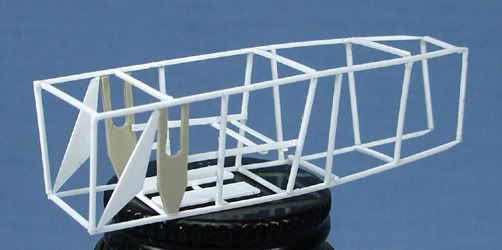
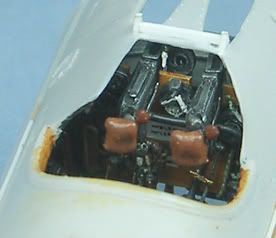
Here it is all closed up to make sure it fits (no doubt something will happen as I built it up that will take it all out of level!!)


Next I will tackle some painting and cockpit detailing.

All comments and feedack welcome.

BC
agiosdimitrios
_VISITCOMMUNITY
Thessaloniki, Greece / Ελλάδα
Joined: April 15, 2008
KitMaker: 90 posts
AeroScale: 89 posts
Posted: Saturday, October 18, 2008 - 12:28 AM UTC
Even if you left it with the work you have done so far, still it would be an excelent model.
Congratulations Brad, it is always a pleasure for me to watch your work, keep on the good job my friend.
JackFlash
_VISITCOMMUNITY
Colorado, United States
Joined: January 25, 2004
KitMaker: 11,669 posts
AeroScale: 11,011 posts
Posted: Saturday, October 18, 2008 - 09:50 AM UTC
Greetings Brad! Nicely Done! Tell us more. What size is the plastic stock you are using? Also what are your chosen adhesives?
legendasboy
_VISITCOMMUNITY
Portugal
Joined: December 09, 2007
KitMaker: 168 posts
AeroScale: 159 posts
Posted: Saturday, October 18, 2008 - 10:32 AM UTC
great work, model on
MerlinV
_VISITCOMMUNITY
Victoria, Australia
Joined: November 26, 2006
KitMaker: 608 posts
AeroScale: 602 posts
Posted: Saturday, October 18, 2008 - 01:19 PM UTC
Hey Brad,

I built this kit many years ago OOB (aside from some details on the engine and a wooden prop)... I was always very happy with my build... Untill I saw what you are doing.

This is amazing stuff!

And I look forward to seeing more.

BTW, I found the Snipe to be one of the better Blue Max kits as regard fit and detail... But my research was not anywhere near as complete as yours is.

Cheers,

Hugh
thegirl
_VISITCOMMUNITY
Alberta, Canada
Joined: January 19, 2008
KitMaker: 6,743 posts
AeroScale: 6,151 posts
Posted: Monday, October 20, 2008 - 03:22 PM UTC
Very nice Brad , Looking forward on watching this one .
BradCancian
_VISITCOMMUNITY
Queensland, Australia
Joined: August 30, 2006
KitMaker: 285 posts
AeroScale: 281 posts
Posted: Tuesday, October 21, 2008 - 12:28 AM UTC
A very minor update - fuel tank, oil tank and ammo cans are basically scratchbuilt now from sheet styrene - not sure if I will use this seat (from the Eduard F.2b).


Instrument panel shape has been cut out and will be painted in a simulated wood grain before addition of gauges and switches. It will be glued into the upper decking to ensure alignment with the guns. Other details will be scratch built and added after painting of the interior frame.

Now I can start some painting!

BC
Removed by original poster on 10/27/08 - 20:32:41 (GMT).
BradCancian
_VISITCOMMUNITY
Queensland, Australia
Joined: August 30, 2006
KitMaker: 285 posts
AeroScale: 281 posts
Posted: Monday, November 03, 2008 - 04:26 PM UTC
Not much of an update, more of a little bit of a modelling milestone for me

I have started a little painting on the interior using my usual oil paint technique for replicating wood... Whilst waiting for the oil paints to dry, I have been playing with a few other details.

Firstly, I really didn't like the wheels Blue Max supply with the kit - they look too fat and the detail is soft. Looking in the datafile, the wheels fitted to the Snipe were similar to that of the Camel. Remembering the Eduard Camel had very nice wheels, I dug out the Camel kit from the stash and they matched up very well. The only problem was, I didn't really want to steal the wheels and leave the unbuilt Camel without feet. Similarly, the Blue Max Vickers guns are soft in detail - remembering the very nice resin vickers guns in the twin-vickers boxing of the Sopwith triplane, I also dug the kit out and glanced longingly - again I didn't really want to steal bits from the unbuilt kit.

So, I decided to have my first crack at resin casting! A few weeks ago I picked up a starter kt for making your own resin castings. After spending a day or so making the silicon moulds (the stuff takes a while to dry and I needed double sided mould), I had my first resin pour this morning. All in all, other than a short-moulded vickers muzzle (easily fixed), the casting went rather well. Here are pics of the wheels and guns straight out of the moulds:


Overall I am quite pleased with how they turned out - the detail is crisp and the mouldings clean.

Ok, so it's nothing really major or ground breaking, but it's a first for me I am rather chuffed now that I can cast details and not have to steal from other kits!

Now, what to cast next.....?

BC
MerlinV
_VISITCOMMUNITY
Victoria, Australia
Joined: November 26, 2006
KitMaker: 608 posts
AeroScale: 602 posts
Posted: Monday, November 03, 2008 - 06:11 PM UTC
Well done Brad.
I purchased a Pinkisil starter kit my self a year or so ago have been trying to get up the guts to try it out.

Next?

How about improving the kits engine by casting your own Bentleigh!

Cheers,

Hugh
BradCancian
_VISITCOMMUNITY
Queensland, Australia
Joined: August 30, 2006
KitMaker: 285 posts
AeroScale: 281 posts
Posted: Monday, November 03, 2008 - 07:34 PM UTC
G'day Hugh - sounds like we have the same starter set! I encourage you to give it a try, it was surprisingly simple.

BC
MerlinV
_VISITCOMMUNITY
Victoria, Australia
Joined: November 26, 2006
KitMaker: 608 posts
AeroScale: 602 posts
Posted: Monday, November 03, 2008 - 09:43 PM UTC
Don't worry Brad,
I can see it getting a great workout on my BE2. Buggered if I'm going to be fabricating eight cylinders one by one.

And I want to be able to make a few Renault 70 Hp's so a few masters and some moulds will fit the bill quite nicely.

It occured to me after I posted that last post that the engine in that kit is one of Blue Max's better efforts...

Cheers,

Hugh
thegirl
_VISITCOMMUNITY
Alberta, Canada
Joined: January 19, 2008
KitMaker: 6,743 posts
AeroScale: 6,151 posts
Posted: Tuesday, November 04, 2008 - 02:47 AM UTC
For your first try at casting parts they are really great . I'm planning on casting my own parts . I have this lovely mercedes D.IIIa engine .
So a question for you and Hugh . Where did you guys pick up the Pinkisil stater kit ?
BradCancian
_VISITCOMMUNITY
Queensland, Australia
Joined: August 30, 2006
KitMaker: 285 posts
AeroScale: 281 posts
Posted: Tuesday, November 04, 2008 - 06:55 PM UTC
G'day Terri - I picked mine up at a local modelling club meeting, not sure where you could pick up something similar where you are? Probably a quick search online would reveal many starter kits available.

Here's some info that may be of use on the Pinkysil kit (ok so it's an Australian website):

http://www.armsmodelit.com.au/InfoSheets/iskitQS.html

You may be able to order it from these guys if you have no luck sourcing something more local.

Cheers,

BC
BradCancian
_VISITCOMMUNITY
Queensland, Australia
Joined: August 30, 2006
KitMaker: 285 posts
AeroScale: 281 posts
Posted: Tuesday, November 04, 2008 - 10:18 PM UTC
I also decided to do some more on some of the other areas of the kit whilst I wait for the cockpit oil paints to dry... here is the kit's Bentley BR.II engine all assembled and wired up - no paint on as yet. The kit engine is in white metal and all 9 cylinders need to be assembled onto the crankcase - fun (especially when you drop the engine mid assembly and pieces go everywhere... ). That said the kit engine is quite nice - given that alot of it will be hidden under the cowl, all I needed to add were spark plugs, ignition wires, pushrods and the pushrod sleeves on the casing.


I think I will give the engine some paint tomorrow night. I think the engine will come up nicely after an oil wash.

BC
thegirl
_VISITCOMMUNITY
Alberta, Canada
Joined: January 19, 2008
KitMaker: 6,743 posts
AeroScale: 6,151 posts
Posted: Wednesday, November 05, 2008 - 02:03 AM UTC
Thanks for the link Brad I will have a look into it . I must say though , that is one of the best engines from Bluemax that I seen from them so far . with the ones sitting in my stash all the engines will need to be replaced . This is where the D.IIIa engine comes in to play .

What did you use for the push rod sleeves ? Looks like q-tip bit's .
JackFlash
_VISITCOMMUNITY
Colorado, United States
Joined: January 25, 2004
KitMaker: 11,669 posts
AeroScale: 11,011 posts
Posted: Thursday, November 06, 2008 - 05:29 PM UTC


Hey Brad the Bentley's had stay pins on each side of the cylinder. Br. I & Br.II types.
BradCancian
_VISITCOMMUNITY
Queensland, Australia
Joined: August 30, 2006
KitMaker: 285 posts
AeroScale: 281 posts
Posted: Thursday, November 06, 2008 - 08:52 PM UTC
G'day Stephen - Blue Max picked up this detail and moulded the pins on either side of the cylinders. Look closely and you will see 'em. Should stand out more under an oil wash.

BC
JackFlash
_VISITCOMMUNITY
Colorado, United States
Joined: January 25, 2004
KitMaker: 11,669 posts
AeroScale: 11,011 posts
Posted: Friday, November 07, 2008 - 04:50 AM UTC
Your right Brad. Too bad there is a gap at the bottom of the cylinders. The stay pins should go into the crank case. But as you said not much will be seen after the cowling is on.
BradCancian
_VISITCOMMUNITY
Queensland, Australia
Joined: August 30, 2006
KitMaker: 285 posts
AeroScale: 281 posts
Posted: Saturday, November 15, 2008 - 02:18 PM UTC
On a minor progress note, I'm still waiting for some areas of the oil paints in the cockpit to dry (been nearly two weeks and STILL tacky - I love oils but I HATE their drying time)... that said, I have progressed, and have been working on the instrument panel. The kit's panel is too short and a little mis-shapen. As such, I scratchbuilt the whole panel using various reference sources. I started building the instruments from scrap plastic, wire and the odd bit of etch from the spares box.


I then added some paint and some decals for instruments:


And added the instruments onto the panel. After another couple of decals and a quick wash, she was done:


Hopefully the rest of these darned oils will dry in the next couple of days so I can begin adding the rest of the details to the cockpit frame. Might get onto painting that engine in the mean time...

BC
MerlinV
_VISITCOMMUNITY
Victoria, Australia
Joined: November 26, 2006
KitMaker: 608 posts
AeroScale: 602 posts
Posted: Saturday, November 15, 2008 - 04:21 PM UTC
Wow!
Great instruments there Brad. Did you use the kit decals for the dials?

Cheers,

Hugh
Hatter50
_VISITCOMMUNITY
North Carolina, United States
Joined: June 17, 2006
KitMaker: 478 posts
AeroScale: 391 posts
Posted: Saturday, November 15, 2008 - 11:51 PM UTC
I do 1/32, I do 1/32, I do 1/32................

Yep, your gauges reminded me why I do 1/32........ ........but they do TEMP me. I'm liking the metal framework along with wood stringers..............makes it very interesting inside. Makes it LOOK like it's 1/32 and not Braile Scale............

Regards
Steve
thegirl
_VISITCOMMUNITY
Alberta, Canada
Joined: January 19, 2008
KitMaker: 6,743 posts
AeroScale: 6,151 posts
Posted: Sunday, November 16, 2008 - 05:27 AM UTC
A very lovely panel indeed the detail really stands out .
BradCancian
_VISITCOMMUNITY
Queensland, Australia
Joined: August 30, 2006
KitMaker: 285 posts
AeroScale: 281 posts
Posted: Saturday, November 29, 2008 - 05:01 PM UTC
Hi guys – cockpit is now done. Other than the seat, the rest of the cockpit details were scratchbuilt from strip and sheet plastic, wire, and the odd etched piece from the spares box. The seat belts are from the Eduard etched set, and the seat is from the Eduard Bristol F.2b with a hole drilled in the centre to allow access to the fuel cap. Tanks and ammo boxes were scratchbuilt as shown previously. I did cut the Vickers guns inhalf to allow for ease of fitment and painting. I also added pads to the Vickers butts from putty. Anyways, I’ll let the pics do the talking.


And here it is dry-fitted into the fuselage halves:


BC
JackFlash
_VISITCOMMUNITY
Colorado, United States
Joined: January 25, 2004
KitMaker: 11,669 posts
AeroScale: 11,011 posts
Posted: Saturday, November 29, 2008 - 05:40 PM UTC
Brad! Tell the truth now. You hired some of Santa's elves or at least Peter Jackson's. The workmanship is excellent! Happy Holidays you steely eyed model builder!
 _GOTOTOP