_GOTOBOTTOM
Modern (1975-today)
Discuss the modern aircraft age from 1975 thru today.
Tamiya 1/48 F-117 Nighthawk
sgtsauer
#065
_VISITCOMMUNITY
Missouri, United States
Joined: March 30, 2002
KitMaker: 2,605 posts
AeroScale: 91 posts
Posted: Friday, November 21, 2008 - 06:41 PM UTC
This is going to be a blog showing the progress of my Tamiya F-117 Nighthawk. I had originally started this kit for the "Black Jets" campaign. But, do to family illnesses and military obligations, I did not get it completed in time.

The kit is the 1/48th scale Tamiya F-117. Aftermarket items that I am using are the Eduard color PE set. I had purchased the Verlinden F-117 update set but it was a total disaster. The only part that is being used out of the Verlinden set is the joystick.

I haven't completed to much so far. I installed a couple of exhaust parts along the rear of the wing edge. I also have installed part of the rear vertical stabilizers.

In this next pair of pictures, I have added PE detail to the rear bulkhead of the bomb bay. Also, there are 8 PE door hinges for the bomb bay. These 8 hinges are visible in the pictures as well:


In this photo I have begun assembly of the cockpit. I have installed the Verlinden resin control stick mentioned previously. I have cut off the kit part foot pedals and replaced them PE pedals from the Eduard set. Visible in this photo is a replacement cockpit bulkhead from the Eduard set. I have also cut off the molded ejection grap handles that are on the seat frame. These will be replaced by colored parts after the ejection set has been painted.


More to follow........
eerie
_VISITCOMMUNITY
United Kingdom
Joined: September 26, 2004
KitMaker: 1,008 posts
AeroScale: 106 posts
Posted: Tuesday, November 25, 2008 - 08:33 PM UTC
Dude, keep it going. I ll put the award up for you. I dislocated my left arm remember. Got delayed too
sgtsauer
#065
_VISITCOMMUNITY
Missouri, United States
Joined: March 30, 2002
KitMaker: 2,605 posts
AeroScale: 91 posts
Posted: Saturday, January 31, 2009 - 07:17 PM UTC
I worked on the cockpit some today. I added several PE parts from the Eduard PE set.


The ejector pin marks in the bottom of the cockpit tub are covered by the ejection seat assembly.

The white piece visible on the right side of the cockpit will get painted yellow. It is an emergency cockpit opening device used if the hydraulics fail. The top consoles and side consoles consists of 5 pieces plus the styrene rod for the manual handle.


The front console consisted of 14 parts. The messed up area at the bottom of the console support fits behind the base for the control stick and isn't visible when placed into the cockpit.

sgtsauer
#065
_VISITCOMMUNITY
Missouri, United States
Joined: March 30, 2002
KitMaker: 2,605 posts
AeroScale: 91 posts
Posted: Monday, February 02, 2009 - 04:29 PM UTC
I worked on the ejection seat tonight. This is the first ejection seat that I've done. I used the kit instructions and a Squadron/Signal book as reference. I could not see the dark spots in the lumbar region of the back cushion with my plain eyes. But boy, my digital camera sure makes it jump out. The seat belts and ejection handles are from Eduard F-117 PE set mentioned earlier


More to come!
sgtsauer
#065
_VISITCOMMUNITY
Missouri, United States
Joined: March 30, 2002
KitMaker: 2,605 posts
AeroScale: 91 posts
Posted: Wednesday, February 04, 2009 - 05:09 PM UTC
I got a little assembly completed over the last couple of days. The first photo is the assembled trapeze ejectors that carry the weapon load and the bomb bay door actuators with a little photo-etch detail (that won't be visible when the GBU's are in place).


The second photo is the assembled landing gear struts and rear landing gear wheels.

sgtsauer
#065
_VISITCOMMUNITY
Missouri, United States
Joined: March 30, 2002
KitMaker: 2,605 posts
AeroScale: 91 posts
Posted: Thursday, February 05, 2009 - 05:43 PM UTC
UPDATE 5 FEB 2009

Not too much was accomplished tonight. I put on the PE hydraulic lines for the 3 landing gear struts.


VonCuda
_VISITCOMMUNITY
North Carolina, United States
Joined: November 28, 2005
KitMaker: 2,216 posts
AeroScale: 1,080 posts
Posted: Friday, February 06, 2009 - 02:05 PM UTC
Anyone who can work with PE and make it look right has my respect. Those hydrolic lines are really going to make a difference in a jet with very little details. I'm interrested to see how you do the paint scheme. Small faded patches and the correct washes will help but that all over flat black is something I've had a hard time working with in the past.
Very nice work so far Brent.

Hermon
sgtsauer
#065
_VISITCOMMUNITY
Missouri, United States
Joined: March 30, 2002
KitMaker: 2,605 posts
AeroScale: 91 posts
Posted: Friday, February 06, 2009 - 05:04 PM UTC
I'm struggling with the paint scheme. Part of me wants to do an operational aircraft in "black". How to do the flat black finish is really going to be a challenge. Although no operational aircraft had visible panel lines, I like the look of the panel lines on the aircraft. So, I will not fill them all in. I am pondering preshading the panel lines in white or gray before airbrushing the flat black. Then, I will go back and vary the shade of "black" on various panels. I'm just not sure what to do.

But, there was also an experimental aircraft that carried an Israeli inspired 3-color camouflage that I would really like to do also. It would basically be a "what if" aircraft if I did do the 3-color scheme.
CaptainA
_VISITCOMMUNITY
Indiana, United States
Joined: May 14, 2007
KitMaker: 3,117 posts
AeroScale: 2,270 posts
Posted: Saturday, March 07, 2009 - 12:39 PM UTC
You have a very nice clean build going.
TedMamere
_VISITCOMMUNITY
Moselle, France
Joined: May 15, 2005
KitMaker: 5,653 posts
AeroScale: 4,347 posts
Posted: Saturday, March 07, 2009 - 07:38 PM UTC
Hi Brent,

Modern stuff is usually not my cup of tea but the work you did so far is excellent. I hope you will consider submitting this as a feature when it will be finished.

Jean-Luc
Rattler
_VISITCOMMUNITY
Texas, United States
Joined: November 23, 2002
KitMaker: 512 posts
AeroScale: 104 posts
Posted: Wednesday, May 13, 2009 - 05:45 AM UTC
Hey hey Sgt,

Looking sweet on the build... matter fact I pulled Mine out of the cache which hadn't been finished lol ... I was wondering umm, would it be possible to get a copy of your decal placement sheet ? I can't find Mine... I think the cache monster ate the bloody thing..

Also have you checked out the Squadron walk around book # 26 on page 73 they show a artist shot of a YF-117A (79-10781) painted up in the 3tone paint.. light gray*FS36375*,light brown*FS30219*, light green*FS34227*. Also on page 52 of same book, they show some color photos of the panel lines towards the back of the aircraft an such 1 photo is from a museum bird which I'm sure is dust build up... lol since we know they never dust the static displays...

anyways I look forward to seeing your bird finished.

drop Me a pm please if I can get a copy of the decal placement page

Thank you very much

V/R
Chris
sgtsauer
#065
_VISITCOMMUNITY
Missouri, United States
Joined: March 30, 2002
KitMaker: 2,605 posts
AeroScale: 91 posts
Posted: Wednesday, May 13, 2009 - 11:44 AM UTC
I'll be progressing on this more in the next few weeks. I unexpectedly got reassigned to a new army unit and had to move very quickly. I'm currently away from home on temporary duty and hope to be back at the model bench in the next week or two.

Chris,

If you are talking about a copy of the decal placement sheet from the instructions, I will scan a copy and email it to you.
Rattler
_VISITCOMMUNITY
Texas, United States
Joined: November 23, 2002
KitMaker: 512 posts
AeroScale: 104 posts
Posted: Wednesday, May 13, 2009 - 03:38 PM UTC
Hi Brent,

yeppers that would be the sheet, I really appreciate it alot man!!

don't ya just love how the army treats ya ? lol

Brent you ever get down Ft.Hood way for TDY, be sure an lemme know

and thank you for getting Me a copy of the decal placement paper..

Chris
sgtsauer
#065
_VISITCOMMUNITY
Missouri, United States
Joined: March 30, 2002
KitMaker: 2,605 posts
AeroScale: 91 posts
Posted: Wednesday, May 20, 2009 - 04:36 PM UTC
Well, I got the F-117 back out on the workbench last night. Man it sure was good to get back at it. I'm anxious to finish it.

I want to take a minute to address a few of the posts above this......

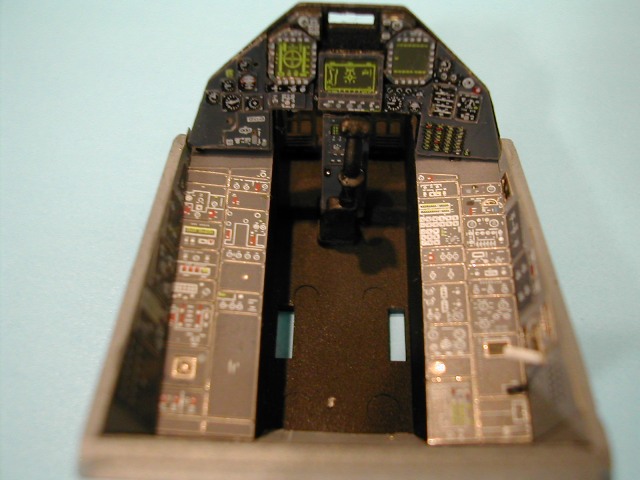
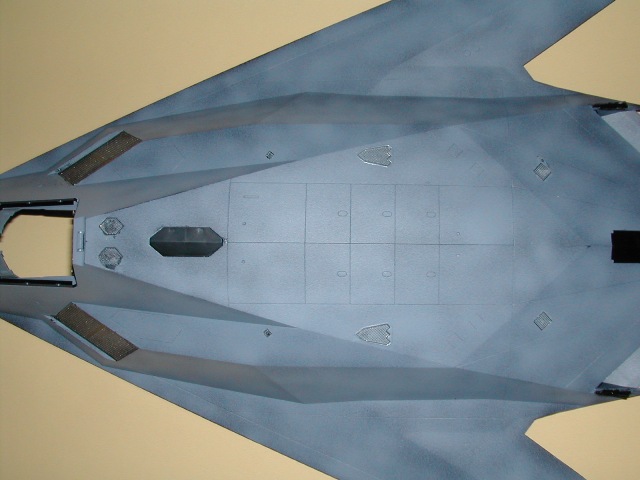
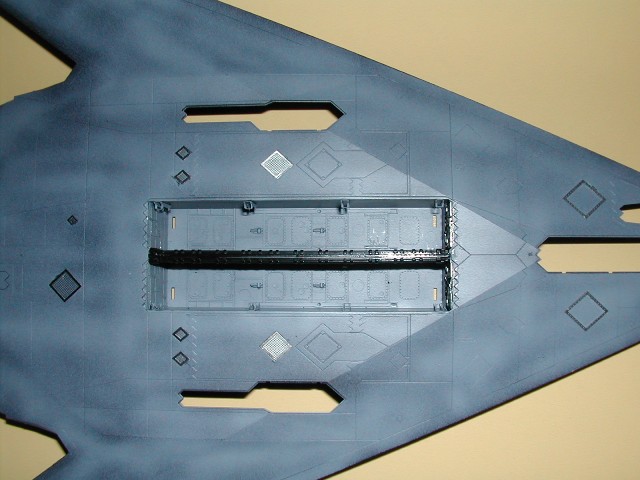
Hermon- Up to this point, I've only dabbled a little in photo-etch and that has been on armor kits. This is the first time I've tried any PE on an aircraft. Matter of fact, this is my first aircraft attempt in years....I'm an armor builder at heart. The hydraulic lines will provide a little more detail for someone to see. It will be interesting to see how the flat lines look when they are painted. I'm going to paint them heavy in the hope that the extra paint will make the lines look more three dimensional. In regards to the paint job, that is still up in the air. I'm leaning more toward a black finish instead of the three color. We will see.

Carl- Thanks for the compliment regarding having a clean build. So far so good...

Jean-Luc- Thank you for your compliments as well. I would be more than happy to submit this for a feature if all continues to go well. I may send you a message or two regarding the particulars on how you would like to see the feature put together.


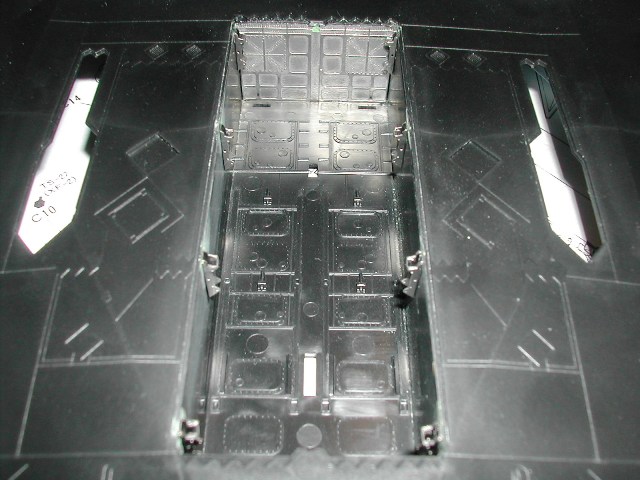
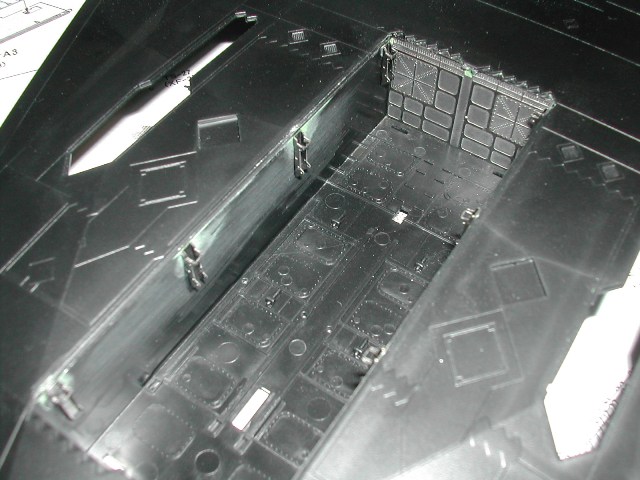
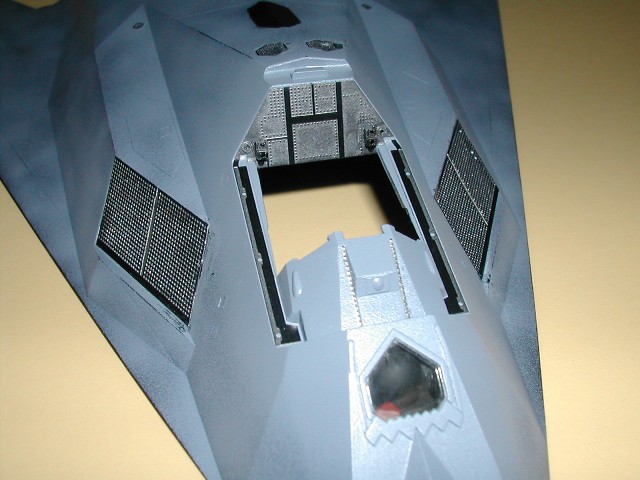
Now for an update...Since the last 'progress' post prior to me moving, I have put on several additional PE details to the upper and lower fuselage. The details have mainly consisted of assorted vents and the air intake screens. I have also used the included masks to mask off all clear parts in preperation for airbrushing. I still have to install the clear parts for the navigation lights and put on the associated masks for them. Doing a great job on the navigation lights are critical to me. As a result of the entire aircraft being one color, the navigation lights will draw a lot of attention due to their color (red/green) I think.

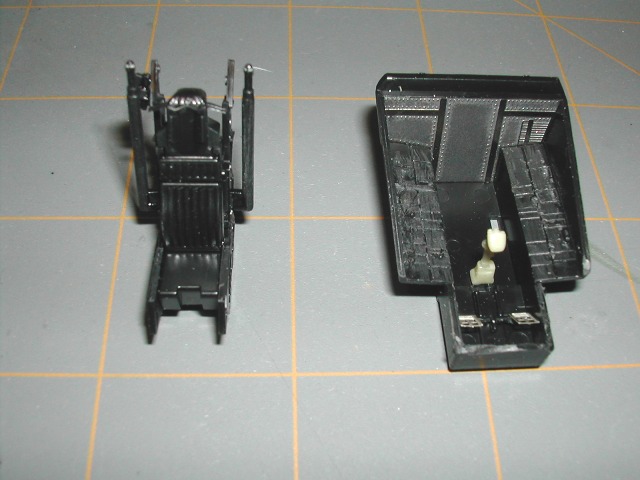
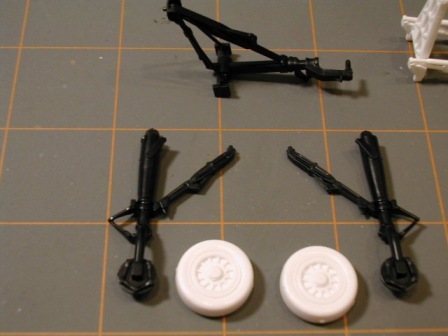
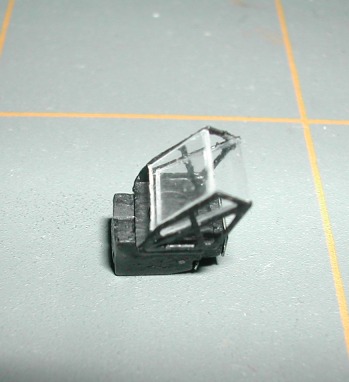
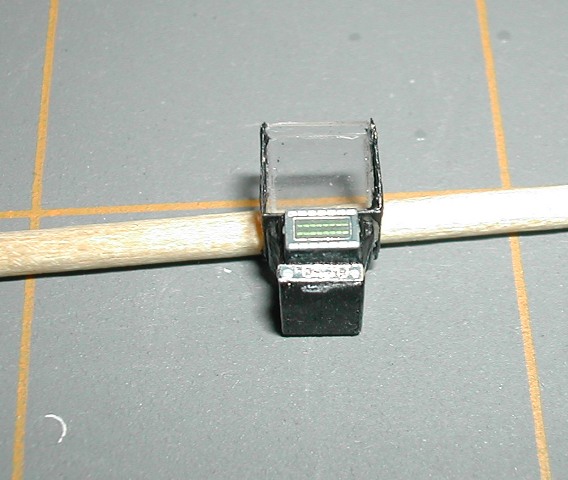
I have assembled the LGB's minus the clear guidance nose piece. They went together with no problems. I still need to prime them in preperation for painting.

Last night, I got all of the kit sub-assemblies laid back out. I re-familiarized myself with where I was at in the kit instructions and PE instructions. I reattached a couple of PE pieces that popped loose during my move. I installed a couple of additional PE pieces.

My main focus the coming weekend will be to get the bomb bay and landing gear well components primed and airbrushed. At the end of the Memorial Day holiday, I hope to have the bomb trapeze's installed and the landing gear wells installed. I think then I will be in a position to join the upper and lower fuselage halves together.

I'll stop rambling for now..I will post some additional pictures on the weekend (22nd to 25 May).
TedMamere
_VISITCOMMUNITY
Moselle, France
Joined: May 15, 2005
KitMaker: 5,653 posts
AeroScale: 4,347 posts
Posted: Wednesday, May 20, 2009 - 06:29 PM UTC
Hi Brent,


Quoted Text

Jean-Luc- Thank you for your compliments as well. I would be more than happy to submit this for a feature if all continues to go well. I may send you a message or two regarding the particulars on how you would like to see the feature put together.


I'm looking forward to it...

Jean-Luc
martyncrowther
_VISITCOMMUNITY
England - West Midlands, United Kingdom
Joined: September 12, 2007
KitMaker: 1,548 posts
AeroScale: 10 posts
Posted: Sunday, May 24, 2009 - 09:13 AM UTC
Hi Brent, nice work.
sgtsauer
#065
_VISITCOMMUNITY
Missouri, United States
Joined: March 30, 2002
KitMaker: 2,605 posts
AeroScale: 91 posts
Posted: Tuesday, May 26, 2009 - 03:55 PM UTC
Over the last couple of weeks, working a few minutes here and a few minutes there, I've completed some fuselage photo-etch.


That is it for today. More coming soon!

Rattler
_VISITCOMMUNITY
Texas, United States
Joined: November 23, 2002
KitMaker: 512 posts
AeroScale: 104 posts
Posted: Tuesday, May 26, 2009 - 04:34 PM UTC
Lookin good Brent...
sgtsauer
#065
_VISITCOMMUNITY
Missouri, United States
Joined: March 30, 2002
KitMaker: 2,605 posts
AeroScale: 91 posts
Posted: Sunday, May 31, 2009 - 06:53 PM UTC
I'm back with another small update.

UPDATE 1 JUN 2009

Today I worked on the cockpit canopy and the heads-up display (HUD). I will post details and pictures of the canopy tomorrow. The HUD consists of two clear pieces in the kit. In the Eduard set that I'm using, you are provided a replacement HUD display bracket and two clear pieces of plastic to replicate the HUD panels.

Here is a photo of the two kit pieces with Eduard replacement HUD bracket.


I had to cut down the two kit pieces to install the Eduard replacement bracket. At some point between starting the kit and moving into my new house, I lost the two clear replacement display panels. So, I used an old clear sheet of styrene from a Tamiya AFV kit and cut out two clear display panels. I know they may not be 'to spec' but I tried to get the assembly to look like pictures shown in the 'F-117 Walk Around' book. Here are some photos of the modified and assembled HUD. I will touch up the paint and try to 'clean' the clear panels up prior to final iinstallation in the cockpit.


The shape of the 'glass' panels isn't quit right but I didn't want to scrap the kit over a couple of missing HUD panels. The people that will see this kit, won't know any different. So, I did the best I could and am happy with the result overall. The thing is so dang tiny, it was difficult for my big fumbly fingers to work with. The wooden object used to prop the HUD up in one of the photos is a toothpick. That kind of gives you an idea of the size of the HUD.

That is it for today.
Rattler
_VISITCOMMUNITY
Texas, United States
Joined: November 23, 2002
KitMaker: 512 posts
AeroScale: 104 posts
Posted: Wednesday, June 03, 2009 - 07:22 AM UTC
looks good !!!! Brent, what glue are you using for your glass on the HUD ??

also, not to be a pest... any luck on the decal placement sheet directions?

Chris
dcandal
_VISITCOMMUNITY
Buenos Aires, Argentina
Joined: September 07, 2006
KitMaker: 918 posts
AeroScale: 688 posts
Posted: Monday, June 29, 2009 - 05:27 AM UTC
You are making a great job Brent, very nice
Narn08
_VISITCOMMUNITY
Kobenhavn, Denmark
Joined: April 13, 2007
KitMaker: 44 posts
AeroScale: 30 posts
Posted: Friday, August 14, 2009 - 12:25 AM UTC
Looks great, nice details.
Gorizont
_VISITCOMMUNITY
Sachsen, Germany
Joined: November 28, 2007
KitMaker: 1,462 posts
AeroScale: 27 posts
Posted: Friday, August 14, 2009 - 09:06 AM UTC
Looks very fine!
I had Monogram´s F-117A with PE-parts, but at this time (10 years ago, or so), I had not enough "know-how", how to use the metal-parts, or refine the kit, using other self-made-parts.

greetings...
Soeren
Gorizont
_VISITCOMMUNITY
Sachsen, Germany
Joined: November 28, 2007
KitMaker: 1,462 posts
AeroScale: 27 posts
Posted: Monday, September 07, 2009 - 09:43 AM UTC
Hi, are there any news about this build?

greetings...
Soeren
sgtsauer
#065
_VISITCOMMUNITY
Missouri, United States
Joined: March 30, 2002
KitMaker: 2,605 posts
AeroScale: 91 posts
Posted: Monday, September 07, 2009 - 09:54 AM UTC
Chris, the glue I used on the HUD is standard Elmer's white glue. I will scan the decal sheet tonight. I am very sorry for my delay in getting that to you.

Hello Soeren,

I am actually going to continue work on this kit tonight or tomorrow. I'm active duty in the Army National Guard and have only been home 5 days since early July. So, needless to say, time to work on this has been non-existent.

So, watch for an update in the next few days. Thanks for your interest.
 _GOTOTOP