Agreed Terri;
The "Venetian red" - brown was a colour that was found to be less than useful. Thats why it was dropped from application by spring 1917. Then the colours through the summer months were dark green and light Brunswick green. Mauve and lilac replaced the Brunswick by the fall of 1917. Just about the same time as the 5 colour lozenge camouflage became operationally used.
Early Aviation
Discuss World War I and the early years of aviation thru 1934.
Discuss World War I and the early years of aviation thru 1934.
Hosted by Jim Starkweather
Eduard's 1:48 Roland C.II kit #8043

JackFlash

Joined: January 25, 2004
KitMaker: 11,669 posts
AeroScale: 11,011 posts

Posted: Saturday, June 27, 2009 - 09:32 AM UTC
thegirl

Joined: January 19, 2008
KitMaker: 6,743 posts
AeroScale: 6,151 posts

Posted: Wednesday, July 01, 2009 - 03:04 AM UTC
I have also read that these machines where also painted in two tone of browns . Would this have been done on the feild by different units ?

JackFlash

Joined: January 25, 2004
KitMaker: 11,669 posts
AeroScale: 11,011 posts

Posted: Wednesday, July 01, 2009 - 04:37 AM UTC
Two seater units were allocated more equipment for repairs. But the standard camouflage from the factories was dk green, lt. Brunswick green and Venetian brown. I have seen a Rumpler or two in a three brown combination camouflage and for the Roland's the light blue was often overpainted on the upper surface either after repairs or at the unit level when components were changed.

JackFlash

Joined: January 25, 2004
KitMaker: 11,669 posts
AeroScale: 11,011 posts

Posted: Friday, July 10, 2009 - 05:03 PM UTC
At the 2000 IPMS Nats in Dallas Texas. the owner of Eduard admitted to the minor fit problems to the lower wing and the six-cylinder engine. A minor concern for me was the interior walls had the direction of the diagonal veneer detail reversed. Only the most seriously affected with A.M.S. (Advanced Modeler’s Syndrome) will notice. I chose the Eduard Limited edition #8043 to build and discuss further.
On their site we see one of the few build kits Eduard took the trouble to rig and someone photographs it after they drop it. Honestly I hate plastic axles. Always, always replace them with brass rod.
The B profile should NOT have any mauve.
On their site we see one of the few build kits Eduard took the trouble to rig and someone photographs it after they drop it. Honestly I hate plastic axles. Always, always replace them with brass rod.
The B profile should NOT have any mauve.

JackFlash

Joined: January 25, 2004
KitMaker: 11,669 posts
AeroScale: 11,011 posts

Posted: Friday, July 10, 2009 - 05:08 PM UTC
The difference is the three tone camouflage instead of the two toned fantasy.
thegirl

Joined: January 19, 2008
KitMaker: 6,743 posts
AeroScale: 6,151 posts

Posted: Friday, July 10, 2009 - 05:17 PM UTC
Very interesting photo by Eduard , why wouldn't they just super glue the fix ? Only takes a few seconds for the glue . After all that time to build the kit , looks nice out of box ..........
So profile Bayerische Fileger schule 5 wasn't armed then ?
So profile Bayerische Fileger schule 5 wasn't armed then ?

JackFlash

Joined: January 25, 2004
KitMaker: 11,669 posts
AeroScale: 11,011 posts

Posted: Sunday, July 12, 2009 - 05:12 PM UTC
Quoted Text
Very interesting photo by Eduard , why wouldn't they just super glue the fix ? Only takes a few seconds for the glue . After all that time to build the kit , looks nice out of box .......... So profile Bayerische Fileger schule 5 wasn't armed then ?
When photographed at its crash site there were no weapons attached to this machine. Not even a rear cockpit gun ring.

JackFlash

Joined: January 25, 2004
KitMaker: 11,669 posts
AeroScale: 11,011 posts

Posted: Thursday, July 23, 2009 - 05:37 PM UTC
I began with assaulting the panels in plastic parts A5 and A12 as these are to be open wood frame work on the full sized version. I note that on existing photos that the interior side walls are over painted the same solid color tone as the early C.II types had over-all on the outside surfaces. The floor panels were varnished wood. And in some early machines even the floor panels were over-painted. Fixtures such as the ammunition drum storage bins were also over painted
Plastic parts B20 and B17 “the hand pumps” are supposed to be identical . If you have opened up plastic part A5 as recommended this is now possible. Simply cut a short piece of HSP (Heat Stretched Plastic) to lengthen B17. These items were bright metal with dark stained or painted handles. Painted monofilament can represent the air pressure lines. running to A19 “the main fuel tank” under A13 “the pilots seat.” A small scrap of plastic to simulate the rear panel of A19 “the fuel tank” is needed. Small gauge solder wire can simulate electrical conduit
The Ammo storage bins B23 (x2) should be located together in the rear cockpit of the right half of the fuselage A1. I scratch built a ‘transmitter box” and placed it above the area where the instructions said to put B23 in the left fuselage half A2. I recommend moving the location for clear plastic part F7 “the camera.” If you follow the instructions you would hide the “Signal strength meter” for the transmitter ( you’ll have to scratch build this unit as well.) The camera was never left in the aircraft on the ground, so have a crew figure carrying it to the aircraft. Photo etch part PE46 “the generator engaging lever” should have a cable attached leading forward and connecting it to B21 “the generator” on the lower half of A1.
Looking at Plastic Part C6 “the rear compartment floor” The stud sticking up in it forward area is the housing for the wireless cable feed. The antenna cable ran from PE43 to this stud in C6 through the flooring to an opening in the belly of the fuselage. In some cases PE43 could be located elsewhere in this compartment but that variation is up to the modeler.
thegirl

Joined: January 19, 2008
KitMaker: 6,743 posts
AeroScale: 6,151 posts

Posted: Friday, July 24, 2009 - 02:17 AM UTC
Super so far Stephen , since I really don't have any ref's on this aircraft so far what you have said will be a great aid ! Looking forward to more of your progress ....

JackFlash

Joined: January 25, 2004
KitMaker: 11,669 posts
AeroScale: 11,011 posts

Posted: Wednesday, August 12, 2009 - 04:26 AM UTC
Images coming today.

JackFlash

Joined: January 25, 2004
KitMaker: 11,669 posts
AeroScale: 11,011 posts

Posted: Wednesday, August 12, 2009 - 05:43 PM UTC
Well finally here we go.

Kit plastic so far. This just to show the basics for now.
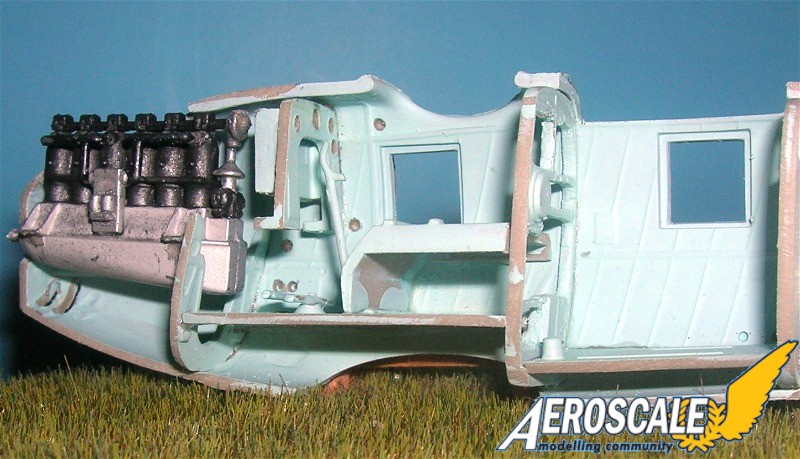
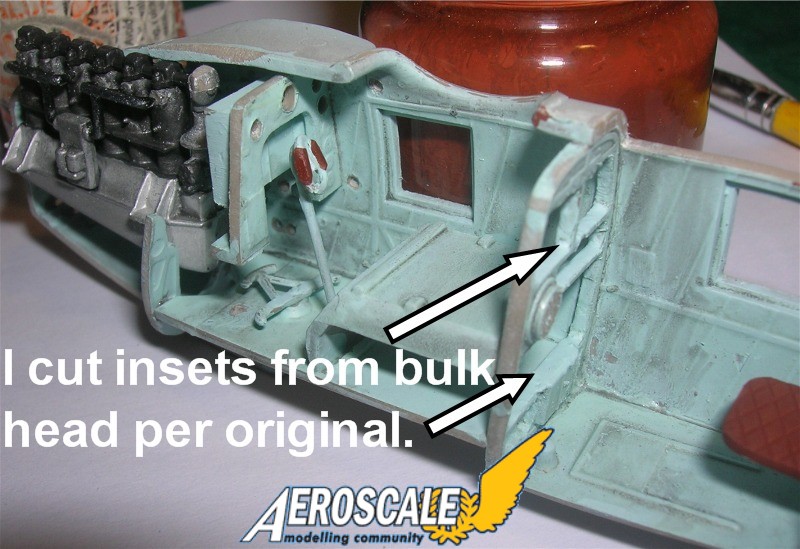
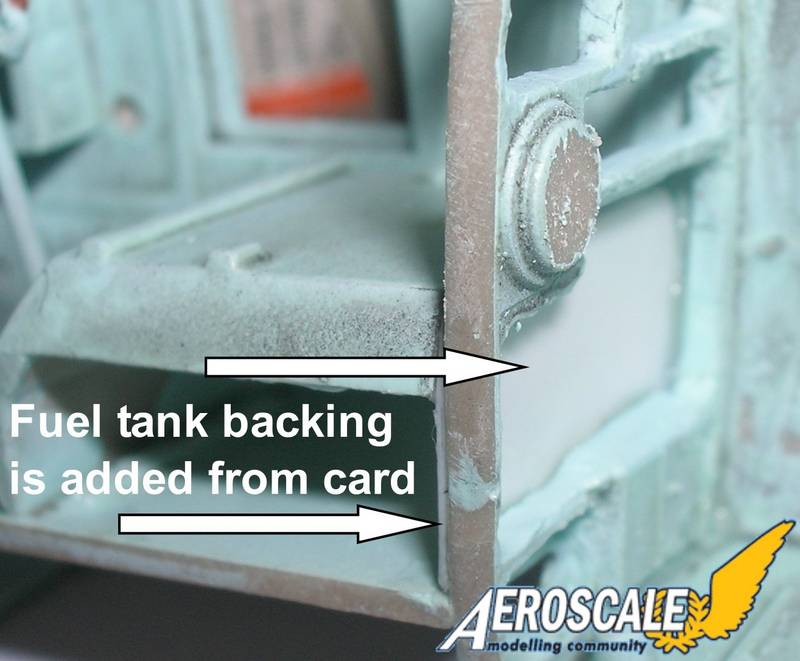
Cut off all four motor mount studs.
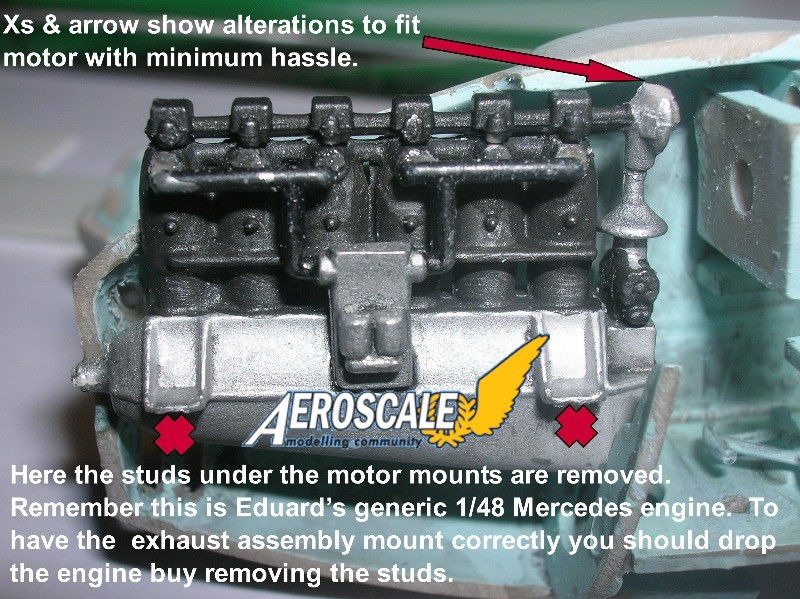

Kit plastic so far. This just to show the basics for now.


Cut off all four motor mount studs.

thegirl

Joined: January 19, 2008
KitMaker: 6,743 posts
AeroScale: 6,151 posts

Posted: Thursday, August 13, 2009 - 02:00 AM UTC
So the interiors where painted the same blue/grey as pfalz aircraft ? Or is there different variations on this . This is the frist build which I've seen the interior painted this way , which looks great so far Stephen .

JackFlash

Joined: January 25, 2004
KitMaker: 11,669 posts
AeroScale: 11,011 posts

Posted: Thursday, August 13, 2009 - 04:19 AM UTC
Quoted Text
So the interiors where painted the same blue/grey as pfalz aircraft ? Or is there different variations on this . This is the frist build which I've seen the interior painted this way , which looks great so far Stephen .
Hi Terri, this is from a couple of posts earlier.
Quoted Text
"I began with assaulting the panels in plastic parts A5 and A12 as these are to be open wood frame work on the full sized version. I note that on existing photos that the interior side walls are over painted the same solid color tone as the early C.II types had over-all on the outside surfaces. The floor panels were varnished wood. And in some early machines even the floor panels were over-painted. Fixtures such as the ammunition drum storage bins were also over painted. . .
As stated before on the Roland. It just depended on what the factory had in stock. As noted above the interior / cockpit images in the Datafile show lt. blue(?) interior walls and fixtures and in some cases even the flooring was overpainted. In another part of the Datafile we see a whole series of late production fuselages lined up at the factory with varnished interior walls. In this image the engines have not been installed yet.
Also the lt. blue of the early LFG Roland C.II did not contain any aluminum powder like the Pfalz.
For the Pfalz D.III the overpainting was either silbergraü or varnished wood. Sometimes there was a mixture where the interior walls weresilbergraü and the fuselage formers were varnished wood. Sometime it might have been just varnished wood.
The silberblaü was only seen on the Pfalz D.VIII or D.XII and the series after that.

JackFlash

Joined: January 25, 2004
KitMaker: 11,669 posts
AeroScale: 11,011 posts

Posted: Thursday, August 13, 2009 - 09:42 AM UTC
Quoted Text
". . .Stephen, looks like your making a great start. The wallfish is a wierdo for sure. What was the reason for the scales? Do you have any period pics of the plane? . . . Guy"
Period pics - certainly I have a few that were not in the Datafiles. The fish scales like the simulated curtains in the windows were affectations adopted by the crews. The Roland C.II was nicknamed "Walfisch or Whale. The was a reference to Jonah & the whale from the KJV Bible. The crew inhabited the deep fuselage that was illuminated by the cellon side windows. As though they lived in the whale.
Narn08

Joined: April 13, 2007
KitMaker: 44 posts
AeroScale: 30 posts

Posted: Thursday, August 13, 2009 - 11:18 PM UTC
I like that "fishplane"  Funny painting scheme
 Funny painting scheme
thegirl

Joined: January 19, 2008
KitMaker: 6,743 posts
AeroScale: 6,151 posts

Posted: Saturday, August 15, 2009 - 11:38 AM UTC
Thanks Stephen . I knew that alum wasn't in the paint . Was asking about the different variations . And you cleared that up . I didn't know that the crew would paint the inside though . Looking forward to more progress.

JackFlash

Joined: January 25, 2004
KitMaker: 11,669 posts
AeroScale: 11,011 posts

Posted: Saturday, August 15, 2009 - 05:01 PM UTC
Quoted Text
Thanks Stephen . I knew that alum wasn't in the paint . Was asking about the different variations . And you cleared that up . I didn't know that the crew would paint the inside though . Looking forward to more progress.
Just to be sure I was clear. The crew only added the "simulated window curtains" inside the fuselage. The light blue colour or varnish was done at the factory before the fuselage half shells were attached to the framing.

JackFlash

Joined: January 25, 2004
KitMaker: 11,669 posts
AeroScale: 11,011 posts

Posted: Monday, August 17, 2009 - 08:20 AM UTC
thegirl

Joined: January 19, 2008
KitMaker: 6,743 posts
AeroScale: 6,151 posts

Posted: Wednesday, August 19, 2009 - 02:01 AM UTC
Thanks for sharing the links Stephen . 


JackFlash

Joined: January 25, 2004
KitMaker: 11,669 posts
AeroScale: 11,011 posts

Posted: Wednesday, August 19, 2009 - 09:14 PM UTC
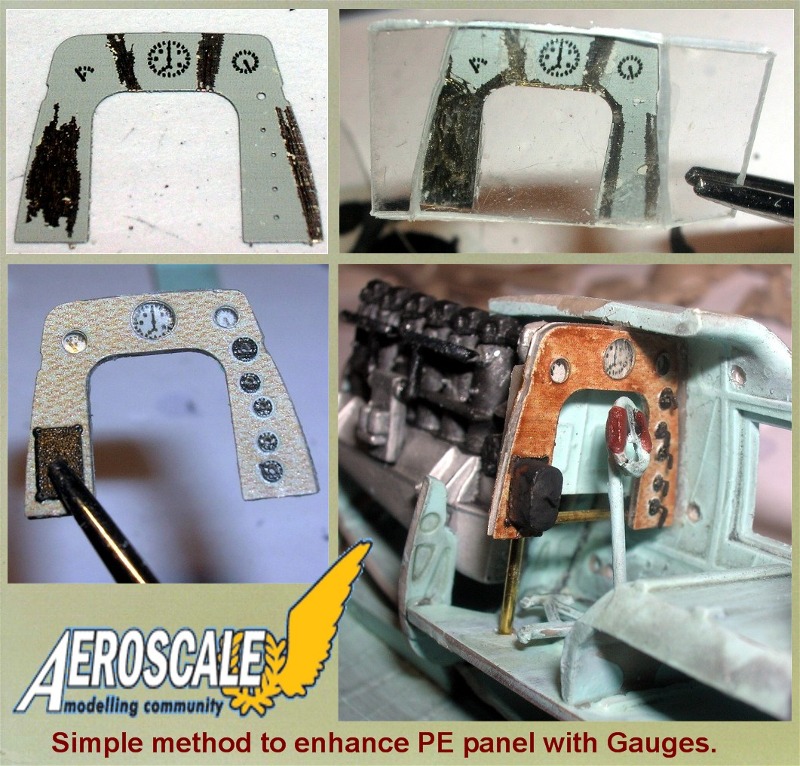
Originally I showed the plastic instrument panel but here I show the PE.

JackFlash

Joined: January 25, 2004
KitMaker: 11,669 posts
AeroScale: 11,011 posts

Posted: Thursday, August 20, 2009 - 08:39 PM UTC
Today I added some more PE. The best is yet to come with this.


thegirl

Joined: January 19, 2008
KitMaker: 6,743 posts
AeroScale: 6,151 posts

Posted: Friday, August 21, 2009 - 01:39 AM UTC
Very , very nice Stephen , love how the instrument panel turned out !

JackFlash

Joined: January 25, 2004
KitMaker: 11,669 posts
AeroScale: 11,011 posts

Posted: Saturday, August 22, 2009 - 06:42 PM UTC
Here is a bit of fun on completing the interior.


JackFlash

Joined: January 25, 2004
KitMaker: 11,669 posts
AeroScale: 11,011 posts

Posted: Sunday, August 23, 2009 - 11:26 PM UTC
A bit further along here.

Care in getting the cales pointed in the right directs is needed here.

These last bottom two images have been adjusted to get closer to the actual colour of the lt. blue.
Care in getting the cales pointed in the right directs is needed here.
These last bottom two images have been adjusted to get closer to the actual colour of the lt. blue.
thegirl

Joined: January 19, 2008
KitMaker: 6,743 posts
AeroScale: 6,151 posts

Posted: Monday, August 24, 2009 - 01:25 AM UTC
Wow , someone has been busy in front of the work bench !!!
Looking great Stephen !!! What did you use for the light blue ?
Looking great Stephen !!! What did you use for the light blue ?
 |


