Pimp my SU-7 BKL - Need for speed

#041
Kobenhavn, Denmark
Joined: July 20, 2006
KitMaker: 10,069 posts
AeroScale: 3,788 posts
Posted: Monday, December 22, 2008 - 01:05 AM UTC
Campaign'oholic - 252+ campaigns completed
North Carolina, United States
Joined: November 28, 2005
KitMaker: 2,216 posts
AeroScale: 1,080 posts
Posted: Tuesday, December 23, 2008 - 08:37 AM UTC
When I read the title to this thread I was envisioning big wheels and pink fur carpet in the cockpit.

Seriously Jesper, that's a lot of PE. Don't wont to work on that one if it's lightening outside! Can't wait to see all those details come together. She'll be a knockout.
Hermon

"Those who would give up Essential Liberty
to purchase a little Temporary Safety,
deserve neither Liberty nor Safety."
Benjamin Franklin
#041
Kobenhavn, Denmark
Joined: July 20, 2006
KitMaker: 10,069 posts
AeroScale: 3,788 posts
Posted: Sunday, December 28, 2008 - 10:36 AM UTC
Thanks for the comments, Hermon.
Work is progressing on this build. However, my computer has crashed so pictures will be coming as soon as it has been fixed.
Campaign'oholic - 252+ campaigns completed
Texas, United States
Joined: February 22, 2008
KitMaker: 5,026 posts
AeroScale: 2,811 posts
Posted: Monday, December 29, 2008 - 05:25 PM UTC
Hello Jesper:
I agree with Hermon, I had other thoughts when I read the heading. Great looking set of items that you have for this build, which nation is this kit and color scheme going to be for?
Robert
If it aint broke dont fix it.
Texas, United States
Joined: January 30, 2006
KitMaker: 1,954 posts
AeroScale: 1,163 posts
Posted: Monday, December 29, 2008 - 06:06 PM UTC
looks ambitious!
welcome to the realm of modeling insanity.
#041
Kobenhavn, Denmark
Joined: July 20, 2006
KitMaker: 10,069 posts
AeroScale: 3,788 posts
Posted: Tuesday, December 30, 2008 - 05:53 AM UTC
Thanks for the comments, guys. The work on this one is progressing quite good due to the holiday. I have put quite a lot of time into it already, but only just put the wings to the fuselage. I will post more pictures as soon as I get my own PC up and running.
Robert, I am considering a Czech three colour camouflage scheme or a two colour Soviet camouflage.
Campaign'oholic - 252+ campaigns completed
#041
Kobenhavn, Denmark
Joined: July 20, 2006
KitMaker: 10,069 posts
AeroScale: 3,788 posts
Posted: Monday, January 05, 2009 - 03:13 AM UTC
Campaign'oholic - 252+ campaigns completed
Uusimaa, Finland
Joined: March 30, 2004
KitMaker: 2,845 posts
AeroScale: 1,564 posts
Posted: Monday, January 05, 2009 - 07:25 AM UTC
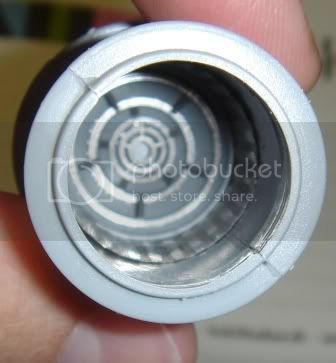
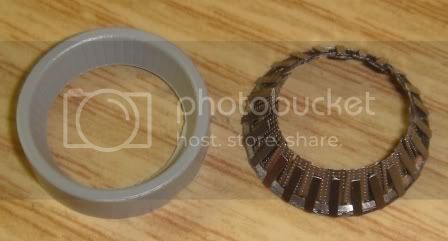
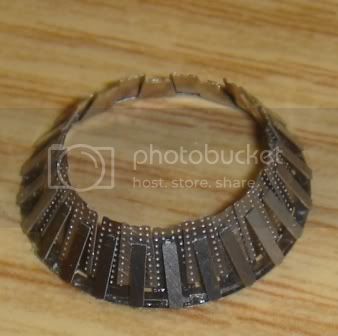
That's gonna looks sweet when finished. Quite a lot of metal you got going into it.

But that exhaust nozzle, I don't know, man. You know, both the plastic and PE parts seem to have their strengths and weaknesses...
North Carolina, United States
Joined: November 28, 2005
KitMaker: 2,216 posts
AeroScale: 1,080 posts
Posted: Monday, January 05, 2009 - 11:02 AM UTC
Jesper, are those nozzles all one piece that you bent into shape or did you have to glue all the pieces seperately? Either way, that's a big difference in the kit offering. Nice job so far. Lets see some more.
Hermon
"Those who would give up Essential Liberty
to purchase a little Temporary Safety,
deserve neither Liberty nor Safety."
Benjamin Franklin
#041
Kobenhavn, Denmark
Joined: July 20, 2006
KitMaker: 10,069 posts
AeroScale: 3,788 posts
Posted: Monday, January 05, 2009 - 09:12 PM UTC
Thanks for the comments, guys.
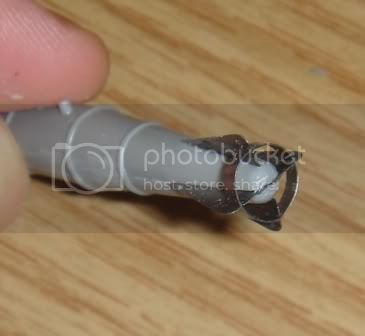
Hermon, the nozzle is a two part thing where you bent all the individual blades into position. Quite easy if you use a big pen as a guide. Otherwise it is quite difficult to get the opening round.
More to follow shortly....

Campaign'oholic - 252+ campaigns completed
#041
Kobenhavn, Denmark
Joined: July 20, 2006
KitMaker: 10,069 posts
AeroScale: 3,788 posts
Posted: Monday, January 05, 2009 - 09:42 PM UTC
Campaign'oholic - 252+ campaigns completed
North Carolina, United States
Joined: November 28, 2005
KitMaker: 2,216 posts
AeroScale: 1,080 posts
Posted: Tuesday, January 06, 2009 - 12:07 PM UTC
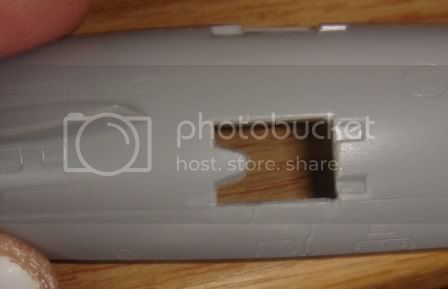
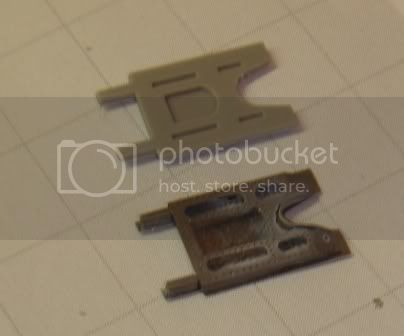
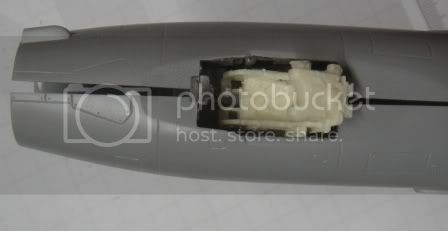
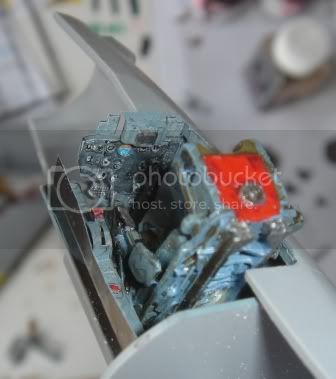
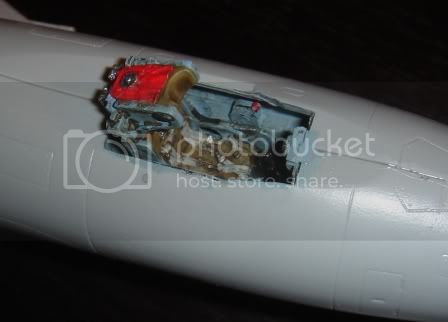
So far the detail I've seen is really making a drastic improvement over the OOB kit. The PE on the inside of the fuselage (air brake) would scare me. I can't seem to ever get the bond between plastic and PE to work for very long in any place that recieves even minimal stress even though I use very strong CA glue.
Keep building

She's starting to take shape.
Hermon
"Those who would give up Essential Liberty
to purchase a little Temporary Safety,
deserve neither Liberty nor Safety."
Benjamin Franklin
#041
Kobenhavn, Denmark
Joined: July 20, 2006
KitMaker: 10,069 posts
AeroScale: 3,788 posts
Posted: Tuesday, January 06, 2009 - 07:58 PM UTC
Thanks for the comments, Hermon.
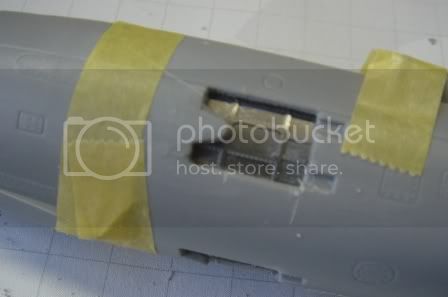
What I did was to use Tamiya PE glue of the strong instant bonds and Gator glue for the small fittings you need to fiddle around a bit. Actually when to use the different types of glue is a major learning from this build for me.
For the detail inside the fuselage I taped a glue bottle on the inside to press the PE into shape until the glue set. I even managed not to glue the bottle into place as well.
However, I have a fear that they will suddenly spring loose after the fuselage is glued together

Campaign'oholic - 252+ campaigns completed
#041
Kobenhavn, Denmark
Joined: July 20, 2006
KitMaker: 10,069 posts
AeroScale: 3,788 posts
Posted: Wednesday, January 07, 2009 - 12:22 AM UTC
Campaign'oholic - 252+ campaigns completed
#041
Kobenhavn, Denmark
Joined: July 20, 2006
KitMaker: 10,069 posts
AeroScale: 3,788 posts
Posted: Friday, January 09, 2009 - 01:23 AM UTC
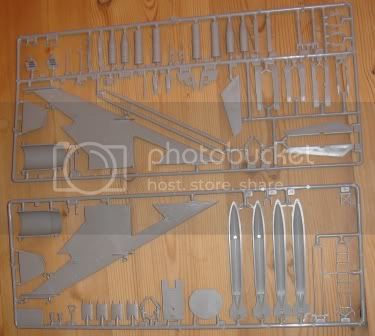
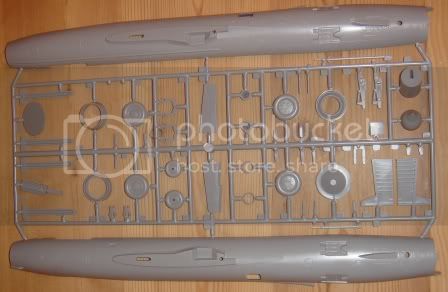
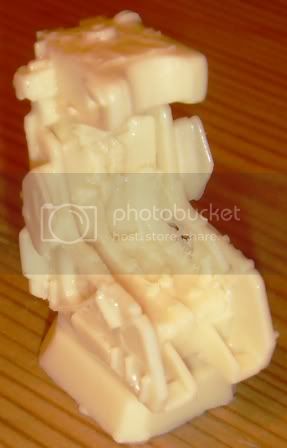
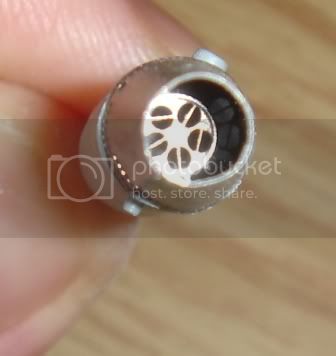
Next up is the weapons load. The Kopro kit includes various options for the SU-7.
Two large bombs - 500 kg?
Two rocket pods.
Two drop tanks.
Two free flight rockets.
Two take off boosters for heavy loads.
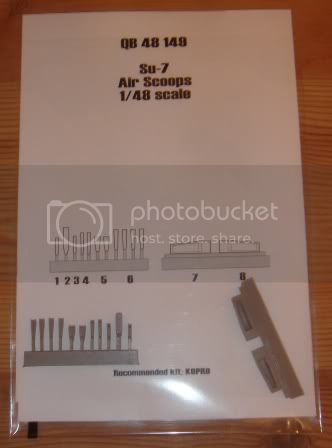
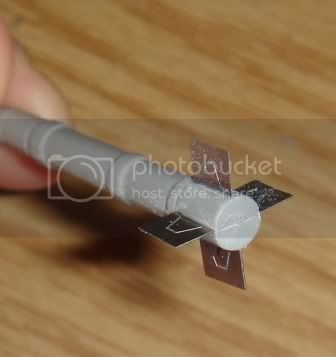
The kit items are showing their age - especially the rocket pods. The Eduard pieces really helps add some correct scale to the fins etc.
However, I am not too happy about PE parts that needs to be folded round. That is a tough job, but looks good when finished.
The wheels are improved enormously by the new PE disks and a little sanding to simulate weight.
Comment welcome


Campaign'oholic - 252+ campaigns completed
Victoria, Australia
Joined: August 23, 2007
KitMaker: 629 posts
AeroScale: 539 posts
Posted: Friday, January 09, 2009 - 02:34 AM UTC
This one is looking really good Jesper.
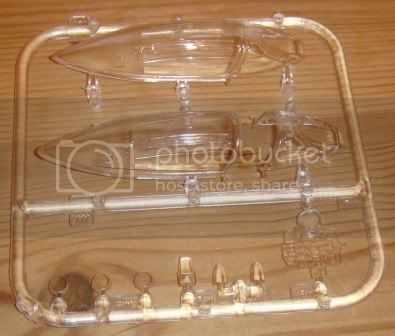
Make sure you test fit the canopy early on, if you plan to have it closed. Resin seats have an annoying habit of being way to high and fouling the clear parts! If the canopy is to be open you can often get away with it.
Andrew
Current Projects:
Eduard 1/48 F6F-3 Hellcat
Hasegawa 1/350 Yukikaze
1/6 JJ Models Sarah "Gothic"
Turku ja Pori, Finland
Joined: September 10, 2008
KitMaker: 470 posts
AeroScale: 279 posts
Posted: Friday, January 09, 2009 - 03:47 AM UTC
Convincing job Jesper. That is alot of metal, how many PE parts exactly?
Quoted Text
If the canopy is to be open you can often get away with it.
But still, make sure it doesn't come out of cockpit (What a funny vision that makes
)
Workbench;
Academy Curtiss Hawk H-75 FAF + Eduard PE
Roden Fokker D.VII "Bruno Loerzer" (Aces High II)
Italeri Messerschmitt Me 262 (The great checkerboard campaign)
#041
Kobenhavn, Denmark
Joined: July 20, 2006
KitMaker: 10,069 posts
AeroScale: 3,788 posts
Posted: Friday, January 09, 2009 - 10:28 AM UTC
Quoted Text
This one is looking really good Jesper.
Make sure you test fit the canopy early on, if you plan to have it closed. Resin seats have an annoying habit of being way to high and fouling the clear parts! If the canopy is to be open you can often get away with it.
Andrew
Thanks for the comments and the warning.
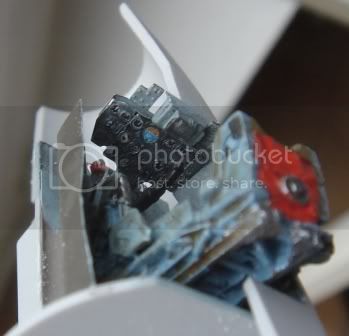
I just test fitted the cockpit and you are perfectly right. The resin seat is too high to have a closed cockpit. I was planning to have an open cockpit to show of the PE/resin cockpit - now it seems like I have no choice.
It turns out the seat is both too wide and too high.

Anyway, I hope I can pull it of without the too large seat will be obvious...

Campaign'oholic - 252+ campaigns completed
#041
Kobenhavn, Denmark
Joined: July 20, 2006
KitMaker: 10,069 posts
AeroScale: 3,788 posts
Posted: Friday, January 09, 2009 - 10:30 AM UTC
Quoted Text
Convincing job Jesper. That is alot of metal, how many PE parts exactly?
Thanks for the comment, Tuomas. I do not know how many PE parts in total, but must be more than a hundred and I have not used all parts.
Campaign'oholic - 252+ campaigns completed
#041
Kobenhavn, Denmark
Joined: July 20, 2006
KitMaker: 10,069 posts
AeroScale: 3,788 posts
Posted: Monday, January 19, 2009 - 01:57 AM UTC
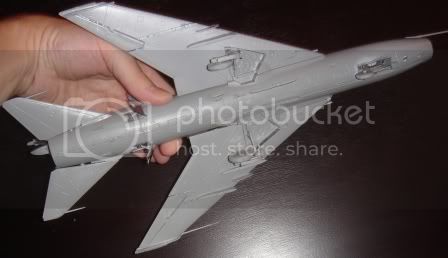
Work is progressing steadily on my SU-7BKL. The fit between the fuselage halves is a disaster especially on the front of the aircraft. This is very difficult to fix without having to rescribe half the fuselage. Nothing I want to do
Other than that all the PE has really added some nice details to a kit that surely looks like a Su-7BKL.
I have now changed my mind completely on the camouflage and I am going for an overall Aluminium aircraft. I want to try out some new washes and some sprayed on Tamiya smoke.
More to follow soon.....


Campaign'oholic - 252+ campaigns completed
Germany
Joined: September 07, 2005
KitMaker: 5,609 posts
AeroScale: 5,231 posts
Posted: Monday, January 19, 2009 - 02:09 AM UTC
Cool Jesper!!!
It is pretty huge, isn't it?! ...
cheers
Steffen
DULCE ET DECORUM EST PRO HOBBY MORI
Scotland, United Kingdom
Joined: February 07, 2008
KitMaker: 1,699 posts
AeroScale: 1,384 posts
Posted: Monday, January 19, 2009 - 02:54 AM UTC
Nothing like PE to up the part count. Having spent last night building
smoke dispensers and mud guards for my tiny tiger that must be 40 parts
just for that.
All that detail must be about twice the cost of the kit!
Really like all the areas you've targeted. All stuff that is easily seen.
I think the rocket pods are my favourite.
Shame about the fit is it the additions you've made or is it just
a rubbish fit?
#041
Kobenhavn, Denmark
Joined: July 20, 2006
KitMaker: 10,069 posts
AeroScale: 3,788 posts
Posted: Monday, January 19, 2009 - 03:08 AM UTC
Quoted Text
Cool Jesper!!!
It is pretty huge, isn't it?! ...
cheers
Steffen
It is a monster. I had to buy a new display cabinet for it - seriously
Then I will also have a place for the 1/48 SU-17 and 1/48 Chinook. These have been in storage so far due to lack of display space.
Campaign'oholic - 252+ campaigns completed
#041
Kobenhavn, Denmark
Joined: July 20, 2006
KitMaker: 10,069 posts
AeroScale: 3,788 posts
Posted: Monday, January 19, 2009 - 03:13 AM UTC
Quoted Text
All that detail must be about twice the cost of the kit!
Really like all the areas you've targeted. All stuff that is easily seen.
I think the rocket pods are my favourite.
Shame about the fit is it the additions you've made or is it just
a rubbish fit?
The kit cost me around 20 Euros and the detail sets, resin seat, resin air intakes another 40 Euros, but I feel it is worth it. Even if the canopy cannot be closed due to the large resin seat
The fit of the fuselage is simply because the kit is bad. It is not that difficult to sand into shape, but rescribing all the small hatches, rivets etc is way to much for me. That job would take the fun out of the hobby for me, so I will have to live with a prominent seam line
Campaign'oholic - 252+ campaigns completed
United States
Joined: August 12, 2007
KitMaker: 153 posts
AeroScale: 139 posts
Posted: Monday, January 19, 2009 - 03:18 AM UTC
[quote
I have now changed my mind completely on the camouflage and I am going for an overall Aluminium aircraft. I want to try out some new washes and some sprayed on Tamiya smoke.
quote]
You're a brave one deciding to do a NMF on a kit that requires that level of seamwork!
It's looking really good (and like a lot of work). I'm not normally into jets, but this is one I've always thought kinda cool looking.
Regards
Automaton
Not everything that counts can be counted, and not everything that can be counted counts. (Albert Einstein)