_GOTOBOTTOM
Early Aviation
Discuss World War I and the early years of aviation thru 1934.
Roden 1/72 Fokker D.VII Out of Box Challenge
BradCancian
_VISITCOMMUNITY
Queensland, Australia
Joined: August 30, 2006
KitMaker: 285 posts
AeroScale: 281 posts
Posted: Saturday, February 14, 2009 - 06:29 PM UTC
Hi all - My local model club here in Canberra Australia is having their annual model competition in May, and one of the categories is known as the "Kittyhawk Cup". To be elligible to enter the Cup, you need to build a kit nominated by the club; the kit must be built strictly from materials out of the box, however any decals can be used. Previous years have included various WW2 aircraft, and jets. This year, the club nominated the Roden 1/72 Fokker D.VII series of models as the Kittyhawk Cup kit. So off to the LHS I went, and picked up the Roden 1/72 Fokker D.VII OAW(mid) - I prepared to build the kit as it comes in the box, warts and all....

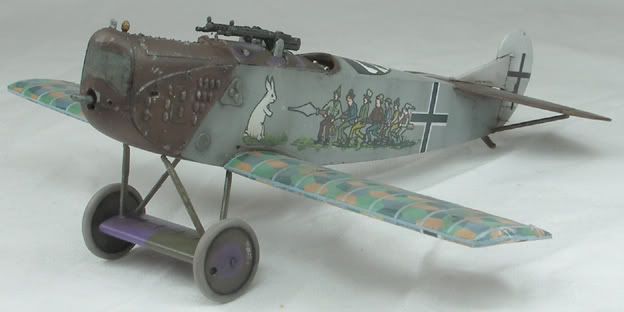
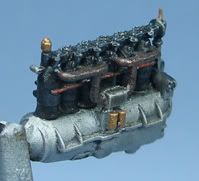
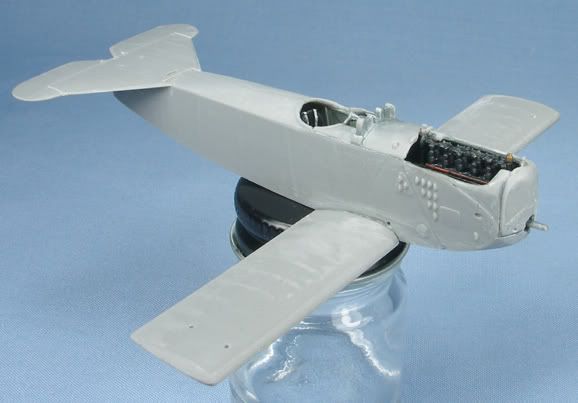
The cockpit and engine went together well. The only additions were seat belts cut from the instruction sheet (still OOB!)... lozenge decals were used on the interior, and the bracing wires drawn on with a pencil (hence why they are so wobbly!). So far so good.

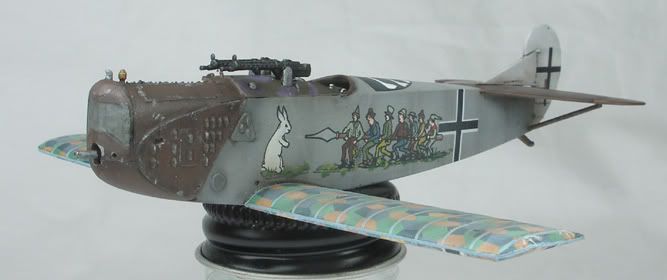
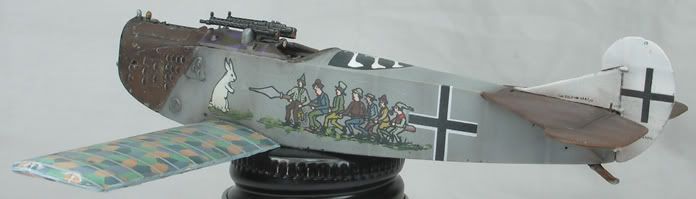
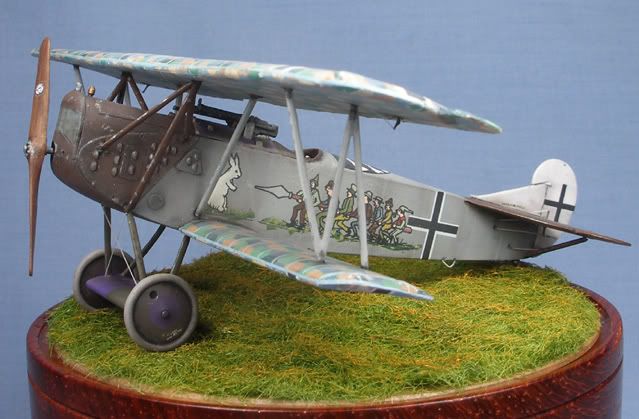
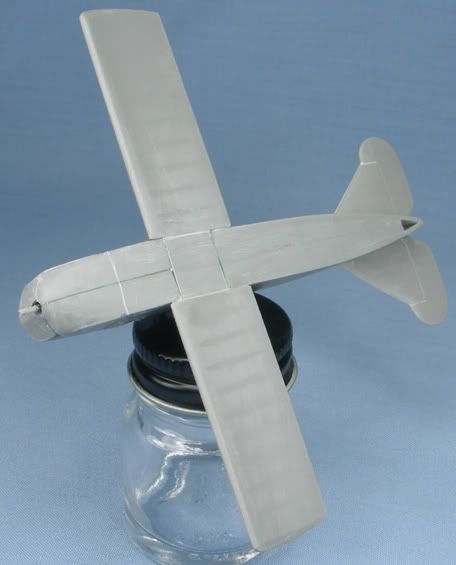
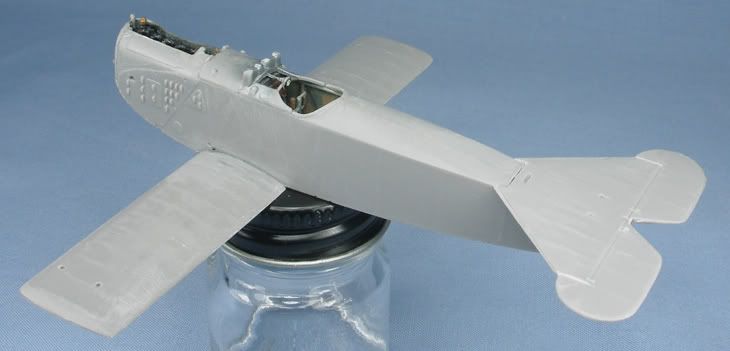
Having read a little about this kit, it is obvious that it is not an easy OOB build. Two minutes of dry fitting fuselage and wings confirmed this was the case... so, out with the file and sandpaper, and straight to it. The biggest challenge so far was the lower wing fit - the gap on the lower wing piece is way too narrow, so much cutting, sanding and filling was needed to get this piece to fit. Other challenges included the horizontal tail plane - again the cut out at the front end was way too narrow - alas I had to use stretched sprue from the kit sprues to add an extra strip along the leading edge of the tailplane to allow me to sand the piece so it would fit on the wideth of the fuselage. Much more preferrable than thinning the whole fuselage and weakening joints... and technically still OOB.... Anyway, here are some pics.


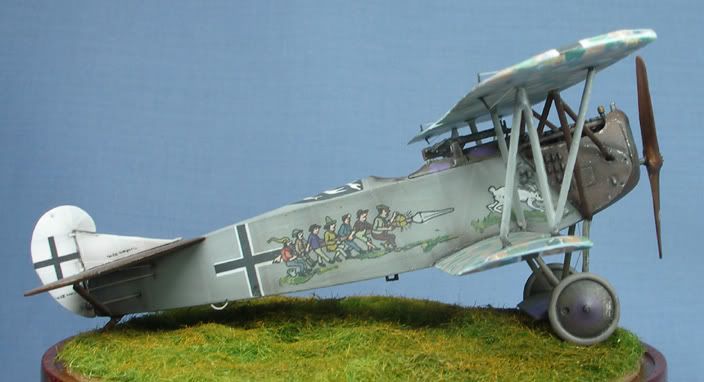
Now to decide on markings... I hear a few schwabians calling....


BC
TheZOX
_VISITCOMMUNITY
Slovenia
Joined: August 23, 2007
KitMaker: 86 posts
AeroScale: 75 posts
Posted: Saturday, February 14, 2009 - 09:44 PM UTC
Very nice detailing Brad
Kornbeef
_VISITCOMMUNITY
England - South East, United Kingdom
Joined: November 06, 2005
KitMaker: 1,667 posts
AeroScale: 1,551 posts
Posted: Saturday, February 14, 2009 - 09:51 PM UTC
yes, looks very good so far considering the fit problems...I love the OOB solutions though *smiles* does that mean anything in the box can be used then?.....staples, bags, instruction sheet, are all viable material

its been an age since I tried anything in 1/72, nice work.

Keith
Roxter
_VISITCOMMUNITY
Rigas, Latvia
Joined: July 04, 2007
KitMaker: 268 posts
AeroScale: 245 posts
Posted: Saturday, February 14, 2009 - 10:01 PM UTC
I built Roden's 1/72 Fokker D.VII once. I recall the problem with lower wing - I cut it in two pieces and then attached. The gap was then filled with plastic and sanded smooth.

Still, this D.VII is looking great, Brad!
thegirl
_VISITCOMMUNITY
Alberta, Canada
Joined: January 19, 2008
KitMaker: 6,743 posts
AeroScale: 6,151 posts
Posted: Sunday, February 15, 2009 - 01:05 AM UTC
That is a great challenge building out of box . A most excellent idea . Looking great so far Brad .
B24Liberator
_VISITCOMMUNITY
Minnesota, United States
Joined: November 07, 2008
KitMaker: 134 posts
AeroScale: 113 posts
Posted: Sunday, February 15, 2009 - 01:46 AM UTC
Brad -

That's a novel idea your club has! I like it! I have a couple of the Roden unbuilts and your workmanship let's me know I should pull mine off the shelf-of-doom and get cracking someday! Nice job! I really like how you did your interior!
JackFlash
_VISITCOMMUNITY
Colorado, United States
Joined: January 25, 2004
KitMaker: 11,669 posts
AeroScale: 11,011 posts
Posted: Sunday, February 15, 2009 - 08:37 AM UTC
Hhhmm the 7 Swabians in 1/72? Sounds like you have a set of PD decals.
BradCancian
_VISITCOMMUNITY
Queensland, Australia
Joined: August 30, 2006
KitMaker: 285 posts
AeroScale: 281 posts
Posted: Sunday, February 15, 2009 - 07:14 PM UTC
Sure do Stephen ... i'm a little worried that they may be a natch old though...

BC
B24Liberator
_VISITCOMMUNITY
Minnesota, United States
Joined: November 07, 2008
KitMaker: 134 posts
AeroScale: 113 posts
Posted: Monday, February 16, 2009 - 09:56 AM UTC
Looking good Brad -

Wow , yes I used to have that set as well. Haven't a clue who I gave them to now though...just a suggestion. If you have it, use that 'decal film' to prevent the 7 Swabians from turning into 7,000 -- in the form of decal splinters...
thegirl
_VISITCOMMUNITY
Alberta, Canada
Joined: January 19, 2008
KitMaker: 6,743 posts
AeroScale: 6,151 posts
Posted: Monday, February 23, 2009 - 03:50 AM UTC
How goes the build Brad ?
BradCancian
_VISITCOMMUNITY
Queensland, Australia
Joined: August 30, 2006
KitMaker: 285 posts
AeroScale: 281 posts
Posted: Tuesday, February 24, 2009 - 10:50 PM UTC
Hey Terri - no progress on anything of late, have been away with work for the last week and a half. Back on deck now so should see some progress in the next week or so

BC
CaptainA
_VISITCOMMUNITY
Indiana, United States
Joined: May 14, 2007
KitMaker: 3,117 posts
AeroScale: 2,270 posts
Posted: Wednesday, February 25, 2009 - 12:56 PM UTC
Wow, but 1/72? I cant even see 1/72 scale pieces.
BradCancian
_VISITCOMMUNITY
Queensland, Australia
Joined: August 30, 2006
KitMaker: 285 posts
AeroScale: 281 posts
Posted: Sunday, March 08, 2009 - 05:25 PM UTC
It's been a while since I have worked on this one, but here is an update. Painting is mostly completed. Decals are from PD decals, and worked well. You do have to paint the individual colours of the fuselage motif however! Lozenge is Techmod (as I had no other alternatives and did not want to use the Roden lozenge).


And dry fitted to the undercarriage:


BC
B24Liberator
_VISITCOMMUNITY
Minnesota, United States
Joined: November 07, 2008
KitMaker: 134 posts
AeroScale: 113 posts
Posted: Sunday, March 08, 2009 - 10:59 PM UTC
Hello Brad -

That's outstanding!

What colours did you use for the engine & tail section as well as the fuselage in general?

Keep it going! Great work!
duncan-k
_VISITCOMMUNITY
England - South East, United Kingdom
Joined: October 13, 2008
KitMaker: 5 posts
AeroScale: 4 posts
Posted: Monday, March 09, 2009 - 03:14 AM UTC
Brad,

Yet again, Fantastic work!

Duncan
TheZOX
_VISITCOMMUNITY
Slovenia
Joined: August 23, 2007
KitMaker: 86 posts
AeroScale: 75 posts
Posted: Monday, March 09, 2009 - 08:45 AM UTC
OMG Brad this is awesome!!! Your D.VII looks like its in 1/48 scale. And your photos are amaizing as well. Do you use a soft box for taking photos?
JackFlash
_VISITCOMMUNITY
Colorado, United States
Joined: January 25, 2004
KitMaker: 11,669 posts
AeroScale: 11,011 posts
Posted: Monday, March 09, 2009 - 12:59 PM UTC
Great build Brad! I have to hand it to you. I could not successfully follow that challenge. I would have to modifiy the gun mounts. But your ground rules say you can't do it. I would develop apaplexy. . .Nicely Done finish as usual. Model On!

(How about a kit review for us here?)
BradCancian
_VISITCOMMUNITY
Queensland, Australia
Joined: August 30, 2006
KitMaker: 285 posts
AeroScale: 281 posts
Posted: Friday, March 20, 2009 - 10:33 PM UTC
Hi guys - she is now finished. Some trimming of the struts were required but otherwise the rest of construction went smoothly. In keeping with the OOB rules of the comp I am building for, the rigging was done from stretched kit sprue. First time I have used this material for rigging - I am glad I don't usually use sprue for rigging as doing it this way is a little fidley. Anyway, here are some pics of the finished model:


All comments, criticisms and feedback welcome!

BC
JackFlash
_VISITCOMMUNITY
Colorado, United States
Joined: January 25, 2004
KitMaker: 11,669 posts
AeroScale: 11,011 posts
Posted: Friday, March 20, 2009 - 10:36 PM UTC
Beautiful Brad! Another of your jewels. My sincere thanks for your posting here.
B24Liberator
_VISITCOMMUNITY
Minnesota, United States
Joined: November 07, 2008
KitMaker: 134 posts
AeroScale: 113 posts
Posted: Friday, March 20, 2009 - 11:39 PM UTC
Outstanding Brad!

That is really a nice kit and a great choice of markings!
thegirl
_VISITCOMMUNITY
Alberta, Canada
Joined: January 19, 2008
KitMaker: 6,743 posts
AeroScale: 6,151 posts
Posted: Saturday, March 21, 2009 - 12:49 AM UTC
Another fantastic job Brad ! Most excellent job done on the lozenge . What did you use for the control horns ? those are really small , I almost didn't see them at first . It's a shame though that the engine is inclosed your painting of it is super .

looking forward to your next adventure . Thanks for sharing your build !
guitarlute101
_VISITCOMMUNITY
West Virginia, United States
Joined: December 18, 2006
KitMaker: 1,121 posts
AeroScale: 1,063 posts
Posted: Saturday, March 21, 2009 - 01:13 AM UTC


Great work, Brad, and in 1/72 scale to boot!

Mark
BradCancian
_VISITCOMMUNITY
Queensland, Australia
Joined: August 30, 2006
KitMaker: 285 posts
AeroScale: 281 posts
Posted: Saturday, March 21, 2009 - 10:49 AM UTC
Many thanks guys!

Terri - the control horns are stretched sprue from the kit - I destroyed the moulded on items during construction, so had to restore them - I took the opportunity to make them more "to scale" in the process

BC
Repainted
_VISITCOMMUNITY
Östergötland, Sweden
Joined: April 04, 2006
KitMaker: 1,058 posts
AeroScale: 1,004 posts
Posted: Saturday, March 21, 2009 - 08:51 PM UTC
great, You have turn this one into a gem Brad,The wooden plinth is a nice touch.

Larsa
B24Liberator
_VISITCOMMUNITY
Minnesota, United States
Joined: November 07, 2008
KitMaker: 134 posts
AeroScale: 113 posts
Posted: Sunday, March 22, 2009 - 12:19 AM UTC
Brad --


Which paints did you use for the fuslage? They sure did turn out nice!
 _GOTOTOP