Early Aviation
Discuss World War I and the early years of aviation thru 1934.
Eduard 1:48 Spad XIII
bobman331
_VISITCOMMUNITY
Massachusetts, United States
Joined: April 13, 2009
KitMaker: 177 posts
AeroScale: 13 posts
Posted: Saturday, April 25, 2009 - 07:03 AM UTC
Cest un bonne avion minature! j'aime les avions viex. Lois, tu as un bonne modeler.

(yes. my french sucks. i just love french aeroplanes so much that i try to speak french. )
Louis
_VISITCOMMUNITY
Bas-Rhin, France
Joined: May 21, 2006
KitMaker: 472 posts
AeroScale: 471 posts
Posted: Friday, May 01, 2009 - 11:23 AM UTC
Hi,

Thank you for your words (and french words).

The joints of the hood are masticated and ended.
"Rivets" are made with a pin (around hoods, around the entrance of the "post of piloting").


The shutters of the radiator is done again.


I cut a small part of the shutters with file, abrasive paper and blade of razor


A+
Kalt
_VISITCOMMUNITY
Mendoza, Argentina
Joined: June 14, 2006
KitMaker: 222 posts
AeroScale: 219 posts
Posted: Friday, May 01, 2009 - 05:03 PM UTC
I Like it....a lot! great work in the shutters

Cheers,

Claudio
JackFlash
_VISITCOMMUNITY
Colorado, United States
Joined: January 25, 2004
KitMaker: 11,669 posts
AeroScale: 11,011 posts
Posted: Friday, May 01, 2009 - 05:39 PM UTC


Here is the back of a real radiator under repair.


Louis
_VISITCOMMUNITY
Bas-Rhin, France
Joined: May 21, 2006
KitMaker: 472 posts
AeroScale: 471 posts
Posted: Saturday, May 02, 2009 - 12:17 AM UTC
Hi,

thank you.

I read somewhere that the radiator is too narrow.

Do you think that???

Hub.
JackFlash
_VISITCOMMUNITY
Colorado, United States
Joined: January 25, 2004
KitMaker: 11,669 posts
AeroScale: 11,011 posts
Posted: Saturday, May 02, 2009 - 06:45 AM UTC

Quoted Text

Hi, thank you. I read somewhere that the radiator is too narrow. Do you think that???
Hub.


I would add a bit to the sides (.030 each side) based on the following images of real & replica / restored types.


real aircraft reference images on Aeroscale.

Memorial Flight organization Spad images

thegirl
_VISITCOMMUNITY
Alberta, Canada
Joined: January 19, 2008
KitMaker: 6,743 posts
AeroScale: 6,151 posts
Posted: Sunday, May 03, 2009 - 11:05 AM UTC
Very impressive Louis . The project in whole is turning out wonderful and a joy to watch .
Looking forward to more .......................

Thanks for the links Stephen and sharing them . I wasn't even aware of them .
Repainted
_VISITCOMMUNITY
Östergötland, Sweden
Joined: April 04, 2006
KitMaker: 1,058 posts
AeroScale: 1,004 posts
Posted: Wednesday, May 06, 2009 - 03:37 AM UTC
Hi
I just missed this build totally, but this is great work you throw in this box, I´m impressed, I shure will follow this build until it´s finished of.
Good work

Larsa Q
RAGIII
_VISITCOMMUNITY
North Carolina, United States
Joined: June 19, 2007
KitMaker: 604 posts
AeroScale: 600 posts
Posted: Monday, May 11, 2009 - 09:39 AM UTC
I have been watching this from the beginning. Really impressive work. Ilike your colors for the scheme!
RAGIII
Yeti123
_VISITCOMMUNITY
Michigan, United States
Joined: February 11, 2008
KitMaker: 311 posts
AeroScale: 278 posts
Posted: Monday, May 11, 2009 - 03:10 PM UTC
Louis:
I am really enjoying watching this build progress. I have not tackled many WWI subjects so I am learning a lot. Thank you for sharing

Taylor
thegirl
_VISITCOMMUNITY
Alberta, Canada
Joined: January 19, 2008
KitMaker: 6,743 posts
AeroScale: 6,151 posts
Posted: Saturday, May 23, 2009 - 04:18 AM UTC
How goes the build Louis ?
Louis
_VISITCOMMUNITY
Bas-Rhin, France
Joined: May 21, 2006
KitMaker: 472 posts
AeroScale: 471 posts
Posted: Saturday, May 23, 2009 - 07:20 AM UTC
Hi Terri.

It goes slowly....

Thank for your nice words everybody.

The shutters of the radiator is finished (exept paint).


I find new Vikers for my Spad. They are "Part" Vickers:


I was anxious to bend the yoke, but it is not so difficult:


Folding the pieces are heated to the flame to make them less hard.

The largest pieces ( It still lacks 7):


We need a little sanding to get it back. Protections ("left gutters" and right too of course) are removed to make the news.


I'm painting the Vickers now, I hate do that.

A bientôt

thegirl
_VISITCOMMUNITY
Alberta, Canada
Joined: January 19, 2008
KitMaker: 6,743 posts
AeroScale: 6,151 posts
Posted: Monday, May 25, 2009 - 04:50 AM UTC
Just have to love them Part PE sets !
JackFlash
_VISITCOMMUNITY
Colorado, United States
Joined: January 25, 2004
KitMaker: 11,669 posts
AeroScale: 11,011 posts
Posted: Tuesday, June 30, 2009 - 11:39 AM UTC
Excellent Louis!
Louis
_VISITCOMMUNITY
Bas-Rhin, France
Joined: May 21, 2006
KitMaker: 472 posts
AeroScale: 471 posts
Posted: Thursday, July 16, 2009 - 06:35 AM UTC
Hi,

Thank you.


A lot of scotch tape to find the axle


A coat of clear paint and after a darker coat. I sand with "Compound". Clear painting appears on nervures of the back. Between nervures there remains dark colour (cf the blue party).


difficult to have perfect edges

A+
Louis
_VISITCOMMUNITY
Bas-Rhin, France
Joined: May 21, 2006
KitMaker: 472 posts
AeroScale: 471 posts
Posted: Saturday, July 18, 2009 - 01:34 AM UTC
Hi,

Blue, red and white again....

I use an old compass on which I fix a blade of scalpel. Pochoirs is cut in some paper to make pochoir (Frisket). Use it without supporting over, It is necessary to go past again several times.


The wing is white first. The small disc don't move. The secont coat is red.


Masks is centered with the compass and with the mark of the top of the compass in the central disc.


The blue must be painted.


A+
Louis
_VISITCOMMUNITY
Bas-Rhin, France
Joined: May 21, 2006
KitMaker: 472 posts
AeroScale: 471 posts
Posted: Sunday, July 19, 2009 - 09:38 AM UTC
and blue:


The right cockade seems correct (????)


The other one is not centered....to correct


A+
Louis
_VISITCOMMUNITY
Bas-Rhin, France
Joined: May 21, 2006
KitMaker: 472 posts
AeroScale: 471 posts
Posted: Monday, July 20, 2009 - 02:08 AM UTC
Argh!!

A new test:


It's white decals...no paint.

A+
Louis
_VISITCOMMUNITY
Bas-Rhin, France
Joined: May 21, 2006
KitMaker: 472 posts
AeroScale: 471 posts
Posted: Friday, August 21, 2009 - 09:08 PM UTC
Hi,

I started again cockades. There was not enough place to make the red party....

The disc is cut in two concentric parties to cover the red and the blue. Just like that the cockade is not moved away from the centre.

I'm painting red first.


I 'm protecting the red with the scotch tape and painting the blue:


Louis
_VISITCOMMUNITY
Bas-Rhin, France
Joined: May 21, 2006
KitMaker: 472 posts
AeroScale: 471 posts
Posted: Friday, August 21, 2009 - 09:19 PM UTC
Hi,

I started again cockades. There was not enough place to make the red party....

I'm painting red first.


I protect the red with the scotch tape and blue is painted:


The "big" disc (scotch tape) is cut up in two concentric parties to cover the red and the blue. Just like that the cockade is not moved away from the centre.

when the blue is finished I protect the cockade and painted the green paint.


I changed the colour of the dark green which seems to me too much dark now:


A+


JackFlash
_VISITCOMMUNITY
Colorado, United States
Joined: January 25, 2004
KitMaker: 11,669 posts
AeroScale: 11,011 posts
Posted: Saturday, August 22, 2009 - 07:40 AM UTC
Beautiful work Louis! As I am also working on this kit your thread has been a real help. Thank you for sharing.
Louis
_VISITCOMMUNITY
Bas-Rhin, France
Joined: May 21, 2006
KitMaker: 472 posts
AeroScale: 471 posts
Posted: Monday, September 21, 2009 - 09:23 PM UTC
Thank you Stephen.

Salut,
Hi,

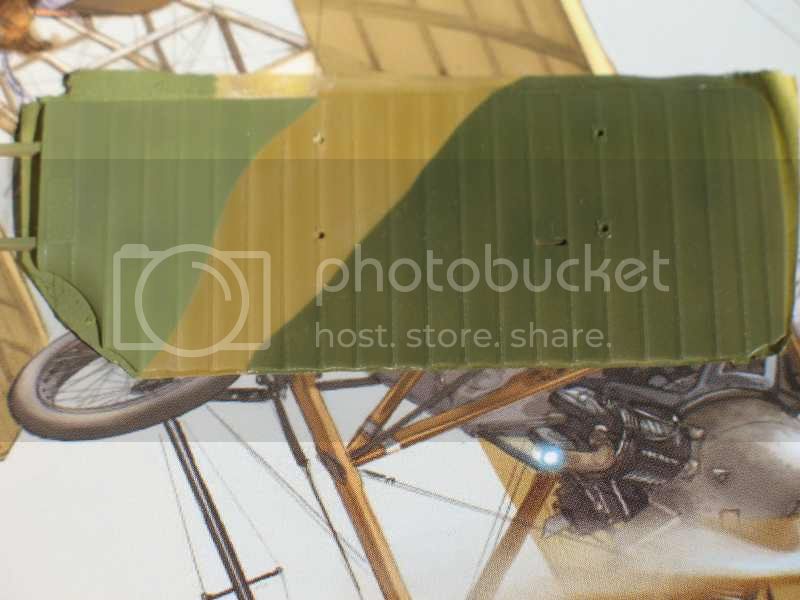
The big paintwork ends finally not without difficulties....


weathering is begun with oil paint:


I make pochoirs by gluing together every piece of Scotch-tape between them with a point of glue before taking it away of the support to put it on the wing.


The small "1" is made with decal (which does not break in small pieces like other one). The red edge remains to pose over....


I was very happy of my head of Indian until I lean over the photographs of the plane (Windsock). It does not resembles emblem painted on the plane!

I therefore touched up the chin in the oil painting, and also painting the red and yellow on the nose and the forehead and the too dark blue forehead, the black plume missing at the end of the white feather, etc etc.

The end of the blue feather is cut.

before:


after:


It is not perfect but I cannot make better.


The frontal ring is painted with the flexible scotch tape which they use in jobs electrical. It leaves tasks of glue alas.

I read (but too late) here that they can make this with a ball of rubber skin:

http://www.master194.com/forum/viewtopic.php?f=4&t=45334&start=25&st=0&sk=t&sd=a


I would try this................ but another day


A+
robot_
_VISITCOMMUNITY
United Kingdom
Joined: March 08, 2009
KitMaker: 719 posts
AeroScale: 691 posts
Posted: Monday, September 21, 2009 - 09:44 PM UTC
Louis, your paint work is inspiring! Persistence has led to a really exceptional finish.

Looking forward to seeing it all together.
JackFlash
_VISITCOMMUNITY
Colorado, United States
Joined: January 25, 2004
KitMaker: 11,669 posts
AeroScale: 11,011 posts
Posted: Tuesday, September 22, 2009 - 08:14 AM UTC
Beautiful Louis!!!
Do you know the story behind this plane and lt. Oscar (T. S.) Gude? Rickenbacker gave him the monicker "T.S."

He used the 93rd Aero Commander's aircraft for a mission and decided to land behind German lines and surrender. Then he made up a wild story about a dogfight and one of the POWs he was with advised Gude that he saw him land and surrender. It seems in the units he served with (94th & 93rd) and even as a POW. Gude was found out to be a "blowhard" with "bad nerves".

Mecenas
Joined: December 23, 2007
KitMaker: 1,596 posts
AeroScale: 1,275 posts
Posted: Tuesday, September 22, 2009 - 08:47 AM UTC
Beautifull job Louis, most impressive.