_GOTOBOTTOM
Early Aviation
Discuss World War I and the early years of aviation thru 1934.
Eduard 1:48 Fokker Dr.I Wknd #8490
JackFlash
_VISITCOMMUNITY
Colorado, United States
Joined: January 25, 2004
KitMaker: 11,669 posts
AeroScale: 11,011 posts
Posted: Sunday, March 01, 2009 - 05:33 PM UTC


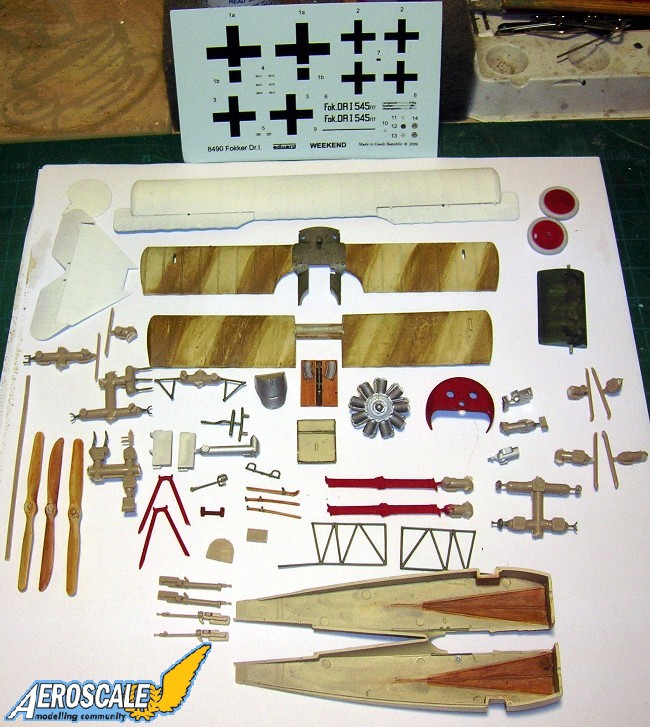
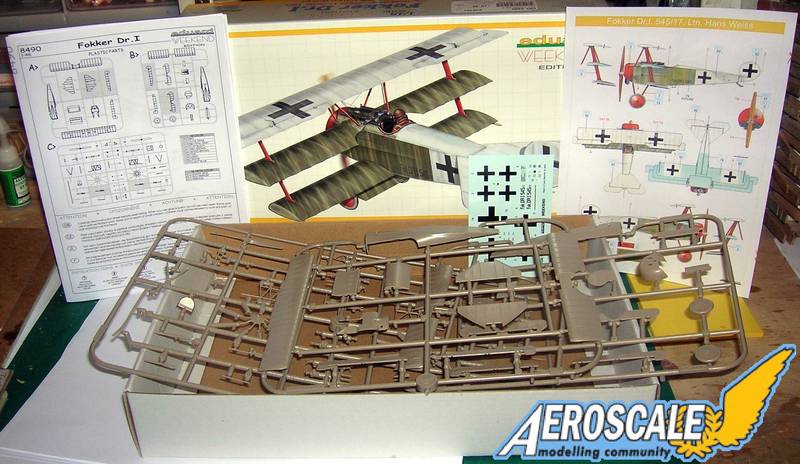
Aurora kit held the reins for years in the 1/48 scale. In 1989 the brave effort of Blue Max gave us a truly more accurate version of the Dr.I. The highly detailed “White metal” motor was the main draw to many modelers. The Blue Max kit was hindered only by the “pinning” needed to attach wings and struts securely. Still, to the collector the Blue Max kit is a must have item in any case. Finally, the first effort in the WWI arena for Dragon Models Limited (DML) was its fine production of the Dr.I. Issued in 3 different pilot liveries this kit was the standard to date of the best Fokker Triplane in 1/48 scale. I personally have built 35 of these DML kits since 1992. The later Hong Kong issue is lessened by the poor type of photoetch included for the Spandau machine guns. Now we have Eduard’s long awaited offering. First released 13 May 2008. There were two initial releases called “Der Rote Flieger”. The 1136 issue and the 1136X issue. Now they have released their Dual Combo kit #8161. Now we have the Fokker Dr.I Weekend #8490. This last Weekend edition is what we will look at here. Note some of the parts are for either the F.I pre-production triplanes or the Dr.I main production triplanes. The kit profile is aimed at Dr.I 545/17 a late production type.


Please remember to mention that you heard about these products in review, here at Aeroscale's Early Aviation forum.
Kornbeef
_VISITCOMMUNITY
England - South East, United Kingdom
Joined: November 06, 2005
KitMaker: 1,667 posts
AeroScale: 1,551 posts
Posted: Sunday, March 01, 2009 - 08:11 PM UTC
Stephen, its Monday, shouldnt you have posted this Friday and finished it by now?.....the weekends over.

Joking apart I just bought the dual combo so will be watching quite eagerly to see what needs fixing.

Keith
SGTJKJ
#041
_VISITCOMMUNITY
Kobenhavn, Denmark
Joined: July 20, 2006
KitMaker: 10,069 posts
AeroScale: 3,788 posts
Posted: Sunday, March 01, 2009 - 09:23 PM UTC
I have the Dual combo set as well and I am a total beginner for WWI birds, so this will be interesting to follow.

Looking forward to see more
JackFlash
_VISITCOMMUNITY
Colorado, United States
Joined: January 25, 2004
KitMaker: 11,669 posts
AeroScale: 11,011 posts
Posted: Tuesday, March 03, 2009 - 06:03 AM UTC

Name: Hans Weiss
Country: Germany
Rank: Leutnant
Units: FA(A) 282, 289
FFA 68
Jasta 10, 11, 41
Victories: 16
Born: 19 April 1892
Place of Birth: Hof
Died: 02 May 1918
Place of Death: Méricourt
Cemetery: Vermandovillers German Military Cemetery, S of Cappy

Fokker Dr. I 545/17. Ltn. Hans Weiss, a native of Hof, went through typical service of units equipped with two-seat aircraft. After training with Jastaschule Valenciennes, he was attached to Jasta 41. After gaining ten aerial victories, he was transferred to Jasta 10 on March 17th, 1918, where he gained another kill. This profile is thought to be Fokker Dr.I 545/17 in the markings of Ltn. des Res. Hans Weiss. He became a flight or "Kette" commander and served at Jasta 11 a month and a day before falling in combat.

Ltn.d.R. Hans Weiss - stellvertreter Kommanduer (acting comannder) of Jasta 11 on 8 April 1918 and on 2 May 1918 was KIA. It is safe to say that the extensive overpainting of his machine was done because he was a kette (flight) leader and the Jasta 11 acting commander before his death.

On April 22, 1918, he was killed (according to Ltn.des. Res Richard Wenzl) in an all-white Fokker Dr.I by shots from a Camel flown by M. S.Taylor of No. 209 Squadron, RAF.

The problem areas I see are The forward fuselage (from a vertical line at the leading edge of the middle wing) and cowling were red. The landing gear legs were the under surface light blue when photographed not red.
CaptainA
_VISITCOMMUNITY
Indiana, United States
Joined: May 14, 2007
KitMaker: 3,117 posts
AeroScale: 2,270 posts
Posted: Thursday, March 05, 2009 - 03:09 PM UTC

Quoted Text

I have the Dual combo set as well and I am a total beginner for WWI birds, so this will be interesting to follow.

Looking forward to see more


Jesper, just build one already
JackFlash
_VISITCOMMUNITY
Colorado, United States
Joined: January 25, 2004
KitMaker: 11,669 posts
AeroScale: 11,011 posts
Posted: Saturday, March 07, 2009 - 04:23 PM UTC
Ok, the box is officially cracked open. Parts have all been washed in mild antibacterial soap. Next some basic painting of wood, linen, bare and painted "metal" parts. I'll probably have flashbacks to my 33 DML / Dragon fokker Dr.I builds. I will have a HARD time just keeping this OOB. I do have that other Aerobase all brass Fokker Dr.I kit. I could do another stripdown. . . Ok thats going to be tough to fight. Just finish the kit Stephen. Eduard said that they were going to offer the 1136 PE for about $17.00USD can't find it on their site. Mumble mumble mumble. Maybe Part of Poland set. . .
JackFlash
_VISITCOMMUNITY
Colorado, United States
Joined: January 25, 2004
KitMaker: 11,669 posts
AeroScale: 11,011 posts
Posted: Tuesday, March 10, 2009 - 07:09 AM UTC
Since there is no Eduard PE offered separately I checked with Jadar on some 1/48 Part of Poland PE. Since it is available in 1/32 You might think that it would eventually be in 1/48. Here is their response.

"Hi Stephen,. . . In Europe data format is another than in USA ;-) I can't help you in PE for Fokker Dr.I.
Regards
Darek Szenfeld"


JackFlash
_VISITCOMMUNITY
Colorado, United States
Joined: January 25, 2004
KitMaker: 11,669 posts
AeroScale: 11,011 posts
Posted: Saturday, March 14, 2009 - 04:51 PM UTC
"Shortly after sunrise, if the wind and weather were favorable, observation balloons began slowly rising into the sky on both sides of the trenches. Tethered within the safety of their own lines, these kite balloons were protected by anti-aircraft artillery and machine guns. The men in the baskets hanging beneath the captive balloons provided important intelligence by telephone or radio to the forces on the ground.

"Balloon-busting became an art form for them. There were men who specialized in it, who developed their own tricks and who had their established methods: to swoop down unexpectedly from a single scrap of cloud, or to put the sun at their backs, et cetera." Bodenschatz, Karl. Hunting with Richthofen: The Bodenschatz Diaries. Trans. Jan Hayzlett. London: Grub Street, 1998.
JackFlash
_VISITCOMMUNITY
Colorado, United States
Joined: January 25, 2004
KitMaker: 11,669 posts
AeroScale: 11,011 posts
Posted: Monday, March 16, 2009 - 11:19 PM UTC
To begin; I had to figure out why other builds I have seen of this kit did not sit right. For me this was the first step.


JackFlash
_VISITCOMMUNITY
Colorado, United States
Joined: January 25, 2004
KitMaker: 11,669 posts
AeroScale: 11,011 posts
Posted: Tuesday, March 17, 2009 - 11:06 AM UTC
The purpose of this comparison helps the average modeler understand how different two kits of the same aircraft can be and to spot some errors. In the top image here the kit propellers are compared. The Dr.I types should be the same length. The Dr.I was shorter than the D.VII because of the minimum requirements for a propeller blade vs. horse power.


Here the wings from both kits are compared. The mis location of the viewing window in the Eduard top wing is easily seen. Now what was this window for? Anyone?
thegirl
_VISITCOMMUNITY
Alberta, Canada
Joined: January 19, 2008
KitMaker: 6,743 posts
AeroScale: 6,151 posts
Posted: Tuesday, March 17, 2009 - 12:28 PM UTC
The window in the top wing was used for inspections and should sit over the wing spar top and bottom of the wing .
JackFlash
_VISITCOMMUNITY
Colorado, United States
Joined: January 25, 2004
KitMaker: 11,669 posts
AeroScale: 11,011 posts
Posted: Tuesday, March 17, 2009 - 09:22 PM UTC

Quoted Text

The window in the top wing was used for inspections and should sit over the wing spar top and bottom of the wing .


Thats right so if it sits over the wing spar what would you expect to see?

Ok its too late to turn back now. I have glued some pieces together. Starting with the landing gear axle wing.


thegirl
_VISITCOMMUNITY
Alberta, Canada
Joined: January 19, 2008
KitMaker: 6,743 posts
AeroScale: 6,151 posts
Posted: Wednesday, March 18, 2009 - 01:44 AM UTC
Can't get at my refs but would it be to check for moisture and cracking of that spar ? Feel like I'm way off but thats what comes to mind at the moment .

On the axle wing would.nt there be some slight bending of this to show the weight of the aircraft when on the ground ?

Looking forward to seeing more of your build . Are you going with the kit markings or opt for another choice ?
JackFlash
_VISITCOMMUNITY
Colorado, United States
Joined: January 25, 2004
KitMaker: 11,669 posts
AeroScale: 11,011 posts
Posted: Wednesday, March 18, 2009 - 07:11 AM UTC
The axle on the Dr.I was a solid piece bungee wrapped around the skeletal structure at each end within the axle wing. It rose / traveled up and down but in a controled movement.

The inspection panel in the top wing is there for acceptance inspectors to view the factory inspection stamps. Each inspector at the factory had their own ink stamp to verify they passed the workmanship. The reveal or open panel was directly over the top wing spar and protected by a clear panel of cellon.

The kit markings will be applied here.
thegirl
_VISITCOMMUNITY
Alberta, Canada
Joined: January 19, 2008
KitMaker: 6,743 posts
AeroScale: 6,151 posts
Posted: Wednesday, March 18, 2009 - 10:12 AM UTC
Thanks Stephen , I didn't know about the ink stamp . Man was I way off (lol) but wouldn't that be inspected before they covered the wings and not after when the fabric went on ? It's great to learn something new .
JackFlash
_VISITCOMMUNITY
Colorado, United States
Joined: January 25, 2004
KitMaker: 11,669 posts
AeroScale: 11,011 posts
Posted: Thursday, March 19, 2009 - 12:47 PM UTC

Quoted Text

Thanks Stephen , I didn't know about the ink stamp . Man was I way off (lol) but wouldn't that be inspected before they covered the wings and not after when the fabric went on ? It's great to learn something new .


Well, in a sense they did. You see the stamps were assigned to quality control inspectors. It was at the final acceptance trials that the stamps were checkd to see if all were present. The machine had to meet a rigorous detail inspection and a short flight trial before it was given a military serial number and accepted.
JackFlash
_VISITCOMMUNITY
Colorado, United States
Joined: January 25, 2004
KitMaker: 11,669 posts
AeroScale: 11,011 posts
Posted: Thursday, March 19, 2009 - 01:13 PM UTC
Wow! did I have a long night a couple of days ago. Since I had broken out the Eduard 1/48 Fok. Dr.I kit I decided to go a bit further. One of the elements of my building strategum is use paint while its good. Most of you have seen my parts bins in the background of my desk shots. In the Fokker Dr.I trays I had three prepped DML / Dragon 1/48 kits ready. This does not included the one I used for comparison with the Eduard kit in the images.

So I decided to mix up a batch of Fokker undersurface blue and I airbrushed all four kits. It took about 2 hours to get it done. This covers all under surface areas that are to be represented as factory or modified factory painted. These will cure up for a few days while I get other parts ready to paint. Usually when these are dry to the touch I shoot them with a clear flat and put them in the parts drawers to cure.

Next I will do the unbleached linen colours and start on the wood graining. Microsculpt has told me to expect his streaked camouflage decals in the next few days. They even have some sections of unbleached (I hope its unbleached) linen decals for the interiors.

The fuselage skeletal framing and the various controls and gauges will be done (Instrument faces will be from the spares box. ) I have some interesting Jasta 11 markings from some of the old "Ministry of small aircraft" sheets. I think Steinhaüser's and 502/17. . .
JackFlash
_VISITCOMMUNITY
Colorado, United States
Joined: January 25, 2004
KitMaker: 11,669 posts
AeroScale: 11,011 posts
Posted: Tuesday, March 24, 2009 - 09:28 AM UTC
Painting bits and pieces continues. I am having to do a bit of scrounging for some better detail parts. The plastic Spandaus alone will not serve my purpose. I must say that the dry fit of my kit parts goes well especially the fuselage. The DML always seemed to have a matching surface problem between the two fuselage halves. Not so with the Eduard kit.

Please remember to mention that you heard about these products in review, here at Aeroscale's Early Aviation forum.
FalkeEins
_VISITCOMMUNITY
England - South East, United Kingdom
Joined: March 07, 2005
KitMaker: 868 posts
AeroScale: 690 posts
Posted: Thursday, March 26, 2009 - 02:55 AM UTC

Reading this with interest - just added one to the 72nd, 32nd & 28th scale Dr. I kit s in the to do pile...
Airbag
_VISITCOMMUNITY
Morbihan, France
Joined: January 24, 2009
KitMaker: 18 posts
AeroScale: 17 posts
Posted: Friday, April 03, 2009 - 01:28 PM UTC
Ref the Eduard Dr I u/c legs. I am currently in the final stages of a build of this kit and like you, I was concerned about the leg length, so I built a jig to check and to aid assembly.

I find that the rear legs (parts C20 and C15) are incorrect in length, provided that the lower end is trimmed so that the angle of the leg at the bottom sits entirely within the hole in the axle wing and the top mounting point is fully set into the depresion in the fuselage side. The same goes for the front legs; if the bottoms are trimmed in the same way, so that the angled piece sits entirely within the axle wing, then the jig lines up perfectly.

The etched Dragon legs are right for length against the Datafile plan (from which I constructed the jig), but this takes no account of the inward angle at which the legs are set from axle wing to fuselage mounting point.

I think the rather gangly look of some models I've seen from the Eduard kit is due to the lower parts of the legs not being fully seated in the axle wing.

The Eduard u/c legs even take into account the slight positive angle of incidence of the axle wing (the l/e bottom should be 0.5mm higher than the trailing edge) I will be adding a couple of small brass pins to locate the front legs into the fuselage, however.

Hope that helps!

Rowan

JackFlash
_VISITCOMMUNITY
Colorado, United States
Joined: January 25, 2004
KitMaker: 11,669 posts
AeroScale: 11,011 posts
Posted: Friday, April 03, 2009 - 10:05 PM UTC
Here is that bit of colour I was mentioning.


The Fokker Streaking here is in the second stage before I add the final brush work. Note also the staining & streaking on the axle wing. This is from the dripping castor oil while the motor is at rest. Then the prop blast pushes the oil back. More on this later.
JackFlash
_VISITCOMMUNITY
Colorado, United States
Joined: January 25, 2004
KitMaker: 11,669 posts
AeroScale: 11,011 posts
Posted: Friday, April 03, 2009 - 10:13 PM UTC

Quoted Text

". . .I find that the rear legs (parts C20 and C15) are correct in length, provided that the lower end is trimmed so that the angle of the leg at the bottom sits entirely within the hole in the axle wing . . "


In this case it is better to open up the holes rather that narrow the leg end.


Quoted Text

". . .The etched Dragon legs are right for length against the Datafile plan (from which I constructed the jig), but this takes no account of the inward angle at which the legs are set from axle wing to fuselage mounting point. . . "


Actually they do. As you mention the length is right. What is needed with the Dragon kit is the opening in the wing axle needs to be beveled at the inside edges.
JackFlash
_VISITCOMMUNITY
Colorado, United States
Joined: January 25, 2004
KitMaker: 11,669 posts
AeroScale: 11,011 posts
Posted: Friday, April 03, 2009 - 10:24 PM UTC
If your thinking about other liveries for your Dr.I kit here is what Blue Rider has in their sheet BR510.

JackFlash
_VISITCOMMUNITY
Colorado, United States
Joined: January 25, 2004
KitMaker: 11,669 posts
AeroScale: 11,011 posts
Posted: Friday, April 03, 2009 - 10:25 PM UTC
There was also a small decal company that did another sheet. The Ministry of Small Aircraft Production.

Airbag
_VISITCOMMUNITY
Morbihan, France
Joined: January 24, 2009
KitMaker: 18 posts
AeroScale: 17 posts
Posted: Friday, April 03, 2009 - 11:44 PM UTC

Quoted Text

Actually they do. As you mention the length is right. What is needed with the Dragon kit is the opening in the wing axle needs to be beveled at the inside edges.


I think you perhaps missed my point. If the legs are the right apparent length on the plan in two dimensions, because the leg is angled away from the eye in three dimensions it therefore actually needs to be longer to reach the same point on the fuselage. Still, you do it your way, I'll do it mine.
 _GOTOTOP